


Likes
5
Share


@Chubbs
Follow
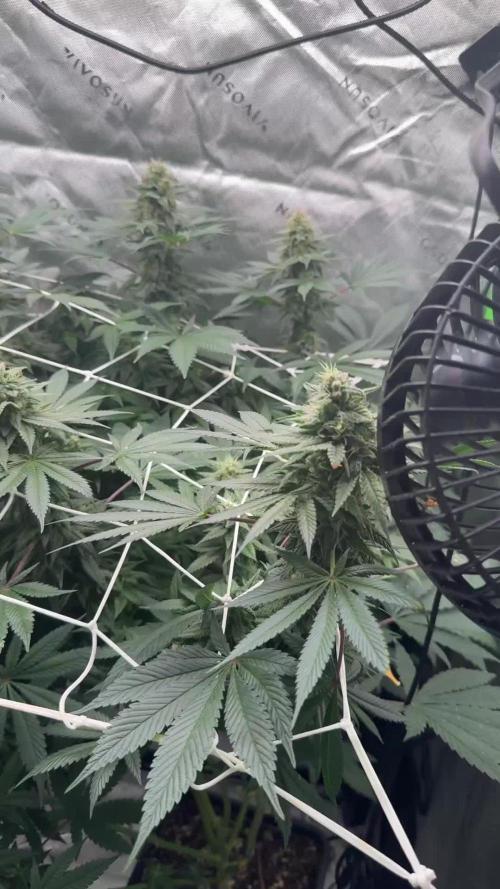
Week 4 for these girls. They've doubled in some since last week. I took a couple of the bigger fan leafs off this week, also raised my lights up allowing some stretch. Starting to see some preflowers and pistols. So next week will be off to the flower stage.
Happy Growing

Likes
4
Share


@cwgrows
Follow
After finding a couple of unseen spots of mold while chopping I meticulously went through every single crevice of each nug from both plants and removed the few spots I found, this took about 10 hours straight (not including light trim and wash). Absolutely stoked with the results of this grow and so proud to have gotten both these girls all the way to the finish line!

Likes
19
Share


@AsNoriu
Follow
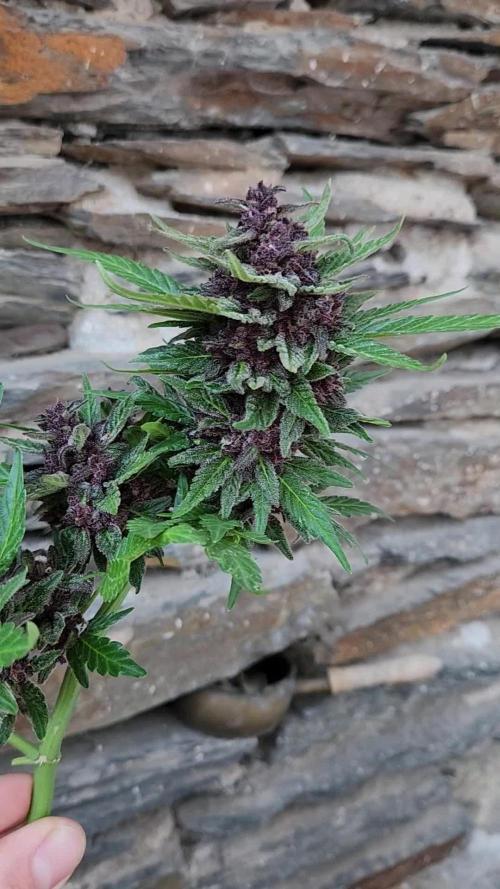
Day 57. In this grow at certain stage i was happy that my cam is broken, but now i hate it !!! Girls are all purpling out, defoliation don't help to get colours, but even now - they are amazing ! That smell, frost, nuggy structure, i love them !!! Especially when i write it under influence of Tallest Kush ;))))
Only water, keeping tent doors open, that way temps are in low 20s and humidity ridiculously low (40 -50) for me ;)))
Middle Kush caught up sister by maturity, one cola starts to foxtail a bit.
Hope to get two weeks, but 9 days at least till chop...
Happy Growing !!!

Likes
24
Share


@3lementa1
Follow
Growing well. Just fed 12 cups Ph'd water (6.3). Lots of cold humid air coming in from outside, plus with the half soil half coco mix I think they're holding water a long time. They're only needing water once a week right now.
They were not impressed with the water-only feeding. Some leaves got burnt tips, some got small yellow dots that look like spores or insects but I don't think are either. I think it's some kind of nutrient or pH unhappiness. I only gave 2/3 of the amount of water I normally would, hoping that they will dry out soon and I can give a proper feeding and check runoff pH.
I left them alone for a couple days and boosted the 1000w back up to 100% to dry things out a bit more. The buds loved it but I think it's damaging the leaves a bit. I put it back down to 75% just now.
I forgot to adjust the intake fan from outside down to low overnight from medium during the day and leaf temp was down to 13.3c when I woke up. Can't be doing that either.


Likes
9
Share

@Oldwied
Follow
After 85 days of growing I havest.
Plant hung up whole to dry.
5 days later by 21°C/ 45% r.h.
It's trimming time.
Likes
58
Share


@Rap_a_cap
Follow
Entering pre-flowering. Calix and pistils appear, beginning of alternating growth. SK has grown well this week the training made her very bushy, as I wanted it to be. A dozen of beautiful branches now have space to form beautiful buds. From now on I will let the main cola grow and stop to bend the main stem. Still no need 4 feed. 👋🤙

Processing
Likes
32
Share


Likes
162
Share


@DutchFarmer
Follow
She germinated and sprouted :)
Thanks zamnesia for the allowing me to partipcate in another growing contest!

Likes
1
Share


@Hydroponicfarm7
Follow
Subimos la temperatura de la sala y vaya si se noto, las plantas crecieron más en 2 semanas que en un mes, una pena no haber podido aclimatar antes la sala


Likes
8
Share


@CeeJayy420
Follow
Even the longest journey begins with the first step, and this grow was another step on the way to perfection as the journey itself is the destination.
Learned a lot and can't wait to apply my knowledge to the next strain.
Likes
19
Share


@Tommy716
Follow
This week has gone great. My lovely lady's are thirsty and taking there nutrients wonderfully. I have increased there water and nutrients intake and they are responding well. They continue to grow rapidly I am moving there light almost daily. I'm running out of vertical room.. All the hard work is paying off, they are starting to show there reward of amazing bud sites developing everywhere. A few more weeks and they will get added micronutrients. I'm pumped to see there development coming soon
Likes
15
Share


@RamirezDusha
Follow
We broke big cola on central plant and cried a lot.
Also we continued partial defoliation time to time.
It should be noted that plants began to drink much more, we watered them every three days, but in five to six litres per watering.
Girls showed their gender. Next week we expect all plants to bloom, otherwise we'll have to change the light mode.
Likes
7
Share


@sellem
Follow
In this week, i defoliated most of the (very) sick leaves on both plants. Afghan Kush is really bushy, Blueberry not so much, she skinny. Both smell absolutely great. Both continue to sweel and grow. We are now, same as in the BPP diary, in what i call the "mostly boring" state. its nice to see the visual changes in the timelapse, but other than that, not much to do besides water them. Both have discontinued to show any new or lets say worse signs of any deficiencies, there are now some overfeeding signs but i rather have that then them trying to creep by.
Watering reduced to 2.2L for each to account for them taking to long to dry out. Roots are STACKED, the soil is almost solid by them. Next grow will be in airpots since i also expect root issues here(ringroots or the like, maybe damage due to overwatering in like week 3/4).
Timelapse i will add tomorrow. Thanks for stopping by and see you next week!
Likes
12
Share


@Jays_Not_Here_Man
Follow
Another week has flown by! The girls are doing great, cruise control this week as I have just been monitoring RH and temps. Trying to keep them as low as possible, I’ve been getting as low as 74 during the day and 68 at night.
I finally took a look a look at the trichomes with my jewellers loop, lots of cloudy, and a few amber around the leaves and top colas, but still lot’s of clear trichomes. I’ve ordered myself a wireless/usb digital microscope to assist with the process, and looks like it will be here just in time to determine harvest day. 😎🎄
I started by eliminating the nutrients at the beginning of the week. I typically allow for 3-4 pure water feeds before I harvest, and at the rate they have been drinking, this should be enough to get through the 7-12 days they have before harvest. I don’t flush, but rather “rinse” with normal water amounts, allowing the plant to use up the remaining nutrients in the soil. This also allows me to recover most of the soil from my grows and reuse ♻️ with other soil mix.
There has been great debate and a great deal of bro science out there for many years, but the recent studies suggest there is no difference in end result when it comes to flushing or using nutrients right until the end, if a proper dry and cure is performed. What do you think? What do you prefer to do? Thanks for reading this far, leave me a comment with your preferred method 👊🇨🇦❤️

Likes
12
Share


@Sieben
Follow
I strifed the lemon orange and can´t wait to taste it , fullgas also impresses me , the small orange lemon in the middle has more haze in it and flowers totally different , Gran Jefa is the smallest has her own charme.
Left Gran Jefa, right back Fullgas , right Front and mid Lemon Orange.

Likes
20
Share


@adam_pawloski87
Follow
We are in Flush !! Was giving them GH Flora series + rapid start + cal mag
Likes
18
Share


@Barcelona_Farmers710
Follow
Una experiencia realmente buena toda una gozada os la recomiendo Farmers!🍯🌈🍨🍓🍌
