The Grow Awards 2026 🏆 


Likes
Comments
Share
@MWHomegrow
Follow
Vegetative Woche 3:
Tag 29 gab es das erste LST nach dem Umtopfen für die Ladys, damit sie das Zelt bald schön ausfüllen zu viert 😊
Hierfür einfach bodenhaken für die Triebe und am Hauptstamm nutze ich gerne die roten Clips.
Tag 30+31 gab es nichts besonderes zu tun 😊
Tag 32 wurde das erste Mal gegossen nach dem Umtopfen mit 2l ph 6.2 Wasser mit 0,8g/l Enhancer, das Wasser habe ich zum ersten Mal mit meiner neuen Akkugießlanze verteilt und ich hoffe so noch gleichmäßiger gießen zu können 😊
Tag 33 wurden wieder mit LST gearbeitet und die Triebe mit den Bodenhaken weiter nach außen gebogen, damit ich möglichst bald ein relativ gleichmäßiges Blätterdach habe welches die gesamte Grundfläche des Zeltes ausfüllt.
Tag 34 war wieder Ruhetag
Tag 35 wurde wieder gegossen und zwar wieder mit 2l pro Pflanze mit ph Wert von 6.2 und 1ml/l Calmag und auch hier wurde zum Gießen di Akkulanze verwendet.
Und so endet Woche 3 der Veg

Likes
21
Share
@Love2Bud_UK
Follow
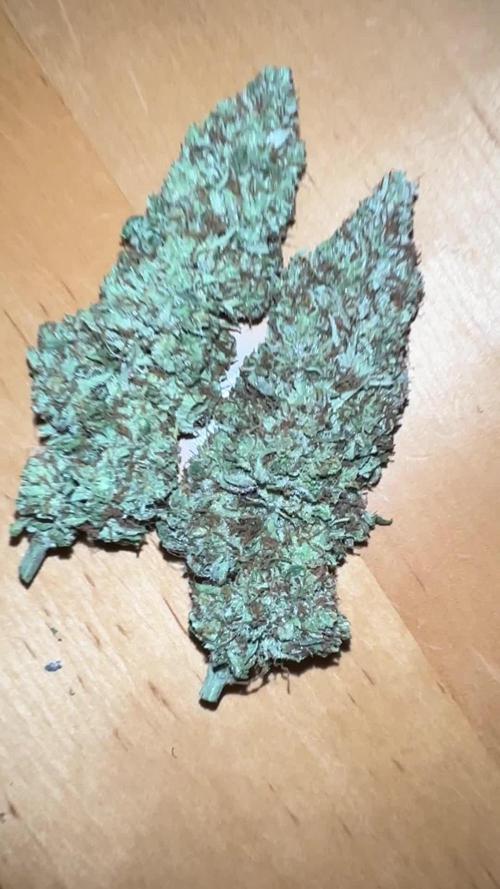
16/07 gave her the chop after 8 days flush and 2 days darkness. Aiming for at least 10 days drying time. My scales couldn't read her wet weight without being cut up, which in not doing yet.

Likes
144
Share
@1Right_Angle
Follow
Oct 9th
- entering week 9 of Flower she has a new vantage point. Protected by 8’ corn crops and a rising mass of land, this Strain has just been moved from between a pair of Garages, and out of Sight from a few teenagers once again.
- 1 or 2 more weeks are all thats needed. She gets a good big feed today and we’ll see what the weather brings.
- big winds may require some bamboo on her long branches for support tba
- fed a solid gallon of food, she is going to finish Strong out here on the edge of the field
- Wednesday 12th, I’ll clean-up some of those Fan Leaves… and feed her the last big meal w/ Nutrients. Then its only water n sunshine
11th
- fed its last nutrients today… water-only from here on in. Nice Tan coloured pistils are mixing-in with the buds
- oct 23rd - 25th is the target for this puppy. Day 73 - 75 of growth

Processing
Likes
1
Share
@Teddy01500
Follow
Bonjour à tous, ces derniers jours ce sont bien passé pour mes petit bébés elles grandissent doucement mais sûrement.C’est la première fois que je travail avec cette gamme de produits (je vous est mis des photos des produits 😉) pour l’instant j’en suis satisfait après, il faut voir le résultat final ce qui est moins facile 😂. Mes petit bébés commence leurs 5ème semaine (je me suis trompé d’une semaine 😕 désolé 😉) trop pressé!!! 😂 de mettre de nouvelles photos 😜. Je vous dis à là semaine prochaine vivement 😉 bonne journée à tous. Je vous remercie 😉.


Likes
43
Share
@TheCannaProphet
Follow
~Entry for the 'Best Rarest & Smallest Pot by Seedsman' contest~
Starring 🤩....
~ Seedsman Zkittlez Auto ~
Zkittlez (Grape x Grape Apple) Auto x Auto Fruit (Auto Fruit Cheese x Auto Blueberry)
Zkittlez Auto is one of the very sweetest-tasting auto strains available anywhere. It is a sativa-dominant (60%) strain that was bred from Zkittlez (Grape x Grape Apple) Auto crossed with a male Fruit Kush Auto, the latter a remarkable fruity strain bred from Fruit Cheese Auto and Blueberry Auto. Growers can expect to harvest some good yields of high-THC buds.
Zkittlez Auto remains a fairly short plant, rarely exceeding 120 cm. in height wherever it is grown. This is a vigorous plant which is able to metabolize a high level of nutrients and she's a thirsty girl too! If growing indoors close to neighbors it is strongly advised to ensure good and effective carbon air-filtration in order to neutralize powerful odors. This strain's life-cycle is approximately 90 days from seed to harvest.
The leaves on this plant are big and wide serving to convert every lumen available into Zkittlez goodness. Indoor growers should obtain between 400 - 500 gr/m2 while plants cultivated outdoors will produce slightly more at 500 - 600 gr/m2. Lateral branching is very good and it is recommended to use supports/ties to prevent snapping and keep buds close to the light source.
This strain's scent is sweet and fruity with candy and berry notes. Its high-THC has been measured at between 21 - 24% with less than 1% CBD. The effect is well-balanced, cerebral and euphoric, and is very good for social situations as well as for relaxing in front of the TV either alone or with company. It also has the added effect of helping to relieve chronic pain, helping with nausea, insomnia and depression as well as stimulating the appetite.**
**Credit to Seedsman.com
________________________________________________________________________________________________________________________________________________________________________________________________________________________________________________________________________________________________________________________________________________________________________________________________________________________________________________________
~ The Setup ~
~ Grown in a 2qt plastic popcorn pot filled with Mother Earth Grow 70/30 Coco/Perlite with Xtreme Gardening Mykos added.
~ Seed was germinated directly in the medium without any 'pre-soak'
~ Feeding will be by Dutch Pro Nutrients
~ 24hr light cycle while germinating
~ 20/4 light cycle after first leaves appear.
~ 4x8 Gorilla Tent
~ HLG 650R w/ 30w Supplemental UVA Bar controlled by a Trolmaster Hydro X controller set for a 15min Sunrise/Sunset simulation. (also a HLG Blackbird for additional side lighting if necessary)
~ Supplemental co2 controlled by an AutoPilot APC 8200 co2 controller
~ AC Infinity Cloudline T6 with Controller 67 using a Terrabloom 6x24" carbon filter
~ De-Humidifier and Humidifier when needed.
~ 14k BTU IdealAir portable A/C unit plumbed into tent for temperature control.
~ BlueLab testing instruments
~ Two Hurricane 18" oscillating fans
~ Two 6" Clip-on fans
~ Two 10" floor mounted fans
________________________________________________________________________________________________________________________________________________________________________________________________________________________________________________________________________________________________________________________________________________________________________________________________________________________________________________________
Weekly Update:
12/6- Here we go into Week Two of flower for the Seedsman Zkittlez Autoflower and she's on FIRE! 🤩
I'm continuing to water/feed daily with 0.25g of well water with a base ppm of 100 to which I added the following Dutch Pro nutrients: Bloom 'A' & 'B' @ 10ml/g each, Multi Total @ 7.6 ml/g, Silica Von Liebig’s Special @ 1.2 ml/g along with Earth Juice's Oily Can @ 5 ml/g to end up with a total 900ppm nutrient solution. After adding the nutrients and checking the EC (2.1 EC), I ph'd the solution to 6.4 @ 72℉.
12/8- The HST really paid off with the Zkittlez Auto's canopy being nice and even with numerous flower sites that are all getting adequate light to them! I did some defoliating of lower shade leaves and any small growth down low on the plant to focus all her energy to her upper portion which is where I want it to be.
Daily watering/feeding continues with her receiving her usual 0.25g of well water with a base ppm of 100 to which I added the following Dutch Pro nutrients: Bloom 'A' & 'B' @ 10ml/g each, Multi Total @ 7.6 ml/g, Silica Von Liebig’s Special @ 1.2 ml/g along with Earth Juice's Oily Can @ 5 ml/g to end up with a total 1050ppm(500 scale) nutrient solution. After adding the nutrients and checking the EC (2.1 EC), I ph'd the solution to 6.4 @ 72℉ then watered until I had runoff. After she finished draining, which took around 5-10min, I turned her pot 1/4 turn.
12/10- Yesterday I just watered her with 0.25g of well water with a base ppm of 100 that I ph'd to 6.4 @ 72℉ then watered until I had runoff. After she finished draining, which took around 5-10min, I turned her pot 1/4 turn.
Today I fed/watered with 0.25g of well water with a base ppm of 100 to which I added the following Dutch Pro nutrients: Bloom 'A' & 'B' @ 10ml/g each, Multi Total @ 7.6 ml/g, Silica Von Liebig’s Special @ 1.2 ml/g along with Earth Juice's Oily Can @ 5 ml/g to end up with a total 1050ppm(500 scale) nutrient solution. After adding the nutrients and checking the EC (2.1 EC), I ph'd the solution to 6.4 @ 72℉ then watered until I had runoff. After she finished draining, which took around 5-10min, I turned her pot 1/4 turn.
She is really looking fabulous with great color and is in full flower mode now!
12/12- Yesterday, I just gave her 0.5g of well water with a base ppm of 100 which I ph'd to 6.3 @ 72℉ and turned her pot.
Today I fed/watered with 0.25g of well water with a base ppm of 100 to which I added the following Dutch Pro nutrients: Bloom 'A' & 'B' @ 10ml/g each, Multi Total @ 7.6 ml/g, Silica Von Liebig’s Special @ 1.2 ml/g along with Earth Juice's Oily Can @ 5 ml/g to end up with a total 1050ppm(500 scale) nutrient solution. After adding the nutrients and checking the EC (2.1 EC), I ph'd the solution to 6.4 @ 72℉ then watered until I had runoff. After she finished draining, which took around 5-10min, I turned her pot 1/4 turn.
Well there's two weeks of flower on the books and we've got another six weeks or so to go with this beauty! See you next week! 😎🤙
~ Thank you from the bottom of my heart for following my grows and for all the ❤️and support you give! 💚What you grow - Grow what you💚
Likes
22
Share
@Appoldro420
Follow
24-02-2022: Decide to remove all the fan leaves of the smallest lady. Just to see what happens. If it is doing her any good I will remove the fan leaves of the other ladies too by next week. Love her without the leaves, she is basically one big bud :)

Likes
3
Share
@High_Grade_Dadli
Follow
Lil youngin on their way home should be home for 4/20 along with 2 of their mother...as for the breeding project pollination is a success also been harvesting pollen(feminized) for later use
Mothers are growing well jus to continue cut and set aiming for about 1000 already cut 3 and got 100...happy growing

Processing
Likes
52
Share
@mr_black32
Follow
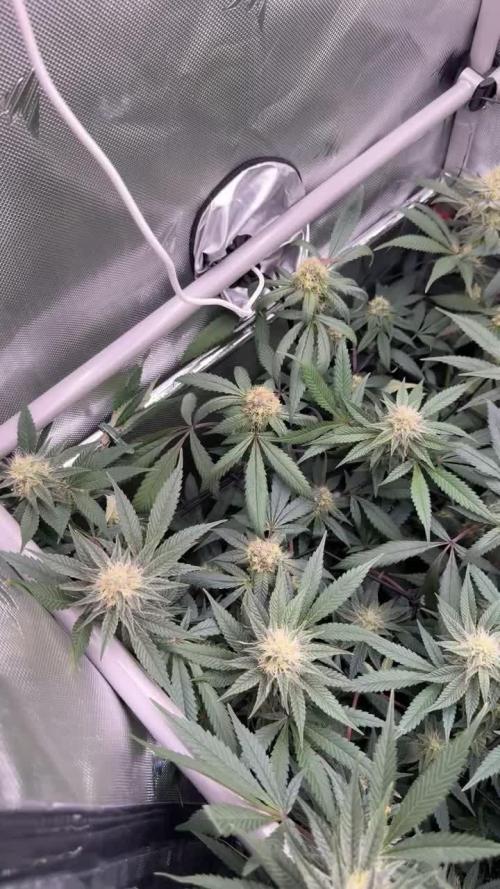
Day 44 : The seventh week is starting, today I think we are doing a defoliation on the Gorilla Glue.
Day 46 : the Forest grows and the resin on the flowers increases 👽
Day 47 : Defoliation
Day 50 : Last day of seventh week


Likes
Comments
Share


Likes
18
Share
@MadeInGermany
Follow
Hey everyone ☺️.
It gets more beautiful from week to week 😍👍.
I have them all this week Sprayed again properly with neem oil in the veggie phase ☺️.
There have been no trips for 2 weeks, but prevention is better 😀.
Because of the neem oil, the plants look very dark and shiny, which I really like when they shimmer like that 😝.
I didn't do any training these days, that will be done again the next few days 👌.
it was watered twice this week with around 0.6 l per plant.
The Ph / Ec measuring device was also recalibrated.
Otherwise there is nothing to report for this week and we'll see you again with the next update ☺️👍.
I wish you and your families a Merry Christmas 😊.
Stay healthy and let it grow 🍀
You can buy this Strain at :
https://sweetseeds.es/de/red-mandarine-f1-fast-version/
Type:
Red Mandarine F1 Fast Version
☝️🏼
Genetics:
Red Poison Auto®️ (SWS39)
X
Tangie (California Orange x Hybrid Skunk)
👍
Vega lamp:
2 x Todogrow Led
Quantum Board 100 W
💡
Bloom Lamp :
2 x Todogrow Led
Cxb 3590 COB 3500 K 205W
💡💡☝️🏼
Soil :
Canna Coco Professional +
☝️🏼
Fertilizer:
Green House Powder Feeding
☝️🏼🌱
Water:
Osmosis water mixed with normal water (24 hours stale that the chlorine evaporates) to 0.2 EC. Add Cal / Mag to 0.4 Ec Ph with Organic Ph - to 5.5 - 5.8 .

Likes
10
Share
@Prilyfe13
Follow
Well well well! We made it to week 3 of flower and everything is just fine. Hahahahaha! Much excite!
11/11/2025
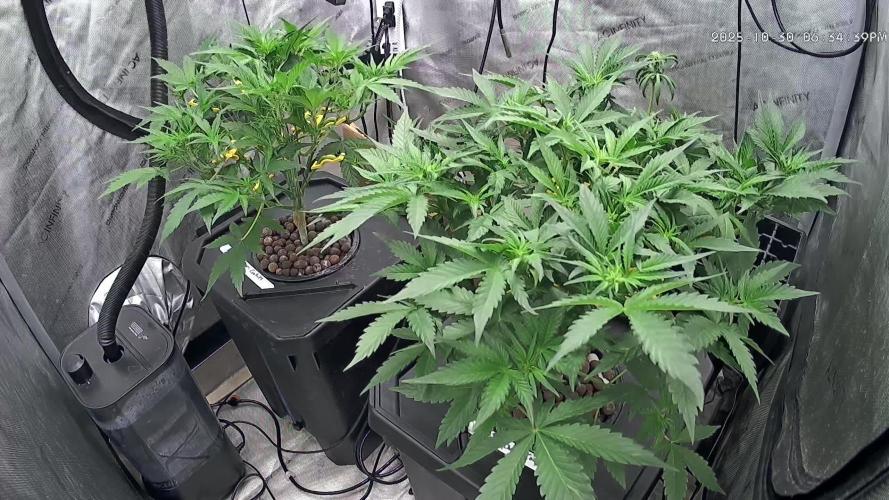
So here we are! Ready for a new week and some new stuff to look at. Over the last couple weeks we've been focused on upward outward growth. Height and leaf structure. Roots and nutes. (Had to tune there. Just had to do it.) But now that the stretch has basically ended, it's time to focus on the buds. We're going to focus on the lowers this run. I feel like tho
This week we are changing some things. I've decreased the humidity down to 45% and increased the temp to 78°. I might drop it back down to 75°, but I've read you can have it warmer and brighter with CO2 in the mix. And I happen to have CO2 in the mix. So I'm trying it out. Plus, I think the plants are looking for more light. They are praying a bit I increased the light intensity to 90%. It should be around 850 PPFD. I know that's a bit high for an autoflower, but these 2 are definitely enjoying the light.
As for the solution, it's stays the same this week. I set the pH to 5.9 as I have read a slightly higher pH is good for the flowering stage. Probably helps with specific nutrient uptake.
Papaya Cookies is looking fantastic. I noticed that she has a circle of tops all leaning out and making a nice open canopy. As for any ailments, I don't see anything anymore. I got rid of all the leaves with any type of issue on them and am now at all fresh growth. And some of the older leaves just to keep some energy coming in. Thos of course wasn't today. But the circle of tops looks great. I may have to use the scrog net. We shall see.
Lemon Cherry Cookies also looks fantastic. She has tops everywhere. Nothing leaning out, but a pretty even spread of tops all over. I did notice that she got a little bit taller than Papaya Cookies. But I'm not sure when that happened. They were perfectly level the other day. Now she's about an inch taller than her counterpart. Maybe a bit more. Something tells me this little lady has a bit more growth in her. I'm just not seeing it. Hopefully she gets over 24". That's what I want. 2 ft plant. I'd prefer a 3 ft plant, but I can't have everything. This one will do just fine. Tons of bud sites. Lots of light and air flow. Perfectly fed.
I also need to address the fact that I won't be cleaning out my buckets this week. There's no change in nutrients, and I made sure to at least wipe the sides of the bucket just over the water. There's a lot of air and water circulation, so I'm not all that worried about anything slimy or icky. There's just no point. They are getting just under a gallon of fresh water every day. So it eventually replaces the older water and depleted nutrients. Anyway, rant over. Lol.
Oh no! I just spilled my humidifier! Shit!...
Well that sucked. Anyway, I have these new grow tent duct vents. They are supposed to block out the light and let the air in. The ones I got go on the 8" ports on the bottom of my tent. Good airflow.
That's all for now.
Likes
4
Share
@JackTheSparrow
Follow
I started LST and some ScrOG, a little late but everything looks fine. very very dense plant
Likes
6
Share
@MadeInGermany
Follow
Flowering day 77
since time switch
to 12/12 h.
Hey guys :-)
Finally the time has come .
The lady was harvested and hung upside down in the dry tent 😍.
Before that, she stood in the drying tent in complete darkness for 2 days and the large leaves were removed.
The small leaves stay attached during the drying process so that they protect the buds and allow them to dry more slowly and evenly :-) .
In the dry tent, the temperature is 18-19.5 degrees and the humidity is 54-58% 👍.
In this environment they are now allowed to hang for 10-14 days before they are fine-tuned and trimmed clean by hand.
then after trimming they come to ferment for 6-12 weeks in dark jars with bobeda packs 62% to keep the perfect humidity.
After a few weeks, the Boveda packs 58% are used so that they can slowly dry out :-) .
Of course there is one last update after trimming.
Until then, I wish you a lot of fun with the update.
Stay healthy and let it grow 💚🙏🏻
👇🏼👇🏼👇🏼👇🏼👇🏼👇🏼👇🏼👇🏼👇🏼👇🏼👇🏼👇🏼
You can buy this Nutrients at :
https://greenbuzzliquids.com/en/shop/
With the discount code: Made_in_Germany you get a discount of 15% on all products from an order value of 100 euros.
👇🏼👇🏼👇🏼👇🏼👇🏼👇🏼👇🏼👇🏼👇🏼👇🏼👇🏼👇🏼
You can buy this Strain at
https://pcg.international/shop/pcg-int/
Water 💧 💧💧
Osmosis water mixed with normal water (24 hours stale that the chlorine evaporates) to 0.2 EC. Add Cal / Mag to 0.4 Ec Ph with Organic Ph - to 5.8 - 6.5
MadeInGermany

Likes
41
Share
@MadeInGermany
Follow
Info:
Unfortunately, I had to find out that my account is used for fake pages in social media.
I am only active here on growdiaries.
I am not on facebook instagram twitter etc All accounts except this one are fake.
Hey guys :-)
The diary of the Blueberry from Dj Short will start in the coming days or weeks.
(Many thanks to a certain grower here in the forum who brought me to one or the other strain 😀👍).
I let 3 seeds germinate because they are regular seeds and I should be a lady with the quota :-)
I am very excited about this grow and can hardly wait until it is finally here .
I will add the remaining data in the table above as soon as I start the diary.
Until then, stay tuned and stay healthy 🙏🏻
You can buy this Nutrients at :
https://greenbuzzliquids.com/en/shop/
With the discount code: Made_in_Germany you get a discount of 15% on all products from an order value of 100 euros.
Type:
Blueberry
☝️🏼
Vega lamp:
2 x Todogrow Led
Quantum Board 100 W
💡
Bloom Lamp :
2 x Todogrow Led
Cxb 3590 COB 3500 K 205W
💡💡☝️🏼
Soil :
Canna Coco Professional +
☝️🏼
Nutrients :
Green Buzz Liquids :
Organic Grow Liquid
Organic Bloom Liquid
Organic more PK
More Roots
Fast Buds
Humic Acid Plus
Growzyme Big Fruits
Clean Fruits
Cal / Mag
Organic Ph - Pulver
☝️🏼🌱
Water:
Osmosis water mixed with normal water (24 hours stale that the chlorine evaporates) to 0.2 EC. Add Cal / Mag to 0.4 Ec Ph with Organic Ph - to 5.5 - 5.8 .

Likes
12
Share
@Pedro_88
Follow
Vamos rumbo a la cuarta semana ya
Ya está empezando a tener un olor débil
Likes
4
Share
@soloczek
Follow
The smell is just gorgeous, ppd favorite for sure like a bag of fresh berries. Guzzlerz starts to purple, whole underside of the leafs are black. Purple Coolies Kush behind of all plants but will be very iced


Likes
63
Share
@AsNoriu
Follow
Day 43.
so main change, i lost my mobile and i had really loads of photos and videos of ex grows. i blacklisted it, but still...
from now i will reduce amount of post and updates, it is stupid, but i cant risk ...
Girls all week on diet, looks like only one Gorilla is starving a bit and would need more, but in my plans last watering with molases this time only.
They already had runs with silica only. cal mag only x2.
Think worm castings was an isue, control garden grows really fine, will be my smallest plants ever, they will have 3 weeks in total for veg.
Happy growing and dont loose your mobiles, huge pain ....
Day 48. Gorillas are really nice and i cant denny it, but ....
Cookies are worst experience ever...
They just dont want to grow and show up new issue the second you fight one....
I even made control garden with more than years old beans of Incredible Bulk and bagseed Strawberry Cough. Both strains grow ok, but not Cookie !!!
Thats honestly wrong genetics, unless someone prove me wrong, open for your advices ...
Hard training again, still on pure water diet with calmag or silica or molases as small bonus while no feed for two weeks + ....
Lights are out because training took longer than i wanted. ...
Next week they go to 24 hours darkness and light is changed to 12/12. That was last week of really hard training, now i will wait for green mass of leaves to cover stems and hope they will make some buds ;))
Choose your beans wisier than me ...
Happy growing !!!

Likes
32
Share
@BudBoutique
Follow
Welcome to Bud Boutique Grow Diary - really appreciate all your love and support :)
Dont forget to check out my other current grows!
🗓️ This Week:
After 14 Days drying inside tent with about 60% rh and 18° Celcius ( I know could be even lower).
- trimmed all well and put them straight into Grove bags for curing.
That is the end of this Diary, thank you all for sticking with me. The next new onces are already up so feel free to check out
Thank you for still staying with me 💚
___________________________________________
--- 🌱 Strain (Sponsor) ---
🏷️ Stardawg by MSNL
https://www.marijuana-seeds.nl/stardawg-feminized-seeds
--- 🥗 Nutrients and Feeding (sponsored by APTUS: APTUS Ambassador) ---
🍸 APTUS: full nutrient schedule extreme
-- Regulator, N-Boost, P-Boost, CaMg-Boost, K-Boost, Allin1 Liquid, Startbooster, Topbooster, Enzym+ every feeding
-- Fulvic-Blast, NutriSpray as Foliar each once a week
🔗 https://aptus-holland.com/
--- ♻️ Grow Control (Sponsor) ---
TROLMASTER: TENT-X + LM14 Light Adapter to dim/sunrise/sunset lights + Temp & rH Sensor all remote on App
🔗 https://www.trolmaster.eu/
--- 🚿 PetraGrow (Sponsor) ---
CannaFogger Foliar Spray
🔗 https://www.petratools.com/product/petragrow-cannafogger-atomizer-new-mini-fogger
--- 🏭 Grow Setup ---
💡LUMATEK Zeus Pro 600
* 🏠🌿 Indoor: Homebox 120x120x200cm (4x4)
* 📐🌀 PrimaKlima exhausting Fan 1180m3/h (running on 60-80%)
* 🌀 Can Light Filter 800m3/h & 1x Fanbox 1x Dyson fan for Air circulation
🔗 https://lumatek-lighting.com/zeus-600w-pro-29/
🔗 https://primaklima.com/de/shop/ventilatoren-de/ec-ventilatoren/pk160ec-tc/
🔗 https://canfilters.com/products/filters/
All Likes and comments are highly appreciated!!!
👨🌾 don't forget to check out my Instagram for daily educational content: budboutiquee
- Bud Boutique
