The Grow Awards 2026 🏆 


Processing
Likes
4
Share
@Ogbangbang2981
Follow
this week is like every other feed bat poo tea and straight water outdoors so sun takes care of her right through

Likes
54
Share
@RastaGrow
Follow
Greetings Rastamans, as you can see my girl is getting thicker and is growing weekly. Every used fertilizers have very good results. Slowly aproaching the time of harvesting, This is evidenced by the trichomes as well as the timing of the flowering cycle. I believe that the harvest from this plant will be great. Use of the necessarry techniques at the right period of times gave me the results that you see yourselves. It is the last day of lighting. It will be in dark for 36hrs. Also today defoliation will take its place and I have already splited main stalk. hope you get enjoyment and also knowledge from my diaries. Wish you all good luck.
Yours trully Rastagrow

Likes
164
Share
@Silky_smooth
Follow
Last week flush week
Overall very pleased with the result did not have a bump in the road at all and she was very easy to grow and very forgiving when it came to her training
The cup grow was a succes she stands only 13,5cm tall and from 1 tip of the mainbud to the other she is 30.6cm long and 21cm wide and packed with nugs and the smells fills up the entire growbox with a sweet bubblegumish smells like the pink bubbalicious chewing gum so nice so i only can imagon what complexity her taste is going to be like❤️❤️❤️❤️
So this week is going to be hell for her i’m going to split her completly tru to about 1.5 cm above the soil put toothpicks between her and bind her back together so the split stay open(about 1.5-2mm) so the flow is even more disrupted this tricks the girl into even more overproducing thc and flavours and she has to fight even harder in her last day’s for her survival and eventually begs for mercy🖤🖤😈😈🖤🖤
She is finishing up nicely her little nugs are packed with cristals


Likes
25
Share
@PrairieFrostGrow
Follow
She went into dark on Sunday Feb 23rd, day 77, and was harvested on February 25th, day 79 from her coming out of the medium
First run from Mesphisto and extremely happy with everything. It has not been without incident and she has had her fussiness. Overall this girl liked her nutrients on the lighter side.......liked her pH on the lower side........she doesn't want much light intensity for the first 4 weeks!
She started off really slow in germination but then took off around weeks 3 to 6 and shot way up! She takes up a lot of room and will not yield four ounces of bud idea but she has grown into a beautiful tree looking girl. I was timid about bending her main stem because of slow growing early on but running her again, I would bend the main stem and train that as well. She is going to be a good producer for this strain and she makes you smile looking at her.......what more can you ask for😍
The colour change was not expected and was a great surprise. Love purple leaves! Still have 4 seeds of this girl to run again. It appears to me that on my pack of seeds the right grow for me is a 3 gal pot, keep her under T5 light for most of veg, give the whole girl LST, keep her tied down tight if she starts to take off in week 3 and 4, keep her pH in the 5.5 to 5.8 range for veg and early flower. Expecting smaller, hard, fire nuggets from her based on how she grew.
Will follow up with more as she progresses through drying. In the box with temp at 62 to 66 degrees and humidity at 60%. Branches are not that long so I am expecting dry should be around 7 to 10 days. 😍

Likes
32
Share
@Appoldro420
Follow
07-10-2021: Bonding is a daily routine right now but that is just as I am used to in second week 12/12. One lady broke, probably to much tension. I fixed her with candle wax, will probably survive that without being slowed down. And if she is slowed down that is not too bad because she grows the fastest of all. Need to remove some leaves one day because light is not penetrating very great as you can see on the pictures. Starting to wonder if the differences between the ladies onder the Mars Hydro are because of the light or because of the strain.09-10-2021
09-10-2021: First signs of early flower are visible😬. I am guessing I switched to 12/12 just in time. Net is almost full, plenty of room for the buds to develop. Nutrients are taken up very fast now. EC is still dropping and PH is still rising so nothing to change. Next week I will raise the CO2 level to 1000 ppm.
11-10-2021: Net is almost full so flowering can start now if you ask me.. Very curious about this round since I am still experimenting with the CO2 and temperature. This night I raise the CO2 level to 1200PPM, just to see what happens. (Yes I can see the impact of these adjustments over one night)
14-10-2021: raised EC to 1.7... Seem to love it. Probably combined with the extra CO2


Likes
15
Share
@Tmasm
Follow
Descarregar de 2 semanas cou ulitama de ph 8.1
Última 48h em escuridão com temperatura rodar 6c⁰ a 13c⁰
Cortada e pendurada com mesmas temperatura baixas para secar lentamente.


Likes
32
Share
@Dunk_Junk
Follow
She's filling out a bit more this week. Just watching and waiting though.
Likes
346
Share
@Canna96
Follow
Hey now! This week went very well. I feel like she is finally done growing, and just starting to thicken up and ripen. I did switch from the liquid koolbloom to the dry, and within 48 hours or so I really started noticing the weight of the colas start leaning towards the floor. I did support the main colas last week, but this week I noticed several of the smaller unsupported colas started drooping to the floor, so i added a few support lines. I am thinking maybe she has two or three weeks left. I am not a big believer in an all out flush, as I do not wish to stress her out even near the end. Rather, I am gradually weaning her off the nutes over the next 2-3 weeks. She is starting to get brown tips on almost every leaf so not sure if this is just her being near the end or a bigger issue?? Any advice please hit me up! I'm still struggling with humidity issues, but she seems to be ok! Thank you so much to everyone in this community for all the love, support, and help with my first grow. Thanks and blaze on!

Likes
10
Share
@MrJones
Follow
White Chrystal Meth Auto
🔸🔸🔸🔸🔸🔸🔸🔸🔸🔸
~~~~04.20.23~~~~
“DAY 72 Above Ground”
📝Sunday 07.02.23 - This lady has lagged behind the others who started at the same time, they are in their projected harvest window, but feel they need another few weeks.
📝Wednesday 06.28.23 - The buds continue to pack on weight and ripen, the smell in the tent is amazing, fed with a Mayan tea from Humbolt Nutrients, loved the way it looked, they have great products.
~~~~~~~~~~~~~~~~~~
🔸🔸🔸🔸🔸🔸🔸🔸🔸🔸
🌱White Chrystal Meth Auto
👨🌾🏽Grown By: MrJones
🔆@medicgrow420
@originalsensibleseeds

Likes
25
Share
@NONSENSE
Follow
🎄🎄🎄 Good day, bud lowers
👨❤️👨 👨❤️👨 👨❤️👨 👨❤️👨
🌲 Continues to stretch the girls in ScrOG. Within a week, the plant bummed to growth, look what happened! 🌲
✂️ I do defoliation once a week, because it is difficult to fit such a plant under the net. ✂️
💚 The buds are gaining mass really fast. I was surprised comparing Monday and Friday pictures. ⭐⭐⭐⭐⭐⭐⭐⭐⭐⭐
✅ Harvest is coming. Therefore, the last watering with fertilizers will be next week, then only clean water and delicious things like sugar. ✅✅
🙈 Are you ready to guess the result? In this report, the variety is revealed in full force. 🙈
🌲 Almost all trichomes are cloudy, there are practically no amber ones. New stigmas are still springing up. 🌲
☢️ The plant very actively began to take nutrients from the leaves - the yellowness is noticeable.
☢️
🌝 Please check this week pictures and small video I made for you .,🐛


Likes
4
Share
@UrbanBoer
Follow
I cannot believe it, 14 days to go then I am going to harvest, I am confident that I would of flushed Lamby quiet thoroughly, for some reason weed needs it’s roots to flushed if you want a super smooth smoke, I wonder if fruit was the same as weed, would we flush the roots to get such tasty and juicy fruit or veggies, or would we bare with that sourness. The real test will be on the 15th of December when it comes to my test smoke, then I shelf Lamby until January after returning from the festive season, by then I would have achieve top tier curing.


Processing
Likes
1
Share
@magicjohnson
Follow
So This week was the same as the last really, It seems all I have to do is sit back and watch these ladies do their thing!
Ive not gone full on with the bloom supplements or PK yet as only 2/5 of the GG are seriously flowering.
The other 3/5 GG are now Finally showing some signs of flower and some tops are starting to build and lowers producing more pistils each day!
The Stardawgs continue to explode, even some friends who were sceptical about the performance of the Quantum board LED's have been flow away by the results.
All of the buds seem to be building dramatically top to bottom which no shortage of frost!
Macro shots on the way!!
Likes
133
Share
@PapaNugs
Follow
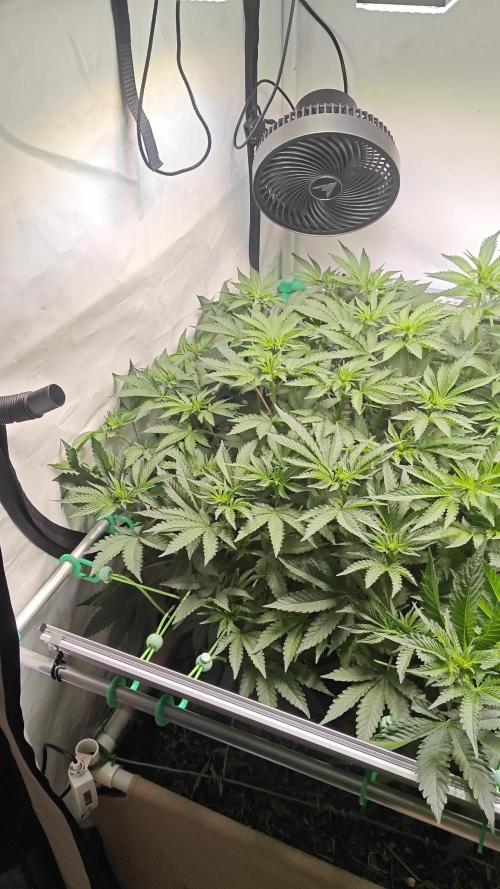
A good week here. Girl got watered once through the week. Otherwise just leaving her be. Will top her this week and start to train outwards before flipping.
Lights at 40% power.
Here are the lights details:
Medic Grow Mini Sun-2 150W LED
Model: MN150-022
Spectrum mode: V1
Efficacy: 2.8 umol/J
Thanks for stopping by!
You can find the light on Grow Diaries:
https://growdiaries.com/grow-lights/medic-grow/mini-sun-2-150-watts
You can find the light on Medic Grow's website:
https://medicgrow.com/

Likes
11
Share
@Heregrowsnothing
Follow
Popped them straight into rockwool, 9 days later they all emerged just adding a few drops of water every couple of days