Processing
Likes
Comments
Share
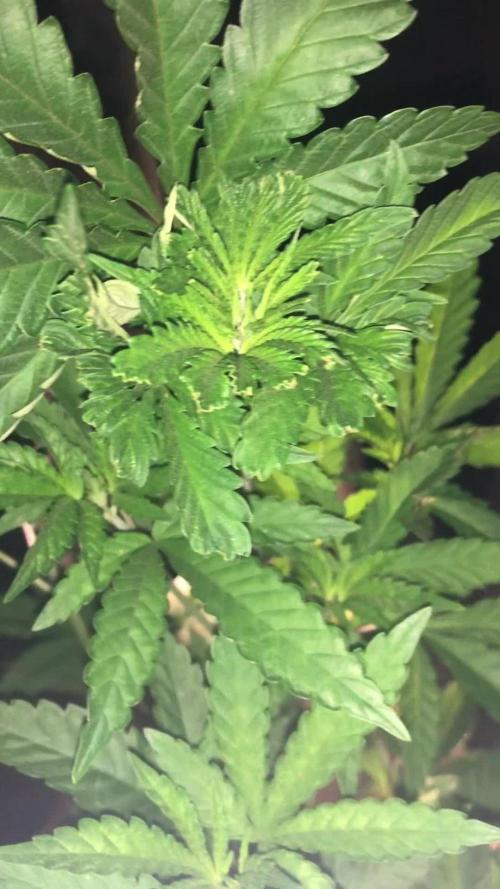
All defolated and flipped today into flower 💚😊🌱
Likes
201
Share
10/5 Day 28 - LED lamp now on 24h - Water: Both plants got 1L of water with nutes. Summary for the day: I still do some LST but truing to do less and focusing on spreading the tops. LED in 40cm full effect. Did some defoliation today but not sure if I'm doing right. - 12/5 Day 30 - LED lamp now on 24h - Water: Both plants got 1L of water with nutes increased to 1.5ml because it's been 10 days since I started with giving them 1ml each time they got water. Now I started to see they drink much more. Last time it was 3 days between watering. This time it was only 1 day since they got 1L water. Maybe increase 1L to 1.5L next time. Summary for the day: I still do some LST but truing to do less and focusing on spreading the tops. LED in 40cm full effect. Did some defoliation today as well. - 14/5 Day 32 - LED lamp now on 24h - Water: Nothing Maybe increase 1L to 1.5L next time. Summary for the day: I still do some LST but truing to do less and focusing on spreading the tops. LED in 40cm full effect. Did some defoliation today as well. - 15/5 Day 33 - LED lamp now on 24h - Water: Both plants got 1L of water with 1.5ml nutes x2 (A+B)
Likes
22
Share
@NanoLeaf
Follow
End of Week 15 (8th week of flower) I have stopped the CO2 supplementation for this week and onwards as the plants naturally slow down photosynthesis and it is not needed during the last 2 weeks of flower. Also raised the lights by 5cm to make sure the trichomes don't get damaged and also dropped the RH and temperatures even more than last week, and surely the colours are becoming more and more vibrant as the ladies are fading into their autumn shades. Feeding just water since middle last week, all I'm doing is giving the ladies PH correct water until harvest to naturally deplete the soil from nutrients and flush out the soil slowly this will help bring out even more colours as the ladies use up the remaining nutrients stored in their leaves as they reach the end of their life cycle. Pest Report: None Smell Report: Staaaaanky!
Likes
39
Share
10/19: I fed today. Only one plant has any signs of deficiency..an Orange Sherbet that needs more Mg than everybody else. Serious stink now! Wow..gonna have to order another carbon filter.. I shot a little video of the soil remediation amendments I'm using these days. This will be the first time I use the Coast of Maine Lobster Compost. I usually use a different brand with added biochar and mycorrhizae, but I wanted to see what all the fuss is about the efficacy of lobster compost. Recipe: About 50 gallons of soil, previously flushed with TPS Liquidsoil to re-establish the microbial population. 1 cu ft - Coast of Maine lobster compost 15 lbs - Earthworm castings 4.5 lbs - Microgrow granular inoculant 4 lbs - Bokashi 4 lbs - Dr Earth Veggie, Tomato, and Herb organic fertilizer 2 lbs. - Nectar for the Gods - One Shot granular fertilizer 2 lbs - granular humic acid plus molasses 1/2 lb - texas greensand 1/2 lb - azomite 1/2 lb - dolomite 10/20: Halle Berry(Blackberry A) is getting soooo fat..maybe 20" in circumference! I spotted another couple of nanners on the Strawberry Pie and decided to leave them to do their thing..might be some very interesting hybrids as a result. It occurs to me that it's almost time to start germinating the next batch of beans...👍 10/23: Fed them and rotated the edge plants. Switched to Cha Ching. 10/24: Halle Berry is foxtailing a bit ever since I upped the wattage in the tiny tent. She's fading nicely..I'll probably flush her towards the end of next week. I started germinating the next batch of beans today, so I'm gonna need these bitches to hurry the fuck up now.. 10/26: Fed them and rearranged a little bit. I dialed back the ONE, increased CaMg and Sweet & Sticky. I flushed Halle Berry with 8 gallons of warm water and LiquidSoil. She's ripe, but I'll let her go another few days.
Likes
30
Share
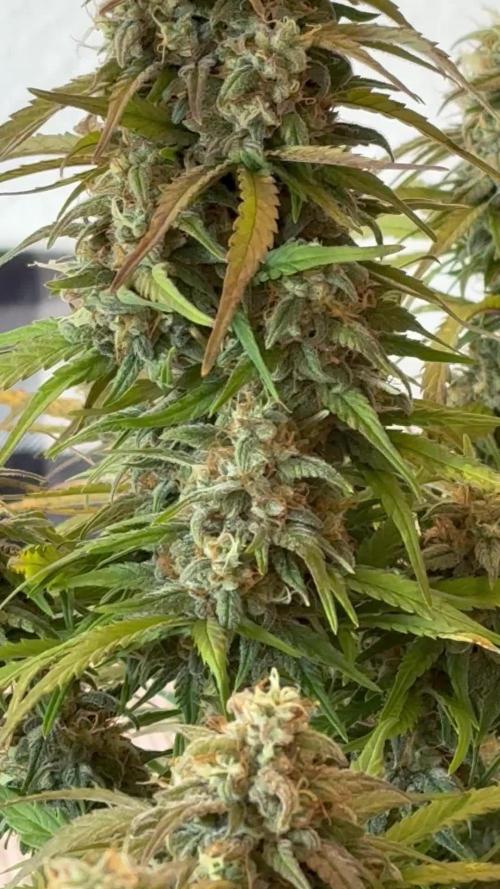
This turned out amazing was a free seed from a mate no idea where
Likes
11
Share
Likes
31
Share
2024-04-25 the ove to the other Roo with stronger Light, pushed her massive, so i have to transplant them into bigger Pots. they have alittle N defiency, but soon its history, because they get 10l ore Soil now. BREEDER INFO Tangerine Snow F1 Fast Feminised is a 75% sativa, four-way cross of (Boost x Tangelo) with (Lavender x Power Plant). This Fast F1 hybrid is bred from Cali genetics and boasts great citrus terps, high resin production for extracts, high levels of THC, very good yields and excellent mould resistance. Tangerine Snow F1 Fast can be grown indoors as well as outdoors. Indoor flowering times are between 8 - 10 weeks while harvest time in northern latitudes is during September while in the southern hemisphere growers will be harvesting during March. Recommended climate regions are hot, dry, humid and warm. These are tall, semi-branched plants that grow in excess of 200cm and display a high degree of vigour with very good uniformity. In common with many other heavily sativa-dominant strains, Tangerine Snow F1 Fast offers excellent resistance to mould as well as to plant pests and diseases. The combination of citrus terps and plenty of resin makes thi a very good extract strain with the 'washing' method delivering very good yields of hash. The citrus terpene profile is reminiscent of mandarins and tangerines and also has sweet candy notes. THC production has been lab-verified at a strong 24% while CBD is low. The effect is uplifting and energising, perfect for use during the day and early evening.
Processing
Likes
59
Share
@Rap_a_cap
Follow
Weather here is still fantastic, hot days, partially cloudy, cooler nights. Long term forecast are excellent till the end of September, probably till mid October. No news to report, I'm just waiting for buds swelling, these are the slowest days of my life. Now she's flowering very fastly, hungry of nutes, some K deficiency signs all around but situation is under control. I've made a major defoliation in the middle and bottom canopy, she's very very leafy. Stigmas are fatter twice then sister's. The overall basic structure of the buds is really impressive, twice thicker than SK and 3 times than RG. But late.... Stay safe Bros
Likes
9
Share
@Peace59
Follow
Tout va pour le mieux ! Il reste une bonne semaine pour la strawberry gorilla avant la récolte ; j ai commencé le rinçage. Il doit rester environ deux semaines pour sherbet et un peu plus pour la gorilla cookies je pense. Grosse chaleur prévu en début de cette nouvelle semaine, jusqu’à 40 degré Celsius. Les trois dégagent de magnifiques odeurs !
Likes
6
Share
@rvabudman
Follow
Graduated, and am off from work for a few weeks, so went overboard on photos. Plant is doing well, leaves are starting to turn yellow (strain trait). Can't wait for the harvest and being able legally gift my xmas ornaments to my cousins during our "cousins walk" at our family xmas party.
Likes
61
Share
Welcome to the start of week 5 for Queen Citronella. She has developed a thick stem and really short internodal spacing. She responds willfully to LST. Day 29.5: Repotted. Look at those roots!! This is a special plant. Day 30: There was brief transplant shock as I forgot to flush the medium to correct PH... she's bounced back today. Queen Citronella has almost outgrown Karen who is 2 weeks older. Day 31: Happy one month birthday your majesty! Swelling in every direction. Starting to gain height. Day 32: I've noted a sudden uptick in thirst. In an unrelated note I have added a little 15w LED above her at about 10cm. I doubt it'll make any noticable difference but it's in there anyway as I use it for photos, so it may as well be on. Day 32.5: Have removed approx 20 fan leaves and performed further LST. Day 33: Look how fast Queen Citronella responds to LST and defoliation. She has gained 1cm in the last 24 hours and now stands at 25cm. Day 34: 26cm. Day 34.5: Fertigated. Added pot risers and adjusted pot. Performed further LST on lower nodes. Performed HST on some higher nodes just for practice. Day 34.75: Fertigated 4l Day 35: She didn't gain any height at all that I can tell, but she has put on a lot of leaf growth in the last 24h. So here we are at the end of week 5, and Queen Citronella is starting to take her regal form. Slightly alarmed by the yellowing new growth but her growth rate has stepped up again so it may be just normal. I'll keep an eye on it. Once I can take enough clones I'll cut her back a lot. For now she can grow as much as she wants. Citronella now smells citrusy, if you brush against her it's quite strong. Defoliated approx 6 fan leaves.
Likes
11
Share
Was really worried the whole time through out my grow as I am a Newbie and this was my first grow. Thanks for all the help provided by users on growndiaries. Much appreciated. Had great result from my solo cup. 12.6 grams of dried bud. Time for curing and let that smell build up. Fingers crossed will taste better but smells amazing. Zesty smell when crushed. More confident for my next grow. Hopefully will be more fun and relaxing growing.
Likes
7
Share
Missed a few weeks due to I.T. issues. These girls are going great filling out really well, getting some big buds smell sweet/fruity 2phenos are really frosty all are very sticky in week 6 of flower.
Likes
8
Share
I more Week for the ladies and the chop is coming Going to blast the light for 48hrs the last two days and see if that will increase the Trichomes. the long weekend will be the harvest and the hanging for 10-14 days then the bucking and trimming
Likes
55
Share
High GD community Week 16, Zuchinis all around, tomatoes getting ready on a daily. Cucumbers are getting almost mature proportions. Everything going well. Terra preta Location: center perma garden Surface: 125cm x 105cm Depth: 115cm The hole was dug out over 3 days, it were very sunny days. 😅 Theres mostly loamsand with a small sandloam bottom that was very hard. The sand was also very compressed and hard. The top layer is this grey dusty soil of about 40cm deep. At the bottom theres pure sand thats soft, easy drainable. First step is to fill up the entire bottom with fine chopped wood, progressively using bigger pieces of wood. I try to use some hardwood like oak to for its extra K (potassium = pot ash). A bit of charcoal to. This will take the entire first day, bcs it needs to have a minimal ticknes of pure ashes of around 5cm. Otherwise, after compressing it with the upcoming layers, the ash-line would almost disappear. Not all the wood needs to be burned entirely. Its a first layer with lots of N and K. Bones can be used to in the fire making the NPK complete. But it can be added also as a separated layer. I dont have that much bone material because my 2 dogs, or eating, or burry them somewere. Little warning at the end, be aware of your local laws applied to open fires. 😅😉 After a good burn ive got between 8 and 12cm of ashes in total over the entire surface. A small layer of soil (5cm) is put on top of that. Theres no need to harden out that layer, pressure will to the work and the layers will compress over time into ideal circumstances. On to the next layer!! Next is a layer of the compost, but the part that isnt allready decomposed. Its green/brown/yellow of color. And a bit of everything, grass, weeds, leafs and some thin branches. Another layer soil to cover that up. Now i formed a thin layer of chopped(10mm) wood(beech), just enough to make a thin,almost 1 piece high, layer. On to this i added a complete wheelbarrel of compost(black) with small pieces of still not completly decomposed materials. Lots of worms here. On that, you guessed it, an other layer of soil. I try to have both types of soil in that mix, the almost pure sand and the more grey type. Next, back to the beech. This time the rest of the bag follows. Theres a good layer of around 3cm deep. On this ive layed down some new small woodsticks to make a small fire again. Starting at the center and adding some last branches i found. It turned out really smoky!! Half way the burn ive opend the core of the fire, trying to spread the small pieces of char over the complete surface. After that, i added for the first time some water here. And an other layer of soil again, this is just covering up each time. Max 5cm!! Now we are at the upper half of the pit. Still 50cm to go. Now ive added some compost again, the green/brown/yellow one, with on top of that, a 15 liter bucket with compressed bokashi fermentated kitchen leftovers. Making a layer out of that and some fresh bokashi juice with 10 liters of water to drain those benificial bacteria into to compost layer just underneath it. This layer is almost 20cm tick. Again, yeah, soil, 5cm. Ive bought some blond peat to at to to toplayers. Last 25 to 30cm of soil, is a mix of the peat(20%) and the two other types of soil. First ill do tiny layers of each, last 10cm i try to mix it. And to finish the job, ive took some 100% reused and composed soil with some perlite in it from past use. I havent watered a lot, but the meteo predicts a good amount of water in the upcoming days. The soil that stayed and didnt get back to its original place, ive used to make a new top layer on the rest of the mini field. I havent used clay because it was hard to find or just to expensive. Beside the peat(250l), i didnt buy anything. So its labor intensive, but real cheap. If you dont get a sanction by the community ofcours! 😅😅😅 Feel free to comment and give your toughts. 🙏🌿🌿🌿🙏 Thats it for this week boys and girls, Thanks for reading and passing by and 💚💚💚👏👏👏👍👍👍 for Marshydro leds. Quality/price top! Grow safe buds and feel free to check out my other ladies doing fine thanks! 🙏🌿🌿🌿🙏 Weedseedsexpress!!!! 👏👏👏 LarfxWSE for discount at weedseedsexpress!!! 15% off!!! Zamnesia!!! 👽👽👽 Add OrganicLarF as a code when buying your own MarsHydro LED light and get a nice reduction!!!👽🚀🛸
Likes
203
Share
@yan420
Follow
🌈💐🍬🌈💐🍬🌈💐🍬🌈💐🍬🌈 Hi and welcome to another grow again from Kannabia we are talking about my second attempt at the strain Runtz Auto it's going to be a single plant diary and I'll be LSTing HSTing topping and pruning like last time. Only difference is that I’ll be trying a different nutrient schedule this time to try and avoid pH fluctuations as much as possible as the last pheno seemed a bit sensitive on pH issues, so I’ll be keeping it more simple but maybe at a higher dose let’s see what she wants. Thank you Kannabia for the chance to try out your awesome seeds 🙏🏻❤️ 🌈💐🍬🌈💐🍬🌈💐🍬🌈💐🍬🌈 💭❗💭❗💭❗💭❗💭❗💭❗💭 ❗Events"&thoughts worth noting❗ 💭❗💭❗💭❗💭❗💭❗💭❗💭 23.10.24(GW)(morning)The little lady popped her head above ground. 23.10.24(VW1)(afternoon)Soaked her with (*1) again, I really hope I won’t burn her, what I’m doing is not advisable but I’m a greedy man I guess, it’s all or nothing 😉 27.10.24(VW1) Add 10ml TriPartMicro to (*1) and use at next feed. 30.10.24(VW2) in the clip I’m just strengthening the main stem for her future training and not just being mean😉 02.11.24(VW2) Add another 10ml of TriPartMicro and get it to 20ml and let’s see how she reacts, use on next feed✅. 05.11.24(VW2) Topp her and prune nodes not needed and start training preparations, add clay pellets up to the first node from the bottom that I’ll keep (if possible of course)📸✅. *part of training preparation👇🏻 05.11.24(VW2) Add another 10ml of TriPartMicro and get it to 30ml and let’s see how she reacts, use on next feed✅. 08.11.24(VW3) noticed the leafs being too green nearing slight N toxicity so I’ll feed with (*1) at 50% strength the next two feeds observe and act accordingly. 09.11.24(VW3)Did first LST session and then fed her(📸) 13.11.24(VW4) She seems to be happy with nutes at 50% strength so I’ll keep it that way for another few days observe and give her a regular 100% strength feed hopefully timed right with the flowering stretch. 16.11.24(VW4) Pruned excess bud sites and defoliated (📸) 20.11.24(VW5) LST until stretch is over and maybe do one last pruning of excess bud sites just as the first bunch of pistils/buds appear. 23.11.24(VW5) Did my last major HST & LST session✅, end of the week I'm switching the diary to flowering as first pistils are visible and I'll keep on doing a light LST until harvest, might do a last pruning session though maybe middle or end of next week. 27.11.25(FW1) Did a defoliation and LST session✅📸. Noticed some leafs with brown spots📸so she seems to need a bit more PK so I dropped TriPartMicro to 20ml from 30ml and increased GreenBuzzBloom to 40ml from 30ml✅. 02.12.24(FW1) Added 20ml TriPartBloom. 02.01.25)FW6) it's my last update before harvesting end of the week or middle of next week, still not sure. 04.01.25(FW6) Drop TriPartMicro to 10ml, increase TriPartBloom to 40ml, drop GreenBuzzBloom to 20ml 04.01.25(FW6) Still not sure when to harvest, trichomes seem "ready" with a couple of amber between the milky one, the buds themselves seem to need a bit longer as I still see white pistils here and there and hopefully they get a bit more fat. 09.01.25(FW7) definitely the last update, harvesting today or tomorrow. 💭❗💭 ❗💭❗💭❗💭❗💭❗💭 🐝🌼🐝🌼🐝🌼🐝🌼🐝🌼🐝🌼 🌼Day to day tasks & actions🌼 🐝🌼🐝🌼🐝🌼🐝🌼🐝🌼🐝🌼 07.01.25(FW6) fed with (*1) 5l 08.01.25(FW7) fed with (*1) 5l 09.01.25(FW7) fed with (*1) 5l 🌼🐝🌼🐝🌼🐝🌼🐝🌼🐝🌼🐝🌼 🍶💦🍶💦🍶💦🍶💦🍶 💦Nutrients in 30l(*1) 💦 🍶💦🍶💦🍶💦🍶💦🍶💦🍶💦🍶 💦TriPartMicro: 10ml*20ml*30ml*20ml *10ml 🍶TriPartBloom: 0ml *20ml *40ml 💦 Fermented🌿juice:0ml 🍶GreenBuzzBloom: 30ml*40ml *20ml 💦Cal-Mag: 60ml 🍶buxXtrade citric acid Ph- 💦🍶💦🍶💦🍶💦🍶💦🍶💦🍶💦 ⚙️✂️⚙️✂️⚙️✂️⚙️✂️⚙️ ✂️Tools & equipment ✂️ ⚙️✂️⚙️✂️⚙️✂️⚙️✂️⚙️✂️⚙️✂️⚙️ ✂️➡️2xMarsHydroSP3000 ⚙️➡️MarsHydro150mmVentilatorACF ✂️➡️Trotec (big) dehumidifier ⚙️➡️Small no name dehumidifier ✂️➡️Kebab stainless skewers 3 (LST) ⚙️➡️wire+roast beefskewers(LST) ✂️➡️trimming scissors.(HST) ⚙️➡️Waterproof vacuum cleaner for ✂️spills. ⚙️✂️⚙️✂️⚙️✂️⚙️✂️⚙️✂️⚙️✂️⚙️ 🍭🍦🍬🌈🍭🍦🍬🌈🍭🍦🍬🌈🍭 🍦RUNTZ AUTO KANNABIA 🍬🌈🍭🍦🍬🌈🍭🍦🍬🌈🍭🍦🍬 🌈Seed:Auto Zkittlez&Gelato😋. 🍭Effect: Balanced 🍦THC: 20 %. 🍬Features: For beginners 🌈Flavor: Earthy, Floral, Sweet 🍭Complete cycle: 70 days. 🍦Average height: 100. 🍬Yield: 450-500 gr/m2. 🌈🍭🍦🍬🌈🍭🍦🍬🌈🍭🍦🍬🌈,