
Processing
Likes
Comments
Share


@Tazard
Follow
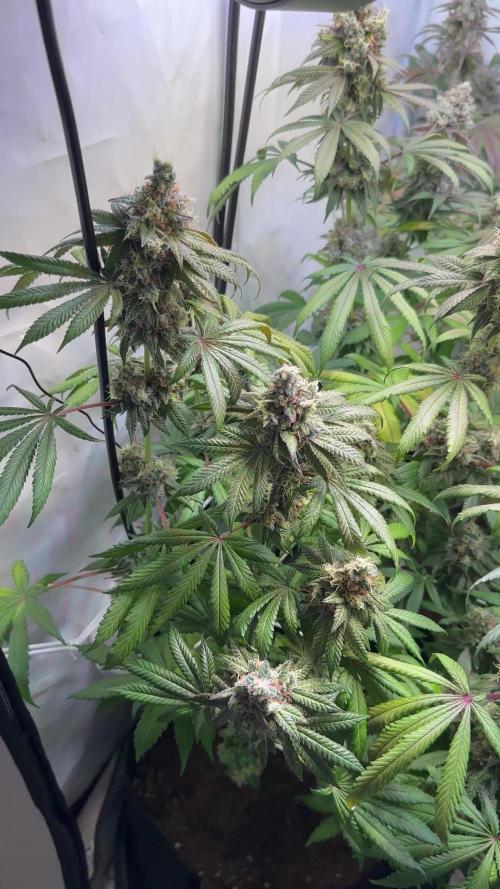
We have a very full tent! Taz’s jungle 😂🤣. Check out the purple purple photos from day 20!!! Everyone looks absolutely beautiful I’m hoping that the white critical will be ready in 4-5 weeks. She’s going to have some fat colas!

Likes
31
Share


@Sider79
Follow
Some Faded bottom leaves . Temps are lower . Not sure if my questions are seen but moving forward with my first Auto Blow Dream grow.

Likes
19
Share


@Ganjagrandaddy
Follow
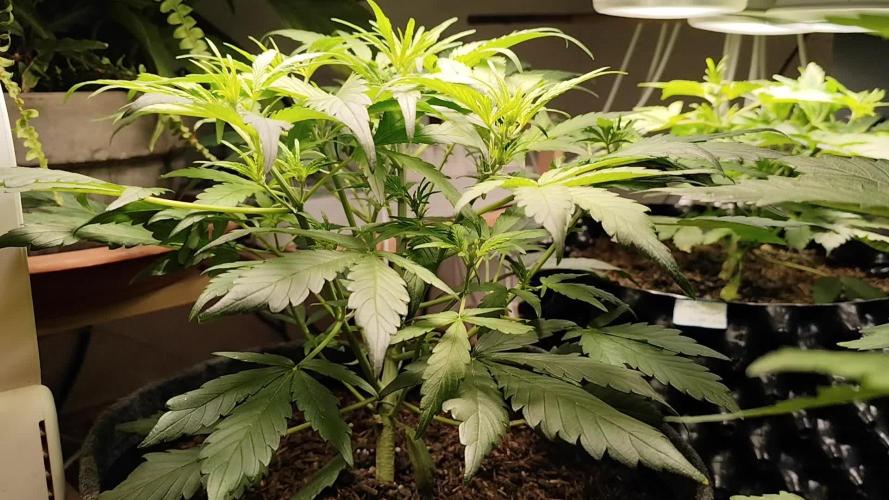
Day 33 from Seed: In general these ladies have just got on with it this week while I worried about some of the other girls. Their training has been a breeze so far and they have been made more pliable by the silica. I have now stopped using the Mega crop in the Los soil now the pot is making it's own nutes but I will keep my eye on them for any paling and need to re feed with the Mc. The coco girls are on 1g/L to see how they settle into that now.
#1is doing brilliantly and her size indicates she will be a great yielder. She is quick to turn her heads back up once pinned so I will need a fast hand to keep up.
#2 The runt of the whole pack. I dont know why she is so small besides some evidence of def on her initial growing leaves. Her new growth looks a lot better but I think she will need less strength feed than the others. Her structure looks good but she is very small I general compared.
#3 was my expected star of the grow room but is now not in the front row anymore. She is perfect and growing great. training has been easy with her and her sites are plentiful too. I think she will be the biggest of the Smoothies.
I am very happy with their progress so far . great work Fast buds.


Likes
32
Share


@Hempcules
Follow
I harvested on the last day of week 13. I didn't water for 3 days before harvesting and hung the branches to dry without trimming. I let them hang for 5 days, then trimmed them and am now curing the buds for another 4 weeks.

Likes
37
Share


@Gardener_of_Goodness
Follow
This week has been a good one! Not too much more stretch just simply filling up both the spaces with foliage and swollen buds!
I’m now watering 6L every 3 days and she’s soaking it all up! Will feed strong for one more week then 2 weeks of flush :)
Dehumidifier turned on and set at 40%, ambient air temp dropped to 23/24 day time and 18 with lights off, air flow changed up daily to really help her.
Getting keen to harvest/cure/smoke and then put in the next round! 😊
I hope all my followers and readers are well and have great holidays! Keep growing, keep smoking and most of all keep smiling! Much love! 👌✌️👍💐💨😎

Likes
52
Share


@DogDoctorOfficial
Follow
Let's realign our cosmic compass and embark on a harvest report for our magnificent Cosmos F1, a pure CBD strain that has taken us on an extraordinary journey. Brace yourself for cosmic revelations and interstellar delights!
After an impressive 11 weeks from seed and 7 weeks of flowering, the time has come to witness the cosmic culmination of our efforts. I carefully hung the entire Cosmos F1 plant to dry, allowing the cosmic energy to infuse every inch of this botanical marvel. It's a sight to behold, with majestic branches reaching for the cosmos, reminiscent of a cosmic dancer frozen in time.
As our cosmic queen gracefully dries, her vibrant hues continue to amaze. The shades of green, intertwined with delicate hints of purple and gold, are a testament to her genetic splendor. It's as if she has absorbed the cosmic essence of the universe, transforming it into a visually stunning spectacle.
Now, let's talk about the cosmic power of CBD. Our pure CBD strain holds the key to a transformative experience. With minimal psychoactive effects, this cosmic treasure offers a realm of therapeutic benefits. It's like a cosmic massage for the mind and body, soothing and relaxing, allowing us to explore the depths of cosmic tranquility.
The decision to hang the entire plant for drying is a testament to our dedication to preserving the cosmic integrity of our harvest. By allowing the branches to hang freely, we encourage a slow and controlled drying process, ensuring that the cosmic essence remains intact. It's a ritual that honors the plant's journey, preserving its cosmic magic for us to enjoy.
As we eagerly await the cosmic transformation, let us express our gratitude to the celestial forces that have guided us on this cosmic odyssey. The cosmos has aligned to bring us the extraordinary Cosmos F1, a gift from the cosmic garden gods themselves. We extend our heartfelt appreciation to the cosmic harmony orchestrated by @James and Royal Queen Seeds.
In the coming days, our dried cosmic buds will be ready for the next stage of our journey. From cosmic concoctions to cosmic culinary delights, the possibilities are infinite. Imagine infusing the cosmic power of CBD into soothing teas, cosmic creams, or cosmic confections. The universe is our canvas, and with our cosmic harvest, we can create cosmic masterpieces.
As we bid farewell to our Cosmos F1, let us cherish the cosmic memories we've shared. The vibrant colors, the pure CBD power, and the cosmic connection we've established with the universe. May our future endeavors be as cosmic and awe-inspiring as this one.
Until we meet again, my cosmic friends, lets keep exploring the cosmic wonders, nurturing our cosmic gardens, and let the cosmic energy guide our cosmic creations. May our harvest be abundant, our cosmic experiences be enlightening, and our cosmic journey be filled with celestial blessings.
As always thank you all for stopping by and for supporting me on this journey, i am super passion about growing and fell blessed to have you all with me on
Likes
10
Share


@Kardo
Follow
Die Cheese ist auch in 2 Wochen fertig sieht sehr buschig aus und hat dicke buds
Likes
34
Share


@ElLocoDeLaHabitacion420
Follow
good week! she continued to grow and she started to put up those white hairs!! flower is comming babyyy

Likes
13
Share


@Robeeriegenetics
Follow
Well, there’s no ghost the VIVO sun pumps that come with the kits they just suck that’s OK. I replaced them with the upgraded version. I refilled the reservoirs


Likes
28
Share

@J4kpvp
Follow
Hey guys:) We‘re finally done with this grow, I‘m pretty happy with the results, but sadly I had one more problem I didn‘t realise until the end. Apparently the white truffle hermed and produced pollen. I think it was due to heat stress, I couldn‘t control the temperature this time around and it was constantly over 32c during the day. Didn‘t know that could stress them so much that they produce pollen… Anyways the white truffle is full of seeds, the other 3 seem to be less impacted with the blue zushi looking the best.
Overall they produced much less than last time when I had the triploids, but in terms of trichome coverage and smell they seem superior this time around. I‘m looking forward to their full potential once curing is done. In terms of smell, the white truffle is definitely the most unique and my favorite of the bunch, so sad I messed them up, but that‘s how you learn:)
On to the next run, this time I‘m going for sativa dominant strains:)

Likes
68
Share


@715creeks
Follow
I'm not sure what to do with this plant now, it seems to be more leaf than bud and there doesn't seem to be any coming.
it's probably time to cut my losses with this one?


Likes
31
Share


@MadeInGermany
Follow
Info:
Unfortunately, I had to find out that my account is used for fake pages in social media.
I am only active here on growdiaries.
I am not on facebook instagram twitter etc All accounts except this one are fake.
Have fun with the update.
Hey everyone ☺️.
This week she has developed beautifully ☺️.
I have already started training (topping) :-).
Otherwise the tent was cleaned and the humidifier filled up.
Until then, I wish you a lot of fun with the update.
Stay healthy 🙏🏻 and let it grow 👍
You can buy this Strain at :
www.Zamnesia.com
Type:
Runtz
☝️🏼
Genetics:
Zkittlez x Gelato
👍
Vega lamp: 2 x Todogrow Led
Quantum Board 100 W
💡
Bloom Lamp : 2 x Todogrow Led
Cxb 3590 COB 3500 K 205 W
💡💡☝️🏼
Soil : Bio Bizz Coco
☝️🏼
Nutrients : Green House Seeds Company Powder Feeding Bio
☝️🏼🌱
Water: Osmosis water mixed with normal water (24 hours stale that the chlorine evaporates) to 0.2 EC. Add Cal / Mag to 0.4 Ec Ph with Organic Ph - to 5.8
Likes
21
Share


@JuicyFruit
Follow
End of week 5 - Night 41
Added a couple videos, one from the side of the buds and one from the back (LST)
things are going well for this plant now, it may only be 15-18cm but its flowering stronger than my other plants. the smell is just getting more pure and strong every day :) and its getting frostier too :D so excited!
I have to grab myself a magnifying glass of sorts on monday to try and estimate when harvest will be :o
Likes
11
Share

@Growbody
Follow
Willkommen zu meinem Growbericht der Gorilla Cookies Auto von 2Fast4Buds. Der Strain wurde 2022 zur besten Indica beim Autoflower World Cup gewählt. Laut FastBuds deren meistverkaufter Strain. Grund genug, den Strain zu testen. Ganz Aktuell wurde die Gorilla Cookies Auto von 2Fast4Buds hier bei den Grow Awards 2026 in der Kategorie Best Strain auf Platz 3 und in der Kategorie Best Autoflowering Strain auf Platz 1 gewählt. Das macht mich noch neugieriger...
Für den Grow verwende ich 15 Liter ROOTiES Stofftöpfe.
Ich war sehr zufrieden mit der Sonnenerde, deshalb habe ich nachbestellt. Sonnenerde hat seine Mischung für die Bio Hanferde letzten Oktober/November geändert. Jetzt sind da kleine Tonkügelchen drin und kleine Gipsstückchen. Laut Sonnenerde soll das die Erde luftiger machen. Auf den Fotos kann man die unterschiedlichen Mischungen gut erkennen. In den AirPots ist die alte Sonnenerde, in den Stofftöpfen die neue. So kann man das Wachstum in den verschiedenen Erden schön vergleichen.
Die Smart Start Plugs von zamnesia hab ich wieder verwendet.
Tag 37: Die Gorilla Cookies Auto von 2Fast4Buds wächst kräftig und hat die Form wie ein Schirm. Diese Woche gab es 3x 1 Liter Wasser.
Schön, das du dir meinen Bericht ansiehst. Schau gerne wieder rein. 👋😎


Likes
46
Share

@DogDoctorOfficial
Follow
Germination Report: Runtz vs. Runtz 🌿✨
Hey there, green thumbs and cannabis enthusiasts! 🌱🌟 I'm thrilled to share the exciting details of our Runtz vs. Runtz germination journey. Buckle up, because this ride is packed with fun, knowledge, and a touch of green magic! 🍃💫
The Germination Journey 🌱🚀
Our Runtz seeds were given the royal treatment from the get-go! We kicked things off with the Cannakan method, ensuring our precious seeds had the best start. Here's a step-by-step breakdown:
Hydration Stage 💧:
Seeds were soaked in water, embracing their first taste of life. This process lasted about 30 hours, allowing the seeds to absorb enough moisture to kickstart germination. Watching those little seeds swell up is always a magical moment! 🌟
Transition to Soil 🌿:
After their water bath, the seeds were gently transferred to soil. This crucial step ensures they have the nutrients and environment they need to grow strong and healthy. Each seed was placed in a cozy, nutrient-rich bed, ready to sprout and thrive.
Understanding Runtz Genetics 🌸🔥
Runtz is a legendary strain, celebrated for its powerful genetics and exceptional traits. Let's dive into what makes Runtz so special:
Parentage 🌿:
Runtz is the love child of two powerhouse strains: Gelato and Zkittlez. This dynamic duo contributes to Runtz's unique flavor profile and potent effects.
Flavor and Aroma 🍭:
Expect a delightful explosion of sweet, fruity flavors with a hint of candy-like goodness. The aroma is equally enchanting, filling your space with a tropical, sugary scent that's hard to resist.
Effects 🌈:
Runtz is known for its balanced high, offering both euphoria and relaxation. Perfect for those seeking a joyful, uplifting experience that melts into a soothing body calm.
What to Expect 🌿✨
As our Runtz plants grow, here are a few things to watch for:
Vigorous Growth 🚀:
Thanks to its robust genetics, Runtz is a strong grower. Expect rapid development, especially in the early stages. Keep an eye on those green shoots as they stretch toward the light!
Resin Production 💎:
Runtz is a resin powerhouse, producing dense, trichome-covered buds. This not only enhances its potency but also contributes to its striking appearance.
Balanced Structure 🌱:
Look for a balanced structure with a mix of sturdy branches and lush foliage. This makes Runtz ideal for various growing techniques, whether you're a novice or a seasoned grower.
The Joy of Growing Runtz 🌿❤️
The journey of growing Runtz is as enjoyable as the end product. Each day brings new growth, surprises, and the satisfaction of nurturing such a phenomenal strain. Whether you're growing for personal use or to share with friends, Runtz is sure to impress with its vibrant traits and rewarding yield.
Stay tuned as we continue this exciting adventure! We'll keep you updated on the progress, sharing all the green goodness and joyful moments along the way. Happy growing, everyone! 🌿🌟💚
Germination method 🌱 @thecannakan
Genetics Runtz F1 @zam.nesia Runtz auto @kannabiaglobal
Nutrition
@aptusholland 🌿
@aptus_world 🌎
@aptus_es 🌍
@aptusbrasil 🌱
@aptus_thailand 🌿
@aptus_portugal 🌳
@aptususa_official 🍀
@aptusplanttechnz 🌺
@aptusplanttechaus 🍃
Ambient controls🎮
@trolmaster.eu @trolmaster.eu.support @trolmaster.support @trolmaster.agro
Soil @promix_growers_eur @promix_cannabis
LED - @lumatekeu
Watering- @autopot_usa @autopot_global
Love and attention- @dogdoctorofficial
#aptus #aptusplanttech #aptusgang #aptusfamily #aptustrueplantscience #inbalancewithnature #trolmaster #trolmastereurope #trolmastersecrets #Autopots #RuntzBattle #KannabiaVsZamnesia #GreenJoy
As always thank you all for stopping by, for the love and for it all , this journey of mine wold just not be the same without you guys, the love and support is very much appreciated and i fell honored and so joyful with you all in my life 🙏
With true love comes happiness 💚🙏 Always believe in your self and always do things expecting nothing and with an open heart , be a giver and the universe will give back to you in ways you could not even imagine so 💚
More info and complete updates from all my adventures can be found ⬆️link in the profile description ⬆️
Friendly reminder all you see here is pure research and for educational purposes only
💚Growers Love To you All 💚

Likes
45
Share


@Natrona
Follow
Sour Jealousy Auto FastBuds 2025 Outside Grow
Week 4 April 27-May 3 Veg
Not much to say. Our weather is roller coaster. One day high of only 72 and low of 44 while most of the others in the mid-80s and low in the 50s. Most of the days were sunny and there was one day of thunderstorms. I can see with the erratic conditions; she has not grown as full and leafy as she should have by now. She only grew about an inch and now 6" tall. I fed kelp and TPS1 once this week.
The last pic is a heron i saw in our ditch.
Your likes and comments are appreciated. Thanks for stopping by.
Growers love 💚🌿
💫Natrona💫