


Likes
9
Share


@Mr_nugs_lover_David
Follow
I shouldn't have started the lst training on her because she started flower very fast and early so she ended uo being very small, which I hate because It has a very skunk citric aroma very powerful, I had a little harvest of 10g counting the little flowers which I used to make cannabutter to make some edibles.I wish I could have a huge harvest of this amazing strain, looking forward to grow her again. 🤞💚🌱💎

Likes
3
Share

@Mr_nugs_lover_David
Follow
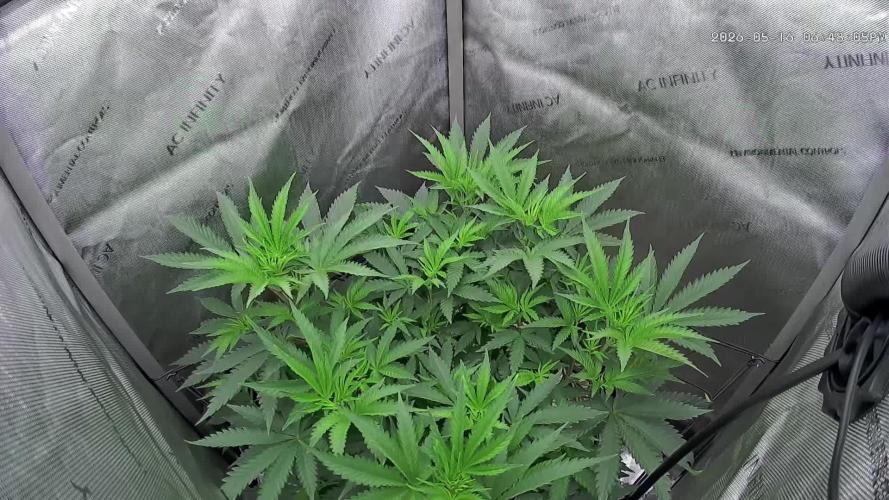
She's looking very nice at the moment,seems to be enjoying and she's recovering so quickly.hope she gets big enough before flower starts which is gonna be a little complicated but it's Okey,she's a beautiful genetic,very strong, she's being fed 100% organically with bacteria,lactobacillus,bat guano, seaweed powder without any chemical substances. Thank you for watching guys 🌱💚❤️💛

Likes
7
Share


@Grow_for_Happiness
Follow
Not much happening this week. WPM treatment worked like a charm and they are looking great. Flipping the lights and installing the netting in next 2-3 days just trying to hold out for some equipment to show. Adjusted ties a few times throughout the week and canopy is kept even. Gave #1-3 another round of defoliation on day 4, last one before flip. Plants really filling out tent now. Grew 4" this week, looking nice and healthy for the flip. Extended my tents exhaust to 18' and temp/humidity still holding as set.

Likes
8
Share


@Random80
Follow
Looking very healthy and growing fast.
Watering her with orgatrex and Bio PK5-8 with every watering as recomended by producer.
Day 45 connected on autopot and will be left alone for 7 days. 30ml of orgatrex diluted in 25 lit of water left in water tank. Air pump conected at the bottom of the tank hopefully to prevent fertilizer to sediment and block the system.


Likes
8
Share


@SavageKraken
Follow
Lots of growth this week. They have all been in 2-gallon Pots and I have transferred them all to 5-gallon pots yesterday. All are doing very well. All have started Cal-Mag and Mystic Dream Blood Root.

Likes
69
Share


@MrHightimes
Follow
Chop Chop! Glad to have finished up this dope little plant! Looking forward to growing this strain in full size pots!

Likes
32
Share


@Ganjagrandaddy
Follow
Day 35 Flowering: Hi Growmies, hope we are all well and in the green.
The Exotic ladies have been displaying their skills this week and fan dancing to this beautiful set of buds now filling the spaces. The smell from them is definitely identified as mango now too.
#1 is fattening out her buds all the way to below the canopy tops too. She isnt the biggest in height but is pushing out some very nice thick buds sets
#2 is the biggest of the 4 Mango cream with a chunky nice looking mainstem that I tried to avoid forming. She had other ideas I think. The side growth is just as impressive too with fat colas forming nicely
#3 is the odd one of the bunch. She is between the two lights and lifted higher than the other 2 the same age but smaller in general. she looks way more mature than the other plants too which is odd. Her colours are really showing through like finished buds tend to look pre chop. She smells so strong of mango too. still with at least 4 weeks to go it will be interesting to see how she matures further..
#4 is at day 28 flowering and has pellets as her feednin the medium. She looks a little rough and nowhere near as healthy as her sisters do. signs of mg deficiency are heavy too and I am using the bloom element that is with the pellets now too. I thinknthe pellets have finished being of use now and might have to get her in mx after all. Her buds look OK but need some powering now from the greenery stores.
All in all things are going well with these ladies and I can only imagine how good they will harvest now.
Be safe growmies
***UPDATE DAY 39 MAJOR DEVELOPMENT***
A major development in the ripening of one of the mango cream girls.
#3 has reached full maturity!!!! I thought she was developing very nice colours and a texture similar to harvested wedding cake strains I have done. as she was still really early in flower and in a small pot , I assumed it was something to do with this that had accelerated her a little in some way. Seeing her trichromes under the scope and seeing amber ones today has me convinced she is done already at 39 days in flower only. Wow thats a fast flowering for a plant of this size too. I have not seen any do this before except a barneys farm Blue gelato that hermied at week 3 flower with perfect seed pods and very mature flowers lowndown . i am leaving her a few days more to see exactly what she does but will keep you posted. Happy days.

Likes
49
Share


@masterofsmeagol
Follow
7/4 SUN was poking out a little bit. Plants loved that little feeding and seen to he noticeable larger this morning. I'm considering starting the nutes. At least the organic ones as well as upping the water intake I've been scared to water with all this rain and my experience last time. I plan on applying BT this afternoon and doing some work on the bottoms of the plants. I also saw a chipmunk in my cage so I have some spots in my fence that need to be patched. I know I can't compare this year to orher years as these are seeds and all the other years were clones. I CAN say for certain that my plants are healthiest they've been out of any of my journals. Previous plants were much larger but I was fighting numerous fungal, pathogens and pests at the sane time. Ear wigs would've lollipopped most buddies by now but I've seen no sign of them. I'm going to apply more poison where they were and add some rat traps inside the cage for the chipmunks. Once I fix the cage I think I'll be good.
UPDATE: Went back over and fixed the holes on my cage from high winds. I found an old wire trap or cage and just cut sections and ziptied them to the existing wire and to the structure thus covering any open holes. I'll need to put lathes aroubdvtge outside because if a rodent REALLY wanted in they could get in. My belt had been wearing thin but I use shit until it breaks (yesterday the heal came off my shoe lol) so I was working hard sweating my nuts off and my belt gives out totally. At least ive got the major stuff done. I took a few videos too. I'm imagining it was this little bit of sun that gave these plants that boost of growth but I'm wondering if the added nutes had anything to do with it. Bags weren't light and I could feel moisture in the soil so I didn't water. I'll check again tomorrow morning. Since I didn't see many plants or even leaves for that matter with damage I decided to hold off ob the BT and the plant doctor. Only time will tell if that was the right decision.
7/5 Plants look fantastic. I see a few more holes in leaves sporadically amd I'm hoping it's pillars. I've seen lots of lightning bugs on my camera though and grasshoppers are abundant. Not one growth shoot has been chewed (knock on wood) which is what the earwigs had always done. I watched a video from last year and by nowcthey had lollipopped all lower leaves. It may not be the best weather growing season wise but despite the rh consistently in the 90's I still don't have pm or fungal pathogens. Need to get the BT out. Didn't water as we've had all that rain. I'll water either tonight or tomorrow morning. Sunny high in the 90s low is 66. Tomorrow looks good too.
UPDATE WENT BACK OVER AROUND FIVE. IT WAS 88 DEGREES SO I WANTED TO CHECK THE GROW BAGS. THE POTS ARE FINE. IT WAS HUMID AS HELL. ONE PLANT WAS SLIGHTLY DROOPY BUT VERY LIGHT AND DRY. I FOUND TWO OTHERS THAT SEEMED LIGHTER THAN THE REST BUT HADNT DROOPED. I MIXED TWO GALLONS OF WATER WITH 1TSP KANGOROOTS AMD PHED IT CLOSE TO 6. I FED THE 3 PLANTS THAT WERE SUPER DRY LIKE A HALF GALLON AND SPRED THE REST OVER THE OTHER EIGHT PLANTS. THEY WERENT DROOPING BUT THEY WERE VERY DRY. I PLAN ON A FULL WATER TOMORROW. I WOULDVE DONE IT TODAY IF THE TEMPS WERENT SO HIGH. ITS RAINED A MONTH STRAIGHT SO I HAVENT HAD TO WATER. I MADE A COUPLE VIDEOS BUT I'LL HAVE TO UPLOAD TOMORROW.
7/6 Another super hot day. I hefted the pots and they still had some weight but I could tell they were dry. This rain has messed up my watering schedule. Well it made it so I didn't NEED to water. These are big plants now. I need to get a schedule to stick too. They're going to probably need a gallon a piece at least. I'm still nervous watering. Right now I'm just reading the plants. I added .5tsp kelp me/you to 1 gallon of water to help with heat stress. I fed an additional two gallons to the garden this morning including the two container plants in the back. They were dry on top too but I know they have water deeper down. Next watering I'll be more consistent and try to give them there 10%. It's great having the bags elevated. I can finally see when I start getting run off. I could even measure the ph of it instead of relying on that meter. Ill check the ph when I go back over. Still a few 🐛 holes but they are few and far between. I really don't want to spray for such a small problem but if I cant find them at night that's what I'll do.
UPDATE: Another 90 degree day. I went back over and gave the garden a gallon of water as they were dry and it didn't rain. Tried to use a soil ph meter to check ph. First couple were 6.4, 6.5 then I got 7.3 and I accidently dropped it. Then I got somethings that were high eights and even one 9! Obviously the Meter shit the bed. I'll lower the ph of the water slightly when I fully water tomorrow and I'm going to measure the runoff.
7/8 I must've messed up the journal again as the dates are off. GAVE PLANTS A FULL WATERING. Each girl got a gallon. I couldn't upload my videos this morning as I had to break up a fight. 3 on 1. Didn't give me a chance to put the videos up. I'll take some stills then I can upload them. I took stills and they all uploaded but didn't fucking save. I'm nit going to keep trying to upload if it's not going to. Noticed a few more holes in leaves and one skeletinized leaf so I need to either spray the bt or something more versatile. I'm putting more poison around the cage and de between the bags. I'll go check things out tonight. Sick of writing a book and uploading to just hace them disappear
7/9 Did a quick video today. Noticed the bags were fairly light despite the plants being soaked amd the pallets wet. I was pressed for time. I gave two gallons to the entire garden. I hope that will hold them over until tomorrow. I'll need to up how much water I give them. Going with a gallon and a half next time. I see more pillar spots and a moth took off when I shook the plants this morning. So I'm gonna have too apply the BT. I figure if I go over before dark tonight I might be able to see aju nocturnal insects around. Luckily my dad feeds the birds and they are always there. I think they help with pests.
UPDATE IT WAS A LITTLE COOLER TODAY BUT MICH MORE HUMID. I WENT AROUND SIX TO MAKE SURE THE GIRLS WERE OK WITH WATER AND TO GIVE THEM A TREATMENT OF BT. I WENT THROUGH THE GARDEN ANDCGOUND THREE LEQVES TO DEFOLIATE AND LITERALLY A COUPLE LEAVES ON TWO PLANTS WITH PILLAR HILESM WHEN I ARRIVED TWO BIRDS FLEW OUT. A HORNET CAME IN WHILE I WAS THERE. THIS DO LESS APPROACH SEEMS TO BE REALLY WORKING. I DODNT SEE NEARLT ENOUGH DAMAGE TO WARRANT SPRAY8NG MY EXTREMELY HEALTHY GIROS WITH ANYTHING. ILL KEEP AN EYE ON THEM AND CLEAN THEM UP A BIT. I DO NEED TO INSTALL THE VERY8CAL TRELLIS FOR SUPPORT. THEYRE PRETTY HEALTHY THOUGH. ONE PLANT IS ABOUT AS WIDE AS IT IS TALL. STILL......PLANTS ARE EXPLODING AND ITS GETTING TIGHT IN THERE. I NEED TO GET THE TRELLIS UP THOUGH.
7/10 I went over and was planning to water. Plants were wet and it's raining. Top of the medium was moist but the bags were light. ONE bag was super light but seeing that we are having showers all day and an additional half inch of rain coming tonight so I didn't water them. Especially since they looked great. Decided to to spray BT yet as the damage is so small and i think the birds have been taking care of the pillars for me. Now I'm wondering if I should've gave that ONE plant a little bit of water but it will be find. Did a video. I'm being careful not to over water. Last year this is when all my buddies were devoured by earwigs. And no senescence like the years before. I think it was hust those earwigs. I haven't lost shot for leaves. Even the stalks are bright green and look amazing.

Likes
7
Share


@BIYEI
Follow
Floracion (Tiempo estimado 64 dias)
Cuarta Semana de Floracion
29/01/2024 - 5:00hrs y 22hrs: Se hace cambio de solucion nutritiva, con parametros ajustados a la semana, Esta vez no se lavan recipientes, Se verifican parámetros básicos del agua y se mantienene constantes apesar de no lavar los recipientes, mantener cuidados específicos, el olor es mas penetrante pero gracias al filtro de carbono se mantiene fuera del indoor sin aroma, empiezan a observarse mas el crecimiento de los pistilos .
Agua de osmosis: Ph 6.0, PPm 950-1200, Ec 1.9-2.3, Temperatura 18°C - 24°C
Ambiente: Temperatura 19-25 °C, Humedad 65%, Ventilación 20%, 12 hrs de luz , 12 hrs de obscuridad.
30/01/2024 - 5:00hrs y 22hrs: Se verifican parámetros básicos del agua, mantener cuidados específicos.
Agua de osmosis: Ph 6.0, PPm 950-1200, Ec 1.9-2.3, Temperatura 18°C - 24°C
Ambiente: Temperatura 19-25 °C, Humedad 65%, Ventilación 20%, 12 hrs de luz , 12 hrs de obscuridad.
31/01/2024 - 5:00hrs y 22hrs: Se verifican parámetros básicos del agua, mantener cuidados específicos.
Agua de osmosis: Ph 6.0, PPm 950-1200, Ec 1.9-2.3, Temperatura 18°C - 24°C
Ambiente: Temperatura 19-25 °C, Humedad 65%, Ventilación 20%, 12 hrs de luz , 12 hrs de obscuridad.
01/02/2024 - 5:00hrs y 22hrs: Se verifican parámetros básicos del agua, mantener cuidados específicos.
Agua de osmosis: Ph 6.0, PPm 950-1200, Ec 1.9-2.3, Temperatura 18°C - 24°C
Ambiente: Temperatura 19-25 °C, Humedad 65%, Ventilación 20%, 12 hrs de luz , 12 hrs de obscuridad.
02/02/2024 - 5:00hrs y 22hrs: Se verifican parámetros básicos del agua, mantener cuidados específicos.
Agua de osmosis: Ph 6.0, PPm 950-1200, Ec 1.9-2.3, Temperatura 18°C - 24°C
Ambiente: Temperatura 19-25 °C, Humedad 65%, Ventilación 20%, 12 hrs de luz , 12 hrs de obscuridad.
03/02/2024 - 5:00hrs y 22hrs: Se verifican parámetros básicos del agua, mantener cuidados específicos.
Agua de osmosis: Ph 6.0, PPm 950-1200, Ec 1.9-2.3, Temperatura 18°C - 24°C
Ambiente: Temperatura 19-25 °C, Humedad 65%, Ventilación 20%, 12 hrs de luz , 12 hrs de obscuridad.
04/02/2024 - 5:00hrs y 22hrs: Se verifican parámetros básicos del agua, mantener cuidados específicos.
Agua de osmosis: Ph 6.0, PPm 950-1200, Ec 1.9-2.3, Temperatura 18°C - 24°C
Ambiente: Temperatura 19-25 °C, Humedad 65%, Ventilación 20%, 12 hrs de luz , 12 hrs de obscuridad.
Likes
16
Share


@BlackForestGrower
Follow
I have now trimmed and hung the plant after 9 weeks of flowering
Likes
1
Share


@Smithsgrow420
Follow
Seen a lot more growth this week, starting to fill the tent up nicely
Happy growing

Likes
6
Share

@Alvareas
Follow
Zu Beginn der Woche wurde auf Blüte umgestellt.
Mit dem bisherigen Wuchs bin ich sehr zufrieden.
Die Pflanze zeigt ein gleichmäßiges Blätterdach, wächst buschig und hat viele Nebentriebe gebildet, die nun Licht bekommen.
Bisher habe ich nur wenige Blätter entfernt.
Gelegentlich habe ich oben einzelne nach innen wachsende Blätter entfernt, wenn sie darunterliegende Triebe verdeckten.
Da die Luftfeuchtigkeit bisher unproblematisch ist und sich keine Staunässe zwischen den Blättern bildet, sehe ich derzeit keinen Grund, mehr Blattmasse zu entfernen.
Eine stärkere Entlaubung plane ich für den 21. Blütetag, wenn ich auch Lolli Poppen werde.
Der Stretch hält sich bislang in Grenzen.
Das hatte ich allerdings auch erwartet.
Bis zum Ende der Woche hat sich die Pflanze um 10 cm gestreckt und die Zeltfläche gut ausgefüllt.
Zur Umstellung auf die Blüte habe ich die LED auf 40 % erhöht, um die entfallenen sechs Lichtstunden auszugleichen.
Der Luftbefeuchter ist ausgeschaltet, und den Controller habe ich auf Temperatur- und Luftfeuchtigkeitsregelung umgestellt.
In der Lichtphase wird nur die Temperatur berücksichtigt, in der Dunkelphase dagegen nur die Luftfeuchtigkeit.
Die Zieltemperatur liegt bei 25 °C, die Zielluftfeuchtigkeit bei 50 %.
Die Abluft ist dabei auf mindestens 10 % und höchstens 30 % eingestellt.
Da beide Werte stark von den Bedingungen im Grow Room abhängen, läuft die Abluft meist auf 30 %.
Aktiv von außen gegensteuern würde ich nur, wenn die Luftfeuchtigkeit im Grow Room so hoch steigt, dass sie sich im Zelt nicht mehr unter 60 % halten lässt.
In diesem Fall würde im Grow Room ein Luftentfeuchter zum Einsatz kommen, vor dem eine aktive Zuluft zum Zelt positioniert wäre.
Die Parameter in Woche 7:
Controller Einstellung Tag: Temperatur und Luftfeuchtigkeit 24C°-26C°, 45% - 55%
Controller Einstellung Nacht: Temperatur und Luftfeuchtigkeit 24C°-26C°, 45% - 55%
Durchschnittliche Tagestemperatur: 26,9C°
Durchschnittliche Nachttemperatur: 23C°
Durchschnittliche Luftfeuchtigkeit Tag: 51%
Durchschnittliche Luftfeuchtigkeit Nacht: 54,3%
Durchschnittlicher VPD Tag: 1,3
Durchschnittlicher VPD Nacht: 1
Durchschnittliche Bodenfeuchtigkeit in Mbar: 94
LED Leistung: 40% = 120 Watt
Beleuchtungsdauer: 12 Stunden
Umluft: Stufe 2 oszillierend

Likes
2
Share


@Jelemond
Follow
Hello names John this is my first grow.I’m not using any bottled nutes for this grow. Instead using nature’s living auto flower concentrate.

Likes
3
Share


Likes
8
Share


@UnUlver
Follow
Я из России, хороших новостей нет.
Закончу ли я репорт - не знаю.
Всем мир.

Likes
21
Share


@CanadianFillmore
Follow
Welcome to week 3F of growfessor theatre, 4x4 edition.
The ladies are looking happy and healthy. Do-si-dos received a heavy defoliation, there were a ton of small inner branches starved for light, so they got cut.
LSD, Green Crack and Mandarin dreams all received a light defo, yellowing leaves were removed.
Lighting provided by Mars-Hydro TSW2000.
Thanks for stopping by, tune in next week growfessors for the next episode 👽🌳💚

Likes
7
Share


@GrownyStark
Follow
After some adjustments needed due to the heat of the lamp, I was able to stabilize my tent temperature to under 26c.
I had to move the light to 2 ft away dimmer at 80% as the tips of new leaves shooting up fast and showing light burns. Mysoil PH climbed to 7.5 so I adjusted ph using big bud by advanced nutrients which drops my solution to 6. This will work for the time being. I've opened up the tent to allow air to flow more freely from the room as the outside air being pulled in had less than 400ppm after some careful measurements. This lead to drops down to 330ppm. I have since closed the vent. Opening up the tent increased co2 levels by 2-3 times. I overkilled fan department added a 16 inch oscillating fan. In the morning it has a strong smell before lights on.
Likes
10
Share


@GrowLowAuto
Follow
Getting a little sticky and stinky. She took the lower branch removal well and has continued in her stretch.

