The Grow Awards 2026 🏆 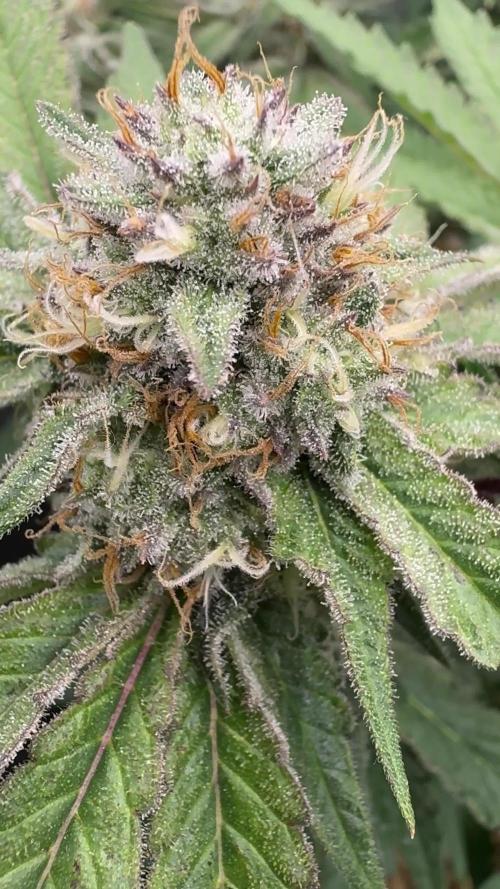


Likes
Comments
Share


Likes
23
Share
@StantonGrowsUk
Follow
Was a normal week nothing too special. Plants are looking abit frail so will be giving them some nutes.
Couple abnormalities on a few leaves 🍃 😌 but will put that down to temp and genetics, we will see how they take to the feeding.
Gonna turn up the light to give the plants more FOOD.
Within the next few days I'm hoping to see more strength in the plants

Likes
5
Share
@DaddyPrime2
Follow
5/2 she's finally tall enough to spread out and she's looking so fucking good. She's showing sex but I don't think its flowering
5/31 the main stem of this plant is crazy. The branching is abnormal and I can't wait to see what it does.

Likes
14
Share
@GoldenWeedGrower
Follow
D29/V25 - 29/04/23 - Benting
D30/V26 - 30/04/23 - EC 0.9 pH 6.5
D31/V27 - 01/05/23 - LST and Benting
D32/V28 - 02/05/23 - Some other LST
D33/V29 - 03/05/23 - Added water and nutes - EC=0,9 pH=6,5
D34/V30 - 04/05/23 - LST
D35/V31 - 05/05/23 - Nothing

Likes
2
Share
@Capt_Chungus
Follow
My first grow has turned in to a science project.
Switched from AN pH perfect Grow/Micro/Bloom to AN pH Connesseur, still giving 50% dose. Had rain Monday maybe, didn't water for 3 days, hit her up last night with the Connesseur and just a tad of Big Bud, looks really good this morning. Yesterday I had mini buds with white pistils, that's why the Big Bud. Everything else is normal- watering 32 oz of water/nutrients at night, MAYBE mist the top soil but haven't really needed it. Will most likely switch to AN Connesseur bloom next week. Very satisfied with Fast Buds and Advanced Nutrients products. It is all on the grower!
Likes
6
Share
@TheMayor4434
Follow
As we enter week five we notice some of the plants pre flowering. But not all so I decide to stick with veg nutrients until all are showing pre flowers. Half way through the week and the rest of the plants are showing pre flowers. Just in time as the plants that had pre flowered earlier on in the week are showing slight Newt burn on the tips suggesting It is time to change to bloom newts which holds less nitrogen. The magnified picture are of the pre flowers forming ( two little fuzzy hairs).
Interesting fact: it takes thousands of those little fuzzy hairs to form just one bud.


Likes
3
Share
@Virginia_Nugz_540
Follow
Okay so I’ve been slacking a bit on the grow-diaries, only because I’ve had a lot going on and also because I don’t feel obligated to do so because this isn’t a sponsored grow. It’s been nice to have a little break but I think I’m ready to come back at it full force again.
These girls are living their best lives, they are all the same age and they are all thriving. Floraflex nutrients, as well as some Silica, Regina-root, and a trichome enhancer called “Grease”!! Seems like the real deal. Watering every other day and let me tell you these girls are very thirsty. Defol as needed!
My new HLG Blackbird lamp fixture is out of this world. My 3 autos that you can also find in my profile absolutely blew up. I typically fit 4 autos in my 3x3 but now it’s essentially one Purple punch from Fastbuds and I had to cram 2 more inside basically because they are going crazy. Unfortunately I had to move them from under the blackbird and put them under a HLG350R and they are still going crazy. Basically what I’m saying is HLG Lamps=Crazy growth and amazing lamps!! HLG has a lifetime customer!
That’s it for now but check in next week to see the progress!
Thanks for tuning in. Until next time and as always, Stay Smokey my Friends!!! 💨💨💨
Instagram: Virginia_nugz_540
Sponsors:
Horticulture Lighting Group
HLG-Blackbird
HLG-600RSpec
HLG-350R Diablo (X2)
Discount code: Virginia_Nugz
Petra Tools
LTPRO 2.0 Backpack Sprayer
Trimbag
Standard Trimbag
Discount Code: Virginia_nugz
Fastbuds
Fastbuds Genetics
Goat and Monkey
Hydrokulture Store
4x4 Gorilla Tent

Likes
16
Share
@Esjey
Follow
Hello, this week and the next ones will be peaceful. It's +-34 days of the girls' life. About 30 more days and we'll switch to flowering. The smell is delicious. I hope that the girls will also give me lush buds. Due to the use of new plant cultivation techniques, I have small concerns about growth, but I hope that my technique will work and I will base on it. (34 days of feminized seeds and the stem at the base has a circumference of 4.5 cm 😁. I should also start fertilization now, but it's already over. If I waited, I would have a problem with bending the stems.
Best regards for all
Smoke weed every day ✌️


Likes
35
Share
@farahweed
Follow
The first week of flowering!!!😍😍
Wow, how attractive!!
It is very attractive to me.
How about you??🌱🌱🌱🌱
Please coment to me!!
I changed the light cycle this week.
I changed the lighting time from 18 hours to 12 hours.
I feel that after doing this, the plant will grow faster in the flowering stage!!!
This week I used short flowering feeding


Likes
422
Share
@Crashoverite
Follow
Hi all🧑🌾
Welcome to my final 🍌💜👊 week update.
First of all. I would like to thank you all for such an amazing support on this bananas journey. I am amazed of the amount of love received from community here. Thank you Grow Diaries and Fastbuds for opportuniy to share and grow this amazing genetics. Love you all❤️💜💚
Was looking for strong indica dominant strain and after reading and hearing so much about this one. Just couldn't resist to not give a go. Was a bit worried before planting seeds that my final yield outcome may not be satisactionary as only have 0.26msq and Fastbuds advertising this strain as 450-550g msq but thankfuly my result was way above this scale.
My 2 beautiful ladies
Athena - right corner lady. She was slighlthly more dominant over entire grow cycle. She got more space on scrog earlier and that's why she developed the most.
Xena - left corner lady, I belive that she could outgrew her sister if she just have more space and another week of time. Did not expect her to turn so well on the end.
Both girls were put in darkness for 48h before chop. Wet trimmed and hang for a week. Daily jars burbing for 10 days and every 2-4 days now.
Weights
Wet trimmed
Athena 870g
Xena 632g
Total 1502g
Dry trimmed
Athena 172g
Xena 147g
Total dry 319g
Bubble hash 6g (37g of trims)
I am very happy with this result.
In my opinion Banana Purple Punch Auto its a masterpiece.
Thank you so much for all the support, likes, follows and comments 🙏❤️💜❤️
Peace and love brother and sisters ✌️💚🧑🌾
Smoke review coming in shortly
Links
https://2fast4buds.com/seeds/banana-purple-punch-auto
https://plagron.com
https://www.biobizz.com/
https://fishheadfarms.com/
Likes
16
Share
@Deepgrow
Follow
El dia 22 desde semilla las he sacado a exterior y han respondido muy bien tras la poda apical y FIM
Dia 25: Agua a temperatura ambiente, Ph 6.2, EC 0.7.
Dia 27: Agua a temperatura ambiente, Ph 6.2, EC 0.7.
El siguiente riego subiré la dosis de fertilizante ya que son muy exigentes con la comida
Likes
7
Share
@Stickygreens420
Follow
Three different strains from LIT Farms (https://litfarms.com). Check them out if you haven't heard of them. Looks like they have some fire 🔥 genetics. I'm about to find out!!
12/30/2022: Started all of the seeds in a cup of distilled water, with a splash of hydrogen peroxide for 24 hours.
12/31/2022: moved into a damp paper towel, using the same water/hydrogen peroxide mix the seeds soaked in.
1/1/2023: 5 of 6 seeds germinated and are showing a small tail. The Frozen White Runtz,
Ice Bath, and 3 out of 4 of the Grand Prix. Still planted all 6. The Grand Prix #4 is the one that was not showing a tail yet. Still holding out hope. Only plan to plant 2 of the Grand Prix, so I'm not concerned yet. Hopefully I get two female!!! Planted all the seeds into a solo cup, filled with BuildASoil Light, and watered with ThermX-70, Rootwise Micro Complete, and some fresh aloe juice from an aloe plant in my back yard. My daughter got to pick the color of the solo cups, so looks like we are using pink, haha. Added a light mulch layer of barley straw, and put in my tent under 18 hours of light.
1/3/2023: the same seeds that cracked two days ago broke the surface today, so I'm calling this Day 1. I checked the Grand Prix #4 and decided to cut my losses and throw in a new seed directly into the cup. We'll see if this one pops and can catch up.
1/5/2023 - Day 3: The five seeds that germinated look healthy. The Grand Prix 3 has some leaf curl on it's first set of leaves, but I'm not worried. Still nothing from Grand Prix 4. Cups are all still wet enough so not much else to do but wait at this point. They have been averaging about 85° with 80% RH.
1/6/2022: the new Grand Prix 4 has germinated, but it has not pushed through the soil yet. I cand see the soil bulging, so I'm thinking tomorrow! The other 5 are looking good and the cover crop on the bed is coming in strong.
1/7/2023: The replacement Grand Prix #4 sprouted! Now let's hope I get at least two female of the Grand Prix for the 3x3. It's a waiting game now.


Likes
47
Share
@Ultraviolet
Follow
Cracked a few stems, twisting them 2, 3 points in the main stem and once on each lateral stem, very early monstercropping, cracked the stem without rupturing xylem or phloem channels, minimal recovery, maximum stress and response. There is a new need for significant reinforcement. I know this knuckle will eventually require the throughput of a superhighway. No point in dilly-dallying. Growth grinds to a halt, at least it feels like that. Energy is now distributed fairly evenly to each stem at equal heights and equal light intensity. Growth is not slower; there is just far, far more to do all at once in equal measure, start raising her soil EC up to 1.0mS/cm and maintaining.
Upped to 40DLI for now. Temps back in the daytime 87+ range. NPK Raw Grow to keep the soil water solution at 1.0ms/cm, thereabouts. Enzymes and amino acids are applied foliarly to the underside of leaves each night 🌙. Aim to coat the undersides of the leaves where the majority of the stomata are located. Use a spray with smaller droplets to increase the surface area of the leaves that are covered. Adding a surfactant to the mix can help the spray spread better on the leaf surface, improving absorption. Just remember not to add anything immobile..
Heat denatures enzymes.
"blah blah what's the point? It's hardly going to do much."
Plants have a surprisingly low photosynthetic efficiency, typically converting only 1% to 2% of the total solar energy that hits them into chemical energy. (Too much defoliation and high VPD all night). In fully optimized conditions, that rises to 6%-8% efficiency.
Plants may use approximately 25% of their respiratory energy (50% of total respiration) for enzyme turnover, which includes production and repair, but the exact energy cost for heat damage repair is not specific, as the total respiratory energy is not definitively given for plants. Plants generally have a high protein turnover rate, with enzymes making up a substantial portion of this turnover.
10% total ATP is photosynthetically processed.
90% total ATP is processed during cellular respiration.
25% -50% total respiratory energetic output is spent on enzyme turnover (Ballpark). Sounds like it's worthwhile to me. The longer you have waited, the harder you must swing.
Processing
Likes
9
Share
@LittleBigTrees
Follow
Still not given any food. It will be a few weeks until she needs food as I've just put her into a 4 ltr pot 👍
Likes
2
Share
@HIAZ_urbanbudfarmer
Follow
Back 2 are on week 5 day 34 of flowering & front plant Orange sherbet clone is week 8 day 54 & very close to harvest, changed her over & flushing with water & Rezin only. Awaiting delivery of a new 60x microscope lense to view trichomes but the buds look like their just about done. Calyx closed & swollen, amber pistils curling in, they are nice & dense buds.


Likes
7
Share
@Chubbs
Follow
420 Fastbuds Week 5
Gorilla Cookies Auto
Hello grow fam. This week has been good but got extremely cold a few nights down into the low 50's. Plants seem to be OK all in all. Flower sites seem to be maturing nice, plants not showing any major signs to worry about or try and fix. I did do a defoliation on most the the major fan leafs and light lollipopping on some of the lower nodes. So far so good.
Happy Growing
Likes
34
Share
@Grey_Wolf
Follow
Original Sensible seeds Girl Scout cookies
5 weeks of Flowering Completed
8th March 2020
This Lovely Smelling lady is really starting to add some bulk to her flowers 💪 She still has about 5 more weeks to go so I'm hoping for Good things from her.
Ive been needing to feed her a bit more often as she seems to be taking everything I give her and wants more.
So as a supplement to what is already in the super soil Ive been adding Lots of Compost and Worm casting teas plus Liquid potassium @ 1ml/ L
Checked soil Ph and temp and was 6.3 and 23 c check out the video update 👊
That's it for this weeks update Thanks for stoppping by 👍
