Likes
Comments
Share
@Trinidad
Follow
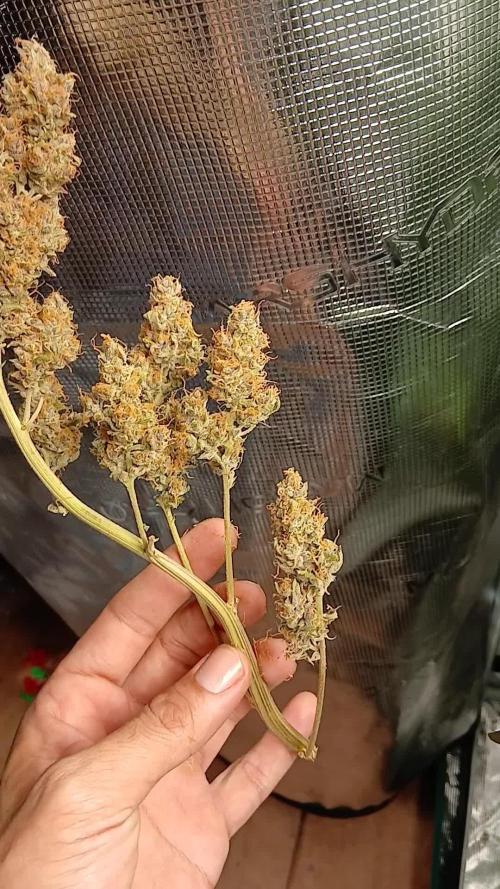
She was left to dry for 13 days. I smoked some of her buds while drying. Offical weight could of been higher if I had the patience. She have a unique smell, very fruity and musky. I will have to wait for the cure to give more fair analysis. I smoke her in the evening when I am winding down after work and preparing for sleep. I had to weigh her in two parts. One part I took my time to trim the other I just gave a rough trim and placed in jars. I took about 3hrs to trim.
Likes
155
Share
@deFharo
Follow
Bienvenidos cultivadores de marihuana clandestinos y también a los que tienen la fortuna de no serlo!🖐️👨‍🌾👍 Este es un diario donde semanalmente explico algunas de mis técnicas de cultivo y preparados orgánicos, los cuales llevo experimentando dos años en cultivos de marihuana interior. • Hay dos componentes absolutamente necesarios para cualquier cultivo y de los que no se puede prescindir: La luz y el agua... hoy toca hablar de agua, homenajear al agua que la montaña y el cielo me regalan para mis plantas de marihuana!! 💧💧💧 Tengo que decir, que hasta el momento, nunca he usado agua con cloro en mis cultivos, mi interés por el agua pura de manantial ya venía de antes, pues yo mismo la consumo habitualmente, el cloro es añadido al agua corriente para hacerla potable y acabar con posibles bacterias o patógenos, pero no distingue entre buenos y malos. Siempre he creído que el consumo de agua pura, ayuda a mantener la micro biota de nuestro sistema digestivo, os podría hablar de las ventajas palpables, pero voy a obviar comentarios escatológicos. En el caso de mi modo de cultivo, donde baso toda mi técnica en el mantenimiento e inoculación masiva de Microorganismos de Montaña (MM) en el sustrato, el uso de agua pura sin cloro es obligado. El 03 de julio de 2020, publiqué lo siguiente: GROWING TIP: Agua!! Mineralizada, viva y estructurada. La importancia de la calidad del agua para el cultivo es vital para mi, he recorrido los manantiales, ríos y arroyos de mi zona con el medidor de EC y el de PH para conocer las aguas que me rodean, recojo siempre que hay oportunidad agua de lluvia de la terraza de un vecino, nunca me falta agua pura, desecho regar con agua del grifo. Para mi, y actualmente, la mejor mezcla de agua que puedo ofrecer a mis plantas es agua de lluvia 75% con otra de un manantial de montaña de agua alcalina (Carbonato cálcico PH: 9.2) y muy mineralizada (EC: 0.85), esta agua yo mismo la consumo regularmente, consigo una mezcla de agua pura con un EC alrededor de 0.19, me garantizo así el aporte de calcio y otros minerales. En épocas donde no llueve uso agua pura de manantiales y arroyos con EC de 0.3. Estas aguas las filtro y almaceno a obscuras en mi casa, la cuestión es que el agua parada pierde oxígeno y también desordena su estructura molecular haciéndola caótica. Para poder recuperar esta estructura y oxigenación, el agua debe estar en movimiento como en la naturaleza, yo me ayudo de un agitador magnético para volver a tener agua viva, el agitador crea un vórtice implosivo que en 10 minutos pone las cosas en su sitio y carga de oxígeno nuestra agua, una vez hecho este proceso voy añadiendo los nutrientes uno a uno y sigo agitando hasta el final. El agua tratada con esta técnica, mejora la asimilación de nutrientes porque favorece el intercambio catiónico e inunda de oxígeno nuestro sustrato y raíces, también con esta técnica se pueden bajar las concentraciones normales de EC en un 30% y conseguir los mismos resultados, prueba y verás!! ------ Hoy tengo algunos comentarios nuevos sobre los diferentes tipos de agua que uso y usé. - Agua de río: Comencé recogiendo agua de los dos ríos caudalosos que cruzan mi pueblo, buena agua, no hay industrias en su cauce, pero sin embargo las aguas fecales de los pueblos acaban en él. Por lo que, ante la duda, deseche el uso de este tipo de agua. - Agua de lluvia: Como comenté antes, recogía agua de lluvia desde el desagüe de la terraza de un vecino (PH: 7, EC: 0.07), mucho trabajo, exposición vecinal y explicaciones surrealistas a los transeúntes que me preguntaban, como decir que recogía el agua para mi perro que no podía tomar agua con minerales por tener tendencia a la formación de piedras en la vejiga, en otras ocasiones, respondía con entusiasmo que era la mejor agua para cocinar alubias!! 🤷‍♂️😎 Definitivamente dejé de recoger agua de lluvia de ese lugar, pues el agua que explico a continuación ya viene con los niveles de EC que yo busco... - Agua de montaña: Manantial permanente a 700m de altitud, el PH varía según la época del año, cuando en otoño, invierno y primavera hay más lluvia, el PH está en 7, y el EC en 0.25, en verano el PH sube a 8 y el EC a 0,5, esto es debido a que la carga de minerales es mayor cuando no hay lluvias. Según la geología de la zona, rocas cálcicas, arcillas y basalto principalmente, este agua mineral contiene suficiente mineral (Ca, Mg, Si, Al, Fe, K...) para no tener necesidad de usar aditivos como CalMag. Esta, es el agua que más uso para riegos. - Agua de manantial alcalino: Casi a nivel del mar, muy mineralizada, con menos variación de PH y EC en épocas de lluvia: PH entre 8 y 9.2, EC entre 0.5 y 0.9. Esta agua la uso de varias maneras: a) Es el agua que yo bebo. b) El café y la comida la hago con esta agua. c) Por su nivel de alcalinidad la uso para los diferentes fermentados anaeróbicos, compensa la extrema acidez de estos preparados y aporta minerales ya solubilizados. d) Este invierno la he usado para riegos mezclada con agua de des-humificador al 50%, obteniendo agua con un EC de 0,25. e) Las raras ocasiones en que riego sólo con agua, uso ésta si el cultivo va bien, y si necesitara hacer un lavado de sustrato por sobre fertilización, uso el agua de des humificador: PH: 7, EC: 0.09, que al no contener minerales el poder de disolución es mayor. - Agua de des humificador: Este invierno debido a las bajas temperaturas, alta humedad relativa y aparición de oídio, me vi obligado a tener funcionando permanentemente un des humificador, y para hacer de la necesidad virtud, he estado recogiendo esta agua exenta de minerales, mezclándola al 50% con las aguas del manantial alcalino, de esta manera me he he ahorrado algunos viajes al manantial de montaña. Recientemente medí el consumo de este aparato, y casi me caigo de espaldas al comprobar un consumo de 140w, lo he tenido encendido más de 3 meses las 24h del día y en ocasiones he tenido funcionando dos des humificadores! y yo, engañosamente, pensé que no consumían más de 50w... bueno, después del disgusto de saber el despilfarro de vatios, yo, que me he esforzado mucho en los últimos cultivos, acarreando macetas del interior al exterior, por consumir el mínimo de luz eléctrica y que me ha supuesto obtener unas cosechas medio bajas para lo que estaba costumbrado, ahora, en mis nuevos 4 cultivos la luz no va a ser el obstáculo, ya que ahora los des humificadores están guardados, y voy a alumbrar estas plantas con todo lo que me quepa en la carpa, la media de vatios por planta de mi última temporada de cultivos fue de 40w/planta, esta temporada voy a llegar a los 100w por planta... más luz es igual a más masa floral!!🌲🌲🌲🌲 - Agua de mar (for nerds): Yo no me he atrevido a usarla para riegos, pero con el agua de mar preparo Ormus casero con agua del mar Cantábrico, donde separo el sodio y hago precipitar los minerales: Publicado el 10 de julio de 2020 a) Fuente principalmente de Magnesio, Azufre y calcio para todo el cultivo. El Ormus contiene de un 30 al 60% de magnesio. Yo lo uso sistemáticamente en todos mis riegos, las dosis van desde el 1% al 2%. b) Contiene más de 70 minerales, la mayoría en modo monoatómico que mejora el intercambio catiónico y la asimilación de nutrientes. c) Al ser un producto alcalino se puede usar para subir el PH del riego cuando se necesite. Aumenta muy poco la carga de EC. d) Forma parte de mis componentes en la solución acuosa que preparo para germinación y establecimiento de semillas. e) Almacenado a obscuras el producto no tiene caducidad conocida. • Agua de coco (for nerds). Producto natural rico en azúcares, vitaminas, proteínas y aminoácidos, enzimas citocininas (División celular, crecimiento), ácido giberélico (Estimulación de raíces) y minerales (Ca, Fe, P, Mg). - Los momentos clave de más demanda de enzimas citocininas comienzan en la mitad de la primera etapa de germinación y establecimiento de la plántula, y al comienzo de la etapa de floración/reproducción. En la última etapa de los cultivos es innecesaria. - Los momentos clave del ácido Giberélico comienzan también en la primera mitad de la primera etapa de cultivo y las últimas semanas de crecimiento vegetativo, después de estas etapas la necesidad del ácido decae hasta hacerlo innecesario en las últimas semanas del cultivo. - Yo uso el agua de coco, alternándola con otros nutrientes, sólo en las primeras etapas de la planta y hasta la preflora. - Las dosis dependen de la carga de EC que se prefiera. Como mínimo aconsejo una carga en disolución de EC de 0,4 o PPM 200. - El agua de coco natural se debe guardar en el refrigerador, como máximo 4 días, pues fermenta con mucha facilidad. y esto es todo por hoy... tengo sed! 😁 Hasta la próxima semana... SALUDOS CULTIVADORES!!🖐️👨‍🌾💧💦🌞💡 =================================
Likes
178
Share
Hey Guys, Growth has taken off a lot this past week, have had to add a heater to the grow which isn’t ideal but with warmer months coming this should only be temporary. I have the thermostat set to start the heater when temps go below 23°c. Watching Dr Bruce Bugbee on YouTube, he stated that growth does start to suffer below this temperature. One of the plants has some odd colours and growth which I’m pretty sure is Mg deficiency, which is probably due to that particular girl being more sensitive to PH swings than the rest of the ladies. I have had to insulate some of the circulating pipes as the water cooler was struggling to keep the water baths cool. Seems to have helped keep temps down a couple more degrees, I mate have to reconfigure where my water cooler is in the piping run after this grow Finally a special thanks to the GD team for selecting my previous diary for DOTM, very flattering considering some of the great content that was submitted for March 2020! Happy growing all!
Likes
16
Share
@BB_UK
Follow
Greeeeeat week! Dynomyco has truly helped this Girly to get off to an amazing start and gave her the force to gain thick stems and more branches! It could also be the addition of Co2 in the grow area! I also give her a diluted foliar feed of formulex as she goes through the day as I have a very low humidity for that week but I can bring it up now as I don’t need it so low in my home! (Was drying other plants)
Likes
17
Share
@Wakesk8
Follow
Starting 3 week in veg..looks good and I just started some LST..if everything goes well I will put them in flowering in about 2 weeks! Let’s see the progress!! Booommm
Likes
11
Share
Pow pow and welcome in Week14 - official Week8 of bloom 😃 There is no much changes from last week apart from buds getting more dense with pistils changing colour to orange all over. Skywalker is absolutely full of knuckles or “good foxtails” as some of you will say. LemonWalker bending as mad due to bud weight 😍 At this stage both girls are in flush mode getting nothing but plain water. Pinched small stem from each of them to run some pre-test...couldn’t resist haha. Stay tuned for updates 🙌 Video Update Day 5 of week 8 (week14) => check this fist size Budz 😍 ...they are hard as a freaking stone and I’m not able to grab it in my big hands 🙌 That’s the last update before the harvest this weekend. - last two days in light before 48h darkness. Stay tuned as in next couple of weeks last harvest update with reviews and weight results ✊🙌
Likes
119
Share
Well growmies ive been looking forward to the Strawberry Pie, the more she went into flower the more the frost would build up , and that's when the terps came out and they came out strong , there no stealth for this girl 👉 Stinky 👈 Buds are tight and full of frost 👈 Couldn't of asked for better Genetics 😉 The smell coming from this girl during the entire grow was just dreamy 👈.... Definitely got the strawberry terps backed by this gassy flav 😍 Amazing 👉 Big thanks to all my Growmies out there in GD land 👈 Much appreciated 🙏 Thanks To MarsHydro for the TS1000 x3 👉I used NutriNPK for nutrients for my grows and welcome anyone to give them a try .👈 👉 www.nutrinpk.com 👈 NutriNPK Cal MAG 14-0-14👉 All Weeks NutriNPK Grow 28-14-14👉 Weeks 2 & 3 NutriNPK Bloom 8-20-30👉 Weeks 4 to 8 NutriNPK Bloom Booster 0-52-34👉 Weeks 4 & 9👌👌
Likes
9
Share
Her buds are getting huge. The trichomes are everywhere now and the smell is amazing. I had to add a lot of string just to support the branches. This strain is growing so incredible, I love it. I wish I had more of this strain. It was my only seed for now. Very happy (10/10)
Likes
20
Share
She's an octopus full of very stinky sweet nuggets man!. I'm in love with this black cherry punch #1 she's in a 30l pot and her performance has been amazing. Very happy with this lady. The aroma of the flowers is suuper sweet very like cherry and like strawberries. Such a pleasure to grow this Cherry pie 🥧🍒 cross 🔝💎👨‍🌾 PD: I had to tie some of the colas cause they were just Fallin cause of the weight of the nugs. A set of 2 branches broke because of the weight of the nuggets so I chopped it down the 2 colas and put them in the drying room.
Likes
51
Share
Day 1: This was the fastest germination I have seen. Only 72hrs from being planted to looking happy and healthy above ground. My plan is to not water this week and only rely on the humidifier which is filled with Ph’d water for feeding the plant. Now that the seedling is above ground I have changed from the 3 small CFL’s to just one 200watt CFL. I’ve added a strip of silver tape around the inside of the top of the pot to help reflect light. Day 2: Looking good. I put a few drops of water around the seedling just to dampen the soil a bit. Temperature is a bit hotter than I’d like at 30 degrees with the lights on but that’s down to the outside warm weather conditions. Seems to be okay though. Day 3: Happy and healthy. I put another few drops of water around it again to keep the soil damp, but only in close to the seedling. I’m keeping the top layer of the rest of the soil dry so it’s not appealing for little bugs and mould. Underneath the dry layer the soil is still wet since I soaked it through before planting the seed. Day 4: Getting wider but not any taller which is awesome. I put another few drops of water around the bass of the stem. The humidity doesn’t seem to be enough on its own, probably because of the high temperature. Day 5: Happy and healthy looking. Day 6: Everything is awesome. Day 7: One week old and it’s all looking good. Another few drops of water again today around the stem. Plant is starting to take shape. Wahoo, one week down.
Likes
23
Share
Week 14 marks a special chapter for Nectar Drip. What started as a straight 12/12 from seed run has turned into one of the clearest side-by-side lessons in plant behavior this room has given us so far. Same room, same feed, same light cycle, same genetics—but two very different approaches, and now two very different outcomes. From seed, this run was split in philosophy. One Nectar Drip was trained early and shaped by hand. The others were left almost entirely untouched—no topping, no real intervention, just leaf tucking and enough space to do their thing. That contrast became the real experiment. By now, the result is hard to ignore: in this format, under 12/12 from seed, the less we interfere, the more the plant seems willing to give back. The trained plant stayed smaller, stacked tighter, and never fully matched the natural size or output of the untouched sisters. Still beautiful, still resin-heavy, still absolutely worth growing—but clearly the most reduced expression of the group. And that made the decision easy. This week, the trained Nectar Drip became the chosen plant for fresh frozen. Not because it underperformed—but because it offered the perfect candidate for something different. Smaller structure, dense flower, extreme resin coverage, and a terp profile too loud to ignore made it the obvious pick to sacrifice to the wash. Rather than drying it traditionally, the whole plant was harvested and frozen immediately to preserve the volatile compounds exactly as they were on the stem. That means this one is no longer headed for jars—it is headed for ice, agitation, and eventually bubble hash. For anyone unfamiliar with the process: “fresh frozen” means harvesting the plant and freezing it immediately after chop instead of drying and curing first. This preserves more of the volatile terpenes and allows the resin to be processed later into solventless extracts—most commonly ice water hash. In simple terms: instead of smoking this plant as flower, we freeze it now so we can wash it later and separate the trichome heads into hash. Same resin, different destination. And if any plant in this run deserved that treatment, it was this one. Even as the smallest of the group, it was dripping in frost from top to bottom. Thick trichome coverage, greasy heads, sticky stalks, and that unmistakable oily feel when touched—the kind of resin that tells you immediately this cultivar has extraction potential. The aroma made the decision even easier: fruit up front, skunk underneath, something creamy in the middle, and a strange almond-like edge that keeps showing up every time the flower is handled. Loud, weird, greasy, and complex—exactly the kind of profile worth preserving in fresh frozen form. The remaining plants are still standing, and this is where the room shifts into its final phase. At this point, the living Nectar Drips are no longer being fed in the traditional sense. This week is water only, using collected rainwater and reclaimed dehumidifier water, with a small amount of enzymes to help break down remaining organics in the root zone. No more push. No more force. Just clean hydration, natural fade, and enough biological support to keep the substrate active while the plants finish at their own pace. It is the final reduction phase now—less input, more observation. And the plants are responding exactly the way they should. Fade is accelerating across the room now, and this is the kind of late-flower senescence we want to see. Fans are pulling color, chlorophyll is retreating, and the plants are beginning to cannibalize what remains in reserve. This is not deficiency panic—it is end-of-life behavior. The engine is shutting down naturally. Energy is no longer going into leaf production or structural growth. Everything is being redirected toward resin, ripening, and final flower maturation. Morphologically, that means the stretch is long over and the architecture is locked. What we are seeing now is finish work. Calyxes will continue to swell. Bracts should tighten. Resin heads will continue shifting from clear to cloudy. Aromatics will intensify. Leaf mass will continue fading back. Water uptake will begin slowing. The flowers are no longer building size the way they did two weeks ago—they are building finish. And that finish is already obvious. Buds across all remaining plants are dense, compact, and far heavier than their frame suggests. The untouched plants especially proved the point this run has been hinting at from the start: in this style of cultivation, less handling allowed for stronger vertical development, better natural structure, and ultimately more productive flowering sites. No topping, no recovery, no unnecessary stress—just uninterrupted forward motion. The difference is visible now in both size and final output. What happens next is simple: patience. There is no hard harvest date yet, and there does not need to be. From here forward, timing belongs to the trichomes. Right now, heads are mostly cloudy with very little amber present, which means we are entering the harvest window—but not fully inside it yet. Clear means early. Cloudy means peak THC. Amber means degradation begins shifting the effect. Until those heads begin showing the level of amber we want, these plants stay standing. So now we wait, watch, and let them decide. The room is loud. The flowers are greasy. Frost is everywhere. The fade is beautiful. The smell is ridiculous. Fruit, skunk, cream, funk, and something strangely nutty underneath. Sticky, oily, loud, and getting louder by the day. Nectar Drip has been a special one. Big respect to TICAL and Zamnesia for this collaboration—this cultivar has been loud, unique, and unforgettable from start to finish. Huge thanks as always to everyone following along, whether you have been here since day one or just landed in the diary this week. To the regulars, the silent watchers, the growers, the learners, the curious ones, the supporters, the skeptics, the OGs, the new faces, the lovers and the haters—thank you for being part of the ride. Big love to GrowDiaries for giving growers a place to document the process, and respect to every sponsor and supporter helping keep this garden moving. One plant went to the freezer. The rest are headed for the finish line. 📡 DELETED @ 1K Please stay tuned.we never quit https://www.youtube.com/@TheDogDoctorOfficial NEW 🙏 Thank you for your patience and continued support. FOR DISCOUNT CODES AND MORE JUST FOLLOW THE LINK https://website.beacons.ai/dogdoctorofficial 📲 Don’t forget to Subscribe and follow me on Instagram and YouTube @DogDoctorOfficial for exclusive content, real-time updates, and behind-the-scenes magic. We’ve got so much more coming, including transplanting and all the amazing techniques that go along with it. You won’t want to miss it. GrowDiaries Journal: https://growdiaries.com/grower/dogdoctorofficial Instagram: https://www.instagram.com/dogdoctorofficial/ YouTube: https://www.youtube.com/@dogdoctorofficial Deleted by Youtube - https://www.youtube.com/@TheDogDoctorOfficial NEW Vimeo : https://vimeo.com/dogdoctorofficial Under construction stay tuned ⸻ Explore the Gear that Powers My Grow If you’re curious about the tech I’m using, check out these links: 🔆 Lighting & Environmental Control • Future of Grow — Advanced LED lighting technology https://www.futureofgrow.com/ DISCOUNT CODE: DOG20 • Lumiflora — Under-canopy LED lighting https://lumiflorade.com/ • TrollMaster — Environmental controllers and automation gear (past collaboration) ⸻ Genetics • Zamnesia Seeds — Genetics used in this project https://www.zamnesia.com/ ⸻ 🌱 Soil, Substrates, Boosters & Root Support • Plagron — Substrates, bio mixes, and supportive products https://plagron.com/en/ ⸻ 🎒 Storage, Curing & Preservation • Grove Bags — Curing and storage solutions https://grovebags.com/ ⸻ 📸 Photography Equipment & Tools (Not sponsors, but part of my creative toolkit) • Sony A6700 • Sony full-frame macro lens + few more • Stacking photography workflow - learning • iPhone (for behind-the-scenes shots) We’ve got much more coming as we move through the grow cycles. Trust me, you won’t want to miss the next steps, let’s push the boundaries of indoor horticulture together! As always, this is shared for educational purposes, aiming to spread understanding and appreciation for this plant. Let’s celebrate it responsibly and continue to learn and grow together. With true love comes happiness. Always believe in yourself, and always do things expecting nothing and with an open heart. Be a giver, and the universe will give back in ways you could never imagine. 💚 Growers love to all 💚 📸 P.S. – The Eye Behind the Lens All photos in this diary (for now — except for the ones showing the camera, which I took with an iPhone) are taken with a Sony A6700 paired with a Sony full-frame macro lens and a few more. Photography is part of the story — it’s how we share the fine textures, the glow, and the quiet details that words can’t always capture. I’ve also started experimenting with photo stacking — a technique where multiple images, each taken at a slightly different focus point, are layered together to create one perfectly sharp image from front to back. It’s not digital enhancement or AI; it’s pure photography — a way to reveal the plant’s beauty in microscopic depth, from trichome to petal. You’ll even see a few shots of "ghost me" capturing the shots — camera, lens, setup — because every grow deserves not just to be cultivated, but documented like art. FOR DISCOUNT CODES AND MORE JUST FOLLOW THE LINK https://website.beacons.ai/dogdoctorofficial NEW DISCORD - Official Server Invite Link : https://discord.gg/ksjAkA5T74
Likes
14
Share
@Canna96
Follow
Hey now, hope everyone has been well. Super excited football season is finally here so things are about to get busy. I went out of town for 4 days and the plants struggled a little bit with the PH getting slightly too high before I returned. I also came back to see that some type of insect was munching away on the lower leaves of my Sundae Driver which I sprayed the plant and coco with neem oil, but hopefully they didnt do much damage before I can get them under control I have never experienced insect problems indoors, likely because I grow in Coco and not Soil. However, I left a 5 gallon airpot full of coco from a previous grow outside for a couple weeks by mistake, and pretty sure bugs got into. I wont make that rookie mistake again. Anyways the rest of the ladies are looking pretty good, They are almost getting what I consider a full dose of nutrients, even though it half of the manufacturers recommended dosage. I am feeding all Gen Hydro cal mag, Armor Si, and maxi grow. I also add some food grade hydrogen peroxide to keep the reservoir fresh for around 10 days or so but I clean it once a week. I did get all the ladies transplanted from solo cups to airpots on day 16, and it took 24 hours or so for them to recover from the transplant and start growing again. I am running 3 of the 3.4 gallon, and 2 of the 5.4 gallon just because that is what I had available. I hopefully top them all sometime this week for the first time, as soon as the roots are a little stronger. I let them grow to 7 nodes or so before I top them and make sure they're growing fast. Hopefully I can still mainline the Sundae Driver, she looks healthy other than those two leaves chomped off. All the plants are on their 5th nodes, except for the Green Crack 2.0 which is only on her 4th node. We got another heat wave coming through my region that I am not too excited about but at least its earlly in the game and I dont need to crank this light up yet. I am only running it at 30% and its putting off plenty to keep this ladies happy. Hoping to get a topping done this week, then another one next week, and be ready to flip to flower by week 7 or so. Thanks for stopping by, Stay Safe and Blaze On!!! 💪 Website: https://medicgrow.com/ https://growdiaries.com/grower/medicgrowled
Likes
1
Share
Great grow!! Should end up with over a half a pound off of these 2 and the little I harvested about 2 weeks ago. I got 2 oounces dry off of her. They smell amazing and are covered with trichomes
Likes
13
Share
Well we have hit flush week,.. a couple weeks later than planned,... mainly cloudy trichomes few Amber dotted about, smells amazing,.. defo roll on next week for the chop 😀 👍
Likes
1
Share
She looking good smell nice!
Likes
2
Share
@Ninjabuds
Follow
Skunk apple runtz I'm probably only going to keep 1 of these guys seeing the 2nd just has really bad growth so far. I'm sad about this I made this cross out my last grow and was hoping for the better end of things. The other plants is decent but we will see I hope it has the growth pattern of the lit farms Rick bobby and the bud structure of the obama runtz I grew It's looking like a good start to a week the plants are strong they are getting to the point I can let the dried dry out completely. I'm thinking by the end of this week the plants will be starting to be sold. Last week I put all the plants into my bigger 2x4 tent with my medicgrow mini sun 2 the 500w version. Only a few of the plants were ready for that light. Seems like the only plants that really have good resistance and have a strong start are the weedseedsexpress.com seeds. Shout out to weedseedsexpress.com for the strong plants. I ended up putting all the plants back into my 2x2 tent with the 55w amazon light it has alot more blue light in its spectrum. It's kinda weird b4 I switched the plants to the 2x4 tent they were getting 220umol under my amazon 55w led then when I put them under the 500w light 25% strength about 50in from plants and they were getting only about 195umol in that tent but it was stressing most the plants. I assume a larger light has more side lighting hitting the plants. I think when useing larger lights it's good to measure umols from the top but also coming from the sides. I think durring seedling stage they only need about 50% the umols coming from the side the plants as the top is receiving. When I put the plants back in the small tent about the same umols as they were getting b4 the switch and they were still a little stressed. So for a few days I put the small light at the top the tent giving them 100umols for a few hrs then 130umols the rest the day.
Likes
29
Share
@BunnyBud
Follow
I learned a lot from this cycle, I'm really happy with the results, look at those beautiful succulent buds! 🐇🌱💚
Likes
53
Share
Week 2 Flower Report: Blackberry Auto's Swift Blossoming! Greetings, fellow cultivators! Week 2 of flowering marks a significant milestone in the journey of my Blackberry Auto, and let me tell you, this one's moving at lightning speed – the fastest I've ever witnessed in an auto. Let's dive into the unfolding botanical saga and witness the blossoming beauty firsthand. Burgeoning Buds and Floral Symphony: As the second week of flowering commences, the once-timid buds of Blackberry Auto are now burgeoning into floral marvels at an unprecedented pace. Each bud tells a story of promise and potential, with delicate pistils reaching out like fingers, embracing the essence of bloom. Hydration Harmony and Nutrient Nourishment: The AutoPot Aquavalve continues to be a steadfast companion, ensuring the plant's hydration needs are met with precision, crucial for this rapid growth. Coupled with a nutrient regimen tailored to support flowering, Blackberry Auto thrives in a symphony of hydration and nourishment, laying the groundwork for robust bud development. Aromatic Euphoria and Visual Splendor: As the flowers unfurl, they release an aromatic symphony that fills the air with notes of sweetness and delight. Meanwhile, the visual spectacle is equally captivating, with hues of green giving way to vibrant shades of purple and indigo – a testament to the genetic lineage of Blackberry Auto. Tender Care and Gentle Guidance: Amidst the flowering frenzy, I continue to provide tender care and gentle guidance to Blackberry Auto, ensuring she stays on track despite her rapid pace. Low-stress training techniques are employed to ensure optimal light penetration and bud development, shaping the plant's canopy into a tapestry of floral abundance. Anticipation and Gratitude: With each passing day, anticipation grows for the bountiful harvest that lies ahead. I extend my heartfelt gratitude to @fastbuds_official for bestowing upon us this botanical marvel. To Aptus Holland, my main sponsor, your support fuels this green journey and enables the flourishing of Blackberry Auto's potential. Kudos to Grow Diaries for providing the platform to document and share this journey, and a shoutout to the community for the camaraderie and shared passion that enriches our collective cultivation experience. As we embark on the second week of flowering, I invite you to join me in celebrating the beauty and wonder of Blackberry Auto in bloom, moving at a pace that leaves us all in awe. Together, let's revel in the magic of nature's artistry. Genetics Blackberry Auto @Fast_Buds Food - @aptusholland @aptus_world As always thank you all for stopping by, for the love and for it all , this journey of mine wold just not be the same without you guys, the love and support is very much appreciated and i fell honored and blessed with you all in my life