


By continuing to use the website or clicking Accept you consent to our cookies and personal data policy and confirm that you are at least 18 year old. For details please see Privacy Policy and Terms
Accept
Likes
Comments
Share

@Roberts
Follow
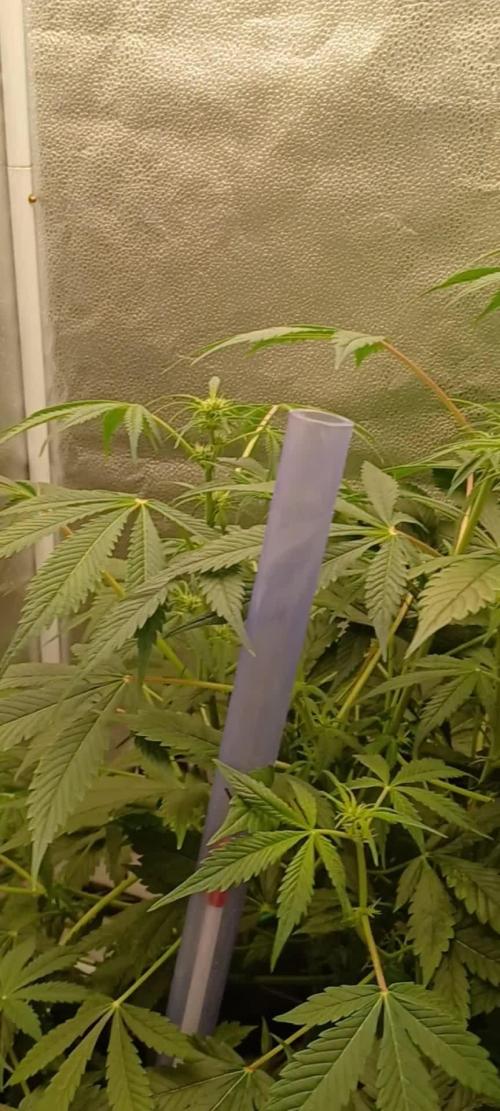
Auto Black Opium is doing good. She has started flowering and is starting to stretch. Everything is going well. Thank you Spider Farmer, Divine Seeds, and Athena nutrition. 🤜🏻🤛🏻🌱🌱🌱
Thank you grow diaries community for the 👇likes👇, follows, comments, and subscriptions on my YouTube channel👇.
❄️🌱🍻 Happy Growing 🌱🌱🌱
https://youtube.com/channel/UCAhN7yRzWLpcaRHhMIQ7X4g.

Likes
7
Share


@fabialien
Follow
Lunes 11 de marzo 7 am de 2024:
Se dejaran hidratando las semillas por 24 hrs.
Martes 12 de marzo 7 am de 2024: pasamos a papel dejamos por 24 hrs.
Miércoles 13 de marzo 10 am de 2024: revisamos las semillas y vamos preparando macetas pequeñas para transplante.
Miercoles 13 de Marzo 3:30 pm se traspasa a tierra.
Viernes 15 de marzo 11:47 pm 2024, ya que abrieron bien se pone bajo lámpara 100w a 30 cm de distancia, tienen domo protector! El lunes en la nueva semana subimos el avance, hasta el Lunes...
Sábado 16 de marzo 2024, de las 3 semillas la 1 ya abrió completamente, 2 y 3 están por abrir completamente.
Likes
29
Share


@HighZenBerg
Follow
Here we go again !
Welcome to my grow diary. This time I was gifted with a single seed of Sensi Amnesia Feminized by Sensi Seeds.
To celebrate the upcoming legalisation in Germany, I dedicate my diary to all my fellow German pot heads. We almost reached our goal !! 👏
As always, I got started and throw the seed in a cup of water and let it soak for 24 hours.
After that, she was directly transplanted in a little pot with BioBizz Light Mix soil.
To keep temperature and humidity up, she will spend the first days in a little propagator
Update: germination successful !
We mark 11/27/2021 as her day 1
Update 2: the lady gained hight quickly. That’s why I reduced the light distance to 40cm.
Temperature at day: 25-27 C
Temperature at night: 19 C
Humidity kept around 65%
Germination week was without problems. No Temperature or humidity issues at all. She got a bit tall in her first days.
Keep in touch !
Cheers HighZenBerg


Likes
53
Share


@Mastr
Follow
Just chop her down in 75 days from seed
Veg 21 days
Bloom 54
She produce very dense nugs alot better than before I think without bloombastic won't happen I let her dry in 23° for 32 hour then 24°for 3 days then ready this is quekest way you can dry your bud without test or smell like grass its take max 5 days

Likes
14
Share


@Vitaliy
Follow
day 71 - rest
light schedule: 19/5 , 100% power
day 72 - 1500 ml water + 6 ml ph perfect + 2 ml b-52 + 5 ml bud candy + 5 ml overdrive
light schedule: 18/6 , 100% power
day 73 - rest
light schedule: 18/6 , 100% power
day 74 - 1500 ml water + 6 ml ph perfect + 2 ml b-52 + 5 ml bud candy + 5 ml overdrive
light schedule: 16/8 , 100% power
day 75 - rest
light schedule: 14/10 , 100% power
day 76 - 1500 ml water + 5 ml flawless finish
light schedule: 14/10 , 100% power
day 77 - rest
light schedule: 12/12 , 100% power
day 78 - 1000 ml water + 3 ml flawless finish
light schedule: 12/12 , 75% power
day 79 - rest
light schedule: 12/12 , 75% power
day 80 - 500 ml water + 2 ml flawless finish
light schedule: 12/12 , 50% power
day 81 - 84 - no light, add few cubes each "night" to send a message "winter is coming"
day 85 - harvest day


Likes
25
Share


@MisterMartian
Follow
- Going to start with 16x seeds with no back ups, hopefully 16/16 will germinate :) Using Mars H. Ts1000 instead of 1250W custom one.
- Seeds straight outta fridge, waited 15-20 min for frost effect to shake, planted right into rockwools and added mid to warm tap water with 6.3 PH & put a fridge bag and rounded it around instead of the cap of the germination tray just to try something new.
- I started watering manually and might use drip/hydroponics depending on the torture level and will update the system & add/type here every detail.
- I will use Advanced Nutrients first whole series from beginner/hobyist to grand master, will be my 5th grow with this series. After germination, depending on the roots and their overall health, I might use ROOT !T first feed. Since they're autos, it'll be tricky.
- Going to be my 5th grow ever and this particular grow includes 10th to 26th numbered (all until now) plants I ever grew.
Processing
Likes
4
Share


@inxxx
Follow
Hi everyone, today is the beginning of third week of flower. Everything runs smooth, no issues. Added auto gorilla, so 7 plants in DS90 :) another 5 in veg. New seeds from RQS ordered (Kush, cheese, amnesia, medical mass, thunderfuck).

Likes
41
Share


@MadeInGermany
Follow
Flowering day 37
since time change
to 12/12 h.
Hey guys :-)
The buds have developed incredibly nicely this week.
The smell is getting more and more extreme :-) .
The whole plant itself looks perfect 👍.
The growth has slowly stopped as the full energy goes into the production of the buds.
This week it was watered 3 times with 1.2 l each (nutrients see table above)
They were individually inspected and checked for their health.
Osmosis water for the coming week was refilled in a 100 l tank 👍.
Have fun reading the diary and stay healthy 💚🙏🏻
👇🏼👇🏼👇🏼👇🏼👇🏼👇🏼👇🏼👇🏼👇🏼👇🏼👇🏼👇🏼
You can buy this Nutrients at :
https://greenbuzzliquids.com/en/shop/
With the discount code: Made_in_Germany you get a discount of 15% on all products from an order value of 100 euros.
👇🏼👇🏼👇🏼👇🏼👇🏼👇🏼👇🏼👇🏼👇🏼👇🏼👇🏼👇🏼
You can buy this strain at :
https://www.exoticseed.eu/
Water 💧 💧💧
Osmosis water mixed with normal water (24 hours stale that the chlorine evaporates) to 0.2 EC. Add Cal / Mag to 0.4 Ec Ph with Organic Ph - to 5.8 - 6.5
MadeInGermany

Likes
11
Share


@Novagrow
Follow
This stuff has taken an age to dry! I think it was a little too cool in the tent. ah well.
Its currently in jars curing, so havent had chance to try it out and i think im prepared to give it a full 6 weeks of cure.
Results wise, little disappointed by the yield, only 4oz but it was a micro grow - I think perhaps although i didnt notice it at the time, the heatwave fortnight i had during flower may have had something to do with the lack of growth - but still the quality of the buds is high, plenty of trichomes and buds are really dense.
As its still in cure its still a bit hay-smell as the chlorophyll continues to work its way out but there are lovely undertones of gas and fruit - (cherry?)
Will check back in with a smoke report in a few weeks but wanted to get a couple of vids of the buds (yes i dont trim them like the pros, i dont care :p )


Likes
11
Share


@CocoLogic
Follow
Sept 20th: (F34)
Fertigation once a day with NEW recipe (1300 EC 6.1 PH) watered until 10-20% run-off
Sept 21th: (F35)
Fertigation once a day with same recipe (1300 EC 6.1 PH) watered until 10-20% run-off
Sept 22th: (F36)
Fertigation once a day with same recipe (1300 EC 6.1 PH) watered until 10-20% run-off
Sept 23th: (F37)
Fertigation once a day with same recipe (1300 EC 6.1 PH) watered until 10-20% run-off
Sept 24th: (F38)
Fertigation once a day with same recipe (1300 EC 6.1 PH) watered until 10-20% run-off
Sept 25th: (F39)
Fertigation once a day with same recipe (1300 EC 6.1 PH) watered until 10-20% run-off
Sept 26th: (F40)
Fertigation once a day with same recipe (1300 EC 6.1 PH) watered until 10-20% run-off


Likes
1
Share


@Pestitel
Follow
Amazing experience with the Mix Pack, I will try it again next summer for sure. Love the variety.
Likes
33
Share


@nerdz
Follow
Chopped and I'll hang them in the he dry tent and keep it around 60rh/17c for as long as I can. 🤑
Update: got the tent at 15c/61rh and wow the buds have a different type of firmness than before. I can't wait...
So far my best grow of the 3
Likes
37
Share


@TheIceCreamParlour
Follow
If you pheno hunt you will be rewarded!
Big yields
Medium/Manageable height
Fast speed of growth
Medium flower cycle
Rock density buds
Sweet/sour/lime/apple smell and taste
Must keep temps low 26c 80F sweet spot
100% I will grow again when I have space. A great grow despite some silly errors by myself and one crazy pheno weathered the storm to produced some serious quality cannabis that showcases the best award winning genetics that Royal queen seeds have meticulously bred. I'll always have a royal queen seed plant in my tent from now on.
Likes
62
Share


@masterofsmeagol
Follow
7/12 Soil was a little damp so I watered lightly only what looked like it needed it. Dr. Zymes seems to have no negative effects. Plants just look super clean. I still saw some patches of PM and I only had the free samples so I'm going to have to use another product in conjunction to treat this. Overall I'm pretty impressed with the Dr. Zymes. HAD MY VIDEO AND TONS OF PICS UPLOADED BUT THIS SITE WOULDN'T ALLOW ME TO SAVE. I'LL UPLOAD THE REST LATER "IF" THIS EVEN ALLOWS ME TO SAVE. Went back over at three and watered the girls. Everything looks amazing. Trying to upload video now.
7/13 Didn't water this morning. Plants look fantastic. Went over at 4:30pm. Things looked great. Definitely stretching. I took some good pictures. Didn't water as plants seemed VERY happy and soil still had a little moisture. I gave them a touch of kindness which means I gave them a tiny bit of water to hold them over until morning. I know this is not a good practice to get into but I didn't want to come back to wilting plants. The little seedlings are turning more lime green (which isn't good) and have some yellow leaves. They have recycled soil from last grow. May need to feed more. I went through them and moths flew everywhere. We have a major brown tail moth problem here. I know I just sprayed Dr. Zymes but I'm going to have to spray BT. I must've seen at least half a dozen moths. On just those three tiny plants. Still struggling with PM.
7/14 Went to the garden briefly this morning. It rained last night and was drizzling while I was there so I obviously didn't water. Its still sprinkling and I'll be over there later to check. Plants are really stretching into "the asparagus" stage as I like to call it lol. What will eventually be a bunch of colas stretch into what I think looks like asparagus spears. That may be part of the reason why some of the leaves turn yellow and die in the lower middle canopy during this time. Everything looks great though and I certainly have plenty of leaves. I looked at last year's diary at this date and got some relief noticing the same things happening last year at the same time of year. UPDATE: Went back to the grow as the "rain" and "thunder showers" weren't producing much water. I checked the soil and it seemed to have dried out some (more on smaller bags) and hadn't FULLY watered the plants. I watered lightly. I listened and I could hear the water work it's way down the medium. Even if it pours tonight plants will be ready for a feed tomorrow. The 3 little ones in buckets outside especially. I have work to do tomorrow.
7/15 It's overcast today and looks like rain. Forecast called for a nice sunny day. Anyway I fed two gallons to nutes to the garden and did some slight defoliation. I had to hurry as I had a doctor's appointment. I have branches that need to be tied down and plants need to be cleaned up a bit. If it's not raining I may do a preventative BT spray. We have a HORRENDOUS outbreak of brown tail moths. I don't think the bother cannabis but they are poisonous and the rash that develops is hell. 90 degrees at 6:30 plants weren't totally dry but the top inch or so was so I gave them a good drink. Took some pictures and a video I'll upload when I have a better connection. Cop was watching me. Good thing I'm in a legal state and my grow is totally on point.
7/16 No water this morning. Soil was still wet. Plants are looking good. Will update more later on. Defoliation, pruning and spraying are on the agenda. Made a video and took more pictures but internet is spotty and doesn't want to upload. Went back and watered lightly before a massive thunder storm dropped sheet rain for like an hour. Internet is still slow so I'll have to wait till tomm to upload.
7/17 No water. Brown tail moth rash is driving me crazy. Plants still stretching and look overall healthy. Defoliated some this morning. Will update more later. Went back over and gave a little water before it began to downpour.
7/18 Raining with what looks like more rain in the forecast. Good. Hopefully will help me lower the pH a little. I didn't take pictures or even go in the cage this morning. This brown tail moth rash has me scared lol. It really sucks. Makes poison ivy seem pleasant. When rain stops BT will be sprayed.


Likes
15
Share


@Ronin716
Follow
So at the start of week 3 I began to LST CM#3 to just experiment basically and topped CM#2 I believe. Again, just to experiment. This is my first grow and I was stunned with the reactions to both! The new growth after topping was about 1/4” in about 12hrs.. Crazy to me and the lst is proving to expose these bud sites and encourage amazing growth QUICK!! I’ll continue to train daily. One of the videos show the topped CM just yesterday. In 4 days, it’s grown soo much! Also, a video mentions the gender reveal but since then, all 4 have officially revealed themselves as female at the 22 day mark.

Likes
44
Share


@UKauto
Follow
doin gooood 👌🏻 Responded well to the topping and LST. First sign of pistils today. Should turn out great, hoping for a nice stretch soon 🙏

Likes
23
Share


@Sators
Follow
Hey los amigos!💚
🌱Day 44.💚
🌱Day 46. Trim bottom leaves off.💚
🌱Day 48.💚
See you next week!😀