
Likes
Comments
Share

@Schnabeldino
Follow
📅 Week 14 | Days 99–105 📅 🌼🌸🌺 Late Flowering Stage 🌼🌸🌺
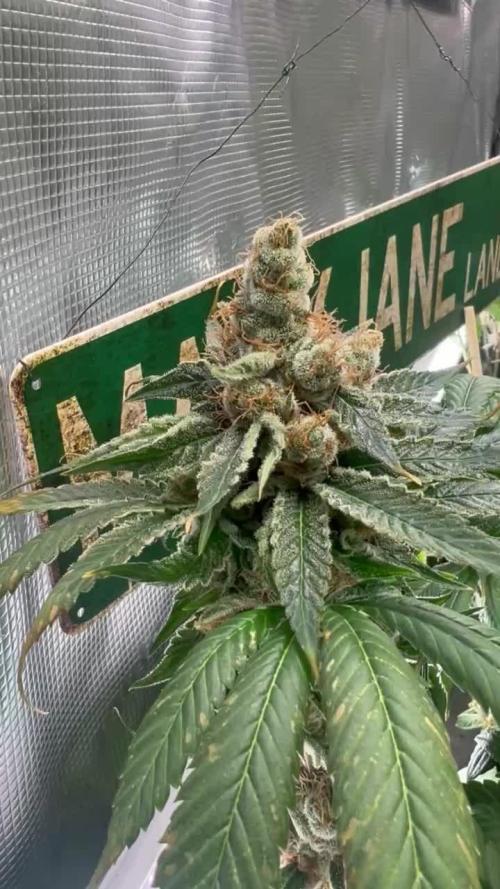
Day 105 🌞 – Oreoz (Harvest in Sight)
🔸 Visuals: Oreoz is now strutting her stuff like a true queen on the red carpet. The buds are rock-solid, swollen to perfection, and absolutely drenched in a frosty coat of milky trichomes. A few amber heads have started to make their debut, giving us a sweet little wink that harvest is just around the corner. The fiery orange pistils have curled in and deepened in color, making the whole plant look like a masterpiece.
🔸 Aroma & Resin: The terpene profile is now in full swing—sweet and creamy with a subtle earthy twist. Touch her once and your fingers are instantly glued together from the insane resin production. She’s basically a sticky, fragrant work of art.
🔸 Climate:
The temperature couldn't be worse...towards the end, of course, it will be almost 30 degrees for the next few days.
Humidity has been tamed, sitting comfortably between 50–55%, keeping mold far, far away from those dense colas.
VPD remains locked in at 1.4 – 1.6, letting the buds finish without a hint of stress.
🔸 Nutrients & Water: Overdrive week is in the books. From here on out it’s plain, pH-balanced water (EC ~0.5) to flush her through. She’s drinking noticeably less now—a sure sign she’s in her final act and drawing on her own reserves.
📈 Current Conditions
🌡️🔆 = 28°C
🌡️🌜 = 21°C
💨 VPD = 1.4
💨 RH = 55%
🔦 PPFD = 900 µmol (12/12)
🔦⌚ DLI = ~38
🛠️ Setup (unchanged)
💡 2 × Sanlight Evo 4-120 @ 90%
⛺ 120 × 120 × 180 cm
🍯 18 L pot
🌱 Bio-Bizz Light Mix
💊 Advanced Nutrients
💧 Tap water (EC 0.5)

Likes
2
Share


@CheeRz
Follow
The nice weather has finally returned, and it should stick around for the next few weeks. It's just in time for the last couple weeks of the ladies. ☀️☀️☀️
Likes
11
Share


@RhodiesGrow
Follow
Day 15: Do-Si-Dos Auto is looking strong. First big feed: 4ml FloraMicro, 6ml FloraGro, 3ml FloraBloom, 2ml CALiMAgic, 1ml RapidStart, 1ml Floralicious Plus and 2.5ml Armor Si. RO water PH 6.0
Temp: 75º RH: 63% PPFD: 450 VPD: .53 kPa
Day 16: Do-Si-Dos Auto ahead of the pack. She looks the healthiest in the tent so far. Time to LST that little girl, hopefully she will respond nicely. No water no feed. Temp: 76º RH: 61% PPFD: 475 AVG VPD: .46 kPa
Day 17: She looks real good. Taking the LST well. Keep growing. Will feed tomorrow. Temp 77º RH: 55 % PPFD: 500 AVG VPD: .6kPa
Day 18: Moved up and turned up the lights. Fed 250ml of 4ml FloraMicro, 6ml FloraGro, 3ml FloraBloom, 1ml RapidStart, 2.5ml ArmorSi, 2ml CALiMAGic and 1ml Floralicious in RO water PH 6.2 PPM: 750 Solution Temp: 69º. Tent Temp: 77º RH: 60% PPFD: 575 VPD: .44 kPa
Day 19: Looking good. Tent Temp: 77º RH: 60% PPFD: 550 VPD: .44 kPa
Day 20: Still looking good. New growth. Fed another 250ml RO water with 1ml RapidStart PH: 5.7 Tent Temp: 77º RH: 60% PPFD: 550 VPD: .44 kPa
Day 21: End of Veg Week 3! Looking strong and healthy so far. Almost feeding/watering daily at this point, will up the solution volume and see if it will last a day or two longer. Fed 350ml-400ml of 4ml FloraMicro, 6ml FloraGro, 3ml FloraBloom, 1ml RapidStart, 2.5ml ArmorSi, 2ml CALiMAGic and 1ml Floralicious in RO water PH 6.2 PPM: 750 Solution Temp: 69º. Tent Temp: 77º RH: 60% PPFD: 500-550 AVG VPD: .44 kPa


Likes
15
Share


@MG2009
Follow
02/10/2021
I supper cropped the top 4" down toward lower level to promote auxins to redistribute, also starting 12-12 light cycle should be 8-9 weeks of flowering🙏 if she more than doubles in stretch,then I will need to switch to LED lights to finish
Likes
31
Share


@THCpapa
Follow
Week 19, and it's like my plants have hit a leafy plateau – the growth seems to have slowed down, or maybe I've just gotten used to their leafy antics. But hey, who needs fast growth when you've got an overwhelmingly beautiful smell wafting out of your tent?
When I open the tent, it's like stepping into a fragrant paradise. The smell is sweet, strong, and just downright heavenly. Is this how heaven smells? If so, sign me up for eternity in a leafy paradise!
But it's not all sweet smells and smooth sailing. I've noticed a slight discoloration of some leaves, and I suspect it might be due to a pH issue. Time to put on my plant detective hat and make some adjustments. I'm switching to feeding only pH water for the rest of the grow, hoping to nip this issue in the bud (pun intended).
So here's to Week 19 – a week of heavenly smells, pH detective work, and the ongoing adventure of growing these amazing plants. Cheers to my green companions – may they continue to delight the senses and grow into leafy wonders! 🌿🌺


Likes
10
Share


@Undermisensi
Follow
I add a half of teaspoon of Epsom salt with every feeding because its straight coco except on days I feed plain water. I do this from beginning of veg up until the last week before harvest when I flush

Likes
7
Share

@Bread_n_Buds
Follow
Our Tangerine Dream Automatic from Zamnesia Seeds was planted a week after the other grow tent mates, so understandably, it's a little late in flowering, but not much. It'll be ready for harvest by the end of the year or so. It's growing well, it's been well-trimmed, and the flowers are swelling nicely. So far, so good. But we're waiting for it to land. (Cit the haine)
It's drinking a lot. I add 1.5 liters a day, and I find it very dry in the morning. Its potency is unpredictable.
Techniques chosen - Here, we've decided to let it grow freely and beautifully, with some careful tidying of the lower layers to prevent unnecessary flowers.
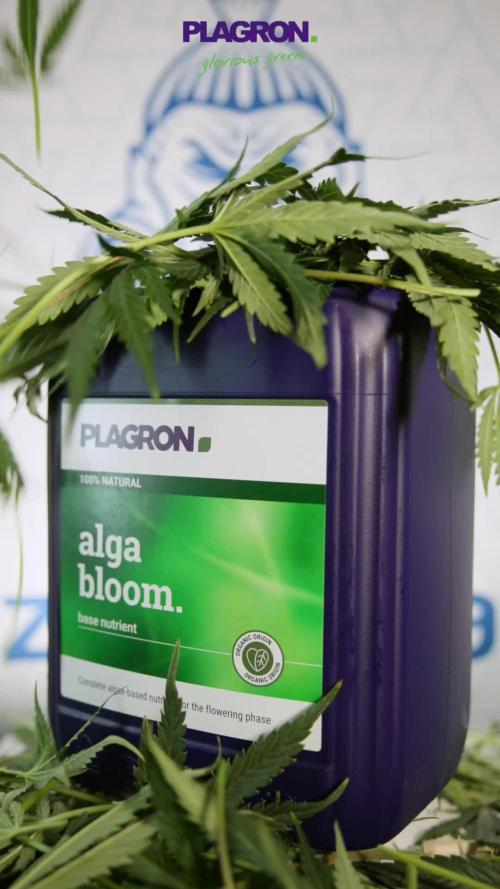
We're 100% organic and 1000% Plagron, as usual.
The soil we've chosen is the recently launched Plagron Bio LightMix, which will allow us to get off to a smoother and more reliable start, without the sudden changes that liquid fertilizers can cause. A week's worth is enough, so don't overdo it.
We're in the final flowering stage, and things are starting to get serious, so we're adding our legendary flowering stimulant and starting with Bloom.
- Pure Zym 1 ml/l
- Silic Rock 1 ml/l
- CalMag Pro 1 ml/l
- Sugar Royal 1 ml/l
- Power Buds 1 ml/l
- Green Sensation 1 ml/l
- Alga Bloom 3 ml/l (Slow when it is too much dark)
Choose your favorite style and calculate your results on the website:
www.plagron.com
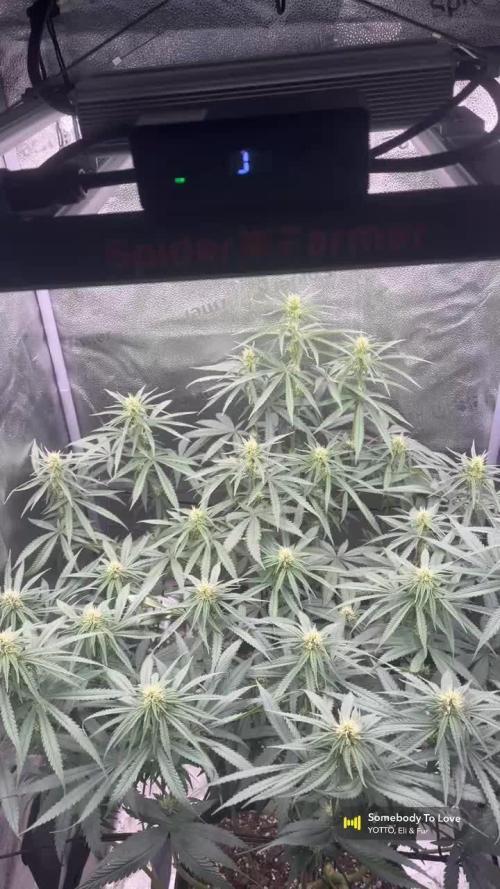
Our new 720W Spider King lamp from Vanguard Hydroponics is still dimmed to its lowest setting. Visit the new Growshop area on the Zamnesia website:
Z - https://www.zamnesia.io/it/531-growshop
A very good strain, not tall but very bushy! Try it!
Z - https://www.zamnesia.io/it/10967-zamnesia-seeds-tangerine-dream-automatic.html
Z - Are you looking for a strain with citrus aromas, uplifting effects, and a short life cycle? Tangerine Dream Auto meets all these requirements and more. Combining G13, Afghan, and ruderalis genetics, this strain is a faithful reproduction of the original feminized Tangerine Dream, but in a more compact and faster autoflowering version. With 60% sativa-dominant genetics and 21% THC, it produces a stimulating and creative cerebral effect with a relaxing physical sensation. Whether grown indoors, outdoors, or in a greenhouse, this autoflowering strain offers a one-way journey into the euphoric world of sativas.
The original Tangerine Dream is renowned for its striking appearance, vigor, and productivity. And Tangerine Dream Auto is no exception. Expertly bred to preserve the characteristics of its photoperiod cousin, Tangerine Dream Auto seeds produce tall, sturdy plants that quickly complete the vegetative phase, forming a dense canopy of healthy, green leaves. True to their sativa heritage, these plants tend to stretch once they begin flowering. However, Tangerine Dream Auto rarely exceeds 70cm, whether grown indoors or outdoors. Around 11 weeks after germination, these sturdy plants will be filled with long, bright green buds covered in orange hairs and glossy, milky resin. On average, Tangerine Dream Auto plants yield up to 500g/m² indoors and 300g/plant outdoors.
You know it, but I recommend it. Here you'll find many beautiful things, essentially "all the best nature has to offer."
Z - www.zamnesia.com
Music //
www.radionula.com
+ Feng Shui Music
+ Frequencies 432 Hz

Likes
6
Share


@FlowerBloom09
Follow
2 weeks now , I had some mold on my soil I scrapped out with a Spoon , I added more soil & everything seems Healthy! Also had mini fits but they are no longer with us

Likes
10
Share


@nonick123
Follow
🚀 4 clones de Blueberry Pie F1 Fast seleccionados por @stacksfarmz - https://www.instagram.com/stacksfarmz/
🚀 Breeding by @seedsmangenetics - https://www.seedsman.com/eu-en/blueberry-pie-f1-fast-feminised-seeds-sman-blpi-fast-fem
💦 BioTabs 15% DISCOUNT code "GDBT420" biotabs.nl/en/shop/ @biotabs_official
🌱Substrate PRO-MIX HP BACILLUS + MYCORRHIZAE @promixmitch @promixgrowers_unfiltered
💡2 x Mars Hydro FC1500 EVO Led Grow Light (2024 NEW FC 1500-EVO Samsung LM301H 150W LED) - https://marshydro.eu/products/fc1500-evo-led-grow-lights/ - https://www.amazon.de/dp/B0CSSGN5D8?ref=myi_title_dp


Likes
22
Share


@donovanliam
Follow
I have a new light with a bloom setting hopefully that will make a nice flowering. Got a new fan for air circulation. The new light has cooling fans. Haven't noticed any burns so im happy with my order. If you look at the last few pictures my tent is home made and cheap very cheap. The lights not an expensive one but I think its fine for now.
Processing
Likes
12
Share


@n00bs
Follow
Esta semana entra nuevo apoyo: un LED Quantum Board de 65 Watts. Sigue mismo ritmo de riego.


Likes
6
Share


@IQuSX
Follow
topman!
For so long there was no answer for weeks, because at the time when I could take pictures and write, ultraviolet worked - you should not interact with it without protection, and there it is +30 ... heat, even more so in clothes!
All the leaves were burned, but how the firebrands swelled !!! Flushing is over, today or tomorrow we will “cut down”.
I was glad to work on the bugs with this strain, it showed how cool and persistent it can be, it is the strongest in the box (unlike him, Amnesia and Tutankhamon did not cope with 2 hour UV and were “cut off” a week and a half earlier ).
After preparing the crop, I will give data on the wet and dry components! Thank you for your attention!
Further-more. (s)
Likes
15
Share

@Meisterwulle
Follow
Moin Leute,
die Woche ist einiges passiert, habe aus Platzmangel #2 aus dem Zelt entfernt und nach draußen gestellt. Sie macht sich aber prächtig und hat sich sehr schnell an die Wetterbedingungen gewöhnt und wächst fleißig weiter. Hab außerdem ein wenig den Dünger umgestellt, allerdings einfach aus logistischen Gründen :D
Die anderen beiden machen sich ebenfalls hervorragend und füllen den ganzen Platz im Zelt, habe die etwas höher wachsenden Triebe noch etwas angepasst - sieht man dann in den Bildern nächste Woche. Ansonsten keine Auffälligkeiten die Woche, läuft alles nach Plan 🏻
Gruß Wulle

Likes
69
Share

@nonick123
Follow
Día 80 (19/08) Riego 500 ml H2O pH 6,55
Día 81 (20/08) Riego 250 ml H2O pH 6,55
Día 82 (21/08) Riego 500 ml H2O pH 6,55
Día 83 (22/08) 💥Comienza la floración! 💥
No riego. Día nublado y de bajas temperaturas
Día 84 (23/08) Riego 500 ml H2O pH 6,55
Día 85 (24/08) No riego. Día nublado y de bajas temperaturas
Día 86 (25/08) Riego con 1 Litro de Té Floración de Lurpe Solutions. Preparación: 24 horas con bomba de aire (oxigenación) con ingredientes:
Healthy Harvest 8 ml/L + Insect Frass 16 ml/L + Hummus Lombriz 8 ml/L + Melaza 1 ml/L + Kelp Hidrolizado 0,25 g/L
💦Nutrients by Lurpe Solutions - www.lurpenaturalsolutions.com
🌱Substrate PRO-MIX HP BACILLUS + MYCORRHIZAE - www.pthorticulture.com/en/products/pro-mix-hp-biostimulant-plus-mycorrhizae
Likes
4
Share


@the_big_pink_place
Follow
Weeks going good, soon to be separating and starting to veg in there own tents. Today the day I'm updating is mid week and the growth from when I took those pictures are insane wait till next week's update. They monstered out on me.
Likes
11
Share


@tangie
Follow
Chopped her two days into week 14.
What else. Buds. There are a lot of them. And they are quite large. And they look like they will require little effort to trim.
What more can I wish for? I am a very happy man.
Upd 1: Trimming is SO SIMPLE! Not much sticking out to begin with, because of the amazing bud structure and me plucking most bud node fans. Solid nugs which are not bothered by anything, so pulling smaller sub-bud fans is very simple too, while the buds are what I would call moist. I'll call this Moist Trim 😄
✂️✂️✂️ Went for the best trimming tools available on the market (well at least my research concluded so) and LOVING every minute of trimming with the B-500SRF. Why would I or anyone else use something less suitable or less comfortable for such a delicate and long job is beyond me, except if you cannot afford one right now, in which case I wish you to experience it one day.
Fiskars are also very good in therms of the blades, coating and cutting ability and precision, but the spring is just too stiff, like way, way to stiff for something that is to be used for hours on end. One might argue that such spring force helps overcome resin buildup, but please just rinse your instrument regularly in an appropriate solvent (ethy, iso, whatever — consider you instrument materials as well) and wipe it after. Why would you let significant amounts of resin to accumulate on such a gentle and precise tool? Kinda defeats the purpose?


Likes
47
Share


@Ultraviolet
Follow
New week. 55-65 DLi. The dodecahedron is the only Platonic solid that has infinite numerical pathways. Might mean nothing to you yet, but its means infinity to me.


