




Processing
Likes
6
Share


@MG2009
Follow
08/16/2020
Just posting the picture of my seed to harvest plant on an 11-13 schedule. Will post pics of the others this evening. Pic #2 is 4days later. #2,#3,#4 are the other contestants I like #2
#2,#3,#4 are out side until? Light schedule is closer to flowering tent 11-13 schedule, I've noticed that they do not like any light irregularities and they will herm. So I recommend a equatorial light schedule that the breeder suggest.11-13.
Likes
11
Share


@VagueReaper
Follow
I'm very happy with how my plants turned out and can't wait to get going again. They're now hanging in my tent so hopefully dried and ready to trim by Christmas day at the latest.
I will update on weight when dried and on the smoke when cured.

Likes
141
Share


@bioaccessory
Follow
Наконец обрезал все лишние веерные листья, не меньше часа провозился. В результате я уже вижу, что часть будущего урожая оказалась под сеткой, да и сами растишки планировалсь выше где-то на 5-10см.(можно было позже на неделю-две переключить на цветение, и раньше перестать заправлять ветки под сетку, на будущее). Соответственно боковой досвет получился высоковато для таких компактных растений. Его можно легко поднять, а вот опускать под сетку я даже и не планировал - нужно разбирать всю конструкцию, оставлю как есть в этот раз.
"Красная" растишка зацвела на пару дней раньше, потому и тормознула раньше "желтой", и в результате теперь уже заметно ниже.
Однако то, что я вижу сейчас - очень даже обнадёживает, продолжаю колдовать.😎
Переключился на нижний обдув.
Спасибо, что заглянули, и будьте здоровы! 🙏
Продолжение следует ...😶

Likes
3
Share


@Bread_n_Buds
Follow
Our friends at Zamnesia are frenetically active in the search for innovation for their growers and here we have a strain that brings us a citrus that reminds us so much of my homeland Italy but also of the one that is hosting me Spain both great growers of mandarins and therefore Tangerine Dream.
If you only look at them a week ago it seems unbelievable, but when the plants start, they go.
In this diary you will find the plant worked with the techniques in this case the first topping was done, we cleaned everything else creating the Mainfold and we are going to work everything with the main lining. We are at the first topping and we have two mini branches growing.
The other one you can find in the diary next worked without the application of techniques that involve cuts to preserve its speed.
The comparison is the salt of the experience.
We have started the Plagron fertilization program, we are in 100% organic configuration, the soil is recycled Promix + 1/3 fresh soil + 10% Perlite + RQS Mycorrhiza Mix (4gr in the mix, 1 gr under the small fiber pot).
We are administering // 1 ml/l of Power Roots - 1 ml/l of Pure Zym - 1 ml/l of Sugar Royal - 3 ml/l of Alga Grow
I have doubts about the compatibility of Pure Zym with mycorrhizae. If in doubt, ask the experts, don't mix too much at random.
https://plagron.com/en
Doubts about Pure Zym / Mycorrhizae compatibility have been dispelled, they can go well together according to Plagron experts. If someone tells you that enzymes eat mycorrhizae, which in principle may seem possible, explain to them that it is not true.
https://www.royalqueenseeds.it/growing/452-easy-roots-mix-di-micorrhize.html
Taste this strain a little bit, it's a cross of legendary strains ---- // https://www.zamnesia.io/en/10966-zamnesia-seeds-tangerine-dream.html
Short Description Zamnesia // When legendary genetics are crossed, something exceptional can only be born. Tangerine Dream is the result of crossing classic strains. With citrus and sweet aromas and flavors, vigorous growth and euphoric and stimulating effects, Tangerine Dream by Zamnesia Seeds has it all. But don't take our word for it: order your seeds now and discover it for yourself.
You can find the whole world of growing on Zamnesia and much more, take a tour of the site and you will find "all the best that nature has to offer" in various shapes and colors.
The new strains are exceptional and the old ones are no less... p.s. for now zero Hermaphrodites, growers can you say the same?
---- // www.zamnesia.com

Likes
11
Share


@Paradox_1ste1
Follow
Plants looking healthy and they are starting to form strong buds by the looks of it . Some of them have startet to have brown leaves, but the bud looks healthy.
Ive put the lights from 600w to 400w since they are suffering from high light and temp. Now the temp should be 24°to 26°.
Likes
14
Share

@MrGrowDiarie
Follow
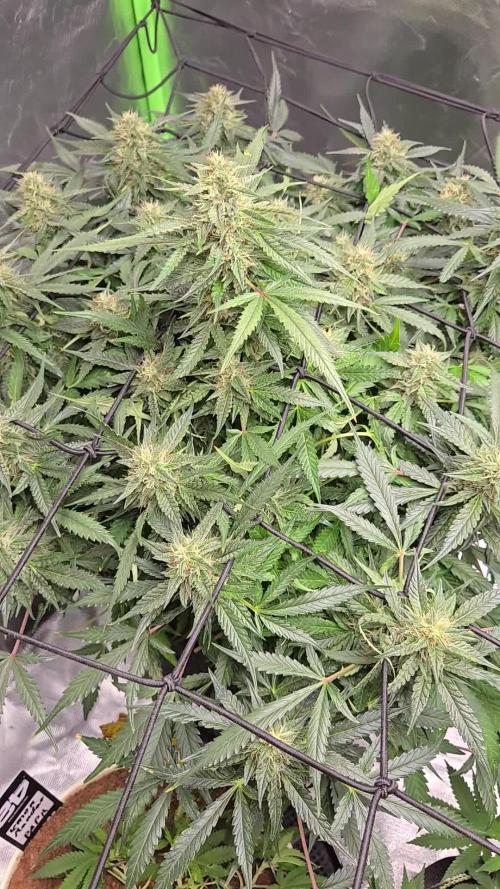
Day 56
The plant is looking very healthy and vigorous at this stage of flowering. The canopy is completely filled out under the SCROG net, and the structure is well maintained, allowing all the main colas to receive even light exposure. Bud development has really accelerated over the past week; the flowers are stacking nicely and the buds are noticeably denser than before. There is a visible increase in trichome production, with sugar leaves already showing a heavy coating of resin. The aroma is becoming stronger and more complex, with a noticeable sweet and earthy scent whenever the tent is opened.
The leaves are a deep green color, indicating that nutrient levels are well balanced at the moment. There are no visible signs of major deficiencies or toxicity, although some of the older fan leaves at the bottom are starting to fade slightly, which is normal for this stage of flowering. The plant appears to be focusing its energy on bud production rather than vegetative growth, which is exactly what I want right now. Pistils are still mostly white, but some are beginning to turn orange, which suggests the plant is approaching its final weeks


Likes
60
Share


@SooSan
Follow
12/12 + 151 jours
Vu qu’il y a 16 plantes mais que sur growdiaries on ne peut mettre que 8 variétés j'ai divisé en 2 diaries pour le bas de la tente
1️⃣
🏠 90x60x90
☀️ FC-E 4800 => puissance a 60%
🍁
Black Bomb / Philosopher Seed
Amnesia Lemon / PEV Seeds
Amnesia Lemon /PEV Seeds 35g
Blueberry / PEV Seeds = 17g
Blueberry / 00 Seeds = 17g
Wappa / Paradise Seed = 11g
Dark Phoenix / Green House Seed
Quick Sherbet / Exotic Seeds = 14,5
Mango Cream / Exotic Seeds 19,5g
Banana Frosting / Sensi Seed = 11g
Hindu Kush / Sensi Seed 10,5g
Mix 1 / Sweet Seed = 26,5g
Mix 2 / Sweet Seed = 15g
Mix 3 / Sweet Seed = 22,5g
Mix 4 / Sweet Seed = 14,5g
📎 https://growdiaries.com/diaries/122084-grow-journal-by-soosan
📎https://growdiaries.com/diaries/124052-grow-journal-by-soosan
2️⃣
🏠 30x60x50
☀️TS1000 => 100w = 54g
🍁
Quick Sherbet - Exotic Seed = 12g
Quick Sherbet - Exotic Seed = 12g
Quick Sherbet - Exotic Seed = 17,5g
Quick Sherbet - Exotic Seed = 12,5g
📎 https://growdiaries.com/diaries/122080-grow-journal-by-soosan


Likes
Comments
Share

@Olduffybastard88
Follow
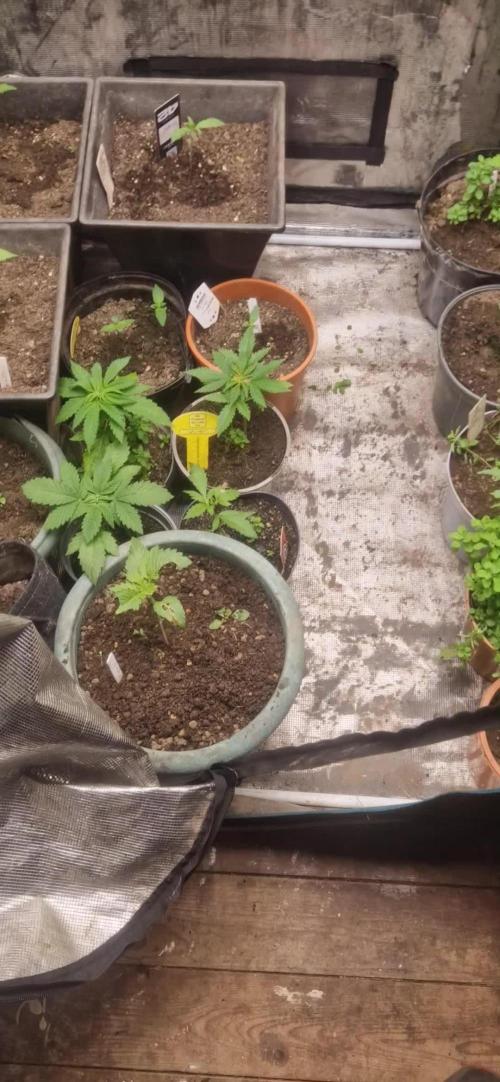
Moved half the girls in the tent kept the others in the greenhouse as I will be planting them outside and flowering these ones inside



Likes
8
Share


@Kawannabic
Follow
Todo correcto, crecen muy rápido. No parecen tener problemas de exceso de nutrientes por haber crecido en sustrato allmix.

Likes
15
Share


@XperencdGmanXG
Follow
had some left over fish shit tea brew from the veg run, so I gave it to the flowering girls right now, due to the brewing there are only low levels of N and lots of microbes. Worry about the microbes and the plants will uptake what they need, this philosophy seems to be working very well.
Likes
9
Share


@Headies
Follow
So this week after I gave it under nutrients I apparently gave it too much nitrogen while having a potassium deficiency. Shiney dark leaves, So i fixed that, but some didn't bounce back, and I tried nitrogen. I think they are doing pretty good considering everything I've put them through SO FAR. lol. Nutrients are NPK Raw's total lineup, follow their instructions at first, Fastbuds adjustments as of this week.
Likes
25
Share


@PrairieFrostGrow
Follow
*********Week 6 (Flower week) - January 14 to 20, 2020 (Days 36 to 42 from germination)
The week went by pretty quick and overall and started to show more positivity. She finally set her buds 👍 and has taken off with more growth😃.....stretching. Wrestled with the idea that she might be a photo rather than an auto, had that one before, and wanted to ensure she was not. Moved her into the veg tent and with the lower light intensity and temperature she seemed to relax and finally set her bud sites......she is an auto......so why the heck so long to flip? Genetic issue or normal growth pattern??? Again, happy to see the growth but she will not be a producer of quantity so hoping the quality will be there😯😕😯
Have done some further cleaning on the bottom and removed a couple of small growing nodes. The branches were tiny and I want to keep her focused on the thicker branches she already has. Introduced Massive this week for bud density. She has become tall and lanky over the last two weeks. Not at all the growth pattern I was expecting.......would have definitely bent her top over had I known she would go like this😩 Wondering if I should bend over SW2 or not now😕
Keeping wet and happy is a balance. She was good with 2L last week and by the end of the week now she wants close to 3L. I also bumped up the CalMag on one of the feedings a bit to help ensure she doesn’t show issues. Won’t be using CalMag much longer as we are getting later in flower.
Not sure how much longer to feed......will go another full 2 weeks for sure. I suspect she will run a full 10 weeks, then if allowing a 2 week flush you only go through week 8. Really don’t know what she is going to do at this point😕😕
Going to be interesting if her sister follows everything in the same manner.......she is in a 1 gal pot...downsides from 3 gal........live and learn Baby!!!👏👍
Little more detail:
Jan 14/20 - Day 36
- only given 1L of plain water, pH 6.1
- no nutrients.
- thinking she maybe a photo period......if so then I need to back up her medium to and end of veg state and get ready to run her in 12/12 to flip her.......had happen with a Dinafem pack before.
- that would suck.....another 7 weeks to go if she is.
Jan 15/20 - Day 37
- 2L water - Dual Fuel & CalMag @ 0.5ml/L - 450ppm & pH to 5.7
- She is now 18" tall!!!!! A little odd compared to other diaries for this strain??
- Side branches firming up but the low ones are still soft.
- Her Main stem is still soft as well.....more of what you expect in veg not flower......as a comparison.
- Nodes growth is still odd, some nodes have four fan leaves for example?
Jan 16/20 - Day 38
- 1L plain water only today.
- She did not drink a lot yesterday.
- SW1 & SW2 moved to veg tent under T5.
- ThinkIng I will shock them a bit and see what happens. If a photo she should calm down and show signs of new growth.....too many hairs popping but grasping at straws here.....if she is an auto she should form buds in a couple of days???
- Set the temp in the tent to 82 degrees and humidity to 55%.
- Moved light to 14” off top cola.
Jan 17/20 - Day 39
- Nothing given today. No water.....dry out day.
- She looked good this morning.....perky and happy
- Leaves opened up and exposed buds........give her another day or so.......she is an auto......just really slow consistently through all stages.
Jan 18/20 - Day 40
- 2L full feed plus 1L plain water added to reduce the ppm and not shock her.........740ppm and 6.1pH.......total watering 3L
- nothing in PM.....pot still wet.
- concerned about bud sites not getting enough light so moved her back into the flower tent in evening.
- replaced CO2 in tent.
- Very happy today and good growth with leave up.
- 22” tall and 24” wide..
Jan 19/20 - Day 41
- 3L feeding again today. Full strength again but added Piranha and Voodoo Juice at 2ml/L as well.....975 ppm 5.9 pH.
- full strength was 1275ppm so added plain water to bring down a bit.
- runoff: 1130 ppm and 5.7 pH.....Start bringing up the pH now to 6.1.
- Cut off two more low bud sites with tiny branches.
- Tied her down more now to help make her wider. Reached up to a couple of the higher nodes I had left alone previously.
- Seeing a Kush style long branches. She is now the tallest in the tent!
Jan 20/20 - Day 42
- Awesome night after stripping. She is taller again and looks happy, more vibrant!
- 2L plain water 6.2 pH in AM.
- 2L plain water Sensyzime @ 2ml, LW8 & Rezin @ 1.5ml = 75 ppm 5.9 pH. In PM.
- She seems happy. Filling out more on the side branching.
- Bud sites are getting larger but still small overall........if like everything else with girl.......just give her time......patience😩😩😃👌
Have a great week fellow growers.......

Likes
9
Share


@Jofflepov
Follow
Luscious growth. Good conditions. All but two plants are doing good. First flowering is visible.
Amazing stretches.


Likes
65
Share


@TheBudWhisperer
Follow
Background
Fingers crossed that these Spicy Bitch regs provide at least one male so that we can back build some stock of it. In the event that does take place we’ve got a single clone of each strain from the previous pollen chuck to sit in the tent with them so they can make babies for the next few months. The whole point of the last year was to start making some foundational genetics for a third generational cross we could call our own. If you’ve been following along than you’ll know that it’s been anything but easy. Our previous pollen picks didn’t pan out at all so we’re back to the drawing board with a new option from ExoticSeeds.
This’ll be a 10 plant run with 5 regs and 6 strains for pollination including the strain itself.
We’re running in a 2x4 MarsHydro grow tent all powered by a Mars Sp6500. That’s a little more than 600w packed into half the recommended footprint😳. Why? you ask - because we like our buds big and overcompensatory😂. Really, I’m just of the mind that we can pack more light into this space than recommended and get much better results. The math doesn’t lie. At least not as long as I wasn’t high when using the calculator again…..
Many thanks to @MarsHydroLED for the opportunity to test run the equipment👊.
In addition, we’ve also moved to a new nutrient system - Druid Nutrients out of the Netherlands. They don’t really have a presence on GD yet but you’ll be hearing about them very soon I’m sure. The beauty of this system is that it’s literally a 1 (one) component system for the entirety of the plants grow cycle. It really has changed the game in terms of ease of feeding and maintenance. It’s also very versatile and seems to provide everything needed across multiple different strains in the same ratios. Keep your eyes peeled for these folks. Pretty much a guarantee that they absolutely blow up once more people know about them👍👌😎.
Strain Background
Spicy Bitch: predominantly sativa, heavy yielder with a daytime kinda trip profile. It’s a cross of Queen Mother and a Pre-2000 AK47. We’ll pull what pollen we can and hope to have a female run out a larger supply of seed for the future.
Many thanks to @Exoticseeds for the chance to give these beans a go👍👊.
Pollination Strains:
Holy Surfer S1 - this is one of the focal points for this cycle. A fellow growmie was kind enough to ship over some S1 genetics I took an interest in. The only ask back was that if I did cross it to send a few his way for testing👍. Shoutout and cheers to @blendmedmedman. Hoping to have something back to ya in short order. For full details on this alluring hybrid option check my buddies link at seedfinder -
https://en.seedfinder.eu/strain-info/Holy_Surfer/Smiling_Tiger/
Northern Lights - this came from a particularly interesting batch of seeds that have shown a very dependable variegation trait. It’s a compact and squat plant requiring very little maintenance. Typical for the strain really. It’s been chosen as an option to potentially mellow out the high , shorten the stature of the resulting hybrid and inject it with some of that mellow indica effect.
Boogie Nights - total shot in the dark. Still haven’t even tried the strain myself yet but it was available at the right time and interesting enough to make a salad with. Big thanks to AMS who’ve been nothing short of an excellent seedbank to collaborate with. Expect similar growth characteristics to that of the Northern Lights. Better resilience however.
Blueberry - this particular clone is from extremely strong stock. Spliff seeds broke the mold with this strain. She’s lower maintenance than the NL, more resilient than anything else we’ve got on the menu and the terp. Profile on this girl is out of this world. If we can bring any of these qualities to the cross, then it could be magic👌.
White Widow - garrghh, I just can’t get away from this particular plant. Again, still haven’t even tested the buds yet and all I can say is that the growth characteristics are extremely vigorous and desirable. This plant is one of 3 unicorns that I have yet to tame due to a combo of extremely bad luck and circumstance.
All told, it’s still the same story: a VERY experimental breeding project designed to shotgun a broad swath of genetics against a reliable and dependable Breeder who’s put out proven fire 🔥🤟😎👍.


Likes
1
Share


@Growyourownathome2x2
Follow
Haven’t had a chance to post here lately but here’s some pics I’ve took over the last few weeks since I started training, it’s coming along nicely
