


Likes
Comments
Share

@xTaps
Follow
05.09.
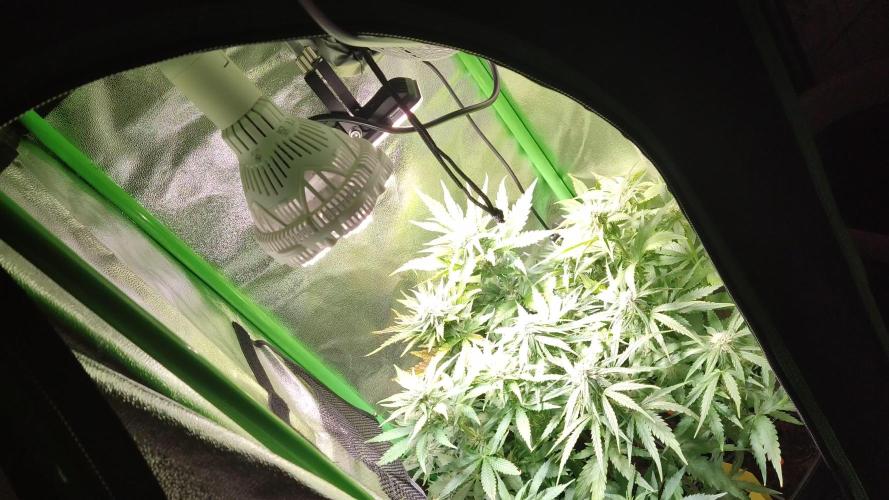
Dimmed one light to the half, they begin to smell lightly.
10.09.
Moved the Spiderfarmer Dehumidifer into the room, lowering the humidity from 80% down to 52%.


Likes
2
Share


@SSKNFbyHAZE
Follow
Hi Growmies~!
What This Post is About
Today, I'll be recording how to cultivate soil microbes at home.
These microbes offer numerous benefits, and they are simple to make.
How I Came Up with This Technique
Since 2014, I’ve tried synthetic growing methods like DWC. While they gave quick results, I often ran into issues with consistency.
Nutrients would expire during breaks, meaning I had to keep buying new bottles.
I strongly felt I needed a change.
A couple of years ago, after taking a break, I started to research and switched to organic growing.
At first, it felt overwhelming with all the steps and prep work, but I saw real potential.
After experimenting with different methods, I came across Korean Natural Farming (KNF) and JADAM, introduced by Mr. Cho.
His simple, ultra low-cost techniques inspired me. They focus on letting nature do the work.
While growing,
I noticed that synthetic nutrient bottles were expensive, especially when trying to complete a full nutrient set.
Organic growing may require more attention and can be costly when investing in organic materials.
Preparing the soil in advance and top dressing with dry nutrients every other week - just these two methods were consuming space, time, and money.
Indoor farming is unnatural, while organic farming is a natural approach.
I had to bring these ideas together, but organic farming often seems geared toward large plots like farms.
Incorporating organic techniques into my indoor garden requires a lot of effort and careful calculations.
So this is one of my techniques for keeping my plants happy:
supporting their daily needs helps them snap out of deficiencies quickly, allowing them to grow consistently.
It took me a while to adapt this technique for indoor use.
I hope this helps, guys!
Supplies Needed
- Potatoes: Provide nutrients and food for the microbes.
- Sea Salt: Stimulates microbial activity and controls harmful organisms.
- Dechlorinated Water: Allows the microbes to grow and multiply.
- Compost, leaf mold, or worm castings: Contains natural microorganisms that are key for this process.
How to Make (1 gallon)
1 cooked potato (about 2 golf ball-sized)
1 pinch of sea salt
2 tablespoons compost or worm castings
1 gallon dechlorinated water
1. Mix Ingredients: In a clean container, fill it with the dechlorinated water, dissolve the sea salt, and add the compost along with the mashed potato.
2. Ferment: Optionally cover the container and let it sit at room temperature for 24-48 hours.
3. Strain (Optional): After fermentation, you can strain the solution if you prefer a clearer liquid.
Note: Watch the timelapse video to see how the microbes activate!
**WARNING**
Wear gloves if possible and/or avoid contact with open wounds
How to Use
IMPORTANT: Always dilute the solution before applying it to plants.
- Use when bubbles form a "pizza shape" on the surface.
- Dilute 5-10 ml per liter of water for bi-weekly feeding. (Test a small batch first to find the best rate for your setup.)
- Once the bubbles disappear, the microbes are likely inactive. You can either mix the rest with water as fertilizer or discard it.
Pros
Promotes Plant Growth
- Usually fixes deficiencies in as little as 6 to 72 hours.
- Improves nutrient absorption, and helps plants thrive.
Boosts Plant Immunity
- Works as IPM: Can be used as foliar sprays (no staining on leaves).
- Lowers the risk of powdery mildew and other diseases.
- Helps the soil ecosystem with beneficial organisms like predatory mites and springtails.
- Naturally reduces pest pressure (Less risk of fungus gnats and other pests).
Improves Soil Health & Supports Composting
- Quickly breaks down organic matter and nutrients.
- Makes growing organically in small containers, like 1-gallon pots, easy.
- Over time, soil becomes softer and richer, even in small pots.
Cost-Effective, Sustainable & Eco-Friendly
- No need for complex equipment like pH pens, air pumps, or other tools.
- Reduces the need for CalMag, N-P-K, or micronutrient supplements (just add a little bit of sea salt to every watering).
- No sugar sources needed in the soil.
- Works for all types of plants—houseplants, exotics, ornamentals, and crops.
Cons
- Limited shelf life; the solution will develop an unpleasant odor after a certain period.
1 Corinthians 10:26


Likes
112
Share


@Tropicannibis_Todd
Follow
Alright Then
We just hit week 2 and all is well , have to admit she tricked me by perhaps topping herself which stunted her I think ,still good Growth in just 14 days😃 .......
So this little sprout is tuff but I screwed up and placed in a bad spot and it got HEAT STRESSED😭 Fixed problem so should see it bounce back within a few days.......👍
Very little water given ,so far and rain water to be used entire growth
Lights being readjusted and chart updated .........👍
👉I WISH GD HAD DISCORD SERVER SO GROWMIES COULD HAVE A PLACE TO HELP AND TALK THINGS RELATED TO GROWING IN REAL TIME .....👈
👉SO I CREATED ONE ALL YOU NEED IS TO JOIN THE GROWDIARIES DISCORD SERVER !!!!!!!!!!!👈
LINK IS 👉
https://discord.gg/zQmTHkbejs
AND SEE HOW IT PLAYS OUT !!!!!!!

Likes
10
Share


@asstonmartian
Follow
Ok so I put a significant amount of time into this grow. Learned a ton (everything lol) as it was my first. After the final week, I decided to harvest when the trichs were milky and clear. Few amber here and there but time constraints meant I had to chop a bit earlier than I’d have preferred.
I do prefer a more uplifting cerebral effect yet realize with an indica leaning strain, having all cloudy and maybe 25% amber would have been 👌🏼.
My drying process began by chopping a plant at a time, I washed the buds to get the PM or traces off (also grime from outdoor city air). I used a big bucket and did hydrogen peroxide. In heindsight I would have used baking soda as well and did a two step wash.
After washing them, I hung to dry with a fan until they stopped dripping then into the tent they went for drying at roughly 68 degrees and 55% humidity.
I staggered the harvest and wet trimmed about 70% of the time with the latter 30% dry trimmed. This was done for convenience and to try both ways.
I dried everything for about 12-13 days until the smallest stems snapped and the larger ones were borderline cracking. I started jarring everything with humidity meters, about a half oz per smaller widemiuth jam jar.
The smell was never hay-like but did vary in strength and scent from plant to plant. Almost no seeds which was pretty great to see. One of the outdoor plants had quite a few seeds so I kept that separate. It ironically had the stinkiest floral smell.
So what’s the total!! After curing in jars for about a month, I weighted everything and came out with 10.5oz of cured trimmed flower and about 2 oz of sugar leaf trim which I am making canna butter with and cooking. Made some reduculously strong cookies: 11 cookies from about 10 grams of trim. Ate two and was medicated for about 24hrs 😂.
Some of the buds were super dense and cured down to 58 RH easily. There were a few of the large big buds that had mass but less density and fewer trichomes. These were more red-hair visually than the others.
The smoke: surprisingly smooth. The effect is energizing and uplifting at first, with a nice sedative body feeling on the second half of things.
Overall, I’m super happy with the result. Learned a TON and will be modifying my approach a bit next go-around this spring. Stay tuned!!!
Processing
Likes
19
Share


@ElMetitor
Follow
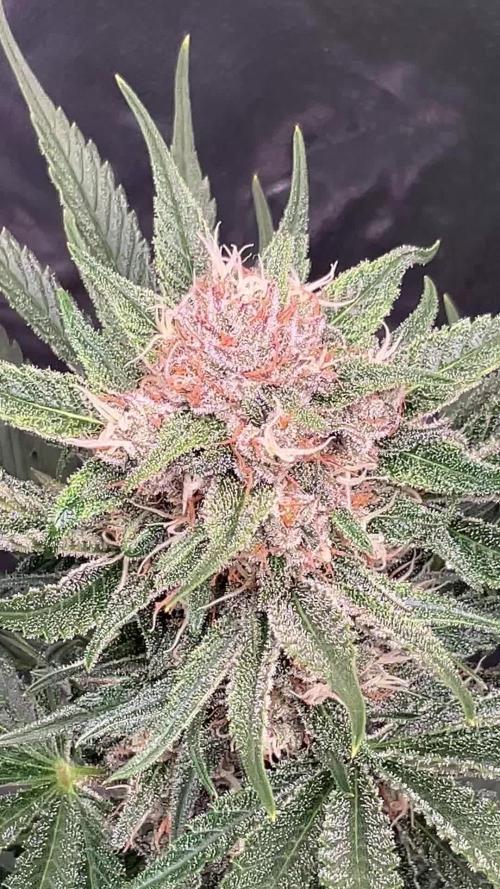
We are doing very well, this Indica has developed a lot of internodes, I expect big dense buds of flowers, the structure has become robust, with large and thick palmate leaves, the plant has a bushy structure, has stopped growing in height and is standing. proceeding to grow the flowers in width, I really like the purple that you see a little everywhere, the leaves at the base are starting to die as it should, even the vase has taken a certain weight, the climate is still a lot hot no rain, but at least there's a bit of wind all the time, I feed the plant with 1078 PPM, and 3 L of water a day, overall I am very satisfied with Ayuaska purple is vigorous and vital, a nice Indica. I eliminated some black insects that I discovered to be harmful, luckily I caught them all in a group as soon as they came out of the eggs, it was easy to exterminate them, I also administered the mycorizia to the ground (which I do every 6 weeks) to avoid mold and diseases .💪


Likes
19
Share


@Weedosaurus
Follow
Way bigger than expected.
The buds got very large by the end of flowering.
The smell is strong and delicious, the buds looks dense and are heavy.
Will update when dry.
Update 1 : I put 1/3 of the harvest into a water curing cycle. Five days changing water every day.
First time I tried, the water was clearly taking something out of the plant not sure what by now.
Made it dry yesterday all the water is gone already and now its about being really dry before storing it.
Likes
26
Share


@Growin_it
Follow
Defoliation on lower branches to improve air flow and future larf.
Going into 12/12 for flowering, next week.


Processing
Likes
142
Share


@MadeInGermany
Follow
Hey everyone :-)
This week it smells more and more sweet and fruity in the whole room 😍.
There is actually not much to report, everyone is now under 12/12 :-).
This is the last grow that comes in the entire diary.
From now on, each plant will be added to the diary 👍.
I wish you all a lot of fun watching, stay healthy 🙏🏻 and let it grow 😎👌


Likes
14
Share


@Tried_and_Tested
Follow
Another steady week of bud development. I haven't really done much with those apart from the occasional removal of yellow leaves and tucking nuisance leaves under the net.
The plants are all still growing in line with the previous expectations, with Topping and LST being the biggest, Mainlined next and then LST only in last place. It will be interesting to see the results though.
Should only be a few more weeks until harvest, as a large majority of trichomes are already milky.

Processing
Likes
14
Share


@Canadian
Follow
This girl is turning out to be a very impressive Beast exotic colours and her smell at fruitiness with a air of skunk it's quite remarkable there's really not much to say about her except that she's cruising through at great speed and looking like she is on steroids remarkable genetics from sweet seeds.
From now on I don't think I'm going to be able to take her out of the tent because those huge branches are filling up with big heavy flowers . One interesting note about this girl is that she does not drink that much water and does not require much nutrients looking forward to see this girl finish thank you for reading I will continue to update have a happy grow
Likes
20
Share


@CzAlmighty
Follow
Best flower 🔝
Strong flower. I love qualitty of HSO.
everyone recommend This strain. 💚
Thank for watch. ✌️🏼🔝🔝🔝


Likes
81
Share


@SlowpokeFuegobud
Follow
Hello my wee little blueberry lovers! ❤️
Week 2 has started and me smoking Blueberry Muffin is coming closer and closer! 😎
DAY 9
Watered for the first time 💧
DAY 11
Watered with nematodes 🐛 just 100ml of water each plant because the soil was still damp.
Thanks @Green_Buzz_Nutrients for sponsoring my grow, those products really do their job! 💚 If you want to give them a try, there's a generous discount code in my setup description. ⬇️
_______________________________________________________________________________________
BLUEBERRY MUFFIN CANNABIS SEEDS
SIGNATURE STRAIN
INDICA DOMINANT | SWEET STRONG BLUEBERRY SCENT | ENERGIZING | F9 DOUBLE BREEDING LINE FOR HYBRID VIGOR
BLUEBERRIES | MUFFINS | CHAMOMILE
Blueberry Muffin is a company favorite. This seed produces plants that grow uniformly and produce frosty colas highlighted with purple flakes. The buds smell powerfully like fresh baked blueberry muffins, making the name of this strain a piece of… muffin. EMERALD CUP 2017 6TH PLACE!
CANNABIS STRAIN BENEFITS
Available: Reg, Fem
Parentals: Razzleberry x Purple Panty Dropper
Ind / Sat: Indica
Photoperiodic Flowering: 45 Days, Sept.15th-Oct.10th
Flavor / Taste / Smell: Blueberries, Muffins, Chamomile
Effect: Energizing
%THC: 20-28%
Characteristics: Epic Terps, Consistent Yield
https://humboldtseedcompany.com/blueberry-muffin/
________________________________________________________________________
Setup:
140x70x200 cm Spiderfarmer tent
2x Monkey 16W fans (not oscillating)
1x Secret Jardin 30W
1x box fan 50W oscillating (on lowest level)
LED
Full Spectrum 320W AGLEX AGL-320W-MA
5,6 kg
foldable, dimmable
864 pieces Samsung LH301H
864umol/s
2,7umol/J
full spectrum white + RED 660nm + IR 740nm
wavelength range 380-780nm
covering 3x4ft
Green Buzz Nutrients https://greenbuzzliquids.com/
❗ Use code GD42025 for generous 25% discount (for orders of minimum 75€)
Biobizz Lightmix + coco + wormcastings + perlite
Carbon Active Granulate Filter 125/360 cm³/h
PrimaKlima exhaust EC 125-400/240 cm³/h

Likes
10
Share


@Stacy_smokez
Follow
Going well did some defoliating and going to do some more also added to my grows as well deffiecies still present need a ph pen to check everything may switch nutrients next grow as well

Likes
37
Share


@Wrongholn519
Follow
First and foremost.. .
I apologize on the tardiness of my diaries. I came down with Covid 2 weeks ago and it really put me down for a little bit. I'm finally feeling a bit more like myself and am spending more time in my garden again.
In my last journal I was talking about the different mutations I had with both these ladies from the germination stage. After doing some research I found out that the blackberry auto is actually a triploid mutation and I'm glad I kept her.. she's looking amazing despite a slight nitrogen toxicity... maybe the soil was a little hot for the blackberry auto compared to the other pheno's I'm growing. The blackberry auto is well into flower and looking great. I'm going to continue to strip as much vegetation off her as possible and lollipop upwards through flower.
There's not much I want to say about the Forbidden Runtz auto. She was a twin mutation and she has been stunted from day 1. She has grown lanky and thin, but I'm hoping to get some bud to press as soon as I harvest. She currently is looking a little stressed out, I've been feeding her at various pH and E.C. ranges just to see what happens. Please note the curling of the oldest fan leaves.
Likes
4
Share


@Willy_Balls
Follow
I was dealing with weird tacoing of leaf tips. Never had it before. Also the tips were light green. I think it was a bit of shock when changing light spectrum. Although the intensity was pretty low. Lamp was set only on 250w for a 5x5 space. Maybe it was a bit too low.
I think the issue resolved itself in acouple of days and after switching to 12/12 . DLI dropped and plants recovered fast. They seem to grow beautifully now.


