


Likes
Comments
Share

@DogDoctorOfficial
Follow
Super Silver Haze (Zamnesia Seeds) – Flower Week 4
📖 Quick Recap – From Seed to Week 4 Flower
• Week 1 Flower: Transition was smooth—plants showed pistils almost immediately, adapting well to the flip. Stable structure, great color, and strong roots already visible.
• Week 2 Flower: Morphology shifted fast—nodes stacking, pistils multiplying. Feeding recipe adjusted: removed Start Booster, added Top Booster (0.25 ml/L), plus Plagron Power Buds, Sugar Royal, and Green Sensation. Plants handled higher temps like champions.
• Week 3 Flower: Light defoliation done to open airflow and light penetration. Both phenos look like twins, compact, about 120 cm tall, hybrid-style leaves, strong root systems, and steady bud formation. VPD slightly high (~1.37 kPa), but plants remained stress-free.
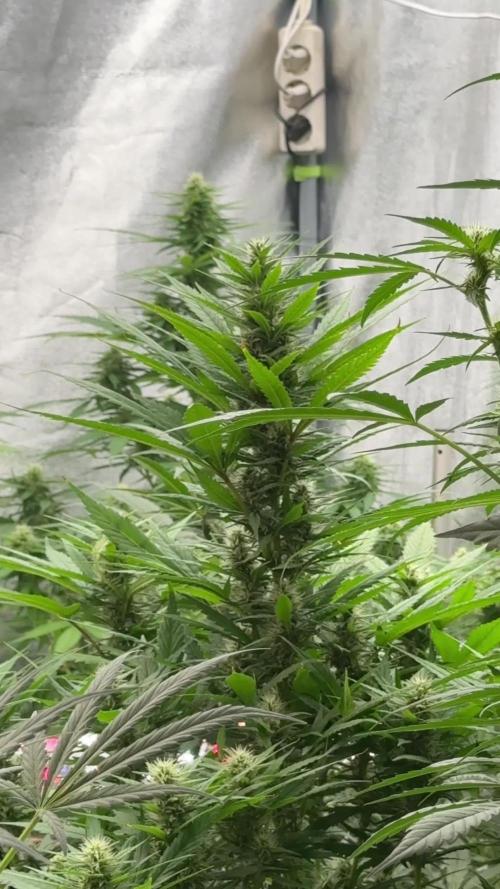
• Week 4 Flower (current): Buds are swelling, pistils thick and beautiful, leaves lush and symmetrical. Feeding recipe simplified—no All-In-One Liquid or Top Booster. Soil provides NPK; boosters fine-tune flower development, aroma, and resin potential.
Week 4 Flower – Super Silver Haze (Zamnesia Seeds)
Grower: Dog Doctor
Strain: Super Silver Haze
Breeder: Zamnesia Seeds
Phenotypes: SSH #1 & SSH #2
Stage: Flower – Week 4
Pots/Medium: 11L fabric pots, custom super soil with Aptus amendments
Watering: Hand watering (guided by substrate moisture)
Tent: 8×8 shared environment
Control: TrolMaster Hydro-X + Tent-X, WCS substrate sensors
Lighting: Future Of Grow Black Series 600W + ThinkGrow ICL-300 (x2) + Lumatek Zeus Compact Pro 465W
Climate this week: ~29–30 °C, RH 60–65%, VPD ~1.3–1.4 kPa, CO₂ ~700 ppm
⸻
Snapshot of the Week
Week 4 marks the true turning point in flower. Both SSH girls are thriving, healthy, vigorous, and balanced like twins. Their bud sites are swelling, white pistils are thick and abundant, and the morphology shows textbook hybrid traits: broad yet elegant leaves, dense node spacing, and compact stacking.
What’s especially impressive:
• Consistency: Both phenos remain very similar in form and pace.
• Bud set: Flowers are already defined and filling out evenly across the canopy.
• Health: Zero stress from previous light defol, strong root expansion, and steady nutrient uptake.
⸻
Feeding Strategy – Why We Adjusted
This week we removed Aptus All-In-One Liquid and Aptus Top Booster. Here’s why:
• The super soil recipe prepared earlier already contains a strong base of NPK from pellets and amendments. At this stage, overfeeding could disrupt balance or push excess salts.
• Instead, we’re focusing on boosters and stimulants to enhance flower initiation, resin metabolism, and plant resilience.
Current Mix (per liter):
• Aptus Regulator (0.15 ml) → Improves nutrient uptake, strengthens tissue, boosts stress tolerance.
• Aptus CalMag Boost (0.25 ml) → Keeps structural integrity high under intense light and CO₂ conditions.
• Plagron Power Buds (1 ml) → Stimulates rapid floral development and tighter bud formation.
• Plagron Sugar Royal (1 ml) → Biostimulant that enhances secondary metabolism, terpenes, and resin potential.
• Plagron Green Sensation (1 ml) → Complete flowering stimulator, focusing on density, aroma, and taste.
Why this recipe works now: The soil provides the “meal,” while the boosters are the “spices.” We’re enhancing flavor, weight, and resilience without overwhelming the root zone.
⸻
Environmental Dynamics
• Temperature: Still on the warm side (~29–30 °C), but stable. The incoming AC will soon help bring conditions closer to optimal.
• Humidity: RH floats around 60–65%. At this flower stage, still acceptable, but we’re monitoring carefully to avoid mold risks as flowers thicken.
• VPD: ~1.3–1.4 kPa. This is within a healthy mid-flower range—enough transpiration to drive nutrient uptake without locking stomata.
• CO₂: ~700 ppm. Boosting photosynthesis and energy flow under high-intensity LEDs.
Why this matters now: Flowering metabolism is extremely demanding—sugars, nutrients, and water must all move efficiently. Stable VPD, good airflow, and consistent irrigation ensure every part of the canopy stays productive.
⸻
Gear Check – Shoutouts
• Lighting: The F.O.G. Black Series 600W, ThinkGrow ICL-300s, and Lumatek Zeus Compact Pro 465W are delivering a rich, full-spectrum spread with great canopy penetration. This balanced array ensures bud development isn’t just on top colas but throughout the plant.
• Control & Monitoring: The TrolMaster Hydro-X + Tent-X system, coupled with WCS substrate sensors, allows precise irrigation based on actual root-zone moisture, EC, and temperature. This data-driven approach prevents over- or under-watering, keeps the medium stable, and maximizes nutrient efficiency.
• Airflow & Filtration: Dual 6” extractors with carbon filters maintain fresh air exchange while neutralizing odors. Clean air is not just about smell control—it’s about disease prevention and consistent CO₂ delivery.
⸻
Education Corner – What Week 4 Flower Means
At this stage, the plant is fully committed to flowering.
• What to expect now:
• Steady bud swelling, with white pistils covering all main sites.
• A slight increase in daily water consumption.
• Noticeable aroma starting to form—terpenes are building.
• What NOT to expect yet:
• No heavy trichome coverage—resin glands usually start to pop in weeks 5–6.
• No “final bulk”—density and mass pack on in late flower (weeks 6–8+).
⸻
Looking Ahead to Week 5
• Bud Bulk: Expect pistils to continue exploding as flowers begin their first swelling cycle.
• Trichomes: Resin production will soon kick in, expect frost to start appearing.
• Environment: With AC in place, temps should drop into the mid-20s °C, and VPD will fall closer to the “sweet spot” for dense flowers and reduced disease pressure.
• Defol Touch-ups: Another light defoliation may be needed around week 5–6 to open up bud sites deeper in the canopy.
⸻
Final Thoughts This Week
The Super Silver Haze legacy is shining through, these phenos are vigorous, symmetrical, and stable, a perfect balance of old-school genetics and modern growing science.
Big thanks to Zamnesia Seeds for representing this classic. It’s a privilege to watch her take shape week by week.
To the community: thank you for sharing this journey. Whether you’re a grower, a learner, or just a lover of the plant, every comment, every message, every piece of shared knowledge makes this all worthwhile.
Onward to Week 5—where the magic starts to sparkle.
📲 Don’t forget to Subscribe and follow me on Instagram and YouTube @DogDoctorOfficial for exclusive content, real-time updates, and behind-the-scenes magic. We’ve got so much more coming, including transplanting and all the amazing techniques that go along with it. You won’t want to miss it.
• GrowDiaries Journal: https://growdiaries.com/grower/dogdoctorofficial • Instagram: https://www.instagram.com/dogdoctorofficial/
• YouTube: https://www.youtube.com/@dogdoctorofficial
There’s a new series blooming and it’s more than just plants. It’s about process, patience, and paying attention.
⸻
Explore the Gear that Powers My Grow
If you’re curious about the tech I’m using, check out these links:
• Genetics, gear, nutrients, and more – Zamnesia: https://www.zamnesia.com/
• Environmental control & automation – TrolMaster: https://www.trolmaster.eu/
• Advanced LED lighting – Future of Grow: https://www.futureofgrow.com/
• Root and growth nutrition – Aptus Holland: https://aptus-holland.com/
• Nutrient systems & boosters – Plagron: https://plagron.com/en/
• Soil & substrate excellence – PRO-MIX BX: https://www.pthorticulture.com/en-us/products/pro-mix-bx-mycorrhizae
• Curing and storage – Grove Bags: https://grovebags.com/
⸻
We’ve got much more coming as we move through the grow cycles. Trust me, you won’t want to miss the next steps, let’s push the boundaries of indoor horticulture together!
As always, this is shared for educational purposes, aiming to spread understanding and appreciation for this plant. Let’s celebrate it responsibly and continue to learn and grow together.
With true love comes happiness. Always believe in yourself, and always do things expecting nothing and with an open heart. Be a giver, and the universe will give back in ways you could never imagine.
💚 Growers love to all 💚

Likes
2
Share


@DigiDom
Follow
She seems to doing well but I'm curious to see what will happen if I keep trimming her to shape her. Instead of having to lollipop later in the grow.

Likes
8
Share


@GrowingABushWithButch
Follow
It's Day 54 Week 08 0f Flower For My 02 Kombucha Cream by atlasseed . And For My Snow White and SpliffStrawberry by Spliff Seeds Amsterdam . So Today I Started My Day By Checking My Tricomes On My 2 Kombucha Cream. The 02 Where Looking Fully Milky So My 02 Kombucha Cream Got Flushed TODAY with Some Flawless Finish by Advanced Nutrients . The 2 Received 80ml of Flawless Finish mix with 1OGallons Of Water Ph at 6.0. Tomorrow they will get Rinse off with ph balance water. Yesterday I watered my Snow White and SpliffStrawberry Ppm where down to 100ppm. All 4 Plants will get a nice ice bath in a few days. My plan is to check the Tricomes on the SpliffStrawberry In a few more days she was still Milky when I check her yesterday. I will chop her down next weekend. And the rest will get the chop at 30%Amber Tricomes.
Happy Growing Growmies 🤘🏻








Likes
4
Share


@Momentum
Follow
wurde extra für uns geschnitten, und jetzt nach 2 Wochen Wartezeit ist er endlich da. Wirkt noch zerknautscht, aber das bessert sich die Tage. Auf geht's!
(Wir sind übrigens wieder im unauffälligen 40x40x70cm von EazyGreens.)


Likes
18
Share


@biggreens420
Follow
hey guys here with the new release from fastbuds thanks to those guys for the testers . Will be starting as usual in coco ecothrive to be precise pictured above with a pinch of mykos mixed in. To germinate I always make a hole with my little finger to the first knuckle drop the seed in and cover , water very slowly around the edge of the pot until you get runoff like the video shown . Then i put them on a plastic or paper plate onto the heatmat (not directly on it as it dries the media too quick) in a dark place and the longest iv had to wait is 4 days after that as soon as they break the coco I put them under a small 12w led/cfl light (pictured above) 6500k at around 15 cm as this helps build a good root sytem ready for transplant will be on no nutes this week will start on plant start and katana roots next week at this point i have no fan running just the light will add a fan to sturdy her next week. will only get one maybe 2 very small waterings this week depending on how quick the media dries thanks for reading happy growing guys

Likes
47
Share


@420DeepGrow
Follow
Sorprendido por la noticia de mi primera colaboracion con MarsHydro 😊🙏 y muy sorprendido tambien por el envio de las semillas por parte de 420FastBuds.
La marca numero uno en focos 💡, carpas de cultivo ⛺️, extractores 🌬️ y demás aparatos que necesitas para tu cultivo.
Para esta aventura arrancaremos con 💡Mars Hydro TS 1000 Full Spectrum LED Grow Light 150W Regulable y 1 semilla autofloreciente a un ciclo de 20/4.
Verdaderos 150w con este TS1000, la mejor luz de cultivo LED para principiantes.
Ofrece una luz adecuada para 2-4 plantas 🌱. Su precio razonable, la marcada mejora del rendimiento y el control variable de la producción la hacen amigable para los nuevos cultivadores. Todo un tesoro para cualquier cultivador que este comenzando.
Usaremos para esta aventura una carpa de 60x60x90, MarsHydro una carpa para los más exigentes.Con una solapa de cremallera mejorada, dobles cremalleras de metal con forro,reflectante diamante tipo Mylar, postes de metal para una estructura mas solida, no se puede pedir nada mas.
Garantizando una respuesta en solo 24 horas tanto si has usado antes la marca como si no.
Que decir de 420FastBuds, uno de los mejores bancos de semillas a nivel muendial. Si quieres una Auto de verdad, esta es tu cepa.
Wedding Glue auto:
Perfecta para concentrados.
Una enorme cantidad de resina la hace ideal para aquellos que buscan los mayores rendimientos en extracciones.
Auto súper productiva. ¡Esta variedad puede producir hasta 550gr/m2 en 70 días!
¡Entre las más fuertes del 2022! Una autofloreciente potente con un 26% de THC.
Terpenos ideales para los golosos. Un delicioso sabor a vainilla dulce que te deja la boca agua.
Perfectamente equilibrado. Un efecto bien equilibrado adecuado para uso diurno y nocturno.
💡 MarsHydro TS1000:
https://www.amazon.com/gp/product/B07PLY1WKK
⛺️ 60 x 60 x 90 MarsHydro:
https://www.amazon.com/dp/B081PN2QDN/
🌻 Wedding Glue Auto:
https://2fast4buds.com/es/seeds/wedding-glue-auto
Tercera semana de floracion, es increíblemente rapida, MarsHydro hace buen trabajo también, estoy muy sorprendido y no se si se va a salir del armario 💪
Solo le aqplique en la estapa de crecimiento agua con un PH6.5 y humus de lombriz.
Necesito subir las dosis de nutrientes porque ella requiere comida.
📅 Dia 36: Descanso
📅 Dia 37: Riego con nutrientes EC 1000
📅 Dia 38: Riego con nutrientes EC 1000
📅 Dia 39: Descanso
📅 Dia 40: Riego con nutrientes EC 950
📅 Dia 41: Descanso, es un planta que come mucho, la que mas de todas las auto hasta ahora.
📅 Dia 42: Riego con nutrientes EC 850
Likes
31
Share


@Mrs_Larimar
Follow
2024-04-25
the ove to the other Roo with stronger Light, pushed her massive,
so i have to transplant them into bigger Pots.
they have alittle N defiency, but soon its history, because they get 10l ore Soil now.
BREEDER INFO
Tangerine Snow F1 Fast Feminised is a 75% sativa, four-way cross of (Boost x Tangelo) with (Lavender x Power Plant).
This Fast F1 hybrid is bred from Cali genetics and boasts great citrus terps, high resin production for extracts,
high levels of THC, very good yields and excellent mould resistance.
Tangerine Snow F1 Fast can be grown indoors as well as outdoors. Indoor flowering times are between 8 - 10 weeks
while harvest time in northern latitudes is during September while in the southern hemisphere growers will be harvesting during March.
Recommended climate regions are hot, dry, humid and warm. These are tall, semi-branched plants that grow in excess of 200cm
and display a high degree of vigour with very good uniformity.
In common with many other heavily sativa-dominant strains, Tangerine Snow F1 Fast offers excellent resistance to mould
as well as to plant pests and diseases. The combination of citrus terps and plenty of resin makes thi
a very good extract strain with the 'washing' method delivering very good yields of hash.
The citrus terpene profile is reminiscent of mandarins and tangerines and also has sweet candy notes.
THC production has been lab-verified at a strong 24% while CBD is low. The effect is uplifting and energising,
perfect for use during the day and early evening.

Likes
34
Share


@LockDownGrow
Follow
well the C1 is coming along very nicely , i managed too bend over the top stem using trainer wire ,
This week I had too change my lighting too 600 true watts of kingbo dual optical LED range due too the temps getting closer too 30c than I would like , and by doing so I have now got a constant temp of 27c lights on and 18c lights out
Update day 5 week 3
Well as you can see from the pics this week has had alot of growth and even showing signs of pre flower and it drinking alittle more than the others
Update ,
Day 6 of week 3 this lady is well into pre flower now the growth tip formation is looking like early flowers and I wouldn't expect her too grow leaves now ,
Really cannot fault these kingbo led lights they produce large plants in a short space of time and gives nice thick and dense buds ,

Likes
105
Share


@BioBuds
Follow
One was more bushy and was a little behind. As I said, they had some heat stress and I think the 15-liter pots are too small when the environment is hotter.
Still, they are totally worth growing and joy to smoke. They don't need much curing and the weed is very very strong.
Going to try this strain again very soon!!
Processing
Likes
18
Share


@Barcelona_Farmers710
Follow
Esta semana apesar de tener temp Máxima de 28... se va recuperando bien de las podas, el led de TodoGrowled funciona perfectamente para sus 55w farmers!🍁

Likes
5
Share

@Imatail
Follow
✅ Wedding Cake Auto – Final Harvest Report:
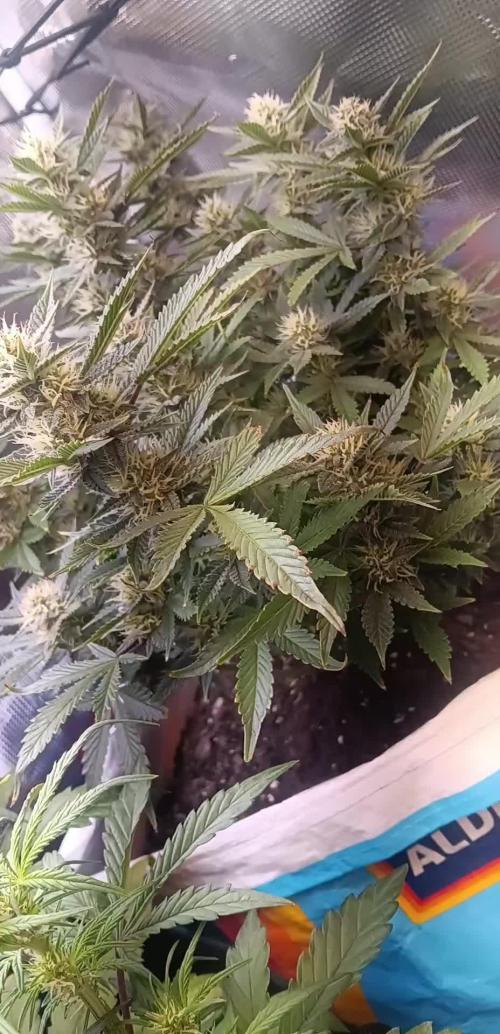
Finished harvesting the remainder of my Wedding Cake auto. Main cola was taken earlier at peak cloudy with some early ambers (~10–15%) for a more balanced effect. The rest of the plant was allowed to mature further and came down with roughly 20–25% amber trichomes. Bud density was excellent across the mid and lower branches — structure held up well without support.
She was grown fully organic — no synthetic inputs — in living soil amended with bone meal during flower. Dried at ~70°F / 50% RH for a slow 7-day dry. Cure will begin this week in Grove Bags (1 oz size). Aroma leans toward earthy-sweet with some gassy backend as she dries.
👑 Special Queen #1 Auto – Ongoing Flower:
This plant has been a beast. She’s in the latter half of flower now with impressive lateral branching and heavy stacking across all colas. Trichomes are mostly cloudy with a few early ambers showing on the top-most bud sites, so I’ll be continuing her for another week or two to hit my preferred heavy amber target for a deeper effect.
She’s bounced back from early lockout and transplant stress after being moved into ~8 gal of fresh FoxFarm soil with top-dressed organics. Water-only since week 5, and she’s thriving.
🌿 Notes:
This run has really dialed in my process — organic medium, minimal inputs, and clean environment. Next steps will be sanitation, tent reset, and prepping for my upcoming tester autos.


Likes
14
Share

@420DeepGrow
Follow
Gracias al equipo de MSNL Seeds, Marshydro, XpertNutrients y Trolmaster sin ellos esto no sería posible.
💐🍁RS11:
RS11 es uno de nuestros nuevos híbridos 50/50 perfectamente equilibrados. Creamos RS11 cruzando Pink Guava x OZK x Sunset Sherbet con la intención de crear una variedad que ofrezca medidas iguales de efectos edificantes y relajantes. Aclamada como una de las variedades más sabrosas del mercado, su sabor agrio y dulce a bayas viene con un potente rango de THC del 27% al 31%.
💡TS-3000 + TS-1000: se usaran dos de las lámparas de la serie TS de Marshydro, para cubrir todas las necesidades de las plantas durante el ciclo de cultivo, uso las dos lámparas en floracion para llegar a toda la carpa de 1.50 x 1.50 x 1.80.
https://marshydro.eu/products/mars-hydro-ts-3000-led-grow-light/
🏠 : Marshydro 1.50 x 1.50 x 1.80, carpa 100% estanca con ventanas laterales para llegar a todos los lugares durante el grow
https://marshydro.eu/products/diy-150x150x200cm-grow-tent-kit
🌬️💨 Marshydro 6inch + filtro carbon para evitar olores indeseables.
https://marshydro.eu/products/ifresh-smart-6inch-filter-kits/
🍣🍦🌴 Xpert Nutrients es una empresa especializada en la producción y comercialización de fertilizantes líquidos y tierras, que garantizan excelentes cosechas y un crecimiento activo para sus plantas durante todas las fases de cultivo.
Consigue aqui tus Nutrientes:
https://xpertnutrients.com/es/shop/
💻 Trolmaster Tent-X TCS-1 como controlador de luz, optimiza tu cultivo con la última tecnología del mercado, desde donde puedes controlar todos los parametros.
https://www.trolmaster.com/Products/Details/TCS-1
📆 Semana 6:
Esta semana ha explotado 💣, los cogollos comienzan a tomar densidad y llenarse de resina, me hubiera gustado aplicar algo mas de nutrientes en la fase vegetativa, la próxima vez será.

Likes
59
Share


@OutForReal
Follow
Day 52 - I think/hope that the stretch is over for the 3 ladies. They are still dark green but nothing new as my previous run has the same particularity.
#1 The tallest has been a bit low in height by some her on he main stem to avoid any light burn from the 150w hps. She is also the most advanced in flowering one.
#2 The topped one is looking strongest than the 3 others , she start to have few pistils
#3 The 3rd one is growing with a natural shape, she is less dark green than the 2 others and she's not flowering yet
---------
Day - 30.11 - Watered with 1.5/2L of Megacrop each at 1.5Ec and I can spot a N deficiency on the #1 And the #3 so I'll add some guano in the soil to help them in that early flowering stage 😁👍


Processing
Likes
52
Share


@CBD_Sweden
Follow
@MephistoGenetics,
Hi all the happy people here in GrowDiaries.
This is my second cultivation ever and it will be fun to try a bigger space than my closet grow.
First, I'm just going to say I'm done with the construction of my new growroom.
The room is 2.14 meters by 1.7 meters and has a ceiling height of 2 meters.
It provides a floor area of 3.6 square meters.
I use a 54 Watt Lightwawe T5 for germination and 2 Pcs 400 Watt HPS lamps.
I have a channel fan that replaces the room air about 40 times an hour to get a comfortable environment in the room, the air enters a fresh air intake from the outside.
The air is purified through a carbon filter to then leave the room to the rest of the basement.
Then I use that heat to heat the rest of the basement.
I will use 10 pcs 15 liter Autopots to grow with and a 100 liter water tank that supplies the pots of water and nutrition.
I will grow completely organically in soil and will watercure my buds to get the best possible medicine for me.
But there are no cultivation rooms to be displayed here, so I continue with what is most important.
Today I have put my seeds in paper towel and hope the seeds have germinated within a few days.
I am very excited to see how the new growroom will work and how this Stilton Special will turn out.
Strain Name: Stilton Special F1
Genetic heritage - Sour Livers F3 x Northern Cheese Haze F3
Strain behaviour - Stilton grows well from the off, and develops into a stout but branchy specimine that leads to a fine yield of awesome flowers. She's not too stretchy but also is sizeable enough with good growth, to train and shape to your liking. Flowers develop pretty fast and grow to a good size, it may to advised to clear out some undergrowth and if needs be a very gentle defoliation mid-way through the grow, although leaf tucking may suffice well enough.The end product is of top shelf quality and she doesn't lack in yield either.Give your garden, nose, and body a treat and be sure to indulge in a slice of Stilton this year, You won't regret it.
Size - 50 - 70 cm
Structure - Medium height but bushy
Flower Density - 9/10
Indica/Sativa - 65/35
Cycle Time - 65 to 70 days from sprout
Yield - 90 to 140 grams as a single plant
Best Method for overall high yield - 9-12 per 1,2m x 1,2m sq in 10-15 Liter pots (Soil)
Aroma - Very strong, Cheesey/fruity/sour/spicey/ with a dash of coffee.
Taste - Dank berries
Effect - Good hybrid powerful but balanced effect
Medicinal Benefits - TBA
Best Grown - Indoor/Greenhouse
Cannabinoids - TBA
Extract information - Ideal extract candidate - High in resin, oil and terps.
.................................................................................................................................................................................................................................................................................................................................................
2017-08-21. Started to germinate the seed.
.....................................................................................................................................................................................................................................................................................................................................................
2017-08-23. Seed germinated and put in small pot in the humidity dome.
.........................................................................................................................................................................................................................................................................................................................................................
2017-08-27. Slow and steady she grows.
----------------------------------------------------------------------------------------------------------------------------------------------------------------------------------------------------
2017-08-28. Transplanted to the 15 liter autopot.
--------------------------------------------------------------------------------------------------------------------------------------------------------------------------------------------------------------
2017-08-29. New movie of the girl and a new pic of the grow room from now.
-------------------------------------------------------------------------------------------------------------------------------------------------------------------------------------------------------------
2017-08-29.
Hello to you who read my diary, I just want to say that I am pleased that you have chosen to check in with me and in my diary.
I just want to say that I do this for myself and for a steady flow of my medicine.
Everything you read and see in my diary is 100% honest and I will never distort or beautify anything here.
I document my crops so that I can learn from my mistakes and also to look back at those different crops.
I try to update with pictures every day and with text if something special has happened in the garden.
This is my strainhunt for the best medicine and the beginning of my journey with cannabis and the cultivation of it.
-----------------------------------------------------------------------------------------------------------------------------------------------------------------------
2017-08-30. Cleaned the room this morning, just vacuuming and cleaning with chlorine solution. Im testing the fan to control temp and humidity, it works great.
Added a movie. Everything is looking great right now.
------------------------------------------------------------------------------------------------------------------------------------------------------------------------------------------
2017-08-31. 3 new pics.
--------------------------------------------------------------------------------------------------------------------------------
2017-09-01. New pics and a video of the room from today.
-----------------------------------------------------------------------------------------------
2017-09-02. New pic
----------------------------------------------------------------
2017-09-03. Video of the girl this morning.
----------------------------------------------------------------------------------------------------------------------
2017-09-04. Week 2 starts, new pics.
----------------------------------------------------------------------------------------------------
2017-09-05. KL 08.00. Cleaned the room this morning, just vacuuming and cleaning with chlorine solution.
KL 12.00. The girl got 2 liters of water with nutes in it, added a video.
----------------------------------------------------------------------------------------------------------------------
2017-09-06. KL 08.00. The girls woke up after their beauty sleep, the leaves are always a bit down after 6 h of darkness, but they will stretch now when the HPS lamp starts.
Everything looks good and I keep trying to tuck the leaves so they get the maximum amount of light where needed. Added pics and video.
--------------------------------------------------------------------------------------------------------------------------------------------------------
2017-09-07. Day 17 from sprouting. I have never tested PH in my grows, when growing organic in soil iv learned that it adapt PH by it self. But im curious by nature so i had to test.
Kl 10.00 Tested PH in the soil, it was 6.9 and tested my tap water and it was 6.8. Added video of the girl.
Kl 22.30. New pics
------------------------------------------------------------------------------------------------------------------
2017-09-08 KL 08.00. Good morning, added new video.
2017-09-08. Kl 23.50. Gave every girl 3 liters of water and nutes, added new video.
--------------------------------------------------------------------------------------------------
2017-09-09. Kl 21.00. Defoliated a lot and added pics.
------------------------------------------------------------------------------------
2017-09-10. Kl 08.00. Last day of week 2. New video.
2017-09-10. Kl 23.00. 3 new videos.
-----------------------------------------------------------------------------------

Likes
18
Share


@Jays_Not_Here_Man
Follow
Long time connoisseur, 1st time grower. I started thinking I wanted to do outdoor, but where I live, it’s pretty cool until almost mid June. So in July I committed to indoors, and have been slowly figuring it out, while consuming TONS of content and advice from forums. High Hope’s! 😎
Processing
Likes
25
Share


@Cannibalgardens
Follow
Ok team I'm going crazy with these beans anymore I'm onto growing six seperate strains from 6 breeders .. They are all sponsored from the companies to run , the #alienaphrodesieac is a 80/20 indica heavy new strain from a contest on Instagram .. There are strains that all carry heavy indica traits and have been what I wanted to grow for the last little bit .. They are going to replace the last run that is in flower right now .. Trying this perpetual grow thing .. The ladies are all happy and healthy after a few more weeks they will get the transplant onto their final homes .. Thanks again to all the sponsors who have given me the chance to grow their strain ...cheers follow me on instagram @cannibalgardens.


Likes
11
Share


@PanGrower
Follow
I have now installed osmosis, the water after it is 15 PPM. Fertilizer added 100% 2 weeks of vega, and finally ppm 730