The Grow Awards 2026 🏆 


Likes
5
Share
@Kominest
Follow
There’s a big variety of budshapes on the Q1 which I really like the dos si dos buds all have the same shape and look big and stacking
Unfortunately one of my mates spotted a banana on the Q1 maybe caused by calmag deficiency so on Monday to Tuesday night I decided to harvest her . Trichomes were most milky and with an expected blooming time from 5-6 weeks harvesting her starting of week 5 hurts a little but should be fine . Dos si dos now solo in the tent with no bananas or seeds spotted yet


Likes
121
Share
@NuggetPawn
Follow
So they’re still stretching, I thought they were slowing down a couple days ago, but then I walked in today and realised shit, they’re still going, must have grown another 3 inches since yesterday.
They have almost filled out the whole 6x4ft space, a little space by the door and in the corners, the floor is looking well shaded which I am happy about, as that means I am not wasting too many photons.
I have an maybe another 10/15cm of spare vertical capacity before I’m going to have to start some emergency super-cropping. Starting to get a little anxious
I still haven’t changed out the reservoir from 16 days ago, although my top ups have been the same composition as noted above. I think I will drain her out tomorrow which has a drastically lower ratio of nitrogen. I have to say, this Botanicare range is incredibly stable and forgiving once you get past mid veg.
As for the genetics, she knows how to grow without little fuss. Maybe I have been very lucky, time will tell once I finish my next grow with a different strain. The plant at the back of the room is a little squat compared to the other two but maybe she will catch up.
Waffled on a bit here, thanks for stopping by, have fun all!
Likes
8
Share
@GrowsGanjaGuy
Follow
I can never talk bad on auto flowers. I did not pay much attention to these girls and it shows but the genetics from FASTBUDS were so good that the quality of the buds was still A1. I bought more FASTBUDS seeds and will grow them in my new setup and hopefully I can maximize the yields this time around.

Likes
2
Share
@LoganatorDude
Follow
Morning of day 14- tops look dry but it’s just the very surface. They took a little longer than I wanted to dry out.
The weather has been cold windy and rainy, not much sun lately, and we are still about a month away from our potential last frost date. Farmer’s Almanac says last frost date is May 30th or something crazy, even though the days are normally rather warm by now. I haven’t fed as of Day 14 because they are not dry enough, there is plenty of amendments in the pot, especially towards the bottom, except I will still spoon feed a little bit. I just rehydrated the tops as they were really dry at least 1-2 inches of the tops were dry, but the bottoms are still plenty wet, so with clean water in a spray bottle, I just lightly rehydrated the top a lil, so I might be feeding tomorrow for day 15, but I don’t know yet. Keeping the tent around 80 degrees Fahrenheit, and only about 25-30% RH. This helps me compensate for the lack of heat provided by the LEDs and help the plants adapt to a higher water demand. I haven’t seen the low humidity effect the seedlings, intact all the plants that grow outside in the hot bone dry climate LOVE IT! They were praising all last year. So to help keep me away from damping issues and to better prepare the little ones for the outdoors, I’m trying to match a hot and dry environment in the tent. With VPD levels way up in the red, I have yet to experience a negative impact. I have damped off enough plants in my life, it’s a lot harder for me in 60-70%RH to water the plants and get them to dry out fast enough in the tent with cold LEDs.


Likes
5
Share
@UnrealPeruano
Follow
It is visible that one of them is delayed by 4 days, but everything is going well. I apply 500ml of water per week to this plant per plant. I'm taking it easy and they seem to be enjoying it. when I complete the 3 week I will do the top pruning and start preparing for the SCROG.


Likes
35
Share
@Master_weeda
Follow
Bonjour à tous les padawans et les maîtres jedis
Pour cette semaine je prévoit de pratiquer comme technique spéciale le LST et juste un arrosage.
Pour cela comme à mon habitude j'attend le cinquième noeud ou que je juge la plante robuste.
Je profite que cette semaine qui va être relativement calme pour faire un LST appliqué et vous faire un rappel de ce qui est pour moi la meilleure technique pour arroser une autofloraison et la façon dont je pratique le LST.
En suivant ces quelques simples conseils vous obtiendrez un résultat optimal tout au long de votre culture :
Le cannabis est une plante qui n’aime pas recevoir un léger arrosage en continu. Il est impératif de l’arroser en grosse quantité, puis d’attendre que la terre soit bien sèche avant d’arroser à nouveau!
Pour calculer la quantité d’eau nécessaire à chaque plante, suivez cette règle :
Le volume d’eau à donner lors de chaque arrosage doit représenter au moins environ un quart du volume du pot !!
Exemples :
pour un pot d’1L, donnez 0,25L d’eau à chaque arrosage pour un pot de 4L, donnez 1L d’eau à chaque arrosage pour un pot de 12L, donnez 3L d’eau à chaque arrosage pour un pot de 30L, donnez 7,5L d’eau à chaque arrosage !etc…
Pour donner un tel volume d’eau, il est souvent nécessaire d’arroser en deux (voir trois) fois, lentement et uniformément sur toute la surface. Disposez de bonnes coupelles sous les pots, celles ci se rempliront d’eau qui remontera dans le pot par capillarité en moins d’une journée. Il est également très important d’utiliser un bon terreau de qualité, avec une bonne capacité de rétention d’eau mais qui assure également un bon drainage (celui ci doit contenir de la perlite, et/ou de la coco, etc..)
Il vous faut alors maintenant attendre quelques jours en sous-pesant régulièrement les pot avec vos bras. Quand ils seront redevenus très légers, vous pourrez arroser à nouveau !!
En effet, comme l’eau pèse beaucoup plus lourd que la terre, un pot gorgé d’eau pèse plusieurs fois le poids d’un pot d’une plante prête à être arrosée. Avec un peu d’entraînement, vous apprendrez donc très rapidement à sous-peser vos pots pour savoir quand une plante a soif.
C’est une technique à la fois très facile et très efficace, et qui peut être appliquée à toutes les plantes en pots !
En arrosant de cette façon, en général vous devrez arroser vos plantes tous les 3 à 6 jours.
Pour cette semaine 3 au jour 17 ma plante fais 12 centimètres et son cinquième noeud apparaît je décide donc de pratiquer un LST sur ma plante.
Pour ce j'utilise du fil de fer galvanisé que je plante directement dans le substrat en faisant attention de ne pas endommagé les racines car n'oublions pas que ce qui pousse dessus pousse aussi dessous.
Jour 17 je pulvérise du une solution composé d'une cuillère à café de savon noir mou dilué dans un litre d'eau en prévention d'éventuels nuisibles.
Je corrige mon LST suivant la pousse de ma plante ...
Pour ma par c'est la manière dont je procède. Comme promis petit rapel de:
Quand commencer à appliquer la technique LST
De nombreux cultivateurs commencent la manipulation dés que les plantes possèdent entre 3 et 6 nœuds ou une paire de feuilles. Durant cette première étape de la croissance, le tronc encore flexible est pliable sans risque qu’il ne se casse, même si au fur et à mesure du développement de la plante il sera de plus en plus difficile de le plier. Nous pouvons continuer à guider la croissance des branches durant toute la culture, même durant la floraison, ce qui pour cette étape représente un grand avantage face à la taille, qui n’est pas du tout recommandé une fois que la formation des têtes commence, cela stressera en effet la plante, ce qui aura pour effet de retarder la récolte.
Comment appliquer la technique de guidage LST
Si nous sommes prudents, la flexibilité naturelle des fibres du cannabis permet de plier leur tronc et branches avec une relative facilitée, même durant la floraison des plantes.
En utilisant une corde fine, nous pouvons accrocher la pointe de la plante à la base du pot par exemple ou à un tuteur que nous aurons planté dans le substrat. Nous plierons le tronc avec précaution et nous le fixerons avec la corde, à partir de là, nous pouvons augmenter progressivement la tension de la corde, chaque jour un peu plus, jusqu’à obtenir la position souhaitée. Soyez attentif à la réaction de la plante, essayez de ne pas appliquer trop de pression sur la corde et rappelez-vous que la flexibilité des branches peut varier d’une plante à l’autre.
Pour obtenir de meilleurs résultats, il suffit de suivre quelques règles simples. Pour commencer, nous devons choisir une corde fine mais pas trop pour ne pas blesser les troncs au fur et à mesure qu’ils grandissent et qu’ils deviennent plus gros.
Nous pouvons utiliser des crochets en plastique souple ou de n’importe quelle autre matière flexible pour éviter d’endommager les plantes. Spécialement en intérieur, utiliser des cordons en plastique de couleur (voir les diaries de @Silky) est très pratique pour voir facilement les accroches et faciliter le travail au milieu du réseau formés par les cordes, les tuteurs, les mailles ou les supports que nous aurons dans la culture. Bien entendu, en culture extérieure et surtout en guerilla nous ferons juste le contraire et nous utiliserons des matériaux de couleur qui n’attirent pas l’attention pour que notre jardin reste discret.
Pour stresser les plantes au minimum, la mieux est de réaliser ces manipulations le soir ou juste après que les lampes en intérieur s’éteignent, ce qui leur permettra de se remettre durant la nuit. Normalement, le jour suivant nous pourrons observer comme les pointes des branches que nous avons pliées se dressent de nouveau vers le haut à la recherche d’une source de lumière.
Que la force soit avec vous
Likes
9
Share
@nurari
Follow
8 неделя подошла к концу, растения набирают цветочную массу. думаю еще пару недель и буду уже отправлять на созревание, в конце августа планирую харвест... Жду увеличения в объеме еще в 2 раза.
Одно растение выглядит очень маленьким, за то остальные я думаю будут иметь хороший вес.


Likes
42
Share
@Ukfarmer420
Follow
Hi guys
Within 48 hours all 3 broke the soil, just waiting on the blackberry moonrock to make a appearance.
Not much to say at the moment but ill keep you updated on the blackberry moonrock from tastebud genetics.
Happy growing gang 💚💪👌
Hey guys so the blackberry moonrock from tastebuds has decided to pop out the soil today 😀 so 4 out of 4 the freebie was a late starter lol.
Its ment to be a 33% thc indica so hopefully i can hit the high 20z.
Happy growing guys 💚👌


Likes
114
Share
@TheFoxFarmer
Follow
Week 1 Flower
The twins are finally in flower and looking extremely happy and healthy. They were thrown into flower on day 55 veg (day 0 flower). They we're lollipopped towards the end of the week, on day 6. I also pinch the tops of the main stems of each branch that is growing taller than the rest, to slow it down. This not only allows the other tops to keep up, but it will also thicken the stem and make the branch stronger.
Their base nutrients were changed to a 1:1:1 (G:M:B) ratio throughout transition. Silicon is increased while they're stretching, as they are growing at a much faster rate. Cal-Mag and Epsom Salts were also increased slightly, and will be kept at this level until they're stopped later in flower.
You can clearly see the difference in structure between these two pheno's, now they're in flower. Unexpectedly, Twin2 hasn't stretched as much as Twin1 in this early stage in stretch, and is sidebranching like mad. With that being said, I think Twin1 is looking slightly better and a more beautiful plant. Time will tell... 🌹
Slo Mo vid of Twin1 on Day 7 📽️
Thanks for following and happy growing! 🐺

Likes
8
Share
@WeeDay420
Follow
Good Day i think check my profile!! Like4like 🤙😜 Merry Christmas & Happy new year !!! BIG BUD for you !! Thank you i Learn and text me all 😅💚

Likes
8
Share
@TakinTopsDaiily
Follow
So this week I did a few upgrades in my garage. First off, I insulated the garage itself to minimize wasting energy keeping my garage warm. Secondly I put a little space heater to help keep my temps more consistent, especially when my lights go out for 8 hours it tends to drop into the mid 50’s, which personally is too low for veg for me anyway. My babies are starting to do some growing now, and with this weeks little bump up in nutrients, I think they will begin to take off. I went up with the calmag as I’m using 100% coco coir as my medium, and it really does eat up a lot of Calmag. I think my babies will get nice and green and have a nice life in my updated garage. Lemme know what y’all think, I’m happy to share and document not only successful grows, but failures also with everyone. We need to humble ourselves and learn to be better from one another everyday. Stay blessed everyone, HAPPY GROWING!
Likes
22
Share
@RDWCGrowing
Follow
1/11/2024 Vegetation Week 1 Day 1- I have a root almost in the water.. Yay!! Top feeding is almost done. she is looking a little sad as I work the transition Top feeding but once the roots are fully in the water she will start to take off. Ensured my PPFD is set between 250-300 it is set to: 258
1/12/2024 Vegetation Week 1 Day 2- I have a root in the water.... NO TOP FEED TODAY SIR!!! now that a root is touching the water and she looks stable, I am not going to topfeed, I will see how she looks tomorrow and as long as everything looks good I am going to go ahead and do a change and week 1 fill on Nutes.. I know it is a couple of days in but the same Nutes go through Week 2 and get changed at Week 3 So I should be good to go.. I will just ensure I fill to root touching the water when I change tomorrow.
1/13/2024 Vegetation Week 1 Day 3- Water Change Day!!
I added 36 Gallons of Water to the system:
Silica= .5mil/gal= 18mil
CalMag= .75mil/gal = 27mil
FloraMicro=3.0mil/gal = 108mil
FloraGro=2.0mil/gal = 72mil
FloraBloom= 2.0mil/gal = 72mil
PH DOWN= 30mil
Very important thing with this system is to now wait the 24 hours for the system to adjust.. Do not make any further adjustments to your PH up or Down for 24 hours to allow time for the system to balance.
1/14/2024 Vegetation Week 1 Day 4- Today I just adjusted the PH to ensure that it was right at 6.0
1/15/2024 Vegetation Week 1 Day 5- Today I Cleaned up the lower damaged leaves from the transition from top feeding to roots in the water. She looks good today.
1/16/2024 Vegetation Week 1 Day 6- Today I just took a picture of the beautiful lady for Log. Other than that just normal day to day operations, check the pH, check the Humidifiers and fill as necessary, check level of water in the Res. Everything looks great. onto Tomorrow!!
1/17/2024 Vegetation Week 1 Day 7- Today I filled the humidifers, checked the PH and just let her grow.. Grow baby Grow.....

Likes
19
Share
@UKLEEDSGROWER
Follow
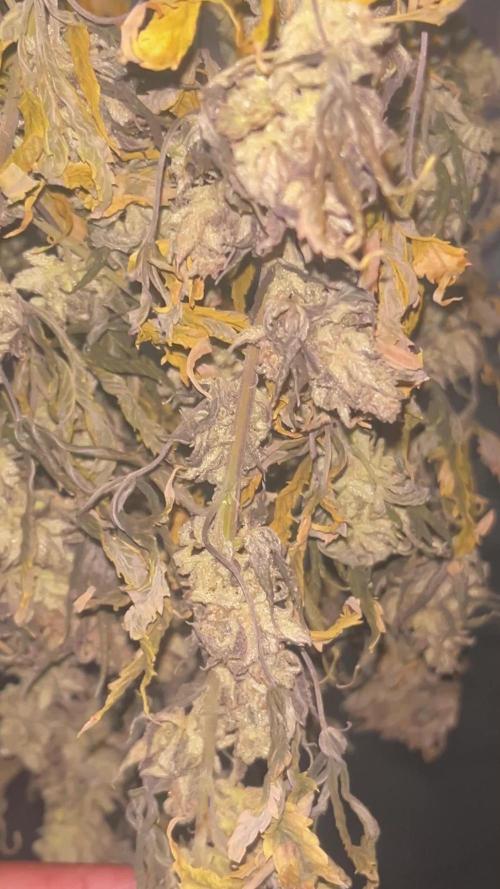
Just harvested last night so will come back on in next couple of week to review!! No estimates on yield as yet. But the smell is definitely pungent lemon and sweet smell. Can’t wait to try the end product!!


Likes
20
Share
@TheGourmetWeed
Follow
One more week is now finished, let's have a look as what happened during this last 7 days and nights
Used the weekend to make a nice cleaning again - I like to take all from the tent and clean on Sundays. Gives a good feeling.
The plant is still full flowering, finally some yellowing and browning pistils. The color of the bud is gorgeous.
Flush has started officially, 2l water every second day for a week, and then probably should be ready a few days after.
It's a great smell coming from this plant, so sweet. Is amazing!
Temps and RH are very stable, which is great. 27c day 60%Rh 24c night ~70%RH
That's all for now, next week there'll be more.
Have a nice week, happy grows to all, and better smoke :D

