
Likes
Comments
Share

@masterofsmeagol
Follow
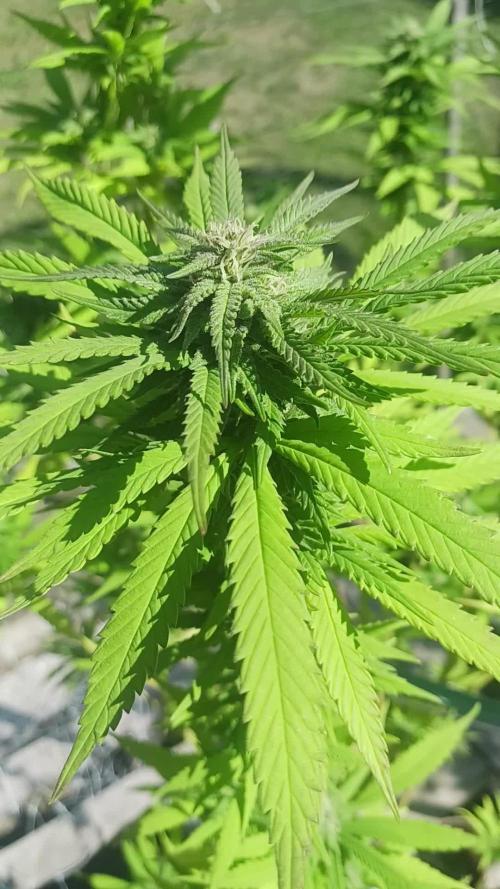
9/6 Didn't do a video this morning. Went over again around noon and defoliated what needed it. I noticed what looked like stem mold on the special kush that those locusts have STRIPPED and saw what looked like mold but I left it and assumed it was just a bite out because it wad right at a node. I removed a major branch the other day. When I got back around noon the spot had tripled in size and was 100% mold. I cut that branch off too. It was a large main limb. The plant IS frosty but it's not ready. You cant see it but the calyx is pink. There are some branches that are completely stripped. They like the special kush for some reason and seem to target that. I should go over at night and see what I can see. Pink kush is flowering fairly aggressive. Not as much as the natural mk ultra though. I cant believe how fast those are exploding. As long as weather permits the pink kush will finish. I tried the special kush #1 which I'm almost done trimming and it wad amazing. Really eases anxiety and hits me square in the eyes. Very sedative happy strain. Tastes like pine, skunk and something I can't quite identify. Maybe the forest? I'm incredibly happy with the outcome.
9/7 Holy shit. It's STILL raining. Just for the ones that didn't hear it in the back, 'I' am so glad I harvested that plant when I did!" I got super lucky. I hate having to cut off limbs or come in the morning to find a branch eaten. Next year I'm 100% getting floating row covers. That will fix most problems. Buds are exploding in size. On everything. We've had some pretty high winds as well. The natural mk ultra continues to surprise me. It seems like the flowers get noticeable bigger day to day. Finally the pink kush has some small buds. This is an October strain though. I had already popped them or I would've been running more 10th planet or mk ultra. Hey maybe this strain will make it through the fall and give me some crazy quality nugs. It's an exciting time to be a cannabis grower. I processed and jarred that Special Kush #1. I trimmed almost everything. I have a jar of "smalls" buds that didn't come off a cola and another jar that is "trimmed" but needs to be "manicured" like the rest. I'll finish today and continue the curing process. It's always great to get an early phenome. Especially when it does what you want. Oh, I noticed a couple spots on leaves that COULD be septoria showing again. With all the rain I'm really not worried. I haven't been giving the preventative dose of Plant Doctor but I might do so when I need to water next. If I have a little while before harvest. That would help with budrot or any kind of fungal issue. I don't want to water when it's saturated. I'll wait until next water and even then I may not apply it. We shall see.
EDIT: Stopped raining around 1 but it's been off and on. I shook everything off and found a pillar in one of the special kush plants. The one I had to cut to major limbs off. I got the moth larvae and removed all the debris inside. Did that with the other special kush and it was fine. I'm going over after dark to see what is munching on plants so fast. While I was removing the pillar a bird flew behind my head and grabbed something on the plant behind me. This morning a little feather was resting on a leaf. After the dive bomb I turned and found another. I can't help but smile. Nature can take her claim. It usually isn't much and I'm fine with that. The birds however are on my side. We've got a synergistic relationship.
9/8 Finally the rain ended. Didn't have time to take a video and everything was soaking wet. I'm noticing that things are getting a lot more frosty. I found my loupe so it will be easier to look at the trichs. The special kush that ive had to take two main limbs off (because they were totally stripped) is losing more. Long stalks with all the nodes eaten off with just the cola at the top. I'm not going to get much off this plant but I don't want to lose everything. The calyxes are pink and starting to retract. I'll take a look at it with my loupe when I get home. We are supposed to have a pretty good week. The natural mk ultra's buds are exploding in size! For the most part EVERYTHING is. It's going to be a good year.
9/9 Everything is exploding in growth. I'm doubting whether the pink kush will finish. I know I have the rest of September at least. Still losing a little bit on the 2 special kush. Not going to get much from them. I found my loupe and checked everything. One of them is done. As it shows in the video SOMETHING has been eating buds off right at the node. It happens much less after trichs start developing. That sk I had to cut two limbs off and IS done but I may not get over to grab it today. There's not much left. When i cut off the branches there was nothing on them. Hopfully the quality will make up for it. Both mk ultras are looking GREAT. Won't be long on the big mk ultra and the 10th planet. I'm planning on a staged harvest. The special kush I harvested is the bees knees but I'll wait for the smoke report to talj about it.
9/10 Had to shake the plants off. They were soaked and the fog was so thick I could barely see. I've got a two hour appt at 4pm and one at 930 this morning but I'm going to find a way to take that special kush that I had to cut those limbs off. It's done and I've reached diminishing returns with that plant. Buds are exploding but I've lost a lot. AR least what I get will be fire. The big mk ultra has tops that are done too. I'm thinkong I mat take some of those if I have time. I'm not sure what I'm going to do. The pink kush is flowering rapidly. It's in the low 40s at night so I think September will be the end of the season. I was hopingvfor more time bit we'll see. I'll keep things updated.
9/11 Went over in the morning amd took a video I'm the afternoon. I tried a sample bud from the mk ultra and it was awesome! I checked the trichs on that plant and it looks ready. If I had more time and the weather wasn't going to be good I'd take it. I want to try the sample joint first before I take the top of the plant. Everytj8ng else is exploding. The other mk ultra is frosty as hell and hard as a rock bit needs to come together. These grasshoppers or locusts are fucking chewing shit up! I noticed a branch on the pink kush completely stripped. I FOUND ONE on my mk ultra natural! It wasn't the first time and it wad huge! Big female FULL of eggs. It took a grade stake to kill it. If I threw it in the air and hit it with a waffle bat it would soar through the air! Definately a little lower quantity. I noticed a little damage on the chem dog but it's not ready. We have a few more days of good weather. If things go good with the tester bud then I'll take the top of that mk ultra.
9/12 Went over and found some more damage from those fucking grasshoppers. I'll do a video when I get back. Mk ultra monster cropped is ready. We've got some rain coming and I dont want to risk it. I'll check the trichs of the other special kush too. If it's close I'll take that too. I'm not going to just watch colas turn onto top hats. I smoked that tester bud and it was awesome. I'll probably take that plant on stages. The other mk ultra won't be long and looks like it might become best one. Pink kush is late flowering but it seems like it might finish. I WATERED EVERYTHING A GALLON BUT THE PLANT IM PLANNING ON TAKING. I'll keep this updated.
EDIT: WENT BACK OVER AND TOOK A COUPLE VIDEOS SHOWING THE GRASSHOPPER DAMAGE. I HARVESTED THE MONSTER CROPPED MK ULTRA. THE TESTER BUD WAS AMAZING SO IM SURE THIS WONT DISAPPOINT. BIG YIELD FOR THISCPLANT DESPITE ALL THE HURDLES. ILL PUT THAT IN THE FINAL REPORT THOUGH. I DIDNT TAKE THE LAST SPECIAL KUSH. JUST THAT ONE PLANT. I WAS TIRED AND IT WAS GETTING LATE. IF I SEE A BUNCH MORE DAMAGE ILL YANK IT TOMORROW. PINK KUSHES ARE FILLING UP BUT BOTH 10TH PLANETS ARE SWELLING TO BEAT HELL! I WET TRIM EVERYTHING AND THEN MANICURE ONCE DRY. IM STILL GOING TO BE IN TRIM JAIL FOR A WHILE.


Likes
49
Share


@DevilsBud
Follow
New week for the 2 pineapple dream edition
Both pineapple dream edition are different from each other but nothing extreme they both smell like pineapple tree the buds are rock solid and glazed with trichomes just amazing stuff
it's going great there at a size that adding extra nutrients is waste and only making flushing take longer so starting to lower all nutrients and preparing for last week exited times
Happy growings Growmies 🤜🏻 🤛🏻
visit www.marshydro.eu
for your best gear and use the PROMO CODE: DEVILSBUD
Some info about the Marshydro FC-4800
Superb Quality LED Chips: The whole light is composed of 1206 pcs Samsung lm301b and Osram 660nm chips. More than two times as many LEDs are used to drive the grow lights at low currents and to avoid overdrive. Quality is guaranteed and efficiency is up to 2.8 μmol/j.
Even PAR Distribution and High PPFD Output: The multi-light bar design and the densely distributed light chips enable the LED grow lights to achieve the optimum PPFD required for plant growth over the entire effective coverage area.
Specifically Designed Spectrum: To ensure even plant growth, blue and red light are enhanced on the basis of a full spectrum combination. Not only does this accelerate plant growth, but it also improves the yield and quality of the plants at the same time.
Dimming Daisy Chain Function: The dimming function saves on electricity costs and enables brightness from 10% to 100% for the different stages of plant growth. A single master light can connect up to 30 lights in a daisy-chain system.
Business LED Grow Light: The light's wavy heat sink dissipates heat quickly and the IP65 waterproof allows the light to operate in humid conditions. 180° collapsible feature for easier installation. All these features provide favorable assistance for commercial cultivation.
And some tent info
●【Lock All Light Insid】MARS HYDRO Grow Tent Interior is made of diamond mylar. Non-toxic to the environment, no harm to plants. High-quality 1680D canvas being double stitched, (ALL OTHERS BRAND grow tent is 601D canvas) which is tear-proof for perfect light locking, No light leaks or rips at all.
●【Durability Grow Tent】Stable Metal corner adapters and poles are the trustful supporters of the tent. No rusting nor paint-falling. Quick easy tool-free installation. Carries strong heavy-duty SBS zippers, double layer lining to create a light-proof seal.
●【Easy Observation of your Plants】Special peeks window made by double layers of cloths. Observe the growing conditions of your plants without opening the tent and avoid disturbing plants. The peek window also serves to dissipate heat and ventilate air.
●【Removable Tray Keep Clean】The package includes a removable waterproof floor tray to hold soil and fallen leaves. The tray can be taken out easily to wash. Removable and water-proof makes cleaning easy.
●【Good Ventilation&Fast Assembly】 Circular double-sleeved vent holes with adjustable nylon strap for air circulation by exhaust fan, ducting, carbon filter, or reflector. Better allows proper light, heat, and airflow. Quick tool-free installation. Reinforced by a sturdy metal frame to ensure security and stability, supports up to 140lb. Perfectly safeguard your plants to thrive even in winter

Likes
19
Share


@Foggedaboudit
Follow
Flush is on. A week or so I reckon. 90% of trichomes are already cloudy. The smell is so complex! The colors amazing! Can’t wait!


Likes
17
Share


@Hashy
Follow
Week 6
Light cycle=18/6
Light Power=120w 50%
Extractor controller settings
High temp= 25c
Low temp= c
Temp step=0c
High Rh= 56%
Low Rh= %
Rh step=0%
Speed max=8
Speed min=2
Smart controller settings (during lights on).
Lights on=06.00am
Radiator on= below 21c
Radiator off= above 22c
Smart controller settings (during lights off).
Lights off=00.00am
Radiator on= below 18c
Radiator off= above 19c
VPD aim=0.6-1.4
DLI aim=35-40
EC aim=1.9
PH aim=6.2
Fri 26/1/24
#1 (Day 36)
📋 defoliate lower leaves that hardly get any light.
Sat 27/1/24
#1 (Day 37)
📋 H=42cm D=39cm DLI=32.5
Raised light about 10cm
Increased light power to 140w
H=42cm D=49cm DLI=30.1
Sun 28/1/24
I have decided today is going to be the last day of veg before I flip to flower.
Lights will have come on today at 6.00am and go off at 10.00pm, they will get 14hrs light today and tomorrow will be day 1 of 12/12.
💧💧💧💧💧💧💧💧💧💧💧💧💧💧💧💧
Method= automatic
Feed=Veg nutes.
Neutralise=0.1ml/L
Silicon=1.0ml/L
Calmag=1.0ml/L
Terra grow=4.0ml/L
Roots=0.2ml/L
Easy Ph down=0.125ml/L
Ec= 2.05 PH=6.1/6.3
Time start=12.00pm
Finish time=13.45pm
(11×5 minute runs with 5 minute gaps)
Total flow rate=181ml/min
Flow rate per plant=45ml/min.
Total volume made=12L
Total volume left=2L
Total volume used=10L
Volume per plant=2.5L (Est)
Runoff.
Total runoff=1L
Ec=2.7 PH=6.1/6.3
💧💧💧💧💧💧💧💧💧💧💧💧💧💧💧💧
#1 (Day 38)
📋 With no information for flower time I'm going to have to guess she will be finished in 45-60 days. I removed quite a few lower nodes that probably won't break through the canopy, they where ideal candidates for clones.
Light cycle=12/12
Light Power=140w 58%
Extractor controller settings
High temp= 25c
Low temp= c
Temp step=0c
High Rh= 56%
Low Rh= %
Rh step=0%
Speed max=8
Speed min=2
Smart controller settings (during lights on).
Lights on=10.01-21.59
Radiator on= below 21.5c
Radiator off= above 22.5c
Smart controller settings (during lights off).
Lights off=22.00-10.00
Radiator on= below 18c
Radiator off= above 19c
Mon 29/1/24
Lights on at 10.00am off at 22.00pm
#1 (Day 39)(Day 1 flower)
📋 H=45cm D=46cm DLI=23.1
At 9.00pm increased light to 150w
H=45cm D=46cm DLI=24.0
Tue 30/1/24
#1 (Day 40)(Day 2 flower)
📋
Wed 31/1/24
#1 (Day 41)(Day 3 flower)
📋 H=48cm D=43cm DLI=28.4
🚿 foliar sprayed (Sumo Boost 2ml/L).
Thur 1/2/24
💧💧💧💧💧💧💧💧💧💧💧💧💧💧💧💧
Method= automatic
Feed=water
Neutralise=0.1ml/L
Roots=0.2ml/L
Easy Ph down=0.ml/L
Ec=0.2 PH=6.6/6.6
Time start=12.00pm
Finish time=13.45pm
(11×5 minute runs with 5 minute gaps)
Total flow rate=181ml/min
Flow rate per plant=45ml/min.
Total volume made=14L
Total volume left=4L
Total volume used=10L
Volume per plant=2.5L (Est)
Runoff.
Total runoff=1L
Ec=2.0 PH=6.1/6.2
💧💧💧💧💧💧💧💧💧💧💧💧💧💧💧💧
#1 (Day 42)(Day 4 flower)****
📋 H=50cm D=41cm DLI=29.0
Lifted light and increasd power to 196w.
H=50cm D=50cm DLI=29.5
She is doing great, has a nice height and shape to her. No problems still. She has been under 12/12 for majority of the week.
Back soon.
Take it easy.

Likes
11
Share


@Ananas_Comosus
Follow
Sunday, 28-08-2022
Looking and getting frosty. Upward growth seems to be slowing down. Top-dressed midweek with 60 ml Humic Acid flakes. Foliar sprayed yesterday with The Amazing Doctor Zymes Eliminator(TADZE). Plants continue to seem pest free since starting to use TADZE.
Only one midweek feed due to pots being saturated with rain on previous weekend. Supplemented feed today with Beneficial Booster comprised of 50 ml molasses, 125 ml EMAS and 15+ ml~ Recharge in 12 litres stored rain water with the molasses diluted in 950 ml filtered tap water, rain water EC=0~, final EC 1.7.

Likes
52
Share


@DogDoctorOfficial
Follow
Let's realign our cosmic compass and embark on a harvest report for our magnificent Cosmos F1, a pure CBD strain that has taken us on an extraordinary journey. Brace yourself for cosmic revelations and interstellar delights!
After an impressive 11 weeks from seed and 7 weeks of flowering, the time has come to witness the cosmic culmination of our efforts. I carefully hung the entire Cosmos F1 plant to dry, allowing the cosmic energy to infuse every inch of this botanical marvel. It's a sight to behold, with majestic branches reaching for the cosmos, reminiscent of a cosmic dancer frozen in time.
As our cosmic queen gracefully dries, her vibrant hues continue to amaze. The shades of green, intertwined with delicate hints of purple and gold, are a testament to her genetic splendor. It's as if she has absorbed the cosmic essence of the universe, transforming it into a visually stunning spectacle.
Now, let's talk about the cosmic power of CBD. Our pure CBD strain holds the key to a transformative experience. With minimal psychoactive effects, this cosmic treasure offers a realm of therapeutic benefits. It's like a cosmic massage for the mind and body, soothing and relaxing, allowing us to explore the depths of cosmic tranquility.
The decision to hang the entire plant for drying is a testament to our dedication to preserving the cosmic integrity of our harvest. By allowing the branches to hang freely, we encourage a slow and controlled drying process, ensuring that the cosmic essence remains intact. It's a ritual that honors the plant's journey, preserving its cosmic magic for us to enjoy.
As we eagerly await the cosmic transformation, let us express our gratitude to the celestial forces that have guided us on this cosmic odyssey. The cosmos has aligned to bring us the extraordinary Cosmos F1, a gift from the cosmic garden gods themselves. We extend our heartfelt appreciation to the cosmic harmony orchestrated by @James and Royal Queen Seeds.
In the coming days, our dried cosmic buds will be ready for the next stage of our journey. From cosmic concoctions to cosmic culinary delights, the possibilities are infinite. Imagine infusing the cosmic power of CBD into soothing teas, cosmic creams, or cosmic confections. The universe is our canvas, and with our cosmic harvest, we can create cosmic masterpieces.
As we bid farewell to our Cosmos F1, let us cherish the cosmic memories we've shared. The vibrant colors, the pure CBD power, and the cosmic connection we've established with the universe. May our future endeavors be as cosmic and awe-inspiring as this one.
Until we meet again, my cosmic friends, lets keep exploring the cosmic wonders, nurturing our cosmic gardens, and let the cosmic energy guide our cosmic creations. May our harvest be abundant, our cosmic experiences be enlightening, and our cosmic journey be filled with celestial blessings.
As always thank you all for stopping by and for supporting me on this journey, i am super passion about growing and fell blessed to have you all with me on


Likes
20
Share


@Insaniac_0
Follow
8set Mainline & 6/4set Manifold in Auto Pot - Selfie Seeds Sweet Slurry x Sugar Cane (6X4) - Week 13
Flower Week 4 Day 28 to 34 - 4/15 to 4/21
Seeing some purple on the leave and they are really pointing up now... They both look extremely healthy this week. I cant really say enough about the autopot system, the once a week effort is a game changer for me.
Feed this week was an auto pot reservoir feed now at 750ppm total before add-ins. I used 750ppm of Bloom concentrate mix (recipe week 5). However, I also added 1ml/gal of CaliMagic (General Hydroponics 1-0-0) and ph balance this week was for 5.8 where Io plan to maintain it until harvest.
Next week nutes will decrease in Bloom mix again. The signs of trichomes, pistols, and calyx are all about 3 weeks from harvest now, so feed will be 400ppm before add-ins for with 5.8ph before feeding.
Likes
25
Share


@KivzBudz
Follow
In the end I’m very happy how this first Grow went. Tomorrow I’m gonna finish the other half and update some pictures. Curing begins now, can’t wait to smell and taste the full cured terpens! 😋🌱

Likes
6
Share

@Thedibber
Follow
Week 2 of flower starts. I can already tell this is going to be a jungle in 2-3weeks 😅
Likes
2
Share

@Oldwied
Follow
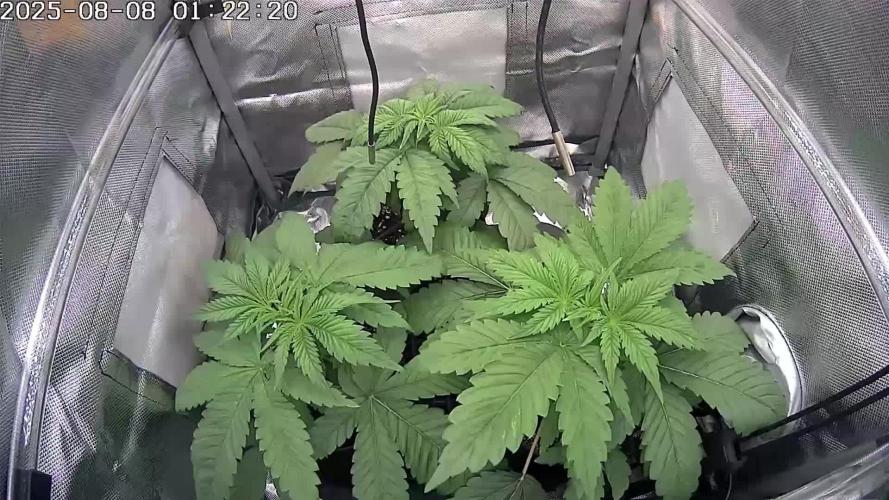
Everything is fine. At the beginning of the week I do the last tucking for the SCrOG.
Light Power: 90%
Day 66
Flower day 19
Photoshooting
Likes
3
Share


@Krautbauern
Follow
Our Calmag arrived on day 28. All the ladies were immediately cast.
On day 30, the plants looked better, but were still lacking. We therefore applied a foliar fertilizer which hopefully helped as an immediate solution.

Likes
31
Share


@LockDownGrow
Follow
this lady has stayed very short but bushy , she is drinking the least out of the rest and bud production has been minimal so far , i gave her a light / last defoliation this week and she has already recovered , purely too open her up too the available light ,
i really do hope she very soon steps up a gear with bud production otherwise i dont think there will be very much on the scales at the end ,
again have had absolutely no issues with this plant at any stage and she certainly has had more than enough light on her too produce , so lets watch this space and see what she can do ,


Likes
7
Share


@ROY4L_GU4RD
Follow
Day 53 of flower today. I filled the reservoir from empty and stopped using the macro. I replaced it with General hydroponics Ripen at 5ml a gallon. Everything is frosty and smells good. As far looks I like the RC the best and the PE the least. I'm going to end up with a sheet ton of it out of the 3 so I hope I'm wrong! 😆
I'm going to do a lower defoliation mid week to get more air flowing. RH is stable but I just want to be careful 🧐 being this close to the finish line. This is definitely one of the easiest runs I've had. It seems PE is pretty maxed when it comes to nutrition but LMC and RC could take a bit more. My PE phenotype is super stretchy compared to them as well.


Likes
5
Share


@eldruida_lamota
Follow
Que pasa familia, vamos con la cuarta semana de floración de estas GG4 Sherbet Fast Flowering, de FastBuds.
Agradezco a Agrobeta todos los kits obtenidos de ellos 🙏.
Ya veis que llevan buen ritmo ya tiene un color espectacular.
Vamos al lío, El ph se controla en 6.2 , la temperatura la tenemos entre 21/24 grados y la humedad ronda el 50%, 7 litros de sustrato. Iremos viendo cómo avanzan.
Agrobeta:
https://www.agrobeta.com/agrobetatiendaonline/36-abonos-canamo
Hasta aquí todo, Buenos humos 💨💨💨
Likes
6
Share


@Luv2Grow
Follow
Day 51 - Into the beginnings of week 8 and all is looking good so far. She’s still got a few days before she needs any water and she’s really fattening up each day. Other than that, not much happening with her.
Day 52 - She’s definitely fattened up quite a bit the last couple of day but hard getting the light spread out to some of her outer branches so my new light should be here and installed tomorrow. She’ll be needing her watering tomorrow as well, she’s almost dry.
Day 53 - Gave her 2 gallons of plain pH’d water today and she seems to be the only one not really bothered by the heat in the tent. I’m doing what I can to keep things as cool as I can but not helping much. Either way, this girl still seems to be thriving so not complaining too much about her.
Day 54 - Looks good after watering yesterday, he next will be nutes. She is fattening up beautifully. Other than that, I think she’s really liking the second light in there and the heat doesn’t seem to bother her too much though it’s finally cooling down a bit.
Day 55 - Nothing major happening today, she’s doing good after her watering yesterday and it appears she’s still chunking up. Got some updated pictures today as well.
Likes
Comments
Share

@AlpenZilla
Follow
This week marked a small milestone for Seriotica:
✔️ Topped
✔️ Lower shoots removed (light lollipopping)
✔️ Transplanted into the final 15L fabric pots – and wow, the root development was way further along than expected. Didn't see that coming!
First time used:
Great White mycorrhiza – and I gotta say, transplanting went super smooth.
No signs of stress at all – I’ll definitely keep using it 👌

Likes
Comments
Share

@eldruida_lamota
Follow
Vamos familia, actualizamos la sexta semana de floración de estas Forbidden Mochi fast de Seedstockers, Aplicamos varios productos de Agrobeta, que son increíbles para aportar una buena alimentación a las plantas.
Temperatura y humedad dentro de los rangos correctos en la etapa de floración.
La tierra utilizada es al mix top crop, por cambiar.
De 5 ejemplares seleccioné 4 para completar el indoor y trasplanté directamente a macetas de 7 litros, se ven bien sanas las plantas tienen un buen color, progresan a muy buen ritmo, ya empezaron a progresar las flores a tricomar y a coger tonos púrpuras rosáceos, están increíbles.
Agrobeta:
https://www.agrobeta.com/agrobetatiendaonline/36-abonos-canamo
Hasta aquí todo, Buenos humos 💨💨💨

Likes
36
Share


@BrigadeDesTerps
Follow
Petite taille effectué, j’ai coupé l’apex et j’ai laisser seulement le noeud juste en dessous de celui qui étais le plus développé, pour vois si les deux repousse de l’apex et celle du noeud en dessous arrive à la même taille/croissance , afin d’être le plus symétrique possible.
Car avant tous je suis passionné par l’art végétal et le bonsaï, j’ai commencé à cultiver du cannabis il y a maintenant 3ans, un été j’ai planté une petite graines dans un bête terreaux vide de nutriments, et là tout a commencé. Mais comme dis précédemment j’aimais l’art, et ce plant en question je l’ai transformé en bonsaï, un magnifique bonsaï, un chef d’œuvre, au quel j’ai perdu toutes photos. L’année d’après j’ai recommencé le même scénario, une graine et on recommence, la se fut un échec, plant trop gourmand et trop sensible au stress, il m’a lâché à 3/4semaine de floraison, puis maintenant 1ans que je cultive en intérieur a rechercher une bonne recette de living soil, toujours à la recherche de perfection jusqu’à couper avant même la fin de floraison car j’étais pas satisfait du résultat. (C’est pour ça aussi que j’ai supprimé tous mes journaux) J’ai coupé deux cultures comme ça et j’ai fais qu’une récoltes sur la troisième. Maintenant celle qui m’excite le plus est la petite graine d’extérieur, oui comme on dit jamais deux sans trois, plus de 1ans que j’attends cette variété, la Frosty purple freak. Le mutant violet de chez Khalifa Genetic. Que je vais bien évidemment travailler comme un bonsaï, mais symétrique , je vais éviter de trop le stresser comme j’ai eu du retard sur la croissance du a certain imprévu de type limace et temps catastrophique. (2 graines bien planté dans mon derrière.) je vais essayer de bien le diriger tous en essayant d’avoir une certaine récolte, en faire un bonsaï crée d’énormes stress au plant et ralenti considérablement la croissance, pour essayer de récolter 50/100 grammes sur le plant en extérieur faudrais approcher les 3/4 mois de végétation si tu implique des haut stress training et de la coupe a gogo. Et j’avoue que j’ai pas payer plus de 50litre de living soil juste pour 15/20 grammes de récoltes sur le plant, même si la satisfaction d’avoir fait une œuvre d’art, ça ne vaut pas le coup, je ferais mieux l’année prochaines, je dois accepter cette défaite.
J’ai mis des vidéo de mon deuxième bonsaï, il étais en début de floraison et il avait environ 4mois, sans nutriments ,je lui estimais 30/50 grammes en fin de Flo, mais il m’a lâcher.
Dans les deux dernières vidéo, il y en a une où on voit bien le dépôt bactérien et nutritifs du thé de compost oxygéné.
Recette du thé pour la semaine
15litre d’eau de pluie
30 gr guano guali
15 gr Meal wormcastings
15 gr nettle
7 gr spirulina
7 gr Hydrosolat Kelp
225 gr wormcastings
15 gr hydrolysât de poisson
15 gr Comfrey
10 gr levure saccharomyces cerevisiae souches lycc 6420
60 gr Zeolit of chabasit
15 gr Azomite
45 ml de mélasse
15ml d’acide Humic et fluvic
J’ai arroser 6 litre pour la purple freak et le reste a d’autre plantes
Et un autre arrosage avec 500ml d’eau neutre avec 1gr bacilllus amyloliquefaciens x5 qui a été effectué le lendemain du thé
La culture se passe bien, du côté de la purple freak
Aucun problème à déplorer, plant très résistant, au changement de température et condition climatique supporte très bien les orages et les temps pluvieux et chaud, pas de signe de maladie, j’ai actuellement des ravageur depuis le début de la culture, pas un signe de problème. Réagit très bien au coupe, j’en suis plus que ravie, elle fait partis de mon top1.
Seul truc qui m’inquiète, c’est ce mauvais temps. Un mélange de chaleur et de pluie, qui a amené de l’oidium sur certaine de mes plantes extérieur, j’ai peur que cela se propage sur la purple freak. Je vais devoir traiter tous cas, sans traitement agressif bien sûr.
