By continuing to use the website or clicking Accept you consent to our cookies and personal data policy and confirm that you are at least 18 year old. For details please see Privacy Policy and Terms
Accept
Likes
Comments
Share

@Danylo
Follow
I would describe myself as a grower who gets more enjoyment out of the growing process itself than from the result of it. Not on this one though.


Likes
37
Share


@m0use
Follow
Plants are chilling, added in some bokashi and dry amendments, not expecting much more from this plant, just needs to finish growing and we can be done.

Likes
7
Share


@NCgrower252
Follow
Next week will flush plants with flavored extract and unsulfured Molasses. All is great!

Likes
37
Share


@GrownwithLED
Follow
After germinating the seeds are transplanted into small pots with soil (see tutorial in VIDEO above). The soil is prepared with water mixed with a little bit of BIO NOVA Roots (0,5 ml/l), which aids the development of the seedling. Transplanting is very easy now, because they have grown a STRAIGHT tap-root while hanging during the SERIOUS' WAY of germination. This straight root allows for easy potting of the seeds. Simply make a little hole in the center of the soil with your pinky finger and carefully place the germinated seed with the white root pointing DOWNWARDS into the hole. Best is to lay it onto one side-wall of the hole with the seed shell right at the surface. Then I push the other side inwards and enclose the whole root with soil. At the end only the top of the seed-shell peeks out of the soil. IT IS VERY IMPORTANT to plant the seeds NOT TO DEEP into the soil. The seedling only needs extra strength to work itself upwards thru the soil and you run the risk of the soil drying out and the seed dying off. When you PLANT THE SEED VERY SHALLOW into the soil (=with the top of the seed-shell still peeking out) your seedling can grow out right away and you have a small plant already 24 hours after putting the seed into the soil.
The small seedling sometimes still has the seed-shell on its 'head', it normally falls off by itself, but sometimes you have to carefully help and take it off with your finger nails. Be careful to NOT clip of the seedling accidentally when you do this!
The seed-shall has an inner lining, which feeds the small seedling when it germinates. This inner lining sometimes gets tangled around the stem of the small seedling after the shell has fallen off. This little skin MUST be taken off the stem right away! Once it dries up, it gets hard and can strangulate the seedling around the stem. In order to avoid this, the skin must be taken off as soon as possible! I show it in the pics above and also made a video about taking off the inner lining of the seed.


Likes
Comments
Share


@TrimQueen
Follow
15th day of blooming. the clone of the clone. Let's go for another round of 24k gold.
Processing
Likes
58
Share


@Dahoola
Follow
---------------
Start week 3
--------------
We started week 3 as we ended week 2, which is great. She continues strongly at the beginning of this week and seems almost unstoppable. She clearly enjoys her surroundings and looks very healthy. She has started preflowering and seems to be gearing up for another explosion in growth. She is very good at leaftucking and has already developed a good number of shoots. On to more! A new update at the end of this week.
-----------------
Update Week 3:
-----------------
End of another fantastic week for MBAP. This week was all about pre-flowering and you can see that she is preparing for an explosive bloom. She has benefited enormously from the LST that I applied and has a good number of shoots ready to explode during flowering. In addition to leaftucking, have also removed the lower shoots so that she can concentrate her energy on the upper shoots. I also did the biotabs in the ground in the middle of the week. We have opted for 3 biotabs in 20-25l soil. Have waited several weeks before putting the tabs in the ground because we work here with aitoflowers. And they prefer a light feeding regiment for the first few weeks. We are going to gradually lower the humidity and get ready for flowering and week 4! Until next update

Likes
38
Share


@GreenHouseLab
Follow
Made the switch to the Nova and voila. Huge difference in overall health and should be rocking the pistils here in no time.
Merry Christmas to all,
GHL


Likes
4
Share


@Ninjabuds
Follow
My Rainbow Melon plant is thriving! It's the second biggest in the tent right now and growing like crazy. The smell is still amazing, too – a really sweet, gas aroma that fills the whole room. I'm excited to see how big those buds get!
The weather has been absolutely gorgeous this past week! We've been hitting that sweet spot of 70 degrees during the day, perfect for getting outside and soaking up some sun. Then, it cools down to a comfy 50 degrees at night, which is ideal for sleeping with the windows open. I've been loving all the fresh air!
I finally got around to building that little wooden planter for my windowsill. It was a fun project, and now my regular plants have a nice new home. It really brightens up the room, and I'm thinking of adding some herbs to it soon. Maybe I'll even try growing some basil!
Likes
8
Share


@Grow_for_Happiness
Follow
Was another good week this week. Seem to have figured out the brown spotting, started adding sensi-calmag to the mix and the spotting has stopped and leaf color is darkening back up. Not sure if was from calmag deficiency or low nitrogen, but either way they look better so it seems like it was the right call.
Did a light defoliation early in the week, maybe a dozen leaves per plant. Just the usual stuff under canopy or bunching too much. Has been much easier to keep humidity down since the heavy defoliation a week ago.
Buds are really starting to look good on three of the four plants with the front left being furthest along. She is starting to pack frost already! Back left still looks a week behind, but coming in strong. Could this be a come from behind winner?
Last day of the week took apart the Autopot system for a good clean. Clean the res, flush the lines with line cleaner, pull and clean the valves with dish soap, cleaned out the trays, wipe down the underside of the pots and back together it all goes. Been running for 40 days and this is the first clean, should be the only one as there's only maybe 40 days left. I find the B52 builds up a bit of sludge after a month or so, but worth using have seen noticable better grows since adding it to the feedings. Either way, an hour of work once a grow is nothing to complain about VS all the time out in hand watering. Also a big improvement on the newer 5.0 valves vs the previous generation. They are about double the diameter, so they gunk up MUCH less and fill a lot faster. Using the old valves I was cleaning every 1-2 weeks depending on feeding frequency.
Lights 18" @90% pushing 700umol/s
Watering 32L every 3 days
Air domes running 100% of time
4" intake @70%
6" exhaust @50%
6" Oscillating fan @50%

Likes
8
Share


@DabNinja710
Follow
5/17/2020
so this is the 3rd week! The lil girl is looking so good. A little smaller than my other plant.
5/18/2020
No water todayvshe looks lovely!
5/19/2020
I gave her just a little 6.5ph'd water.
5/20/2020
It grew its first five point leafs 🍃 I'm pretty excited about it.
5/21/2020
I added some nutes for the fist time.
Big bloom, grow big, microbe brew, Kangaroots, kelp, and holy mackerel
5/22/2020
I did a huge mistake I used table spoons instead of tea spoons. Stupid rookie move. Im pretty worried about it but ill just going to keep an eye on it.if it starts to show nutrients burn ill flush the plant.
5/23/2020
This is the end of week 3. I never thought Id see. Im glad I did this some mistakes but what new grower doesn't have them?


Likes
5
Share


@BelBudz
Follow
Despite the deficincies I'm still happy with the result!
I used Coco/perlite as medium and found some deficincies in the very beginning and at the.
For a next grow I would probably add worm castings and silicium flash for a better start. Place the tabs in a bit later so they last the entire grow. Use orgatrex and bactrex more throughout the grow.
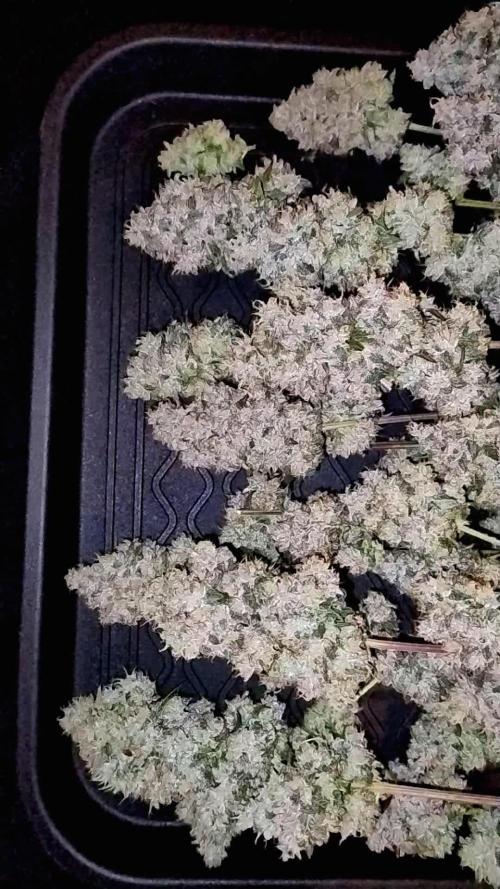
Update after drying:
End result is 31 grams of small and fluffy buds.
Not my best result and most likely caused by the deficincies early on in the grow.
Smell and look are all right. Waiting some more for curing before I will taste them.

Likes
27
Share


@ButterfliesLittleFarm
Follow
Hello Diary.
It ended the fourth week of flowering on my small farm. When I open the box, I am overwhelmed by the strong fruity scent. I have never had such a scented farm before. 😋
The plant looks really impressive, it is a little over a meter high, it is full of flowers that literally cover the whole branch, especially the main cola. 😎
Along with two Haze Berries on the farm, there is also one Fat Banana Auto, on which brown spots have started to appear. For now, Haze Berry looks healthy which gives him a rating more for resilience.
Watering is every 2-3 days, with BioBizz being added every other time. Maybe it’s too much for Fat Banana after all. Preventively I add CalMg 1.5 ml / lit.
Let’s take a look at what happened last week.
07/11/2020 - Day 44.
Watering. I preventively added 1ml / l CalMg and regulated p.H. at 6.3 with Plagron’s Lemon Kick.
Temp / Humidity on the farm - 25.4 degrees and 44% humidity.
09/11/2020 - Day 46.
Watering. Since I noticed leaf decay, I watered like two days earlier just by adding CalMg and I regulated p.H. at 6.4
Temp / Humidity on the farm - 25.7 degrees and 44% humidity.
12/11/2020 - Day 49.
Photographing and watering. This time I added BioBizz as scheduled for the current flowering week.
Temp / Humidity on the farm - 24.8 degrees and 44% humidity.
Overall, I am pleased with how the plants look and how well they are progressing. Now that the intense smell is there, I somehow see a light at the end of the tunnel. Two to three weeks and the harvest is coming. See you soon. 🙌
Likes
7
Share


@Baboon_Grows
Follow
Prepd DrForest Super8 Tea at 24C
Sprouted Seed Tea
Did foliar with SST
And soil drench with rest of the
SST & Super 8 tea
Likes
28
Share


@Southofheaven
Follow
Just started this journal, this is my 3rd grow in this box, experimenting with 3 toppings for 8 main colas


Likes
43
Share


@Jack_Greenstalk
Follow
Increased the amount of nutrients in the feed this week and got a little bit of burn on V, Nemo handled it no problem! removed the yellow spotted fan leafs as part of general defoliation for this point in flower. Continuing to pluck and tuck, meaning removing extra fan leafs (plucking) and bending tallest colas back under the scrog (tuck). shooting to keep all budsights 18 to 22 inches from the light to prevent burn and allow healthy development. I can see where proper distance has been kept best development has occured.

Likes
11
Share


@JoeyGonz
Follow
Lots of preflowers and already frosty AF. They are just now turning from pre's to buds.. I am also mimicking insects as crazy as that sounds.. Every other day I cut few leaves off, or slice off some leaf tips.. Besides cold nights I think that's a good way to make them think they have to defend themselves. Haven't had any health issues or insect issues thank God. The two girls I transplanted late are looking good didn't slows down. If anything they looked like they are happier, leaves up and creating tri's all over. About four weeks to go, But once again things are good to go.