
Likes
Comments
Share

@Mrs_Larimar
Follow
2025-09-18
SHAMAN- Lady loves her space.
She sitz in a rich deep bed of loose Soilmix, stabilized in 2 SCROGS, and covered from above
with a wonderful taransparent roof
We had a couple of rough days with heavy Wind and Rain, but she stayed safely
xxxxxxxxxxxxxxxxxxxxxxxxxxxxxxxxxxxxxxxxxxxxxxxxxxxxxxxxxxxxxxxxxxxxxxxxx

Likes
1
Share


@lebrongrows
Follow
2/18: 4 weeks since we planted them. Some of the new nodes since topping are starting to come in. Also finally got to doing some lst. First time, so I didn't rlly know what I was doing all that much, but my main goal was to pull branches outward and have more light reaching all the nodes. I should definitely have topped and done LST earlier, but oh well, now I know for next time. I also removed some of the new fan leaves that were covering the new nodes. My roommate wanted to experiment with the smallest one so removed some of its big fan leaves. I don't really think that was the right call, but whatever we'll see what happens. Would also have loved to try mainlining but its also pretty late for that. It would have slowed down veg quite a bit too, and since we have to go home from college in early may, they have to be harvested by then. Gonna water later this afternoon as well.


Likes
13
Share


@Inhaledmonkfish
Follow
Amazing week buds have grown loads both plant really top heavy both smell amazing and look beautiful!!

Likes
6
Share


@CalGonJim
Follow
1/16 it didn’t save the last thing I said on here it’s Tuesday and I just cut off a NUG and she is so good. I don’t need to dry her there’s not a lot of moisture this plant feels more like a crisp salad than anything else it’s just great I can’t even describe it but the smell and taste of the plant is the best and it doesn’t need to be dried. It just is perfect cut it smoke it and I love it it’s the best experience
1/17 👍
1/19
1/20

Likes
54
Share


@Mimi420
Follow
Hi guys!
In the last week I started to train my kushes.In the start of the week i super croped the uper ccola's to stop the grow in the height a litle.After 5 days for recoverin,I put the net in.and starting to filling up the space.
They gettin 3,5l with nutrients every 3-4 days.
I'am amazed othe huge leafs on dutc kush.So far is everything going ok 🙂


Processing
Likes
15
Share


@FishTankGrow
Follow
Everything going strong.
Baby Yoda spreading his ears.
One leaf started to curl a bit. Maybe too much water?
Starting nutes tomorrow.
The more leaves. Wanted to start nutes but soil is too moist.
Will hold off for another day. Just misting the surface.
Started with Fox Farm at 1/3 dosage as my soil had organic nutes in it already. Starting slowly.
Saw a gnat running around. Stopped water and misting. Put some packing tape in. Should be ok. 😁
Temperature is creeping up as I add more light. Maybe increase distance soon.
Increased the light distance. Leaves were looking a little baked. Maybe too hot as well.

Processing
Likes
22
Share


@horticulturale
Follow
Hi buddies! We are already in second week of flowering stage and the first flowers are starting to appear, the biggest plants are the ones that are showing flowers more quickly, so the others will show them on the next days, I hope 😁😁
Plants are looking strong and healthy so the best is yet to come!! 🤘🤘🤘

Likes
152
Share


@ThrashedTV_BakedByGlaze
Follow
VIDEO ADDED: DEC 29 2020!
--
PHOTOS ADDED: DEC 27 2020! MORE COMING
VIDEO?!
--
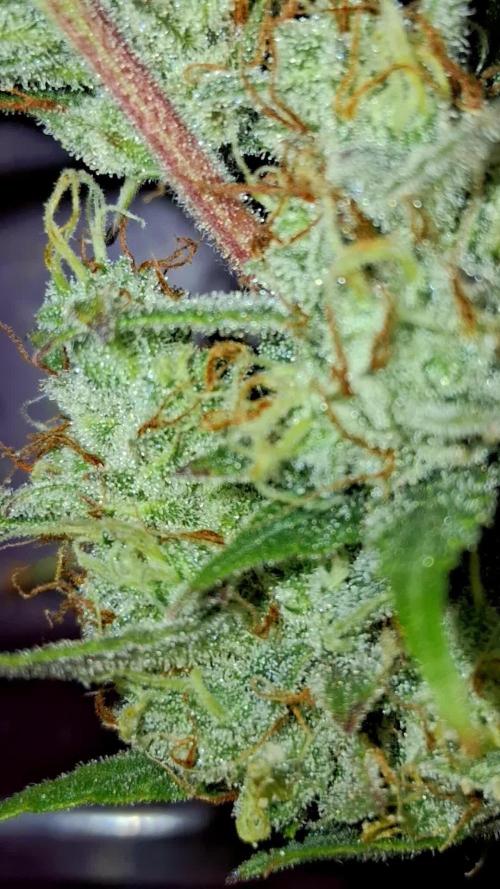
Smell is starting to come down from the fresh cut, definitely has a great look to the bud as the cure goes on, have two 8 gram boveda packs in there after a few days with one that was WAY too big for it 😂
Brought down my Chocolate Mint OG in my other diary right now as well, way more weight to that last plant... probably more than both these Chem Bombs combined, great genetics over @Humboldt_seed_organization 😎
--
PHOTOS ADDED: DEC 23 2020! MORE COMING!
--
DEC 19 2020 - Harvest Day
Chem-Bomb Auto .. DONE.
Step-Brothers ... CHOPPED.
Buds.. TRIMMED.
Giving them my first bud wash tomorrow! Already juiced the lemon, have the spring water, and off-brand baking soda because COVID has every place sold out of Arm&Hammer 😂
Dale: 50 Grams Wet Buds/Stem
15 Grams Trim/Larf = Total 65 Grams Wet
Brennan: 55 Grams Wet Buds/Stem
12 Grams Trim/Larf = 67 Grams Wet
Total Wet: 132 Grams (Buds/Stems/Trim)
Looks like I'm getting in and around the "1 Ounce per Auto Plant" range with my basic soil/hand feed system. The CMOG from my other diary looks like it will be my first 1OZ plant when it dries.
With my past experience of wet buds drying out to about half of bud weight, I'm hoping that they both come in JUST under an Oz a piece.
Going to update with more pictures, going to take a couple days to dry and get a good weight and hopefully get somewhere close to the 64 grams of the ONLY sized Boveda packs I have right now 😇
--
UPDATE - Dec 20 2020 - Cure Day
😵😭 i once again got my hopes up by pulling the classic male "over-exaggerating" and all the wet weight came from the main stems. After 3 days or so of drying both plants together came in just under an ounce. The smell is great and I have no doubt it's quality bud but I need to up my density game somehow for sure. New nutrients or better set up, still very low-end with all my equipment as I've just slowly been finding affordable pieces to add as I go. Maybe more light? Feel free to hit me up below with ideas short of switching to a Hydro set up 😹 I can hardly afford my bags of soil so I definitely couldnt keep up with the financial costs of a Hydro set up yet 😓
Have had a few bowls of the dried/uncured bud and it's very nice, clean, and crazy good for being uncured at this point. Just the classic flower taste from the chlorophyll but the pineapple/tropical taste is coming through nice already.
Final Stats:
26g Dried Bud
26g Trim
--
Thanks for checking in! Will be updating soon and posting more pictures! Throw down a like and/or follow so I can return the favour 🙌
--
IG: @GlazedGrow (DM and let me know you're from Grow Diaries so i can follow back!)
Likes
5
Share


@Pureleelove
Follow
This was an amazing experience for my first grow. Was super unsure of what I was going to yield, but I think 27 grams is a realistic harvest and Im looking forward to see if I can get bit larger of a yield on the next run. I want to try main-lining, see for better energy distribution and more equal bud growth. Also investment into a proper reflector and possibly enclosed space.
Note- I trimmed my plant the night before harvest morning. I removed than fan leaves to start, and then proceeded to trim the plant. I pulled out a lot of the leaves with no frost by hand. The sugar leaves had so much crystal on it I thought I would leave the smaller ones on the bud. I gave it a light trim, and used all the trim to make Isopropyl Alcahol (99%) based extract. Got about 1 gram from the run. I also had a nice little ball of finger charas from the trimming.
I harvested it in the morning at about 04:30 am before the light cycle triggered at 7am. She hung and dried for about a week, where I then chopped her into buds. She cured for 2 weeks before i started smoking.
Ask anything you want to know! Or if I can be more clear on any areas of the grow!
One Love!

Likes
23
Share

@BlaKX
Follow
Hi Growmies es vergingen noch 7 Tage bis ich Ernten konnte ich ließ die Pflanze komplett austrocknen nachdem ich sie ein letztes Mal gegossen habe mit klaren Wasser.
Leider ging es mir gesundheitlich nicht gut weshalb ich kaum Bilder gemacht habe und nicht richtig trimming. Werde noch Bilder den Blüten und Rauch bericht machen.
Likes
12
Share


@thonhash
Follow
Subimos algo más los ml de terranabis,buena asimilación y engorde,gracias a enzynabis que busca el equilibrio de todo.

Likes
12
Share


@Northernlights
Follow
Ich bin mir nicht sicher wann ich sie ernten soll... ist es jetzt schon zu kalt? Helft mir mal bitte
Danke im Voraus
Lg Jan
Likes
1
Share


@DmbTexasRanger
Follow
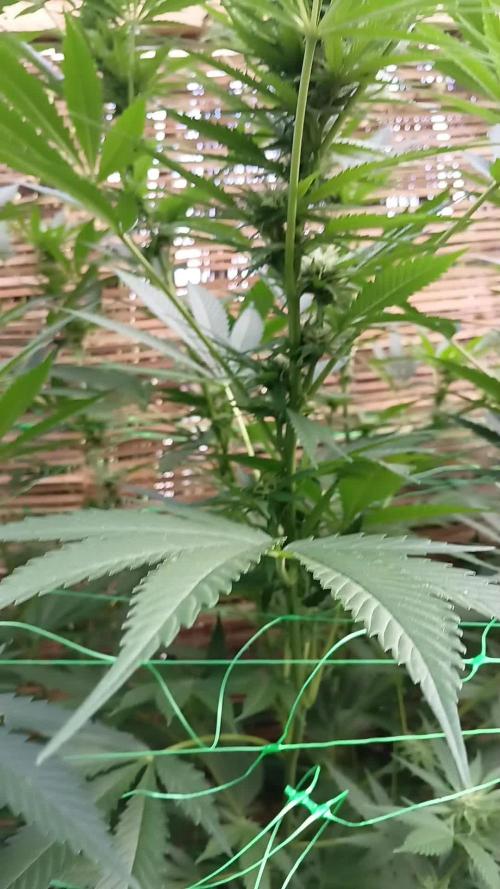
After seeing more serious grows have issues will flipping buds I trellis’ed. Happy to fill out the screen but I had crawling to feed starting this early

Likes
42
Share


@Papablob
Follow
29/12 encore 4 à 5 jour.🤤
01/01 Elle évolue trop bien pour que je la sorte maintenant.🤩 Donc les filles vont ce serrer pour quelques jours. 😀
04/01 Dernier jour. Et mon microscope est en rade..😂 Tout est normal quoi..😋

Likes
7
Share


@NCgrower252
Follow
Alcapulco Gold plants (3) are between 12”-14” and still receiving only pH balanced H2O. The other 2 strains are receiving nutrients listed above.


Likes
13
Share


@rkomaaa
Follow
A lot of problems with run off PH
It drove me crazy, and i gave up
Now is aprox 6.5 and i will see how it will go
Likes
27
Share


@Major
Follow
hello everyone I had a very positive week on my Barney’s Tropicana banana colas are forming and hardening full of resin are on the flowers and leaves the harvest is coming soon I am very happy good luck everyone😘👍👍👌🙏🏻
Likes
Comments
Share

@Xipsiomega1
Follow
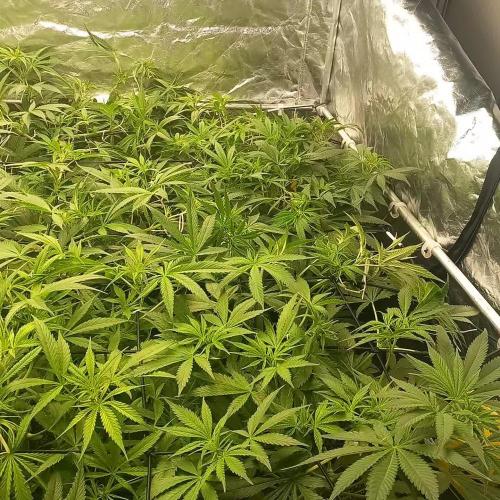
End of the first week in flowering, day 50 from sprout. I gave them 30 hours of darkness before switch to flowering and set the lights at 11/13 schedule for pushing to flower and avoid excessive strech. Some of these strains can stil grow for 4-6 weeks in to flowering. Plants look good. I tie up at the net every day and i am trying to keep the buds sites and stems down . I will try to do it in week 2 too to fill almost every inch of the net (1,5x1,5 meters). I water every 5 days generally and i give them 3lt of tap water. I don't measure ph as my grow is fully organic.

Likes
15
Share


@Antony_mow
Follow
Нам уже мало места, много новых стволов после lst, жду на днях новый гроубокс и лампу, так же через 2 дня начну вводить GHE nutriens
