


Likes
12
Share

@PapaTerps
Follow
Grand Prixx - Wizard Trees
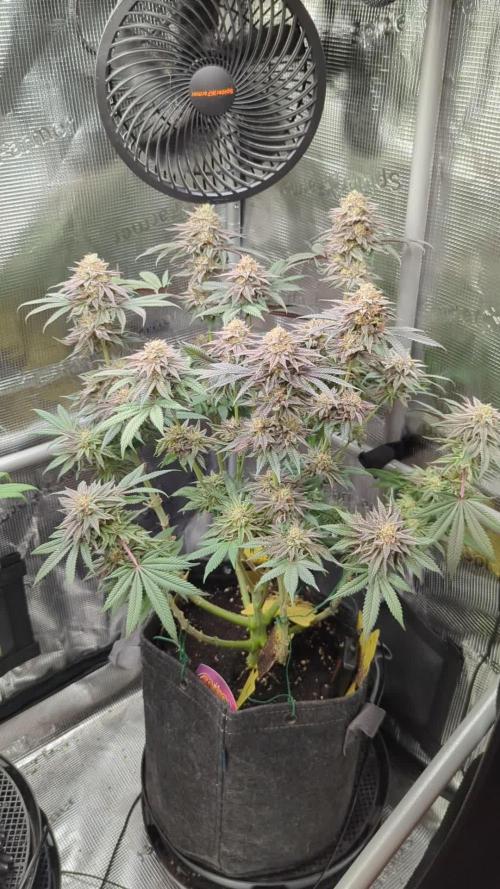
Day 115
🚿 She has been watered every thee days with 2L of RO tap water pH'd to 6.3. As she is approaching harvest, I have slowly reduced the nutrients until she was receiving just plain water. From today, she is just about half way through flush, so another watering and then she'll be left to dry back.
✂️ I've removed a couple of larger sugar leaves from around the flowers at the top canopy to improve light penetration, as well as the usual inspections for mold and pests👍🏻
🌸 Week 9 of bloom and she has been maturing nicely, all her trichomes are milky and all of her pistils are amber, her leaves have taken their autum colours and she is ready for harvest - one more watering and she'll be ready 🙌🏻

Likes
32
Share


@Zurban_Poison
Follow
Good evening, Ladies and Gentlemen!)))😎
Our little killer moved into a 5 liter cool personalized pot of a "Cannapedia Pro Growers Cup" participant !!!
I really liked these small cool and bright pots!)) I hope Peinkiller will like it)) especially if you take into account the fact that the peat soil in which she was transplanted was enriched with "BioGrow" from "GreenhouseFeeding"!!!
I am using this fertilizer for the first time and I am very interested in how it will be in further its growth and development will advance ..) we will see everything together))👌

Likes
2
Share


@GreenLupinCWB
Follow
Ficando com super tricomas , engordando bem e saudável,essa genética da latitud Sur seeds é muito boa,essa planta é um clone de uma olá tá mãe com mais de 5 anos, é uma genética estável e fácil de cultivo,com grandes resultados, precisa de bastante nutrição na flora e absorve bastante água então é bom regar sempre, resistente a pragas e a climas com a umidade alta .
Thai+México=Moby Dick+Super silver haze=Super Moby Dick.


Likes
10
Share


@BodyByVio
Follow
This week I Supercrop all the plants and spred them out over both lights. One more week of Veg and they are ready to explode
Check me out on Instagram @growmorestressless

Likes
16
Share


@Reddgrower
Follow
Got everything hung up. Stripped the fan leaves and broke down into sections. Run 60/60 or as close as i can get until the stems snap.
Likes
12
Share


@GREENPHOENIX6262
Follow
*Week 4 Flower 09/24*
Both Mimosa girls appear to be running fine with Mimosa (1) running a little behind but is catching up accordingly. Small oversight in early growth resulted in a minor stunt but she is improving dramatically.
Water Feed has increased by half a gallon ( 1gallon clean - .5 gallon nute feed)
*Week 4 Flower 09/28 - Mid week update*
Both plants are flowering accordingly - Mimosa (1) is a bit taller then Mimosa (2)
Buds are becoming dense and covered in trichomes.
No deficiencies - No areas of concern - Potassium and Phosphate feeds continue
*Week 5 Flower end of week recap - 09/30*
Both Mimosa's are flowering nicely - Budsites covered in frosty trichomes.
Mimosa (2) looks shorter but that is because her COLA was tied down to expose bottom budsites.

Likes
2
Share

@Ninjabuds
Follow
It’s day 43 of flower! All of the plants look great! I’m going to start dialing back the light intensity slowly over the next couple weeks. Harvest time is getting close
Likes
Comments
Share


Likes
35
Share


@SmokingTiki
Follow
My plants grow well! The leaves issue I get during last week seems to be ok now.
I trained the 4 plants. O.G. Kush and Honey Melon Haze in the begining of the week and the 2 Mandarin Punch on the last day.
O.G. Kush & Honey Melon Haze : topping + LST.
Mandarin Punch : topping only.
I struggled a little bit to maintain a good air humidity. It was oscillating between 50 and 70% but most of the time it was around 60%. I had to use a dehumidifier.
The fan is now "ON" at the same time as the light.


Likes
43
Share


@TheCannaProphet
Follow
~ GG4 SHERBET FAST FLOWER by FastBuds ~
Well fam, here we go again with another epic strain from FastBuds Fast Flowering stable. After having such tremendous success growing their Gorilla Cookies Fast Flower outdoors last year, I've decided to run another of their fast flowering strains outdoors this year... GG4 Sherbet Fast Flower!
The best description of this awesome cultivar comes directly from my friends at FastBuds which is as follows:
"Bred from extremely potent and flavorful Gorilla Glue and Orange Sherbet genetics, GG4 Sherbet FF (Fast-Flowering) takes all the best traits to the next level, offering a high-yielding strain that can produce up to 600 g/m2 in a 7-week flowering time. This super resilient Indica-leaning hybrid thrives indoors and outdoors, and in all types of climates while producing mouth-watering sweet, fruity, spicy and earthy terps that translate into a delicious sugary hazelnut aroma. Expect an extremely relaxing and overall happy effect that’ll leave you with a huge smile from ear to ear. It’s the perfect strain for growers of all levels of experience seeking low-maintenance yet highly productive photoperiod varieties that deliver quality and quantity without extra effort.
GG4 Sherbet FF grows chunky buds with long dark orange hairs and spade-shaped calyxes that get encrusted with trichomes by harvest time, giving them a gorgeous silvery-white appearance. This medium-sized photoperiod can reach up to 200 cm in height and yields up to 650 g/m2 while developing that typical hybrid structure. GG4 Sherbet FF grows with a stocky, bushy appearance, developing one sturdy main cola and fat side branches that support huge yields without much effort. This super-fast variety produces distinctive light-green buds with a high bud-to-leaf ratio, making your trimming sessions a breeze. It’s a top-notch resin producer that doesn’t need much maintenance and will thrive in almost every climate, rewarding growers of all levels with extremely flavorful resin that makes for outstanding hash end extracts."
________________________________________________________________________________________________________________________________________________________________________________________________________________________________________________________________________________________________________________________
The Setup:
This is going to be an outdoor grow, but I have started the GG4 Sherbet Fast Flower indoors as our weather is still too cold to put her outside (nighttime temp's dipping regularly into the 30's℉).
The plan is simple... let her grow inside under a 19/5 light schedule until the nighttime temperatures stay above the mid 40's℉, at which point she'll be moved outside and transplanted into the soil which I have already setup and inoculated with beneficial microbes, and then let the fun begin!🤪💚
________________________________________________________________________________________________________________________________________________________________________________________________________________________________________________________________________________________________________________________
Weekly Updates:
5/9- Week Six for the FastBuds GG4 Sherbet Fast Flower and she is doing great!
Our weather, so far, has been rather cool and damp. We've had showers on and off every 2-3 days which has taken care of my watering chores which I won't complain about.
5/11- I'm continuing to monitor the leaf damage and am keeping up with the Neem Oil applications to mitigate as much further damage as possible. I still have yet to put eyes on the culprits responsible for the damage to the leaves. Tomorrow I'm going to top dress the GG4 Sherbet for the first time since transplanting outside into her pre-amended soil mix.
5/13- Yesterday, I top dressed the GG4 Sherbet FF with 2 cups of Gaia Green 4-4-4 All Purpose and 1/2g of worm castings. After top dressing and working the amendments into the soil, I watered them in via garden hose with well water.
5/15- There's six weeks of veg for the FastBuds GG4 Sherbet Fast Flower and, with our weather finally cooperating, she's beginning to really take off! I can't wait to see what she'll do over the course of the next few weeks... should be exciting!
Thank you for checking out my diary.
Likes
15
Share


@Seabass
Follow
4.7.
every 3 days 4liters for 5 plants
Ph 6 with fertilizer
Slug repellent
Ants repelent
Yellow stickers
Neem oil


Processing
Likes
10
Share


@MichaelMan
Follow
Noticed that on one plant leaf tips are curled down and some of them are yellowish. As I am giving them enough nutrients and using ph perfect advanced nutrients it still may be the ph because these nutrients are meant for hydroponic system. Thinking that they might have a nutrient excess because how dark green they look.
After topping their growth have stunted a bit but it’s normal.
Overall they seem very healthy


Likes
29
Share


@CanadianFillmore
Follow
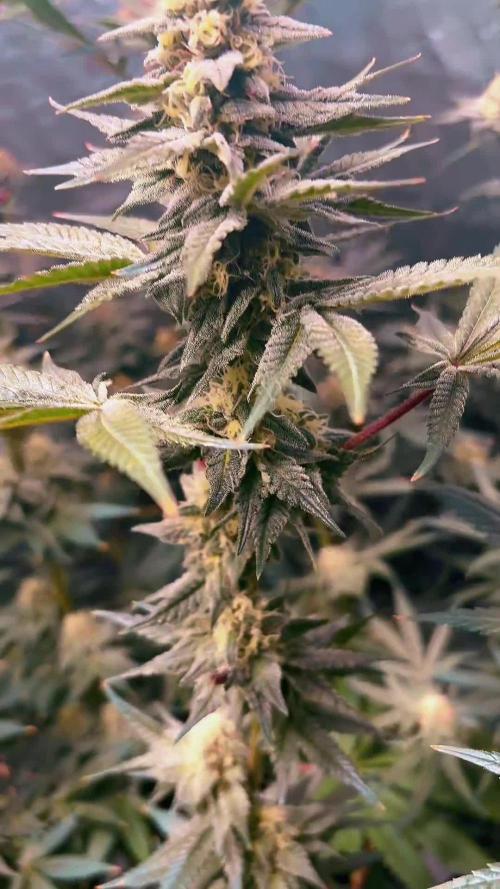
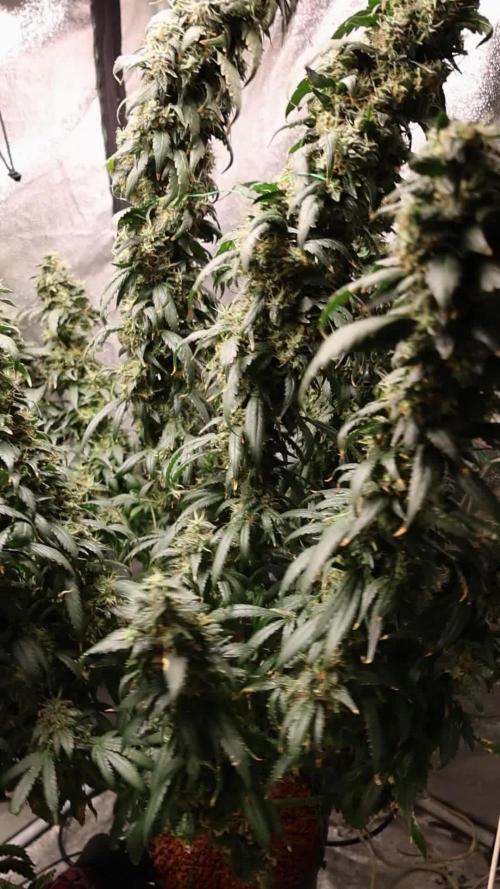
Week 8 begins for LSD. Frost, bulk and an incredible fruity smell. If this girl smokes and tastes like she smells, she's got a long term home in my garden. Last week of feed before flushing.
Thanks for stopping by, tune in next week! 👽🌳🔥

Likes
9
Share


@Bread_n_Buds
Follow
Now we've reached day 25.
We are in the transition phase, pre-flowering if you want, when the seedlings reveal their sex by showing the white fluff or the boyish balls. Here and in all F1 Hybrids you can be SURE, SURE as death that you will never see any balls.
If you have underestimated this aspect of the F1 Hybrid, go back and think about how many times you found the balls on the paint, full of pollen that fertilized your ladies.
Do you like having young ladies impregnate you? Absolutely not for me and this is a very valid reason why you can choose the F1 Hybrid. Really guys the seeds suck and the genetics of the various breeders if they don't do a job like this it means that they are super hybrid poles with genetic traces scattered here and there. Inglourious bastards.
Here we don't want to be Aryan but to cultivate healthy plants with safe results.
Our Pineapple Express F1 HYBRID goes very, very well, even with very slight signs of overfeeding but lighter than the others, almost non-existent. Nothing that affects the final quality and beauty, you will see in the end.
To fix this little thing we go to flush with pH 6.2 and only give Aptus Regulator which should rebalance the plant and soil before delicately moving on to fertilizers for flowering.
Site Description
ZAMNESIA SEEDS - PINEAPPLE EXPRESS F1 HYBRID AUTOMATIC: FRUITY FLAVORS AND ENERGETIC EFFECTS
Combining Trainwreck with Hawaiian, Pineapple Express F1 Hybrid Automatic brings a beloved strain to new heights. This autoflowering F1 hybrid cultivar ensures exceptional uniformity, reliability, and stability, making it well-suited to growers of all experience levels. If you've not checked out Pineapple Express F1 hybrid Automatic for yourself just yet, now is the time.
GROWING PINEAPPLE EXPRESS F1 HYBRID AUTOMATIC
All it takes is 8–9 weeks from germination before Pineapple Express F1 hybrid Automatic is ready to harvest. Thankfully, very little effort is required throughout the growing process, aside from a bit of maintenance, to ensure ample, high-quality harvests. Thanks to its F1 genetics, Pineapple Express F1 Automatic offers superb resilience and uniformity, meaning all plants will have a similar height and appearance, and will churn out comparably large yields. Reaching heights of 50–70cm, Pineapple Express F1 Automatic is not an overbearing plant and can effortlessly slot into any setup. Once ready to yield, growers can see a return in the region of 400–550g/m² indoors and up to 200g/plant outdoors.
AROMAS, FLAVORS, AND EFFECTS OF PINEAPPLE EXPRESS F1 HYBRID AUTOMATIC
Just one hit of Pineapple Express F1 hybrid Automatic treats users to a rich assortment of flavors and aromas. This strain offers strong pineapple notes alongside moments of citrus, spice, and pine, making for a mouth-watering blend that's extremely moreish. Bolstered by 21% THC and an array of cannabinoids, Pineapple Express F1 Automatic showcases an energetic and uplifting high that will have you feeling chatty in no time. So if you've been looking for a strain to enjoy with friends, Pineapple Express F1 Automatic could be just the thing.
As for fertilizers, I'm doing a small comparison experiment to finish off the fertilizers I had at home, it's not 100% indicative, it's only on two specimens but given the stable genetics I decided to try to compare the results of Plagron Vs Aptus , both excellent brands which they will certainly produce beautiful plants which are already of excellent stable genetics. In the next few weeks the comparison will be more evident now the seedlings are still very small and just potted.
So seeds of all brands, in addition to these great F1 Hybrids and the entire Zamnesia line, fertilizers and everything related to the world of cannabis, you should buy them from the best online store in the sector www.zamnesia.io
Likes
17
Share


@MG2009
Follow
09/22/2022
had to harvest early because of but rot, powdery mildew, bud smells incredible, but I had root issues it had very weak root system, probably my fault for starting her so late in season. I will definitely try again in spring, I might get a couple joints off her but not much more. Again I will take the blame for I did not give her a fair chance.
