


Likes
Comments
Share

@GERGrowDesigns
Follow
Growers, Welcome to my Dutch Passion Diaries Competition 2025 entry!
For this competition, I’ve chosen the Indoor Feminized strain: Orange Bud 2.0
Media from Week 19 or Flower week 8-9 After Moving into the New Tent for the flower weeks. Stage.
Here’s what I’m working with for the Final Tent :
• 🌱 Tent: 220x150x150
• 🧑🌾 Breeder Company: Dutch Passion
• 💧 Humidity Range: 50
• ⏳ Flowering Time: 8W-10W
• Strain Info: 20-25%THC, Sativa
• 🌡️ Temperature: 26
• 🍵 Pot Size: 0.5l
• Nutrient Brand: Narcos
• ⚡ Lights : 720W x 2
Dimmed to 400w Each at the Moment. Because of Heatwave ⭐
A huge thank you to Dutch Passion for allowing me to be a part of this amazing competition and for supporting the grower community worldwide! Your genetics and passion speak for themselves!
Curious to try these strains for yourself?
You can check them out and support me at the same time through my personal link:
https://dutch-passion.com/?a_aid=GGD
I would truly appreciate every bit of feedback, help, questions, or discussions – and of course, your likes and interactions mean the world to me as I try to stand out in this exciting competition!
Let’s grow together – and don’t forget to stop by again to see the latest updates!
Happy growing!
Stay lifted and stay curious!
Peace & Buds!

Likes
26
Share


@datrobspeoria
Follow
Hello. this plant is in the first week of stretch and along with the worms hoping to get to about 5 feet tall.... Thanks for checking out my grow and have a great day!

Likes
36
Share


@MadeInGermany
Follow
Flowering day 56
since time change
to 12/12 h.
Hey everyone :-).
We are now close to the harvest 😍
This strain is really extremely fast 👍.
Both phenotypes now remain there for 3 or 4 days before they are put in the darkroom for 48 hours 😁.
The trichomes are now 70% milky and 30% amber ☺️.
They were watered one last time today with 1.2 l per plant so that they can dry again until the darkroom :-).
Before the last update, there will be an interim update of the harvest 👍.
Until then, I wish you lots of fun with the update.
Stay healthy 🙏🏻 and let it grow 🍀
You can buy this Strain at :
https://sweetseeds.es/de/sweet-skunk-f1-fast-version/
Type:
Sweet Skunk F1 Fast Version
☝️🏼
Genetics:
Sweet Skunk Auto (SWS34)
X
Early Skunk
👍
Vega lamp:
2 x Todogrow Led
Quantum Board 100 W
💡
Bloom Lamp :
2 x Todogrow Led
Cxb 3590 COB 3500 K 205W
💡💡☝️🏼
Soil :
Canna Coco Professional +
☝️🏼
Fertilizer:
Green House Powder Feeding
☝️🏼🌱
Water:
Osmosis water mixed with normal water (24 hours stale that the chlorine evaporates) to 0.2 EC. Add Cal / Mag to 0.4 Ec Ph with Organic Ph - to 5.5 - 5.8 .

Likes
64
Share


@Prof_Weed
Follow
Heute startet die Woche 7, hohe Luftfeuchtigkeit und hohe Temperaturen.
Ist immerhin 10 cm gewachsen und supergesund.
Hier und da mal paar Blätter und Mini Blüten entfernt und ein wenig Super Cropping..
Pre Flowering hat ein wenig eingesetzt.
Die Madame Sour Jealousy von FastBuds soll nur wachsen nicht das blühen anfangen!

Likes
14
Share


Likes
34
Share


@BelSun_420
Follow
📋Summary of previous weeks:
I kept watering only by misting the surface and set the light schedule to 21h daily (06:30-03:30), with the lamp at 85cm and dimming adjusted from 45% to 55% throughout the week. The average temperature was 20°C and humidity 72%.
The backup seed #R03 germinated on 13/02, and I started applying Bio Rhizotonic (1ml/1.5L) on 14/02. On 19/02, I did the first complete watering around the plants (300ml per plant, only water).
🌱Heights at the end of the week/beginning of this one:
-#R01: 15 cm
-#R02: 10 cm
-#R03: 7 cm (backup, 1 week behind)
----------------------------------------------------------------------
2️⃣Week Vegetation: 20/02 - 27/02
💡 Light schedule: 21 hours (06h30-03h30)
📏 Lamp To Plant Distance: 80cm
⚡ Dimming: 55%
🌡️ Average temperature: 20,5°
☔ Average humidity: 72%
🌱Height:
- #R01: 15 cm
- #R02: 10 cm
- #R03: 7 cm (backup Seeds, 1 week behind)
----------------------------------------------------------------------
#21/02/2025
I watered again with 300ml, this time diluting 2ml of Bio Rhizotonic by Canna in 1l of water , which will be my last application of this product.
Throughout the week, I’ll post more photos and detail the development of my girls
🌱🌱🌱
----------------------------------------------------------------------
23/02/2025
The soil is still moist in the watering area, so I just sprayed some water on the surface.
----------------------------------------------------------------------
24/02/2025
I bottom-watered each plant with 1L of water without nutrients. 💧
I also raised the lights by 5cm and adjusted the dimming to 60%. 💡
----------------------------------------------------------------------
26/02/2025
I watered each plant again with 300ml of water, no nutrients, around the plants. 💧🌱
----------------------------------------------------------------------
#27/02/2025
End Of the week 2 VEG:
🌱Height:
- #R01: 19,5 cm
- #R02: 12 cm
- #R03: 10,5 cm (backup Seeds, 1 week behind
💚
Likes
3
Share

@MicroHidroGrow
Follow
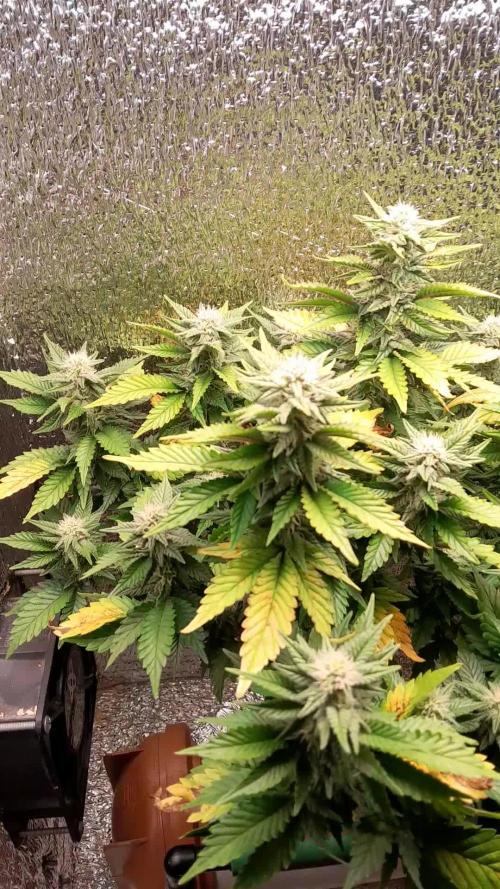
Terminando la 4ta semana y ahora voy a pasar a Overdrive . Espero que esto resuelva los problemas de PH que estuve teniendo. Si bien algunas hojas quedaron muy marcadas, espero que ahora deje de avanzar el amarilleo. Las flores se ven bien y las hojas chicas por ahora no fueron afectadas. De todos modos voy a seguir monitoreando el ph a diario. Hice un lavado antes de agregar esta solución y de paso hice una inundación del caño principal, pero salió bastante limpio todo. Ahora entro en las últimas 2 o 3 semanas, así que es la parte donde no puedo errar más.
Likes
55
Share

@MadeInGermany
Follow
Info:
Unfortunately, I had to find out that my account is used for fake pages in social media.
I am only active here on growdiaries.
I am not on facebook instagram twitter etc All accounts except this one are fake.
Flowering day 65
since time change
to 12/12 h.
Hey guys :-)
We arrived in the last days before the harvest 😊.
The buds have swollen again the last few days.
The trichomes are 90% milky and 10% amber 👍.
This week it was poured twice with 1.2 l each time (for nutrients, see table above).
As always, it is put in the darkroom for 48 hours before it is harvested.
There is still a harvest update and a final update after fermentation 👍.
Until then, I wish you all a lot of fun with the update and stay healthy 🙏🏻
You can buy this Nutrients at :
https://greenbuzzliquids.com/en/shop/
With the discount code: Made_in_Germany you get a discount of 15% on all products from an order value of 100 euros.
You can buy This Strain at :
www.Zamnesia.com
☝️🏼☝️🏼☝️🏼☝️🏼☝️🏼☝️🏼
Strain
Gelato clone from mother (Zamnesia )
☝️
Genetics: Wedding Cake x Gelato x Gelato 33
Vega lamp:
2 x Todogrow Led
Quantum Board 100 W
💡
Bloom Lamp :
2 x Todogrow Led
Cxb 3590 COB 3500 K 205W
💡💡☝️🏼
Soil :
Canna Coco Professional +
☝️🏼
Nutrients :
Green Buzz Liquids :
Organic Grow Liquid
Organic Bloom Liquid
Organic more PK
More Roots
Fast Buds
Humic Acid Plus
Growzyme Big Fruits
Clean Fruits
Cal / Mag
Organic Ph - Pulver
☝️🏼🌱
Water: Osmosis water mixed with normal water (24 hours stale that the chlorine evaporates) to 0.2 EC. Add Cal / Mag to 0.4 Ec Ph with Organic Ph - to 5.8 - 6.4
Likes
29
Share

@MadeInGermany
Follow
Info:
Unfortunately, I had to find out that my account is used for fake pages in social media.
I am only active here on growdiaries.
I am not on facebook instagram twitter etc All accounts except this one are fake.
Harvest day 73
since the time
change to 12/12 hrs.
Hey guys :-)
Finally the time has come .
The lady was harvested.
After the trichomes have been checked (70% milky 30% amber) as always, it was left in complete darkness for 48 hours before it was neatly trimmed by hand.
After trimming, she was put back in the drying tent on nets.
There they are allowed to dry for the next 8-12 days at 62% humidity before they are put into the jar to ferment with 62% boveda packs.
After about 4-6 weeks in the jar I will swap the 62% boveda pack for a 58% boveda pack where it can be ready for another 4-6 weeks to enjoy :-).
As always, the remains of the leaves are used to make Ice o Lator and oil.
Of course, as always, there is a final update during the fermentation process.
Until then, I wish you all a lot of fun with this update.
Stay healthy 🙏🏻 and let it grow 👍.
You can buy this Nutrients at :
https://greenbuzzliquids.com/en/shop/
With the discount code: Made_in_Germany you get a discount of 15% on all products from an order value of 100 euros.
You can buy this Strain at :
https://www.amsterdamgenetics.com/product/kosher-tangie-kush/
Type:
Kosher Tangie Kush
☝️🏼
Genetics:
Kosher Kush
X
Tangie
👍
Vega lamp:
2 x Todogrow Led
Quantum Board 100 W
💡
Bloom Lamp :
2 x Todogrow Led
Cxb 3590 COB 3500 K 205W
💡💡☝️🏼
Soil :
Canna Coco Professional +
Nutrients :
Green Buzz Liquids :
Organic Grow Liquid
Organic Bloom Liquid
Organic more PK
More Roots
Fast Buds
Humic Acid Plus
Growzyme Big Fruits
Clean Fruits
Cal / Mag
Organic Ph - Pulver
☝️🏼🌱
Water: Osmosis water mixed with normal water (24 hours stale that the chlorine evaporates) to 0.2 EC. Add Cal / Mag to 0.4 Ec Ph with Organic Ph - to 5.8 - 6.4


Likes
Comments
Share

@Bobbo94
Follow
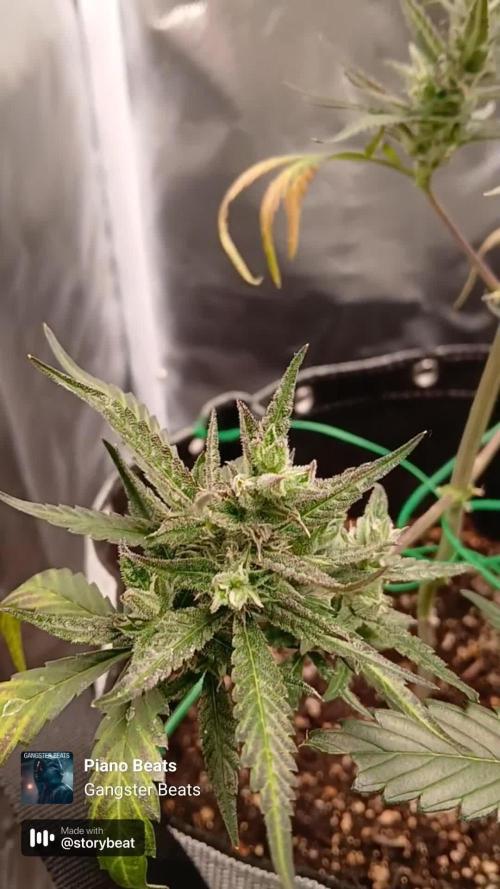
10th week, the smaller Strawberry G was already harvested. 5 grams dry weight. Twig snap two days ago I was out smoked it. Head buzz, Strawberry taste was light and delicious. High lasted about 4 hours. I have a habit of harvesting with hardly any amber so the potency is at its peak.
Processing
Likes
1
Share


@Ganjagrandaddy
Follow
DAY 49 : Another week passes and these 2 ladies are still up for the fight to another week.
Banana is still struggling g in the middle and cant seem to get ahead. She smells beautiful up close but is sadly not a great competitor so far. What she does have in buds is smelling nice and they are fairly solid to touch , just not a big plant really.
Monster Zkittelz on the other hand is a beast of plant . I Have been pulling lowers up to the light this week and she is so covered in secondary growth with nice sized , glistening buds that smell candy sweet . Grows very like GG in her thin arms and bigger buds but with a scrog net this strain would produce so well. I am not disappointed in her in any way. Another week and let's see where she is at then.
Likes
91
Share


@CANNASIM
Follow
RQS . STRESS KILLER AUTO CONCLUSION BEFORE HARVEST.
Harvest time is here, choose to do a final post with how the girl looks after the final flush, so enjoy.
If you are looking for a super resistant strain and easy to grow functional medical strain this is the one.
She was given tap water, and used flawless finish for 6 hours then flush again, 2-3 times in this two weeks, expecting top shelf from her.

Processing
Likes
5
Share


@PETEROG
Follow
Hey everyone at week 4 know and wow have these girls grown early this week I applied some LST and all took really well to say it was my first time trying this
Likes
12
Share


@rickhaZe
Follow
Dia 32: agregamos mas sustrato a cada planta y realizamos poda de hojas bajas y nudos mas desfavorable
Dia 35: agregamos la primera dosis de blossom blaster pro.
6 ml en 6 litro de agua, aplicamos 500ml a cada planta.
Dia 37: aplicamos 500ml de agua por planta.
Dia 38: sesión de fotos a todos los ejemplares de este cultivo y rotación de las plantas dentro de la carpa, todos los dias hago estos movimientos para que todas capten la misma luminosidad y el sustrato se seque mas parejo.
Dia 39: aplicaremos monster bloom en el cultivo, la solución será de 1.8g (ya que es en polvo) en 6 litros de agua

Likes
10
Share


@Barzenegger
Follow
Altough the "anonymous" seedling was still a bit behind, I decided to move the plants into the AutoPots. The pots were still disconnected from the tank and the plants were handwatered for the time being.
3 days later it was clear that "anonymous" had died. I was getting a bit frustrated since the fourth pot was now empty and the other 3 plants were growing happily. I started another germination attempt.


Likes
7
Share


@Salokin
Follow
Hi Growmies,
Can’t really see any swelling anymore and therefore started to flush her. PPM‘s are already down to 100 and will change the reservoir two more times during week 12 to try and bring it down to 0, followed by two days of darkness and harvest. This plant is saving my overall yield of this box, as the Mazaar has performed subpar, probably because she was sharing the box. The afghan, however delivered in terms of production, as promised by ganja farmer seeds.

Likes
7
Share


@Ieiogrow94
Follow
Eccoci qui!!!
Tutto procede per il meglio, i pistilli sono usciti e ora si va dritti dritti alla maturazione, NE VEDREMO DELLE BELLE!!!
Davvero molto molto intrigato da queste bellezze, STRAIN 1 mostra colori violacei nelle prendisole in alto e mi fa ben sperare nel fenotipo viola che cerco. Entrambe le piccole sono in salute e crescono molto vigorosamente... WOOOOW
Grazie a tutti per il supporto ❤️🔥🌲

Likes
3
Share


@Luke_Lee
Follow
—————————————————————
WEEK 3 / DAY 15-21
Mars Hydro FC-E3000
Floragard Professional GrowMix
11L Plant bag made of fleece
Light: 40 cm / 25%-75watt;
Schedule: 24/0;
PPFD: 460 umol/m2/s
22° C - 75 RH
250ml per Plant every 2-3days
PH 6,5-7
1ml BioGrow; 0ml TopMax ; 0mlBioBloom
1ml CalMag
#1 Royal Critical Automatic
#2 Royal Critical Automatic
Fan, extractor and pump ON 24/0
—————————————————————
- 03.02.2025
The second vegetation week begins. The ladies are doing very well. From this week onwards, 1ml BioGrow and 1ml Cal Mag (per 1 liter) are added to the water.
-06.02.2025
The positions of the plants in the tent were swapped. The smaller ones in the middle and the larger ones on the outside.
-09.02.2025
Last day of the second week of vegetation.
The plants look very good overall. So far I am quite satisfied with the growth.
One Royal Critical Automatic has slight rust-colored spots, the leaves will be removed right at the beginning of the third week.
Likes
47
Share


@hawkeye_diesel66
Follow
She is looking great. I topped all of her mains and then waited a few days then started to clean up the bigger fans to expose the lower sites to light and air.