By continuing to use the website or clicking Accept you consent to our cookies and personal data policy and confirm that you are at least 18 year old. For details please see Privacy Policy and Terms
Accept
Likes
Comments
Share


Likes
23
Share


@420DeepGrow
Follow
Gracias al equipo de Kannabia, Marshydro, XpertNutrients y Trolmaster sin ellos esto no sería posible.
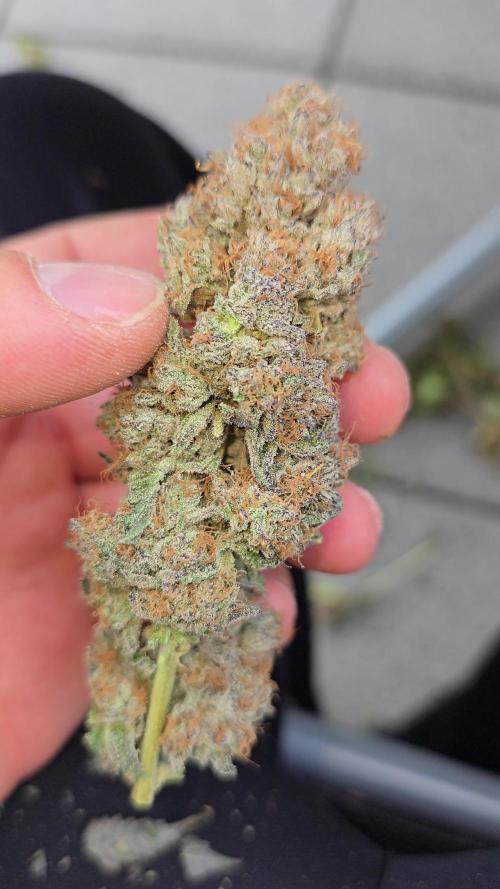
💐🍁 RS11:
Las variedades de marihuana son cada vez más grandes y mejores, y la Rainbow Sherbet #11 de Kannabia ha llegado para revolucionar tu mundo con su extraordinario contenido de THC del 30% y sus terpenos increíblemente deliciosos. Con una genética 70% índica, esta descendiente de la Pink Guava y la Sunset Sherbet ofrece muchas características interesantes, como su espectacular belleza. Sus cogollos a veces adquieren una tonalidad azul y brillan con una gruesa capa de tricomas, por lo que parecen piedras preciosas cannábicas.
Germina las semillas en exterior o interior, y prepárate para quedarte con la boca abierta. La Rainbow Sherbet #11 no necesita muchos cuidados para producir plantas robustas y vigorosas. Incluso los principiantes podrán conseguir un buen botín cuando llegue el momento de la cosecha, y los cultivadores que ya tienen experiencia no tendrán problemas para hacer que sus plantas rindan al máximo. Con un poco de LST podrás maximizar su producción, y tras 9 semanas de floración en interior conseguirás alrededor de 450-500g/m². Al aire libre, esta variedad puede generar hasta 500-600g por planta.
El nombre de esta variedad augura un montón de sabor, y la Rainbow Sherbet #11 cumple con creces. Sus cogollos tienen un aroma extremadamente complejo que convierte cada fumada en un viaje aromático. Las fragancias que más destacan son las afrutadas (principalmente a cerezas y bayas), así como las cítricas. Esta mezcla va acompañada de unos matices terrosos y especiados y de un toque de pino. Tras unas cuantas caladas, los efectos de la Rainbow Sherbet #11 aparecen con toda su fuerza, potenciando la alegría y la creatividad, calmando el cuerpo y la mente, y ayudándote a olvidar las penurias del día.
💡TS-3000 + TS-1000: se usaran dos de las lámparas de la serie TS de Marshydro, para cubrir todas las necesidades de las plantas durante el ciclo de cultivo, uso las dos lámparas en floracion para llegar a toda la carpa de 1.50 x 1.50 x 1.80.
https://marshydro.eu/products/mars-hydro-ts-3000-led-grow-light/
🏠 : Marshydro 1.50 x 1.50 x 1.80, carpa 100% estanca con ventanas laterales para llegar a todos los lugares durante el grow
https://marshydro.eu/products/diy-150x150x200cm-grow-tent-kit
🌬️💨 Marshydro 6inch + filtro carbon para evitar olores indeseables.
https://marshydro.eu/products/ifresh-smart-6inch-filter-kits/
💻 Trolmaster Tent-X TCS-1 como controlador de luz, optimiza tu cultivo con la última tecnología del mercado, desde donde puedes controlar todos los parametros.
https://www.trolmaster.com/Products/Details/TCS-1
📆 Semana 1:
Gran comienzo primaveral después de una germinación excelente. La etapa de plantula se desarrolla con normalidad.
Esta semana aplico tierra de diatomeas espolvoreada en el sustrato para proteger las plantas y las rocio con una solución de cola de caballo para prevenir futuros hongos.
Potencia de la lámpara: 40%

Likes
12
Share


@Brixx
Follow
Well thats my grow diary. I hope it ends up being informative of helpful to someone somewhere along the line. I have more grows going, but I am going to skip on diaries for now. See you next time.


Likes
41
Share


@TerpTurtle
Follow
15 Day dry then trimmed using the Trim Bin.
Curing with Grove bags, first harvest filled 3, 1/4lb grove bags.
*Updating with clone pictures of this pheno in late flower labeled in diary as you look through

Likes
12
Share


@yd_grows
Follow
Planta Reagiu super bem ao transplante e voltou a crescer rapidamente.
Isso fez com que eu decidisse fazer conforme programado e no último dia da 13 semana (29/01/2020) a 3 lampada (LED 50W 3000K) foi anicionada e o ciclo alterado para 12/12h.
Como a terra de transplante já era fertilizada, apenas após 1 mês de flor será alimentada.


Likes
13
Share


@Konkookush
Follow
Happy with the result when i started with a seed.
Mother : 100gr dried
Clone 1: 70gr dried
Clone 2 + 3: 90gr dried

Likes
25
Share


@MyWeedAccount
Follow
(technically, writing this on 9/19..sshhhhh): not too many updates again - still thickening up and getting foxtaily so i've decreased the light intensity.
I cut a small tester nug as you can see (ended up being about 1.5g dry) and dryed it for several days. I was too impatient so i defintetlely broke in a little early, but hey, that's what a tester bud is for, right? I vaped part of it and took one bong rip, and it's amazing y'all...the terps!!! THE TERPSSS!! I really hope I can preserve them when I cure this time. It's seriously like a watermelon candy now, and the effect was very clear-headed and relaxing - great for day vibes.
Also, can't remember if I said this or not, but I started just giving plain tap water since they're both clearly near the end. Will be chopping soon!
----
Thanks for following 🤙 Always appreciative of tips or suggestions

Likes
44
Share


@Cogollo_eu
Follow
**Encontrarás la traducción a español al final de la descripción**
From/Desde: 22/03/19 || To/Hasta: 28/03/19
From day/Desde día: 29 || To day/Hasta día: 35
You can find the Money Maker Diary here:
** Podéis encontrar el diario de las Money Maker aquí:**
https://growdiaries.com/diaries/25667-gorillamakingmoney-gorilla-vs-money-m
-----IMAGES & VIDEOS-----
Video 1:
Exactly the same video as 2 but accelerated +400% to fix it to 1 minute for instagram.
Video 2:
7 days (29~35) TimeLapse, 1 image each 60 secs @ 30 fps
Video 9:
An overview video not as awesome as it's music 😂💪
Video 10:
Myself working on the babies, lowering tops, topping & training.
Video 12:
Full working on the secondary Gorilla, twisting some branches, topping & training.
-----WEEK SUMMARY-----
Well, now i'm getting a bit scared as i adventured myself into Photoperiod, high training, full topping... in indoors at once. I feel that plants are going good, but i really don't know what am i doing, and if i'm doing well. Also i don't know how much time should i give them of vegetation stage, because i don't want to eternalize myself with this tent, so i'm planning to leave this upcoming 6th week and maybe the 7th of vegetation, but no more. Anyway they look pretty atm 😻. In video 10 the main-linning Gorilla suffered an accident as i grabbed the main left branch from a weak point and it has broken (sec 39 aprox.) so it has one less node than the right branch.
-----WATERING CALENDAR-----
24/03/19 - 1.000 ml with all week nutrients @ 0.9 E.C. PH5.8
*****ESPAÑOL*****
-----IMÁGENES & VÍDEOS-----
Vídeo 1:
TimeLapse, exactamente el mismo vídeo que el 2 pero acelerado a un poco más del 300% para ajustarlo a 1 minuto para Instagram.
Vídeo 2:
7 días (29~35) TimeLapse, 1 imagen cada 60 segundos @ 30 fps.
Vídeo 9:
Un vídeo general no tan increíble como la música de fondo 😂💪.
Video 10:
Trabajando en las pequeñas, rebajando las alturas, haciendo topping y entrenando.
Video 12:
Trabajando a pleno en la segunda Gorilla, girando algunas ramas, haciendo toppings y entrenándola.
-----SUMARIO SEMANAL-----
Bueno, ahora estoy empezando a estar asustado. Me he aventurado a probar con fotodependientes, entrenamiento fuerte y super topping, todo a la vez. Siento que las plantas van bien, pero realmente no se lo que estoy haciendo ni si lo estoy haciendo bien. También tengo dudas sobre cuanto tiempo más dejarlas en estado vegetativo ya que no me quiero eternizar con este armario, por lo que estoy planeando dejar esta sexta semana de crecimiento y quizás una séptima, pero no más. Aun así y con todo, las nenas se ven preciosas 😻. En el vídeo 10 sufro un accidente en la Gorila con main-linning ya que amarré el final del tallo principal izquierdo por un punto débil y este se partió (sec 39 aprox.), por lo que tiene un piso de topping de más en comparación con tallo derecho.
-----CALENDARIO DE RIEGO-----
24/03/19 - 1.000 ml con todos los nutrientes semanales @ 0.9 E.C. PH5.8

Likes
Comments
Share


@Nickeluring
Follow
She is doing really well and has grown her branches into a great shape. She has started to flower, and she will get some bloom nutes tomorrow.
I had some bugs munching on the plants so I gave them a good spraying with Neem oil and Potassium soap. I´ll give them another shortly.

Likes
65
Share


@Dendegrow
Follow
Week 4 update! 🌱 Week 3 is done, and the ladies are now three weeks into their flowering phase. So far, everything has gone really well. However, one bud and the plants in the front showed slight signs of potassium overfertilization, which likely caused a calcium uptake issue and led to minor necrosis.
No worries, though – today I completely flushed the entire system and replaced it with a fresh solution. With this reset, everything should be back on track 💪💧.
On top of that, I decided to bring out an old Cree& Osram LED lamp as a booster. This will provide the two smaller front plants with more light intensity so they can metabolize the higher nutrient levels more effectively 💡🌿.
Everything is looking great so far! Stay tuned, follow along, and let’s see how this journey continues 🌺📸.
Woche 4-Update! 🌱 Woche 3 ist geschafft, und die Ladies sind jetzt drei Wochen in der Blütephase. Bis jetzt lief alles super. Eine Bud und die Pflanzen vorne zeigten jedoch leichte Anzeichen von Kalium-Überdüngung, was wahrscheinlich zu einer Kalzium-Aufnahmehemmung geführt und leichte Nekrosen verursacht hat.
Kein Grund zur Sorge – heute habe ich das komplette System gründlich durchgespült und die Lösung durch eine frische ersetzt. Mit diesem Reset sollte jetzt wieder alles reibungslos laufen 💪💧.
Außerdem habe ich beschlossen, eine alte Cree& Osram LED-Lampe als Booster herauszuholen. Damit bekommen die beiden kleineren Pflanzen vorne eine stärkere Lichtintensität, damit sie die höheren Nährstoffwerte besser verstoffwechseln können 💡🌿.
Es sieht alles richtig gut aus! Bleibt dran, folgt mir, und lasst uns schauen, wie sich die Reise weiterentwickelt 🌺📸.

Likes
12
Share


@Chuckwaggon420
Follow
It's going great with these girls oya by the way there is only 2 now! Thats what happens when growing regular seeds you get males no biggie clones will make these 2 more!! 1 I have taken clones off already since100% female and toped and defoliated to produce many tops with net in flower tent. Getting a interesting smell off her it's sweet and skunky but it's very mild rn. Took some clones a day after moved them into 3 gallon show no sign of stress during transplant but play safe did next day and even after toping/ clone take and defoliate still stay strong no sign of shock!! So now have a clone off 1 will take other soon as preflower shows.
Giving them there normal 5.6-5.7 ph and about a gallon of water every 3 days at the moment with the same dose of food for now. They seem to both be very happy and they love the 3 gallon pot. They both are very short and have indica dominate traits. The leafs are cute but still show hybrid traits as they are not fat like a thumb but still short fingers. Small spacing between nodes so that makes them both nice and get a star on there pots for 2 good traits! 1 with most stars at end of flower is the winning clone!!!
Stay tuned
Always changing
Likes
42
Share


@Master_weeda
Follow
Bonjour à tous les padawans et maîtres jedis
Tout d'abord merci à Tom de seedsman pour ses graines ainsi que greenhouse de me permettre de faire cette culture en m'offrant le feeding greenhouse
Je rappelle que cultive simultanément 9 pots de 10 et 11 litres dans une box prévu pour 4 et que je n'utilise que le strict minimum du matériel nécessaire à une culture correcte au prix le plus bas possible
MATÉRIEL CONFIGURATION
Box 80×80×160
Lampe led Lampwin 300 watts ×2
Ventilateur à pince 15 watts
Xiaomi Deerma humidificateurs 5L
Hygrometre thermomètre
Extracteur PROFAN 107 m3/h - 100
Prise programmable électronique ×2
1 pot carré noir 10 litres
Green house feeding enhancer
Green house feeding biobloom
Green house feeding biogrow
Substrat biobizz ligthmix
Fil de fer et pince coupante
Microscope
Petite balance de précision
CULTURE ÉTAPE PAR ÉTAPE
J'ai tout dabord fais germé ma graine avec le easy start de Royal queen seed et je suis agréablement surpris car franchement le taux de réussite est très élevé (17 graines sur 19) simple d'utilisation et très efficace.
Une fois la plantule sortie et d'une hauteur de 2 ou 3 centimètres je la prend délicatement et la place directement dans son pot définitif. Je préconise des pots allant entre 10 litres et 15 litres pour des autofloraisons cultivées en intérieur.
Le pot aura été préalablement préparé (video dans diarie) avec 30 grammes d'engrais greenhouse feeding biobloom et 30 grammes de greenhouse feeding biogrow, soit l'équivalent de 3 grammes par litre de substrat.
Je dépose donc la plantule dans son pot définitif je recouvre un peu de avec de la terre je tasse légèrement et j'arrose pour garder le substrat humide pas plus
Je place ma lampe led 300watts à environ 90 centimètres de la plantule avec un cycle de lumière de 24/24 pendant une semaine. Au début de la semaine 2 le cycle de lumière passera en 20/4 grace a un programmateur car c'est pour moi le cycle de lumière qui offre le meilleur rendement pour une autofloraison.
Jour1: léger arrosage
Jour2: léger arrosage
Jour3: la plantule commence à être plus vigoureuse mise en place de la ventilation pour augmenter sa masse racinaire et léger arrosage
Jour4: arrosage avec un litre et demi d'eau ph6.3 à laquelle j'ai ajouté 0.9 gramme de greenhouse feeding enhancer (soit 0.6 gramme par litre d'eau)
Jour5: aucune technique spéciale
Jour6: aucune technique spéciale
Semaine agréablement calme sans problème ni carence apparente
Que la force soit avec vous !
Likes
13
Share


@russrahl
Follow
1 month in now and all is still good. She finished stretching and I got the second net on now about a foot above the first screen. I tucked her a bit to level her off with the other 3 Obi-wan kush around her, shes still up a bit higher on the sides but I let those go cause there on the sides...lol still feeding nutrients on the lower side, just shy of half strength. Buds are developing good, not as big as the Obi-wan but that was to be expected. Cheers 💨

Likes
3
Share


@HowtoBubatz
Follow
The plant is doing well overall this week! 💪
To handle a few fungus gnats that started showing up, I introduced nematodes into the soil and placed some yellow sticky traps, seems to be keeping things under control so far.
She's growing quite tall now, definitely stretching up nicely, but not really filling out much in width. A true lemony skyscraper in the tent!😂💚

Likes
1
Share


@FarmerFrank
Follow
Node 7 formed and started with node 8. Small issues with leaves as there appeared some spots on lower levels with a slight purple / dark green on the edges of the top leaves. Will monitor…might be genetics of excess N. Ran a clean water week. PH of water set to 6.0 - 6.5. need to start with flower nutes towards the end of week 5. Will start adding the nutes at 1/3 strength for a week (starting on 18.05/2019) and work my way up to full strength at end of week 7. Will also be adding sea grow every second week from here on. Removed some of the lower fan leaves (4). Noticed that the plant did stand still but growth started again after about day 2 or 3 after cutting leaves. Stated folding the 2 top leaves to allow more lights to lower shoots. Technique used is to roll stem so the leaf turn 90 degrees top to bottom. Recovers within 2 - 4 hours. Lifted the pots higher. Light distance 45cm. Watering less this week due to the amount given towards the end of the last week. Only sprayed water to keep the top level wet. Will start with 250ml every second day.