
Likes
Comments
Share

@SkunkyDog420
Follow
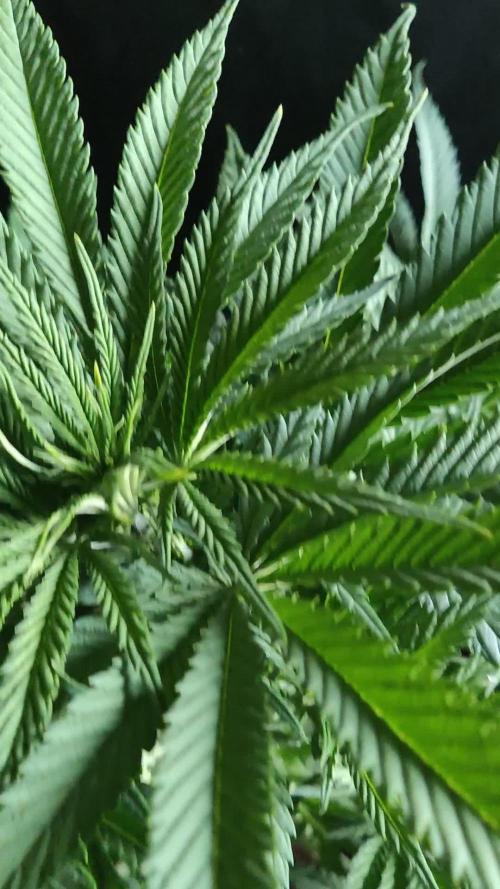
Hallo zusammen 🤙
Sie wächst sehr schön und macht keine Probleme.
Rabattcode für den BIOTABS-Webshop https://biotabs.nl/en/shop/ GDBT420, damit erhalten Sie 15 Prozent

Likes
34
Share


@Roberts
Follow
I am starting a auto moon rock. I will be growing her in 3 gallons of perlite. My 1 gal one was nice, and I am curious to it on a bigger scale. Figured this may be neat upon finishing. 🤞🏻 for a great grow. Thank you Medic Grow, and Divine Seeds. 🤜🏻🤛🏻🌱🌱🌱
Thank you grow diaries community for the 👇likes👇, follows, comments, and subscriptions on my YouTube channel👇. ❄️🌱🍻
Happy Growing 🌱🌱🌱
https://youtube.com/channel/UCAhN7yRzWLpcaRHhMIQ7X4g


Likes
46
Share


@Seedler
Follow
Look what I did to my girl, poor lady. But i'm sure she will bounce back, but with all that leaf shit It's hard to properly tie them down.
So i broke off a total of 2 branches (yellow tape) and managed to attach one back to it. Otherwise she took all the stress LIKE A CHAMP - yet. We'll see.
To be honest, i was quite lazy with her the last days, it was pretty stressful but look at her, she is basically growing herself!
As long as you can cool it, have some sort of system to change water and some, basic nutrients and ph- DWC is the easiest system for me, 100%
Look at the roots and i did not fill up the reservoir for like half a week, so a lot of it wsd exposed to air for a longer time still she is growing and growing.
Two more weeks and i might have a problem with her in flower, because she will drink so much water the reservoir won't hold a long time haha.
Almost forget, i need to add either more fertilizer /ml or give extra calmag. will probably do both kekw
Cheers guys! (whoever reads this, this is your sign, get high 👌)

Likes
14
Share


@GODSGIFT_2005_JM
Follow
For LIQUIDS & Nutes ******GREEN BUZZ NUTRIENTS***** organic.
Also i’m using their LIVING SOIL CULTURE in powder form!
MARSHYDRO ⛺️ has large openings on the sides which is useful for mid section groom room work. 🤩
☀️ MARSHYDRO FC 3000 LED 300W
💨MARSHYDRO 6” in-line EXTRACTOR with speed-variation knob, comes complete with ducting and carbon filter.

Likes
17
Share


@Leonard_Lunte
Follow
Picture 1 - Day 8 - Seedling 1 got its nutrients the first time today. 1ml/L Biobizz Grow about 700ml.
Picture 2 - Day 8 - Seedling 2.1 still stretching a bit too much, am waiting for the new light to arrive.
Picture 3 - Finally got the new setup, the grow tent isnt perfect yet but itll do for the next few weeks (its just an old temporary closet) it leaks a lot of light and moisture but since I only have these 2 mini plants rn I dont think its gonna be a huge problem until flowering.
Picture 4 - Day 9 - Seedling 1 looking good and Seedling 2.1 (3 Days old) will hopefully stop stretching now that I finally got the bigger light here. Watered 2.1 again today with just ph water.
Picture 5 - Day 10 - Nothing special happening, the plants are looking good!
Picture 6 - Day 11 - I now installed a fan in the grow area to better the ventilation. The fan is doing a great job at moving air around, but kinda messing up the moisture coming out of the humidifier... (With fan and humidifier on at same time = 40% with just humidifier running = 60-70%) Not sure how to fix that yet... Will water Seedling 1 again tomorrow.
Picture 7 - Day 12 - Seedling 1 growing good but its leaves are still looking really weird, I think theyre going up on the edges because I put them under slight wind stress, but that issue is fixed now. Some parts of some of the leaves still look really odd to me, like they got cut off or something? I dont know
Picture 8 - Day 12 - Seedling 2.1 is 6 days old now and growing good, theyre some tiny yellow dots on the leaves surface but its really slight so I dont know if its something bad. I watered both plants today, Seedling 1 with Bio Grow Nutrients and Seedling 2.1 with just Ph'd water.
Video - Day 13 - Both seedlings still growing, but looking kinda sus.

Likes
4
Share


@frigo_camelo
Follow
Harvest after 8.5 weeks 🤘🏻 fruity smell , insane cut , will se how its washing in winter , its in the freezer now
the cut was from hanfgarten.de
Processing
Likes
21
Share


@JuicyFruit
Follow
Week 10:
I loved growing this strain, it smelled so fruity while the buds were on the plant.
Towards the end of flowering the buds looked sugar dipped as described on the website.
The sap from inside the stems smells like skittles and sugar lol which was a nice surprise!
Most pistils are Amber so idk what the THC/CBD ratios are going to be. Il give an estimate once buds are cured for 2 weeks or so!
So I’ve managed to get some street weed to compare alongside my own weed and I’ve added the pictures to the harvest so you guys can see them. I tried to pick the best street weed from about 4 varieties so here we go...
The street weed is called Wedding Cake, my weed is obviously Smoothie and I suppose what I want to know is how the street weed looks, does it look healthy? Any guesses as to how it was dried or cured if even? The first noticeable thing is that the street weed stems are huge and the sugar leaves seem to be left on the plant to dry too. Although I did leave sugar leaves on this time I feel that it’s not very professional.
I have smoked a joint of the wedding cake and it’s not all that great, feel a bit sedated/couch locked but not high or happy if you know what I mean :) but yeah please let me know what you think in the comments :)
Curing Update: (1)
Been curing for a week and buds are definitely smoking much better now, the taste and burn still isn’t amazing as it needs a few more weeks curing but it’s unique and exotic.
It’s very strong when it comes to THC, because it still needs further curing you could smoke a whole joint and think damn that’s still too fresh to get me blazed. By the end of the joint you would be struggling to keep a conversation or stand up, Stoned eyes that even eye drops won’t cure :’D and it’s also a real head high in my opinion, audio/visuals definitely enhanced too, everything is extremely bright, sharp and sounds great!
I don’t really care about time of day smoke as i could need something stronger at different times for pain etc but this is definitely a Nighttime smoke, it hits so hard that the best thing you can do is put on some music and close your eyes or watch a movie.
An amazing strain for zoning out entirely into some chill music and if you need weed to deal with strong physical or mental pain or sleep problems then I would recommend giving this a go as so far it has been a lifesaver for me.
Curing Update: (2)
So I think the buds have been curing for just over 2 weeks now and they are looking great and smoking pretty well too. A few more days drying wouldn’t have hurt them but I’m not worried as my Blue Cheese and Pineapple Express harvests are just around the corner!
I added some lovely photos and a video to show you guys how it looks And I’m just about to blaze up a joint from the last photo and tell you all how it smokes too...
(Lights up joint)
Slightly damp on lighting it up although it burns near perfect.
Instant hit on the back of the throat with smooth/mango flavors.
I feel a bit dizzy quite quickly and want to sit down and listen to music after a few tokes followed by a relaxed or mellow feeling.
I’m about halfway through the joint now and I’m pretty stoned. Definitely sweet and smooth like blueberry also sherbet sweet like mango!
I’m almost finished my joint now and I suppose to sum up I’d say that it’s much like the blueberry smoothness you expect mixed with the strength from a well grown mango.
I felt that the effects are great if your in a nice comfortable setting, get relaxed, be creative, watch a movie or even get ready to sleep.
I would avoid anything that requires a lot of effort.
Personally I’ve had minimal problems with getting to sleep and with anxiety while taking this throughout the day and would highly recommend it! It’s the best thing I’ve grown so far :)
Il leave a final review on the buds in 2 weeks, until then take care and happy growing!
Curing Update (3) - 05/03/20
So I’ve finished the smoothie buds and I have to say they were great. The only negative was it’s my first time drying buds with trim and they could have done with a little longer drying.
I made some canna butter from 3G of trim and 2.25g of bud. I made ginger cupcakes with salted caramel icing. You guys can see it cause I added a photo. I can only eat 2 per day with a heavy tolerance - sedative cupcakes hahah.
And check out my blue cheese and Pineapple Express diaries as it’s harvest time!


Likes
8
Share


@Back_woods_buds
Follow
Definitely glad I picked this one to KO first since it’s an easier strain since I’m still trying to learn the whole organics thing but a few more and I should be able to produce something a little better I hope lol

Likes
5
Share


@Brendanfromtherose
Follow
I've brought the PPM down again and kept the pH at 5.7-5.8, plant looks great first grow so very happy, Alot of Trichomes and don't know if I should be getting ready to flush and harvest, buds still getting fatter and she's still thirsty and drinking water but a lot of amber pistils and not sure if the crystals are clear or Milky but plant looks Great, just unsure when to harvest,
I've reduced nutes a little more and calyxs still fattening up, gonna hopefully start flushing at end of this week for about 2-3 days in my 4gallon bucket

Processing
Likes
1
Share


@Blucha
Follow
I need to add a little bit of calmag as I'm recently avoided it at all.
Overall they growing fast. Transition week has finished.


Likes
3
Share

@Lahuertacannabica
Follow
🌱 Seguimiento – Última semana de crecimiento (cultivo desde semilla)
Estamos en un cultivo con 10 plantas desde semilla:
4 plantas de Humboldt Seeds
6 plantas Permanent Marker – Philosopher Seeds
Durante esta última semana de crecimiento hemos aumentado la dosis de fertilizantes siguiendo la tabla de B’cuzz Coco de Atami.
Seguimos regando con un pH estable entre 5.9 y 6.0.
💧 Aditivos añadidos al riego
Hemos incorporado también:
Atazyme, para ayudar a la descomposición de raíces muertas y mejorar la absorción.
Coco Booster Uni, para estimular el sistema radicular y el vigor general.
Todo de nuestra marca de confianza: Atami.
💡 Ajustes en el cultivo
Ajustamos la distancia del LED para optimizar la intensidad lumínica.
Comenzamos a realizar un ligero croping en las plantas más altas para igualar el dosel antes de floración.
🌿 Estado de las plantas
Las 4 plantas de Humboldt están respondiendo muy bien por ahora.
Las Permanent Marker se muestran algo más delicadas. Puede deberse a:
Posible bloqueo de calcio/magnesio
Diferente sensibilidad al pH
O simplemente fenotipos más exigentes
Aunque sigamos una tabla, está claro que no todas las plantas comen igual.
Incluso la cantidad de luz que recibe cada una puede hacer que unas se estresen y otras no.
Reflexión
Esto es lo bonito de cultivar desde semilla:
cada genética y cada fenotipo siguen su propio patrón de crecimiento. Aquí empieza realmente la observación y la selección.
📸 Próxima actualización: últimos días de crecimiento y preparación para el cambio a floración.

Processing
Likes
4
Share


@grown29
Follow
Still looking good! I'll have to chop next week either way to to personal circumstances, but I'm thinking they'll be just about ready by then anyway.
Processing
Likes
15
Share


@Rainy
Follow
Hey guys they are both happy, didn't stretch much because I stressed her at the beginning of the week with lolipoping and some little lst together with change of nutritions but all good expecting some stretch in this week and let's see how she will go 💪

Likes
3
Share


@Flako1985
Follow
Transplanting on 05/30/2019. That when I'll turn on the 600w MH. Germinated on May 12,2019. Popped and Planted with 24 hrs.


Likes
2
Share


@Little
Follow
Empieza la segunda semana con el trasplante a su maceta definitiva. Es pronto para hacerlo, pero las plantas se estaban espigando demasiado.
Riego en nueva maceta con estimulador de raíces.
La semilla pegada sigue ahí, no afecta al crecimiento de la planta, así que voy a dejar que la naturaleza haga su trabajo.
Ahora toca dejarlas tranquilas para que crezcan a su ritmo.
Likes
4
Share


@Farmeryo901
Follow
Day 24 haven't done much but water when dry ive just started to implement fish sh!t to my regiment and silica
The schedule is plain ph water next water fish sh!t then plain ph water then silica
Trying to keep it simple i water about ever 3days so far and everything it going well as far as my eyes can see


Likes
3
Share


@Krautbauern
Follow
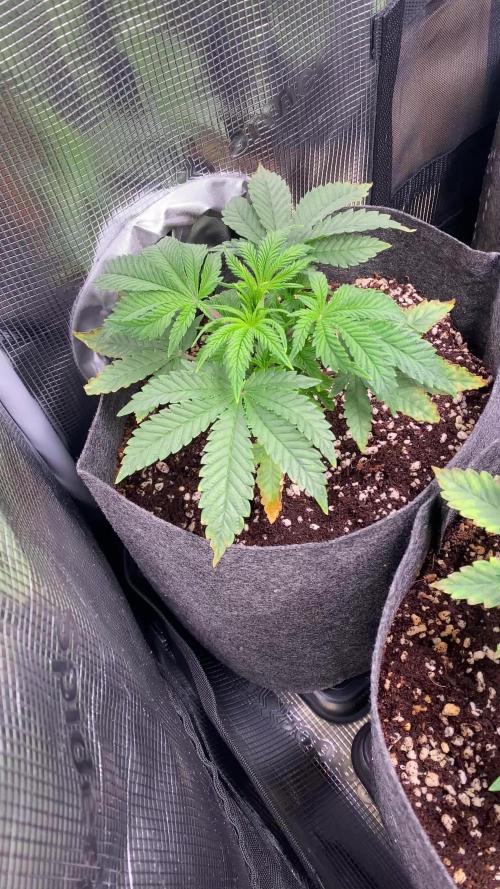
At Day 33 we started with defolation.
They seem to be very healthy, although there are fungus gnats.
The Ladies have no problem with it.
You already can see the preflower in the last pictures.
Next step will be to send them in the Flower Stage and turn up the lights
