




Likes
9
Share


@d0cterstrain
Follow
last week of veg. about to try weaving a scrog for the first time. lezgoo


Likes
49
Share


@Roberts
Follow
RSV11 is doing really good this week. She has gained a lot of strength and stood up on her own. She is making progress nicely. Nothing more to report at the moment. Thank you Spider Farmer, and Terpyz Mutant Genetics. 🤜🏻🤛🏻🌱🌱🌱
Thank you grow diaries community for the 👇likes👇, follows, comments, and subscriptions on my YouTube channel👇. ❄️🌱🍻
Happy Growing 🌱🌱🌱
https://youtube.com/channel/UCAhN7yRzWLpcaRHhMIQ7X4g

Likes
5
Share


@dauntless
Follow
Week 5 started July 24, 2022
Growth is still strong into week five, I see no pre flowering, I think that is because she started really slowly due to me getting used to this new light, etc.
July 27, 2022
Smells like lime sherbet up in here. LST, light defoliation to get some light on the lower colas. Really watered in today for the first time soaking the media, she is stretching and I see maybe some hairs for pre-flower - hope not too too soon though, I'd like more height than nine inches before she fully stretched
Likes
5
Share


@Mr_nugs_lover_David
Follow
Very terpy smell, strong and very citric like a pure lemon, very lemony smell basically, nothing crazy but it's very nice, she's producing a lot of resin, you can see she's a good autoflower, not the bets I've grown but it's nice to have something to Harvey's fast. 100% organic grown
Processing
Likes
13
Share


@Silverback_Guerilla
Follow
I'm wanting to replace all my miscellaneous lights with another quantum bar rig before my Fall grow this year.
Anybody want to buy some gently used lighting gear this summer???😁😎
👉 2 x 100w Cree CXB3590 (3500k) with pin heatsinks - 3 grows usage
👉 1 x 100w Citizen Clu048 COB (3500k) with pin heatsink - 3 grows usage
👉 1 x 120w DIY quantum board (3000k) 256 x LM301b's - no heatsink - used for 2 grows
👉 1 x 60w Bridgelux COB (3500k) - Par38 style - used for 1 day (a back-up bulb)
👉 1 x Morsen 2000w (367w actual) blurple with a bank of 1/6 of the 200 LEDs not working - used 3 grows
👉 1 x Morsen 2000w (367w actual) blurple with only my current grow in use (the replacement)
👉 1 x HeroLight 1500w (285w actual) 5 x COB full spectrum (pinkish-white) - 2 veg stage uses
👉 4 x 36w Par38 type deep red (660nm) bulbs - 3 grows usage
👉 2 x 25w 225 LED panels (660nm) - 3 grows usage
👉 2 x 25w 225 LED panels (440nm) 4 veg stage uses
👉 2 x 25w 225 LED panels (440nm)
👉 1 x 50w 225 LED panel (6500k+440nm)
👉 1 x 20w Par38 style Cree COB (3000k) - (more like a 40w) - used for a week
👉 1 x 15w Sansi blurple Par38 type bulb - used 1 day only
👉 1 x 40w Sansi 4000k daylight Par38 type bulb - used during germination only
👉 4 x 12w MiracleLED red spectrum (4000k daylight + 700nm red) regular light bulb - used during flowering in 2 grows
Just hit me up in chat if you are interested in anything-
============================================
SUNDAY 3/31:
I did a little more tweaking on the timers and ventilation. I foliar fed her a few times and rotated her.
MONDAY 4/1:
I foliar fed her a few times and spun her around, then tweaked the timers a bit more...fingers crossed..
TUESDAY 4/2:
I fed her about 1/2 gallon of all the good stuff, and started her on Open Sesame and Tiger Bloom. Increased Terpinator, Bud Candy, and Calimagic, and decreased Grow Big. She's got at least 10 good bud sites and I never even FIM'd her.👍
MONDAY:
I spun her around and foliar fed her a few times
TUESDAY:
I fed her about 3/4 gallon and started her on Open Sesame and Tiger Bloom. Foliar fed a few times and tweaked the timers again..
WEDNESDAY:
I foliar fed a few times and rotated her, then took some photos. She's starting to stretch now.👍
THURSDAY:
I foliar fed her a few times and rotated her.
FRIDAY:
I watered her with about a half-gallon including boomerang, bud candy, terpinator, kelp me kelp you, calimagic, and armor si.
I foliar fed her several times and rotated her 180 degrees.

Likes
75
Share

@Roberts
Follow
Gushers is bulking strong under the Spider Farmer G5000/UVR40 lights, in the Athena blended line nutrition. She has a nice frost layer and a sweet aroma at the moment. She is grow great. Thank you Spider Farmer, Athena, and Royal Queen Seeds. 👸 🤜🏻🤛🏻🌱🌱🌱
Discount code:GROWERS20
Thank you grow diaries community for the 👇likes👇, follows, comments, and subscriptions on my YouTube channel👇. ❄️🌱🍻
Happy Growing 🌱🌱🌱
https://youtube.com/channel/UCAhN7yRzWLpcaRHhMIQ7X4g
Spider Farmer Official Website Links:
US&Worldwide: https://www.spider-farmer.com
CA: https://spiderfarmer.ca
UK: https://spiderfarmer.co.uk
EU: https://spiderfarmer.eu
AU: https://spiderfarmer.com.au
G5000 Light Amazon Link:
amzn.to/4643esa
UVR 40:
https://www.amazon.com/dp/B0BR7SGTHS
Discount code: saveurcash (Stackable)
Likes
21
Share


@BB_UK
Follow
She’s a total beast! Gave her a little defol to remove some fan leaves blocking light to the lowers, also removed her from the block she was standing on as it wasn’t necessary anymore because she reached height. Now to see some flowers develop! 😊
Likes
11
Share


@LaughingDragon
Follow
Quite the week, finally got to transplant into a larger container, hopefully the roots open up and explore soon. First round of LST completed as well.

Likes
54
Share


@Mimi420
Follow
Hi growers!
The kushes are buding nice!Bubba kush started to coloring a litle.Dutch kush have such a nice smell.Loove the smell that is coming from the tent!
Stay green!🌱


Processing
Likes
12
Share


@2Stones1Bird
Follow
Checkout my Instagram @smallbudz to see the Small budget grow setup for indoor use, low watt, low heat, low noise, step by step.
01/11/2019 -
Started using BioBizz Alg-a-Mic on spray, using it once per day at lights off, 1 or 2 puffs to create a light mist, only on non feed days,
I mixed 0.1ml on 100ml water 6.4 PH.
03/11/2019 - Gave her 250ml plain water with 6.4PH
05/11/2019 - Gave her 0,15ml of each BioBizz Grow, Max and Bloom on 300ml water 6 PH didn't manage to get it higher to 6.3 at least.
06/11/2019 - She started to show some pistols, probably entering pre-flower.
07/11/2019 - Soil was to dry due to 2930c temps gave her 0,500ml of 6.5PH water with 0,25ml Grow, 0,25ml Max, and 0,45ml Bloom BioBizz.


Likes
2
Share

@Mr_nugs_lover_David
Follow
Una cepa bastante fácil de cultivar,yo al preparar un súper soil a base de guano,ácidos humicos,bacterias,mi suero de lactobacillus casero,algas marinas y humus,tan solo regue con agua por lo que no tengo mucho trabajo en ese sentido,ademas tampoco le aplique ninguna técnica de entrenamiento cosa que me gustaría hacer si tengo oprtunidad de volver a cultivar esta cepa, sin embargo vi que empezó la floración siendo pequeña de tamaño,término dando una excelente porra central y algunos cogollos bajeros con los que me fui haciendo algunas infusiones con leche entera y también con aceite de oliva para no tener que recurrir al mercado negro y poder asi añadir mis canabinoides a mi sistema para poder mejorar mi lumbalgia y descansar mejor. El aroma es sencillamente exquisito,ha sido todo un placer cultivar esta cepa,lo malo es que es muy poco para mi ya que soy un usuario que necesita una buena reserva de cogollos potentes sobre todo a nivel físico que me ayuden a lo largo del año.muchas gracias y espero que os haya gustado mi trabajo, paz compañeros Canabicos! 💚✌️❤️💛🌱

Likes
62
Share


@SimpleGrow
Follow
Hello and Welcome back 🌱
It‘s now 7 days ago since I put them in Water to Germinate and now it‘s their 5th day of growing. Yesterday, they got their first 4 hours of darkness and now i‘m slowly going down to 18/6 light schedule. I admit, the environment was sometimes very off due to experiments with VPD and leaf temperatur but I think I can dile it in correctly for this growing stage and beyond (hopefully). I was trying to see what happens if I stress them a little and hoped they would grow faster but they 100% didn‘t like it. They heat up pretty fast when the Air is too hot and dry because the roots are not developed and the plant is not established enough. An established plant can stay outside in the heat of the sun and still have cool leaves.
So my environment for this stage is as above (27°C,70%RH). Light at 15000 Lux (≈370 ppfd) a little high but I‘ve noticed some stretching and I asumed they wanted more light and I really don’t want any more stretching. My media comes without nutriens so i feed little amounts of it every time they dry out enough. This is a Indica dominant strain so I asume they will stay fairly smal. Btw. If anybody wonders if CO2 bags work, check out the Video I uploaded.
They are still seedlings (not really in Veg yet) and so i‘m treating them as such for the rest of the week. Root developement is now the top priority wich, if you didn‘t know, is better in a smal pot first because they are more likely to develope secondary roots but we’ll see. I heard It‘s like topping just underneath the plant. When they are ready to be transplanted I most likely will take the first three.
Update: I did all the preperations for Transplant bc I was worried about root bound. I took Nr. 4 out and washed it as carefully as I could to expose the roots. Some of them got stuck on harder peaces of dirt and got ripped off. But it looks like alot of secondary roots developed instead of just one long taproot, wich is nice. I assume i can transplant them in the next few days.
I rearanged the plants according to the Lux reading, wich is highest in the middle so the bigger plants (Nr.1 and Nr. 3) went to the sides. Maybe Nr.1 got the „smal“ genetics and it’s not anything environmental.
thanks for following along this far and happy growing!
Update: hey guys so yesterday I noticed, that the roots are coming out of the bottom. They were trying to get to the bottom of the three pots 😭 i had to do an emergency Transplant wich went very bad because they were stuck in the little pots. I don‘t think i‘m going to use these kind of pots anymore because they were not easy to get out. I even dropped Nr. 3 but luckily nothing bad happened.
After the transplant both Nr. 1 and 2 were already ready to get more light. But Nr.3 was turning away from the light and the leaves were hanging down. So to lower the stress and encourage root groth I redusced the amount of light to a minimum and lowered the Temperature and highten the RH. This seemed to work well because the leaves were purking up again. The next day after 6-7 hours of darkness they are doing fine again but i‘m going to give them a little longer to establish themselves in the new pot. I changed the light schedule to 18/6 since I had to give them more darkness yesterday. I hope everything goes smothly from now on.


Likes
11
Share


@Eddjack
Follow
Crescita lenta ma compatta . Questo ceppo è molto forte ha parecchie ramificazioni e finalmente inizia a dare veri segni di fioritura. Questa volta ci andrò piano aspettiamo e vediamo che succede growers!

Likes
46
Share


@eldruida_lamota
Follow
Vamos familia que ya actualizamos la cosecha de estas Candy Rain de Zamnesia, para el concurso POWER BUDS Plagron x Zamnesia CONTEST.
Ya era hora de cosechar, estoy bastante contento con los resultados.
Vaya flores que se han marcado repletas de tricomas, y las flores se marcan aromas dulces y afrutados.
Es una variedad bastante fácil de cultivar y muy resistente, crecieron desde el principio bien vigorosas, sin problemas y al final de todo recompensó.
Las condiciones ambiéntales han sido máximas en 25 y mínimas en 20 y una humedad estable en torno al 36% al final de floración y en el secado.
Os comento que tengo un descuento y para que compréis en la web de Zamnesia de un 20%, el código es ZAMMIGD2023
The discount 20% and the code is ZAMMIGD2023
https://www.zamnesia.com/
Espero que disfruteis este diario, buenos humos 💨💨

Likes
10
Share


@Dunk_Junk
Follow
She shot up this week!!!!! Grew 15cm/6"!
Day 42 - I took off about 6 huge fan leaves to give lower levels of the plant some more light.
This is her last week on 20/4 lighting. 12/12 from now on.
Likes
10
Share

@frankensoil
Follow
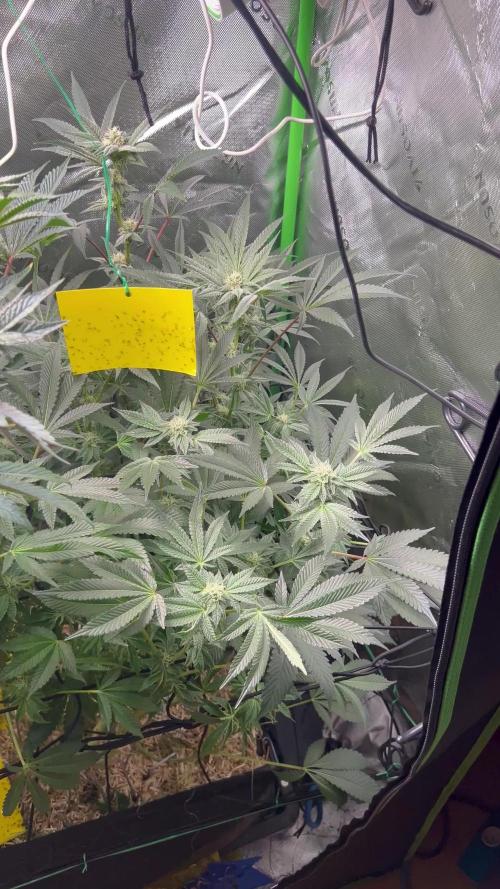
Den Pflanzen geht es prächtig, nicht mehr lange und sie müssten mit dem Bulk anfangen und sich mit Wasser voll pumpen✌️