The Grow Awards 2026 🏆 


Likes
Comments
Share


Likes
32
Share
@Brujha77
Follow
Starting week 9
Nothing to do, expect Trichome checking..
Still needs a few Days, but i think she will finish this week.
Day94
She's finally done 👍👍 Tomorrow morning she get chopped
Likes
15
Share
@McKush420
Follow
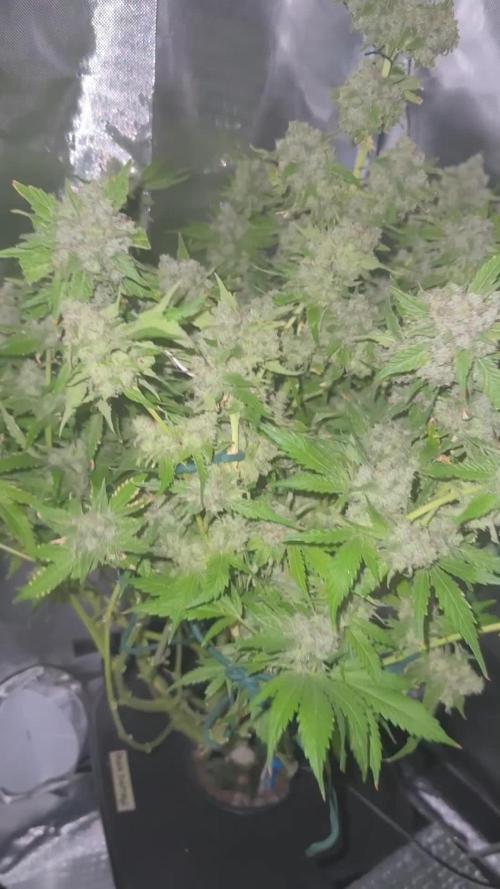
These girls are packin! The most satisfying part of a grow for me is to see the fruits of my labour blossom into plump nuggets of dank joy! They are reacting to the flush in typical fashion. Phosphorus is running out of the fat indica fingers, creating a purple hue. The pheno on the left is a week ahead of the right side plant. At least. I could even see it going longer. Very excited for the range of effects in regards to sativa/indica ratio. A few amber trichromes here and there but the majority are developing a haze that will lead to the results seeking. Soon. We are almost there.

Likes
37
Share
@DogDoctorOfficial
Follow
🌿 Week 7 Veg Report: Terpyz Mutant Mentha de Croco 🌿
Hello, Grow Fam! We’re now into Week 7 of this exciting adventure with my Terpyz Mutant Mentha de Croco ladies, and what a week it’s been! The theme for this week? Patience and appreciation. These girls continue to grow at their own pace, each one showcasing their unique traits and incredible beauty.
Week Recap: Slow and Steady Wins the Race
The girls are still on the slower side in terms of growth, but that’s part of their charm. Each leaf is a masterpiece, more intricate and stunning than the last. Their prayer posture remains consistent—a true testament to their health and contentment in their environment. They may be taking their time, but their vitality and uniqueness shine through every step of the way.
Environmental Conditions: Keeping Things Balanced
This week has been about maintaining a steady environment despite the natural slowdown in growth due to cooler temperatures.
• Temps: Daytime 18–20°C, nighttime 14–16°C. It’s a bit chillier than usual, but these resilient ladies are adapting beautifully.
• Humidity: Stable at 65%, ensuring the girls remain hydrated and comfortable.
• Airflow: Gentle but constant to keep the space fresh and prevent any stagnant air pockets.
Feeding Program: Aptus Holland Perfection
Feeding remains consistent, and the girls are loving the organic-mineral lineup from Aptus Holland. Here’s what’s in their mix this week:
• Regulator: 0.15 ml/L – To strengthen cell walls and increase stress resistance.
• CalMag Boost: 0.25 ml/L – For robust development and prevention of deficiencies.
• StartBooster: 0.25 ml/L – Enhances early vegetative growth and root systems.
The switch to All-in-One Pellets last week has eliminated the need for liquid All-in-One, and the girls seem to be thriving with this natural, slow-release food source.
Watering: A Gnat-Free Approach
This week, I continued with bottom watering. Filling the trays and letting the soil absorb the water has been a game-changer—not just for healthy root development but also as a part of the war against gnats. Paired with yellow sticky traps, this strategy has kept pests in check while ensuring the roots get all the hydration they need.
Growth Observations: Slow but Stunning
• Structure: The slow growth might test patience, but the payoff is worth it. The compact, vibrant structure of each plant is breathtaking.
• Leaves: Dark green, uniquely shaped, and full of character. Each girl is like an artist’s brushstroke—no two alike.
• Praying Posture: Their leaves reach for the skies like they’re soaking up every ounce of light.
Still no cloning or flipping to 12/12 yet, as I want them to grow a bit more before making any big moves. Next week, I’ll decide whether to flip them for a brief period to determine sex or wait until cloning is feasible.
Photography Spotlight: Capturing the Details
This week, I took some time to immortalize their beauty with my Sony A6000 and Nikon DSLR cameras. The intricate details of their leaves, captured through different lenses, reveal their individuality.
📸 Photography Tip:
• Cameras like my Sony and Nikon bring out fine details you’d never see with a phone camera. The larger sensors, interchangeable lenses, and manual controls allow for stunning clarity and depth.
• Macro lenses, in particular, are fantastic for close-ups, like capturing water droplets or vein details in leaves. The difference between these and even the best phone cameras (like the latest iPhone) is night and day when it comes to quality and creative control.
Looking Ahead: What’s Next?
As we move into Week 8, I’m hoping for an uptick in growth speed, but I’m perfectly content to let these beauties take their time. The journey is just as rewarding as the destination, and these girls are proof of that.
Shout Outs & Gratitude
A massive thank you to:
• Terpyz Genetics for these exceptional mutant seeds.
• Aptus Holland for their top-tier nutrient lineup.
• Future of Grow (FOG) for lighting that keeps these ladies praying.
• Pro-Mix Soil for providing the perfect growing medium.
• TrolMaster for environmental controls that make my life so much easier.
• Grow Diaries for the platform to share this incredible journey.
• And, of course, all of YOU—followers, supporters, and even the haters—for being part of this adventure. Your feedback, encouragement, and interaction mean the world to me.
🌟 If you’re curious about the journey, feel free to check out my Instagram and YouTube for behind-the-scenes content, photos, and more!
Until next week, stay positive, stay curious, and as always: Growers Love! 💚
Genetics - Mentha De Croco
https://terpyz.eu/products/menta-de-croco-fern-type?_pos=1&_sid=e9237cbcb&_ss=r
DogDoctorOfficial Discount Codes @ terpyz.eu - DOCTOR 15% off
Nutrition - @aptusholland
https://aptus-holland.com/
Led Power @ F.O.G. Future Of Grow
https://www.thefuturofgrow.com/en/online-store/BLACK-SERIES-600-p489093171
Controls @ TrolMaster
https://www.trolmaster.eu/tent-x
As always thank you all for stopping by, for the love and for it all , this journey of mine wold just not be the same without you guys, the love and support is very much appreciloved and i fell honored with you all in my life
With true love comes happiness Always believe in your self and always do things expecting nothing and with an open heart , be a giver and the universe will give back to you in ways you could not even imagine so
As always, this is shared for educational purposes, aiming to spread understanding and appreciation for this plant. The journey with nature is one of discovery, creativity, and respect. Let’s celebrate it responsibly and continue to learn and grow together!
Growers Love To you All 💚

Processing
Likes
35
Share
@hornato420
Follow
Week 11 has been exactly the same as week 10. There has been some light yellowing one Girl #1 and some of the hairs are starting to turn orange. The colas aren’t very dense. Girl#1 has been doing some weird fox tailing on all the colas.My temperatures haven’t been over 77 and my humidity hasn’t been over 55. I have seen this before in other diaries with other stains. Guess that’s just comes with the territory of ruderalis crossed strains. Can’t really complain cause this is my first rodeo with Autos so I’m just happy to have this experience.
I officially think the delayed Pineapple Express auto might not even have the autoflower trait. It’s been 11 weeks and she hasn’t showed the slightest chance of ever flowering. This is really frustrating and deflating. I’m gonna definitely have to put this girl into 12-12. That will have to be after girl #1 is finished.
I’m very appreciative of all who show your continued support and give insightful infomation. Can’t wait to see what this harvest will be. This is my first official auto grow. I wouldn’t change it at all. Thank you all for your support and time. More to come soon 💚👊

Processing
Likes
21
Share
@jboog80
Follow
Got these girls transplanted this weekend. They are already thanking me. Also, they're loving the LED lighting.

Likes
9
Share
@Enki_Weed
Follow
In den letzten ein bis zwei Wochen hat sich unsere Pflanze weiterhin prächtig entwickelt und zeigt nun deutliche Anzeichen einer fortgeschrittenen Blütephase. Es gab keine dramatischen Veränderungen, sondern eine stetige Reifung, die uns dem Erntezeitpunkt näherbringt.
Die Pflanze präsentiert sich sehr buschig und vital, mit zahlreichen dichten Blütenständen, die sich gut ausgebildet haben (siehe Gesamtansicht der Pflanze). Die Buds sind kompakt und haben in den letzten Wochen an Volumen und Gewicht zugelegt. Man kann deutlich sehen, wie die Blütenkelche anschwellen und sich zu reifen Blütenständen formen.
Trichom- und Stigmen-Reife:
Ein genauerer Blick auf die Buds (wie im ersten Nahaufnahme-Bild der Trichome und im weiteren Nahaufnahme-Bild der Buds mit orangenen Stigmen ersichtlich) zeigt den Fortschritt der Reifung. Die weißen, harzigen Trichome bedecken die Blütenstände in Hülle und Fülle, was auf eine intensive Produktion von Cannabinoiden hinweist. Bei den Trichomen ist nun eine gute Mischung aus milchig-trüben Köpfen zu erkennen, die auf die volle Potenz hindeuten. Erste bernsteinfarbene Trichome beginnen ebenfalls aufzutreten, was ein Zeichen dafür ist, dass der Erntezeitpunkt bevorsteht.
Parallel dazu haben sich die Stigmen (die feinen Härchen auf den Buds) von Weiß zu einem satten Orange-Braun verfärbt. Dies ist ein weiteres starkes Indiz für die Reife der Blüten und die nahende Ernte.
Blattwerk und Nährstoffbedarf:
Das Blattwerk der Pflanze ist größtenteils weiterhin gesund und grün, was auf eine gute Nährstoffversorgung schließen lässt. Einige der größeren Fächerblätter können in dieser späten Blütephase leichte Anzeichen von Vergilbung zeigen, da die Pflanze ihre Energie nun primär in die Blütenentwicklung steckt und Nährstoffe aus den Blättern zieht. Dies ist ein natürlicher Prozess, der oft als "Herbstfärbung" bezeichnet wird.
Wir werden die Reifung der Trichome weiterhin genauestens beobachten, um den optimalen Erntezeitpunkt zu bestimmen, der je nach gewünschtem Effekt variieren kann. Auch die allgemeine Gesundheit der Pflanze wird weiterhin im Auge behalten, um sicherzustellen, dass sie bis zur Ernte optimal versorgt ist.

Likes
19
Share
@Naujas
Follow
the girl looks good, the leaves are a little burnt, but it's really not a big problem. she doesn't have much time left until the finish:) I'm on vacation, so I can't take pictures myself, that's why I asked someone to visit her several times a week :) I'll be with her in a week :) ❤️
Likes
51
Share
@Waveform
Follow
Once again, this week starts where the former one ended. With the exception of all the cables you can see in the first picture. I dared to install a minimalized version of the Raspi control only controlling the self-built humidifier and one blower/fan combination. I was very pleased to see how easily the simple diffusor can hold optimum VPD as long as temperatures are high and humidity tends to fall below optimum VPD. A single 10 seconds evaporation can hold the level for about 2–3 minutes.
I am not pleased to see the Monsanto blowers rather underperform. It’s impossible to reduce humidity or temperature with both running on full speed, while a lifting of the tent door will bring immediate changes. With the Raspi/Arduino success so far*, I am thinking about using old Power Mac fans which are WCM controllable and use 12 V. At least one to increase air intake, and maybe even the blowers.
* It wasn’t any problem at all to have the Arduino collect CO2 and soil moisture data, so after some more cable manufacturing (aka helpless soldering), I could extend the Raspi control. I’m still uncertain about the camera module (@trelorny impressed me with his time lapse videos). I don’t want to put the hardware into the tent with its not so electronics friendly climate, already risking some rare outages of the temp/hum sensor. But the camera module cannot be placed far away. So maybe I’ll use the 3A model I own as a spare part as a camera driver. Any maybe, if it works, invest in a better camera module. Mine is generation 1.
Oh, and the ladies! Gave them slightly fertilised water yesterday, and even it or the better VPD yesterday or a combination of both make me believe bud growth is a bit more visible today. The smell in the morning when I open the tent to release accumulated humidity is outstanding.
They were already thirsty on day 57 again, so pure RO + a bit of tap water until it spilled out of their pot’s bottoms. Many fan leaves turning autumnally now, and the smallest Sherbet suffered a bit from over-fertilisation as I wrote. But it this stage I don’t go for leaf beauty anymore. Just another learning: Don’t use differently sized pots anymore. Hard to feed them individually this way.
VPD was mostly in best range yesterday, and I have the feeling it really supports their bud growth. I added an "Evening time" option to my Raspi control that allows the humidity to sink a selected time before lights shut down. That made it possible to have humidity in best range for most of the night time too.
They were even dry again on day 58 morning. Another time just water. The blowers cannot cope with the flowers’ smell anymore, and so sometimes my flat cannot hide who shares it with me.
Day 60 presents me with a problem: I’ll leave on Friday for a few days. Considering the microscope pictures are not from the tops buds: Would you say it’s safe to give them another week?
Problem solved on day 61. Only clean water from now on, and next week will be their last.
You won’t see any new pictures for some days now. Me too …
Something I wanted to share with you before I leave: I just finished to update my grow box control with a new PWM fan hat that keeps the Raspi cool, while at the same an infrared sensor can now measure real leaf and additional ambient temperature. Setup is much cleaner and more robust now, but I wish my flux would not make the solder stick to the tip of the machine instead of making it flow and stick at the tiny tiny spots I have to hit …


Likes
14
Share
@Gardenergrower
Follow
el ciclo de estas nenas fue corto tuvieron 3 semanas de crecimiento y 9 semanas de floracion me gusto mucho su estructura aroma sabor y colores que entregaron los distintos fenotipos que me salieron muy contento con el resultado y experiencia que me estregaron estas strawberry banana grape de seedsmanseeds , espero les haya gustado el seguimiento que hice , disculpen la calidad de las fotos mi movil no tiene muy buena camara xd , saludos amigas y amigos cultivadores exito en todos sus proyectos
saludos 👏

Likes
4
Share
@poloq_mauriceloetel
Follow
Environment + Pests + Setup
This week (at day 31) I decided to end the battle against fungus gnats. Even after almost three weeks of dried-out soil, dozens of adult insects could be seen, which told me that there were pockets of moisture that I coouldn't influence. Accordingly, I went back to the original plan I had outlined earlier: bring the system into balance and use sand and nematodes. Since I should no longer have any problems with low RH, I have also reactivated the exhaust fan, which lead to the values you can see above.
Nutrients + Environment
From the outset, the plants showed a slight nitrogen deficiency, which was evident in their rather pale, light green color. This is probably due to the fact that the substrate (until now) did not contain enough moisture to allow metabolic and decomposition processes to proceed efficiently. Directly after watering I got reassured that my choice was right and the soil still alive, healthy, and ready to 'get back to work': look at those springtails!
Plants
On day 30, I topped the plants. Both had already formed three nodes and started to develop healthy side branches at all of these nodes. So, according to my plan, I removed the main shoot, leaving enough space for the stump to encapsulate without damaging the healthy plant. I also removed one shoot from each of the middle nodes, as I don't want branches that already grow towards the center (the branches will grow towards the light anyway, and this way I can ensure that there is enough air circulation and room for expansion).
Upcoming:
Start of LST
Likes
Comments
Share
@Maxximillia420
Follow
14.01.2020
Day. 30
Plant is exploding and growing steadily!!
This week Iam gonna cut some cuttings and in about 1- 2 weeks time it’s gone go into the big box !! Nothing exiting happing till now but that’s gonna change soon

Likes
5
Share
@GoodTimesOrganics
Follow
Ich bin nebenher immer noch viel mit anderen Projekten beschäftigt, daher werden ab und zu ein paar Wochen übersprungen.
Allerdings habe ich auch vorgehabt aus der einen Pflanze zeitweilig eine Mutterpflanze zu ziehen um mir ein paar Stecklinge daraus zu machen.
Mit Erfolg.💚🍭

Likes
14
Share
@Downunder90
Follow
## Week 3 Update: Fresh Clones Arrived!
### 🌱 New Beginnings with Greenhouse Super Lemon Haze and Humboldt Seed Bubba Kush 🌱
I'm excited to share an update on my grow journey with Greenhouse Super Lemon Haze and Humboldt Seed Bubba Kush. After a minor hiccup with the initial shipment, Hanfgarten's excellent customer service came through and promptly sent new clones, free of charge. Big shoutout to Hanfgarten for their outstanding support! ⭐⭐⭐⭐⭐ 💚
### Greenhouse Super Lemon Haze 🥦🥦🥦🥦🥦
**Cannabis Strain Benefits** 🧐 🤓
Greenhouse Super Lemon Haze is renowned for its zesty lemon flavor and energizing effects. This strain produces large, dense buds coated with resin, making it a popular choice among both growers and consumers.
- **Parentals:** Lemon Skunk x Super Silver Haze
- **Type:** Sativa-dominant Hybrid
- **Flowering Time:** 10 Weeks
- **Flavor / Taste / Smell:** Lemon, Citrus, Earthy
- **Effect:** Uplifting, Energizing, Euphoric
- **THC Content:** 19-22%
- **Characteristics:** High Yield, Resinous Buds
🔗 [Learn more about Super Lemon Haze](https://shop.greenhouseseeds.nl/feminised-cannabis-seeds/super-lemon-haze/)

---
### Humboldt Seed Bubba Kush 🌿 🥦🥦🥦🥦🥦
**Cannabis Strain Benefits** 🧐 🤓
Humboldt Seed Bubba Kush is celebrated for its relaxing and calming properties. This strain produces dense, resinous buds with a rich, earthy aroma, complemented by hints of coffee and chocolate.
- **Parentals:** OG Kush x Afghan
- **Type:** Indica-dominant Hybrid
- **Flowering Time:** 8-9 Weeks
- **Flavor / Taste / Smell:** Earthy, Coffee, Chocolate
- **Effect:** Relaxing, Calming, Sedative
- **THC Content:** 17-21%
- **Characteristics:** High Resin Production, Dense Buds
🔗 [Learn more about Bubba Kush](https://www.humboldtseeds.net/en/bubba-kush/)

---
### Diary Snippet: The Journey Continues 🤤🤤🤤🤤🤤🤤🤤
Despite the initial setback with the hot temperatures during transport, my new clones are thriving.
I'm optimistic about the future of these plants and looking forward to sharing more updates as they grow and flourish. Stay tuned for more insights and tips from my cultivation journey!
---
⭐⭐⭐⭐⭐### Special Thanks to Hanfgarten ⭐⭐⭐⭐⭐
A huge thank you to Hanfgarten for their quick response and excellent customer service. Receiving the new clones so promptly was a lifesaver, and I appreciate the top-notch support. If you're considering ordering from them, I highly recommend it!
💸💸💸💸💸💸💸🔗 [Visit Hanfgarten](https://www.hanfgartenshop.de/hanfstecklinge.html) 💸💸💸💸💸💸
---
Stay tuned for next week's update, and happy growing! 🌿💚


Likes
10
Share
@Colossus
Follow
Turned today, got impatient to wait another 2 weeks 🤦🏻
Seen some discoloring heading to nutrient burn so ive corrected it all in this new top up (from today)
Didnt take too much notice of the room this week, have removed one foam base from the bottom although i maybe should have left them a little closer to the light.
Added CYCO Ryzofuel 0-0-0.2
Added Advanced Nute Rhinoskin 0-0-0.4
Does this literally have the same fuel?😂
Cyco runs for first 2 weeks of bloom
Rhinoskin runs for 6 weeks.
To add overdrive at 6 weeks to week 7 then flush week 8!
Im guessing the overall BigBud is 6 to 8 weeks. I will stretch her to 8 weeks.
Any tips from here onwards is appreciated 👌
Added a net but im hopeless and with big hands am prone at breaking main stems at this point once LST is applied so i might just leave it as it is until the knuckles form stronger and see how we go!

Likes
49
Share
@masterofsmeagol
Follow
8/8 Rained all night. Still raining today and the forecast says it will continue throughout the day until midnight. It's come down heavy at times but for the most part it's a rain that plants like. Defoliated a couple leaves but nothing really needed it. Without a trellis or my tarps up the grow bags seem to dry out incredibly fast so I need to watch that. It's also "toughened" up the plant wants. I've seen them blowing straight sideways and they were fine. I do need to find that four lined plant bug and spray BT after the rain. Plants lovedcthe nutes. I might feed a little later today or tomorrow. I've got a few things to do but I'll keep this updated.
Went over and defoliated ANYTHING that needed it and combed through every plant during a pause in the storm. Then I shook them all off and did a video. This is by far the healthiest crop I've grown! I think they can handle more nutes too so I'm going to up it next feed. Still seeing stptadoc chunks missing and random pillar damage. BT will handle it. It's just so minor I'm not even sure if it should be addressed that way. I've had pretty good luck just looking for them and picking them off.
8/9 Cannabis can grow an inch or two in a day and it definitely has been! The rain has finally stopped. I went and shook all my plants off. I'm going to check and see the last time I fed and try to get a feeding schedule created that won't cause lockout. That's been a problem in the past. I've defoliated a lot of leaves lately but EVERYTHING is looking amazing. Extremely healthy. I DO need to spray BT for the pillars and I need to move that one plant back. I keep forgetting to grab the little wheels I need to make a platform. There are other ways I could do it I guess. I'll keep this updated. No damage from the storm and I went through and defoliated before and after. Forgot to upload shit and now I'm back home with this shitty internet connection. I'm trying to upload this video but we'll see. It's at like 32%. I did a full workout and came back to find this at 77% lol. I need to remember to upload things when I'm not in the middle of the woods.
UPDATE: Checked on things and did a video. Need to feed, apply bt and secure individual branches before flowering increases
8/10 LOOKS to be a beautiful day. Growbags are heavy as hell and wet on the bottom. I ALMOST fed today and I still might. The pp in the 10 seems to have leeched a lot of nutes. That and a giant blueberry cheese are the only places I'm seeing a deficiency and I want to keep it simply. I also need to put a trellis up apply BT. also if I'm going to move things around I've got to do it before I put up flowering supports. It's harder to move stuff when it's wet. I'll keep this updated. The girls look fantastic.
UPDATE: Went and trellised two of my plants. I was going to feed today but decided to wait until the next time I water. I'm only seeing deficiencies on the phrple punch in the ten and the GIANT blueberry cheese that I watered the most. Bags were heavy as hell this morning but I bet I'll need to water tomorrow. We'll see. Hahaha wow. I'm trying to upload a video but even my tough as fuck plants might have some difficulty in torrential rains like this. Wow. That's all I can say. I'll either go check and shake them off tonight or if it keeps it up I'll wait until morning I guess. What a shit show
8/11 WOW. That's probably the hardest I've ever seen it rain. Got to the grow this morning and found NO damage. It's super sunny amd windy so the bags will probably dry out. I think it's suppised to rain again Sunday. I definitely haven't had to water that's for sure. Nothing was even bent over this morning. The blue cheese I didn't fim or top (I wanted to see gow it grew naturally) pop ka was bent down a little bit but not much considering the pounding it got. You can see on the videos. Since bags were saturated I didn't need to water before I fed. I fed 1.25 pints to every plant. I gave the fifty 2.5 pints and the purple punch in the 10 got closer to a pint. I want to start out slow with nutes as I'm nor seeing many deficiencies. I may fuck around today and put some more trellises up seeing this wind bur when flower comes I can just put my tarp up. I'll update as I go.
UPDATE: WENT BACK OVER BECAUSE THE WIND WAS WHIPPING LIKE CRAZY AND TREES WERE DOWN. I SANITIZED ALL MY TRELLISING AND HORIZONTALLY TRELLISED TWO 10TH PLANETS IN FRONT AND VERYICAL TRELLISED THE THIRD. HORIZONTAL TRELLISED THE PURPL WE PUNCH IN THE 10 AND VERTICAL TRELLISED THE BLUE CHEESE IN THE 50 AND THE 10TH PLANET IN THE MIDDLE OF THE CAGE. GLAD I GOT THIS DONE. NOW I JUST NEED TO SPRAY BT AND I'LL FEEL CAUGHT UP.
8/12 Got my supports up and ready now I've just got to find the time to give the girls an application of BT. I've done a pretty good job with manual removal thus far. Bags are over watered. It's Rained so hard and so often that the bags have stayed drenched. Luckily this ridiculous wind has been drying my grow bags out relatively fast. I'm hoping that will be the case today. They're starting to dry out but it's supposed to rain tonight and I think tomorrow. Bright and sunny right now. These are some resilient plants. They seemed to like the liquid kool bloom. I noticed (barely noticeable but I was looking for it) a SLIGHT color change at the very TIPS of a few leaves on a plant but not enough to consider it burn. I will monitor but I think ive got a pretty good feeding regimen. I plan to use as little as I can get away with. I'll keep this updated.
UPDATE: WENT TO CHECK ON PLANTS AS I GOT "THAT FEELING". EVERYTHING WAS LOOKING GREAT BUT THEN I WENT AND LIFTED MY DRY 22GALS OF SOIL AND COMPATED IT TO MY 20S AND LIKE I THOUGHT THE WIND HAD DRIED THEM OUT. I CANT BELIEVE HOW QUICK THEY DRY OUT. I GAVE EVERYTHING 1.5 GALLONS AT LEAST EXCEPT FOR THE 10 WHICH I GAVE A LITTLE LESS THAN A GALLON. I GAVE THE 50 A LITTLE OVER 2 GALLONS AND I DISNT NOTICE RUNOFF. I HAD MORE WATER MIXED UP IM THINKING I SHOULDVE GIVEN IT ANOTHER GALLON. OH WELL ITS SUPPISED TO RAIN A LITTLE TONIGHT AND THEN TOMORROW. I HAVEN'T WAYERED IN LIKE A WEEK SO I PROBABLY SHOULD'VE GIVEN THE WHOLE 2 GALLONS. THEY GOT DAMN CLOSE THOUGH.
8/13 Rained like hell last night. Oh course it did. Doesn't really matter though. I had to water. I thibk the last time "I" watered was lime a week ago. My bags were dry. Plants weren't drooping and they might've been ok but I've under-watered twice already to the point they drooped right over dead looking and I wasn't going to do that again. Plants seem to love the nutes I gave. Keeping the tarps off and allowing the wind through and having my bags on pallets has really saved me this year. Everyone else is bitching about the rain and lack of sun but things are going great for me knock on wood. I'm not 'in the ground' though so that probably has something to do with it. I just need to check my plants multiple times a day. These plants are getting massive. The cage is at least 8ft tall and the biggest one is about to the top now. Almost as wide too.
8/14 I forgot to write the entry but I uploaded some pics from this morning. They were wet from the storm but I went back over and took video that's like two and a half minutes plus I took some pictures. I pulled the cage out but I need to undue one of the lathes and pull it forward. I also need to apply BT. Plants seem to be aggressively flowering (some more than others) so it's a real exciting time. I went over this afternoon and everything looked fantastic. I'll try to upload a few pictures but the video will have to wait. Didn't rain today and my bags sry out quick so I'm sure they'll be fine even if it rains. I did notice that the two plants I watered most including the smallest container seem lighter in color. IT might hust be the transition to flower but u think I need to increase feed. On the 10th planet's they are green as can be and have that SLIGHT little almost unnoticeable part you really have to look for on the tips that means it's getting its nutes but it's not burnt. I believe I'm going to have to make feeding schedules for each strain

Likes
27
Share
@Dunk_Junk
Follow
Chugging through flowering!
Her lower leaves are loosing a bit of green colour.

Likes
9
Share
@Sleestacker
Follow
I was wondering why she wasn’t breaking ground. So on 4/20 I started looking into the rapid rooter. She was breech! Stuck sideways in the rooter, turned her head first and she’s going in the right direction now!

Likes
7
Share
@biggreens420
Follow
kalidog has reacted great to the switch to 12/12 shes started to stretch and Bush out did some more lst and defoliation tied some of her branches down not much else to report thanks for reading happy growing guys
