
Likes
Comments
Share

@Kassus_Kush
Follow
Blooming and finally booming… I can tell this plant is gonna be HUMANGUS! Don’t think my tent can handle this beast


Likes
Comments
Share

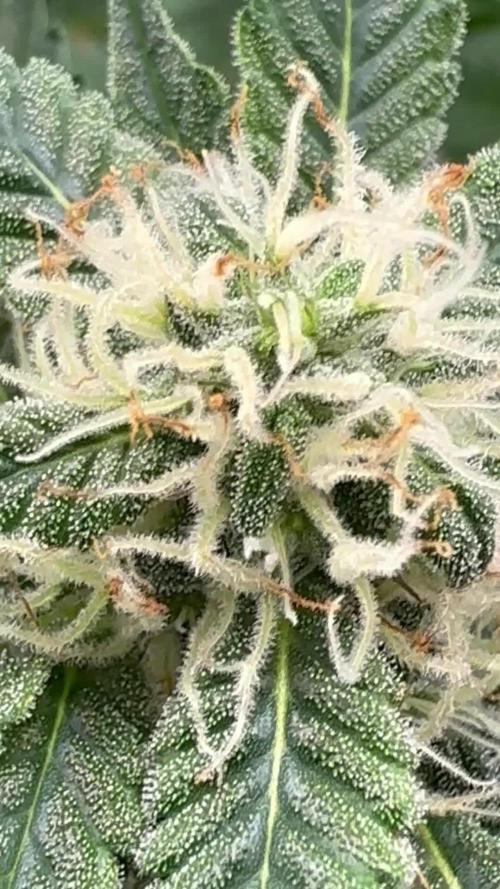
@TrunkoKush
Follow
Earthy Wood and Lemons. Purple Trichome Necks. Purple Stems. Senescence. Purpling Leaves

Likes
34
Share


@pHilosophy420
Follow
Original Auto Amnesia Haze - She is very bushy and growing very well. One more week till flowering so the next watering will be with bloom nutrients :-)


Likes
7
Share


@Adam22
Follow
Transplanted today added another blue CFL 250w +:125w temps gone up nicely.... Looks like it was needed! After a week I will switch to the gavita dual end once these are settled haven't got tent up they seem to be fine so far but they are touching each other
Likes
54
Share


@MrJones
Follow
MrJones Cream Mandeiran Auto XL - ViparSpectra XS2000 240W Infrared Full Spectrum LED Grow Light
´🍪⊱╮🍪╰⊰🍪 WEEKLY GOALS 🍪╰⊰´🍪⊱╮🍪
🏡Indoor - 3"x4"x8" Custom Built Grow Closet
🌞Environment - 80F and 60%Humidity - using Humidfyer as needed.
🌾LST and Defoliation - this strain likes to stretch!
🗓️Week 6 Flower
⚱️5-Gallon 📊6.2 PH
💧 Feeding / Using Dr. Earth Dry Organic Amendments - Home Grown & Bud / Bloom Booster
🌞ViparSpectra XS2000 240W x2 Infrared Full Spectrum LED Grow Light
🕷️ IPM - Will be using Green Cleaner" 1 OZ per Gallon, and CannControl from Mammoth alternating between products each month for Integrated Pest Management.
´🍪⊱╮🍪╰⊰🍪 PLANT UPDATES 🍪╰⊰´🍪⊱╮🍪
📝 Notes - Started the week off with a Treatment of Mammoth CannaControl - Looks like the ladies are done with their stretch, time to focus on VPD and Bud Growth, with the ViparSpectra XS-2000's should no problem supplying the light needed, these girls have just blown up!
╰⊰🍪╰⊰´🍪⊱╮🍪╰⊰🍪╰⊰🍪╰⊰´🍪⊱╮🍪╰⊰🍪╰⊰🍪╰⊰🍪⊱╮
🔶Sunday 07.18.21/ Just watering with H20 PH-6.2
🔶Monday 07.19.21/ This run continues to be easy peasie! Just add water!
🔶Tuesday 07.20.21/ Using H20 PH 6.2 / 6.6
🔶Wednesday 07.21.21/ Buds are starting to fatten up starting to get SATINKT! Using H20 PH 6.2 / 6.6
🔶Thursday 07.22.21/ Dr. Earth and Water - Did not think it would come out so nice
🔶Friday 07.23.21/ Just using H20 PH to 5.8/6.2
🔶Saturday 07.24.21/ Just using H20 PH to 5.8/6.2
╰⊰🍪╰⊰´🍪⊱╮🍪╰⊰🍪╰⊰🍪╰⊰´🍪⊱╮🍪╰⊰🍪╰⊰🍪╰⊰🍪⊱╮
Cream Mandarine XL Auto®️ Information
Tall-stemmed auto-flowering strain. This high-yielding 4th generation auto-flowering strain is the resulting hybrid from the cross between selected specimens of our Cream Mandarine Auto®️ (SWS29)) and a Super Tai’98 elite clone.
The genetic coming from the Super Tai’98 elite clone contributes with interesting Sativa characteristics to this hybrid, such as bigger size, but also subtle aromatic and spicy tones with hints of wood and nuts. The so much appreciated Cream Mandarine Auto®️ genetic contributes with traits from the Indica side, such as high flower and resin production, but also sweet and fresh aromas with tones of citric fruits of the mandarin orange type.
DATA SHEET
Variety SWS55
Indica: 35% / Sativa: 63,4% / Ruderalis: 1,6%
THC: 18-23% · CBD: 0,6%
Indoor Yield: 450-650 g/m2
Outdoor Yield: 50-300 g/plant
Indoor/Outdoor Harvest: 9 weeks from germination
Height: 110-150 cm
Likes
Comments
Share
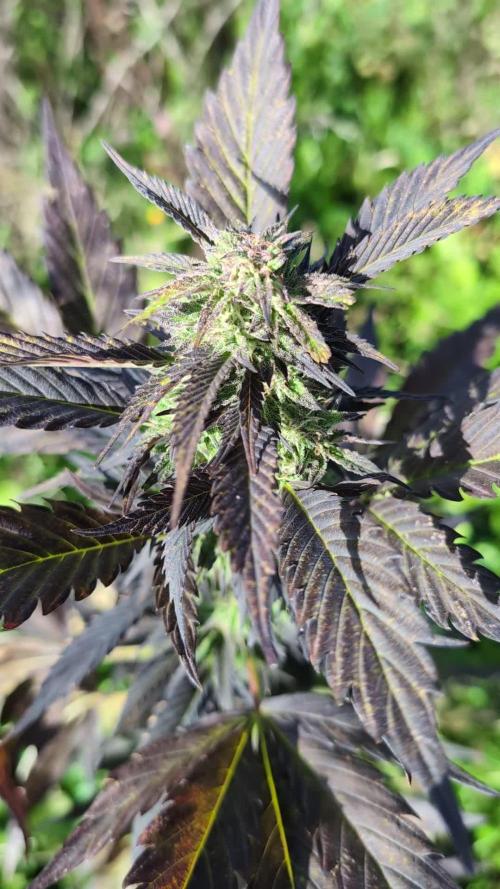

@GoodTimesOrganics
Follow
Hi liebe Community 💚 das Blue Cream Haze Outdoor-Projekt neigt sich langsam dem Ende zu.
Auch die herben und wechselhaften Bedingungen scheine der BCH nicht ganz zu schaden. Die Pflanze steht unter absolutem Stresstest und bis jetzt ist dennoch alles in Ordnung.
Klar ist die Pflanze relativ klein und da die Wachstumszeit nicht sonderlich lange war, sind die Blüten relativ klein.
Trotzdem scheint die Pflanze bis jetzt allen Bedingungen zu trotzen. Auch die erste Nacht mit knapp 0 - 1 Grad Celsius hat sie überlebt.
Ich bin top zufrieden.
🌱💚
Likes
23
Share


@420DeepGrow
Follow
Gracias al equipo de Sweet Seeds, XpertNutrients y Marshydro sin ellos esto no seria posible.
💐🍁 Red Hot Cookies:
Excelente genética resultado del cruce entre un clon seleccionado de una variedad “Super Strong” americana de la familia Cookies, la Tropicanna Cookies (Girl Scout Cookies x Tangie), y un clon seleccionado de una potente variedad también americana de excelente aroma a mandarinas, la Tangie.
Para el cruce se han elegido exóticos parentales con fenotipo de flor roja. El color rojo en las flores se presenta en un 60% de la descendencia y suele aparecer en las últimas semanas del periodo de floración, comenzando desde las ramas y flores inferiores hacia las superiores.
Variedad de marihuana “Super Strong”, muy productiva y resinosa, que alcanza niveles de THC de hasta el 25%. Excelente aroma y sabor, dulce, profundo y denso, con marcados tonos de mandarina y mango, y pinceladas de frutos del bosque.
🚀 Consigue aqui tus semillas:
https://sweetseeds.com/es/the-red-family/3066-red-hot-cookies.html
💡FC6500: Eficiencia líder en el mercado: la lámpara de cultivo LED FC-E6500, que ostenta un estatus líder en el mercado, es una solución rentable con un PPE de 2,8 µmol/J y un rendimiento máximo de 2,5 g/vatio. Ofrece un PPF alto de 2026 umol/S y es adecuada para una cobertura de vegetación de 1,50 m x 1,50 m y una cobertura de flores de 1,20 m x 1,20 m.
Iluminación versátil y uniforme.
https://marshydro.eu/products/mars-hydro-fc-e-6500-730w-commercial-led-grow-light/?gad_source=1&gclid=Cj0KCQjw1qO0BhDwARIsANfnkv9IIrYSbmJqz8PqpJOIyWwJfp5bc3SGJgUV68USLQ4tjmXDYwoBuAsaAue3EALw_wcB
🚥 MarsHydro ADLITE UV/IR/RED:
Para lograr un crecimiento óptimo de las plantas y maximizar los rendimientos es un arte simple que depende en gran medida de las condiciones ambientales adecuadas. Reconociendo las limitaciones de la iluminación natural y las soluciones de iluminación tradicionales para satisfacer estas necesidades únicas, lanzamos ADLITE. Estas luces especiales UV, IR y roja están diseñadas para llenar áreas del espectro, proporcionando las altas longitudes de onda que las plantas necesitan para un crecimiento y desarrollo óptimos.
🚀 Consigue aqui tu Adlite:
https://marshydro.eu/collections/adlite-supplemental-lights/
🏠 : Marshydro 1.50 x 1.50 x 1.80, carpa 100% estanca con ventanas laterales para llegar a todos los lugares durante el grow
https://marshydro.eu/products/diy-150x150x200cm-grow-tent-kit
🌬️💨 Marshydro 6inch + filtro carbon para evitar olores indeseables.
https://marshydro.eu/products/ifresh-smart-6inch-filter-kits/
🍣🍦🌴 Xpert Nutrients es una empresa especializada en la producción y comercialización de fertilizantes líquidos y tierras, que garantizan excelentes cosechas y un crecimiento activo para sus plantas durante todas las fases de cultivo.
Consigue aqui tus Nutrientes:
https://xpertnutrients.com/es/shop/


Likes
16
Share


@grow_nerd420
Follow
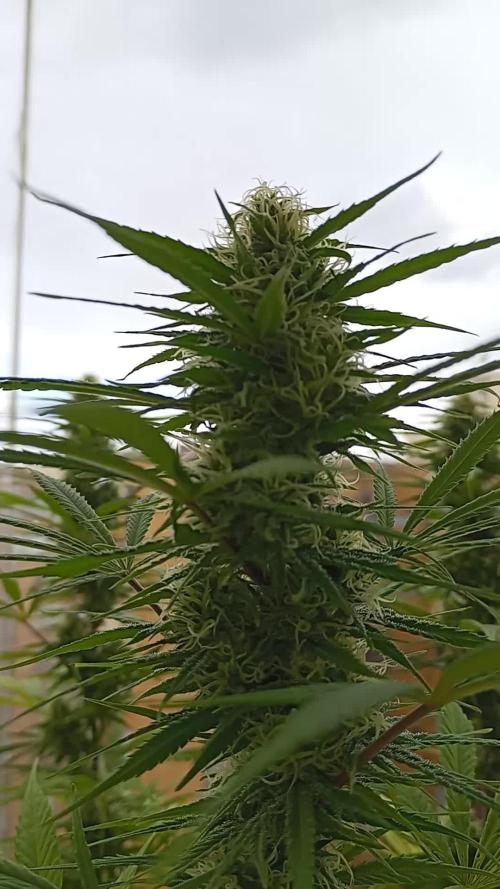
Week 7 of Flower
All Breedbros Genetics 🔥💪
Check My Instagram profile for more!🔥💪✌️
Check Breedbros Instagram profile!🔥💪✌️💚
Thanks for Watching 🔥💪💚💚💚✌️

Likes
8
Share


@Bread_n_Buds
Follow
Our Gush Mintz have undergone a small revolution and are still super beautiful, even more than before.
One of the plants was damaged during the main lining I broke a brunch and it was transformed into a very very beautiful LST plant, it could remain small but I wouldn't swear it has a truly spectacular shape.
In this diary therefore you will find the plant worked without techniques that require cutting but only with a LST this time also on the main stem and very aggressive to give a beautiful shape.
The comparison is the salt of the experience so the plant in the other diary will be worked very differently.
We have started the Plagron fertilization program, we are in 100% organic configuration, the soil is recycled Promix + 1/3 fresh soil + 10% Perlite + RQS Mycorrhiza Mix (4 g in the mix, 1 g under the small fiber pot).
We are administering // 1 ml/l Power Roots - 1 ml/l Pure Zym - 1 ml/l Sugar Royal - 3 ml/l Alga Grow
https://plagron.com/en
The doubts about the compatibility between Pure Zym and mycorrhizae have been dispelled, they can get along according to Plagron experts. If someone tells you that enzymes eat mycorrhizae, which in principle may seem possible, explain to them that it is not true.
https://www.royalqueenseeds.it/growing/452-easy-roots-mix-di-micorrhize.html
Try this strain, it's a top strain of the last few years very high thc level
------------------------------------------------------------------- https://www.zamnesia.io/it/11234-zamnesia-seeds-gush-mintz-automatic.html
Brief description of Zamnesia // Gush Mintz Auto is a relaxing hybrid strain that derives from the original Gush Mintz and a high-performance ruderalis specimen. This cross produced a plant with 70% indica and 30% sativa genetics. Her parents have given her a range of interesting traits, including mint and candy flavors and a high THC content of 20%. Smoking these buds provides creative vibes, a sense of euphoria and a pleasant sensation from head to toe. In addition to its enticing flavors and powerful effects, Gush Mintz Auto produces large yields of compact buds in just 9–10 weeks from germination.
Gush Mintz Auto is extremely easy to grow, with plants reaching an average height of 70cm indoors and 120cm outdoors, making her ideal for discreet grows or limited spaces both indoors and outdoors. This strain is well suited to LST (Low Stress Training) and performs best in a ScrOG setup (a technique that optimizes light exposure to maximize yields).
Punching aromas and deeply relaxing effects
As she grows, Gush Mintz Auto's aroma intensifies, releasing sweet and minty notes. This refreshing flavor profile really comes into its own when smoked, offering an inviting combination of minty freshness and sweetness. The effects are deeply relaxing, enveloping the body in a pleasant well-being without being too sedative. Gush Mintz Auto is perfect for those seeking creative inspiration, making writing, painting or music-making sessions smoother and more inspiring.
At Zamnesia you can find the whole world of growing and much more. Take a tour around the site and you will find "all the best that nature has to offer" in various shapes and colors.
The new strains are amazing and the old ones are no exception... p.s. for now zero Hermaphrodites, growers, can you say the same?
--- // www.zamnesia.com
Likes
11
Share


@Nutrient_gro
Follow
Just been adding water when dry. Adding some pure worm castings top dresses. Will be adding Gaia green all purpose in a week or 2 when needed.
Likes
1
Share


@FarithAriasFajardo
Follow
El registro corresponden a los dias 28, 30 de abril y 2,3,4 de mayo Despues de realizar corte apical y algo de lst junto defoliación leve. Hasta ahora las plantas van muy bien, creciendo muy bonitas y con fuerza. Tratando de llevar todo de la mejor manera ya pude ajustar algo el set donde tengo mis planta y cada vez más contento con estos resultados! Ya hoy la white widow ibl cumple 30 dias desde germinada y la zinfandel 23.

Likes
34
Share


@Roberts
Follow
FBT 2308 is growing great in the Agrogardens nutrition, under the Medic Grow Mini Sun-2. She has gotten her roots pruned, and selective defoliation plus lst. Everything is looking really good for it at the moment. Thank you Medic Grow. Agrogardens, and Fast Buds. 🤜🏻🤛🏻🌱🌱🌱
Thank you grow diaries community for the 👇likes👇, follows, comments, and subscriptions on my YouTube channel👇. ❄️🌱🍻
Happy Growing 🌱🌱🌱
https://youtube.com/channel/UCAhN7yRzWLpcaRHhMIQ7X4g
Likes
244
Share


@DogDoctorOfficial
Follow
Man i am so happy that i decided to enter this Supafreak journey, i am more and more in love with these one , she is just perfect and amazing.
For now i keep bending leafs here and there and tryng to fill up the 3x3 canopy before i take some clones and flip her in to fruit mode.
with the week coming to and end i fell like she is moving great with means that provably i will veg her for 2 mb 3 more week max lets see
added a video of just me and my plants hope you guys enjoy the ride i fell humble that you all stop here to see my Freaky Freak <3<3<3 thank you <3 <3 <3
As always thank you all for stopping by , for the love and for it all, i fell blessed to have you all with me for one more love journey, and a different one form the rest i did so far <3 <3 <3 Thank you Thank you Thank you , you guys are great and have been amazing , thank you for everything <3<3<3
#aptus #aptusplanttech #aptusgang #aptusfamily #aptustrueplantscience #inbalancewithnature #trueplantscience #dogdoctorofficial #growerslove
With true love comes happiness , Always believe in your self and always do things expecting nothing and with an open heart , be a giver and the universe will give back to you in ways you could not even imagine so <3 <3 <3
<3 <3 <3 Growers love to you all <3 <3 <3


Likes
7
Share


@UrbanBoer
Follow
I cannot wait to see how this beautiful Queen is going to look at te end of the flowering stage, she’s the closet I’ve came to LST in a manner I wanted this baby to grow, loving how brunches twirl around the twig, l have stopped growing Christmas tree shaped babies. I LST from the seedling phase right through to flowering, you should not forget that this plant can take stress, imagine it was growing in the wild, some stress in your plant’s lie is critical for positive growth, from my point of view my trees are going to struggle with big buds, because it does not have this thick stems.
Likes
9
Share


@AUTOBUDDHA
Follow
Defoliated this week. Ladies are filling back in nicely.
Tons of bud sites. Very happy with this batch so far! Nutrients every watering this week. These girls will now get one watering of just ph water, then the next watering will be the last watering with nitrogen. After that, we kick the bloom phase into overdrive. They will get micro, bloom, and advanced big bud. Every watering, for the rest of their lives.
Grow-5ml
Micro- 5ml
Bloom- 5ml
Recharge once a week..
What a monster!!! This plant is still young and its just about to start stacking HARD! LOOK OUT FOR NEXT WEEK!

Likes
42
Share


@Polaskis
Follow
Well here we are with the most happiest part of growing marijuana is harvest time!!!!
Good Evening Ladies and Gents, as most of you have followed ots been a pretty damn good year for cannabis growers and myself, well I seen to think so lol. In my diary I have shown 1 plant of the Zsweet Insanity..... but truth be told I had 2 more in the grou nd somewhere else. Wait until you see the picks 👀
The strain is amazing! All three ended up about 4 feet Tolland about 4 feet wide. The massive collas were everywhere. You'll see in the pics above. It stinks sooooooo bad and is frosty AF! The Sweet taste of Lemon and deisel and a woody spice on the way out. Its clearly remarkable this strain! Check it out! The best part is I weight 3/4 of a pound dry 👀 Woooooooooooohooooooooooo!!!!! Hope you enjoyed the diary!!!! 🌱🔥🤤
Likes
2
Share

@BenandLippisfinest
Follow
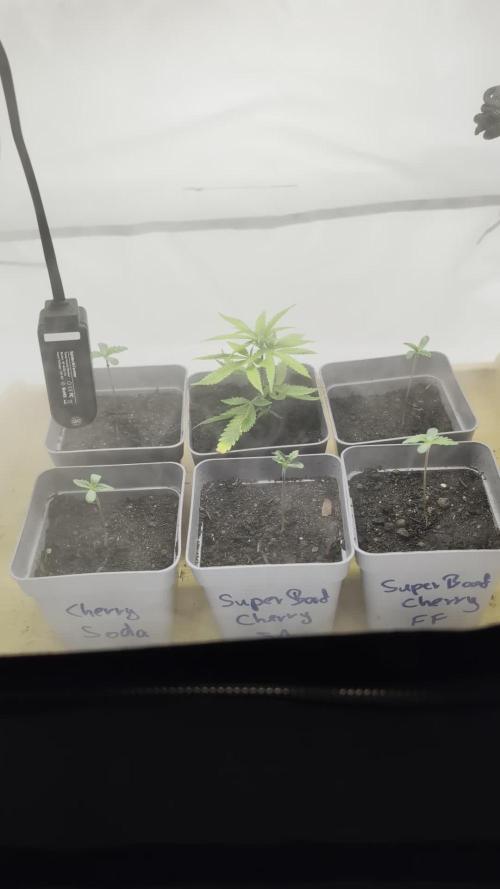
Wir haben noch eine Good GENETIX Steckling mit rein genommen, ein Blueberry Muffin X Super blood Cherry #26, die Mutter ist Crazy abgegangen und hat ein 120x120 Zelt in Beschlag genommen. Die Babys sind leicht gespargelt, ich hab das erste Mal mit der stix gearbeitet und die kleinste Stufe war zu gering bei 30 cm, aber das gleichen wir beim umtopfen wieder an.
We also added a Good GENETIX cutting, a Blueberry Muffin X Super Blood Cherry #26. The mother plant has grown like crazy and taken over a 120x120 cm tent. The babies are a bit leggy; it was my first time using the Stix, and the smallest setting was too short at 30 cm, but we'll even that out when we repot them.