
Likes
Comments
Share


Processing
Likes
3
Share


@Bloom_Room_By_Jared
Follow
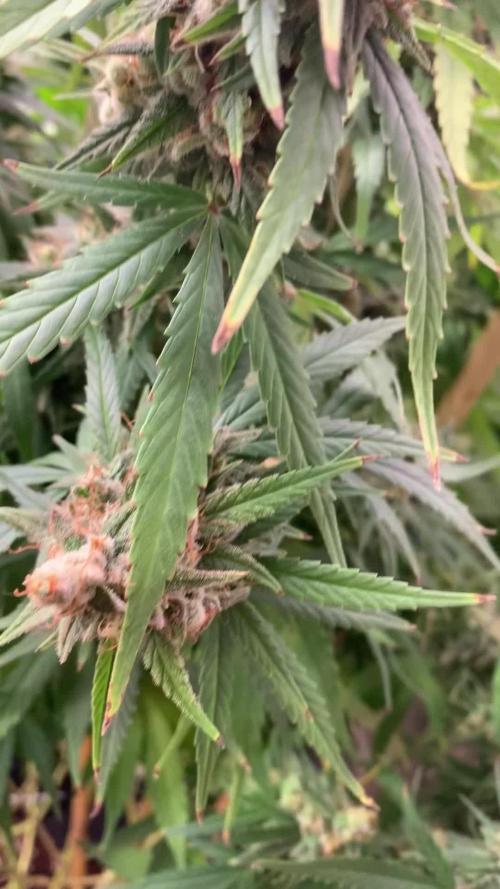
4/16: I’m really not happy with her....she really needs to start swelling up
4/17: seeing a little deficiency with her gave her a little cal-mag bump
4/19: I took off 5 leaves that had patches on them

Likes
153
Share


@Ju_Bps
Follow
Hello my friends 🌲👨🌾,
This week was good, the last week✂️✂️!
I've just given 1 time water Sunday, only 2.5l clear water PH@6.
I've removed lot of dead leaves dpend the week, she had a well senesence, almost all leaves was yellow, Taste should be nice, fruity flower smeel, and so frosted ❄️❄️❄️.
I'll publish the full harvest in few minutes.
Thanks to all for supporting spend this grow 👨🌾👩🌾👊❤️❤️,
Thanks to Mars Hydro for the TS1000 and Royal Queen Seeds for seeds ❤️❤️
https://www.mars-hydro.com/ts-1000-led-grow-light
https://www.royalqueenseeds.com/autoflowering-cannabis-seeds/537-mimosa-automatic.html

Likes
36
Share


@Fayah_Burn
Follow
Today on Day 141 and at the same time @ the end of the 9th week of flowering it is Harvest day (final harvest) for the remaining two Tropicanna Banana's (Plants #1 and #3).
Plant #4 was harvested on Day 134 (8th week of flowering) - see harvest pictures week 8
Plant #3 was harvested on Day 138 (9th week of flowering) - see harvest pictures week 9
Did not take any wet weights as i am drying the buds on the stalks and i dont wanna know how many stalkes i grew 😂
Will be back soon with the dry weights of each one of the four ladies. Some pacience is asked now 😬

Likes
2
Share


@Notsoaveragegrows
Follow
Here’s my flowering cycle I was going off the color of the hairs when figuring they were finish.

Likes
36
Share


@Hempface86
Follow
All right today's day 50 and this girl is rocking and rolling... She's about half the size as I used to growing but I'm used to synthetics so for an all organic I'm happy because I can fit more plants in my tent.. with that being said she's also in less than 2 gallons of soil she's at 23 in and she is frosting up nicely... I'd like to thank the friendly people over at Zamnesia Seeds for making this possible and I highly suggest you guys checking them out for all your seeds head shop and mushroom needs.. I hope everyone is doing well and so are their girls.. happy growing everybody ✌️😎
https://www.zamnesia.com/us/

Likes
5
Share


@Crazy_Doofus
Follow
Gonna ripe her for a full More week, cut her half way. Leave the bottom for another week. Gonna leave the clones too, still full bloom ❤️❤️❤️ trichomes not ready yet
The top of the clones are the same size as the mother plant ♥️♥️♥️ very succesfull!!
Likes
4
Share


@pzwags420
Follow
On day 1 I changed out my reservoir. I lowered my nutes to 650 ppm(25% reduction). I adjusted the PH down to 6.1. My left plant has some burnt tips from either PH shift or over fertilization. My hope is that the lower ppm will help to resolve the issue before it spreads.
On day 2 I adjusted the reservoirs PH from 6.3 to 5.9.
On day 3 the reservoirs PH is 6.0. I installed my new 200 watt HLG Rspec. I adjusted PPFD readings to 700-1300 PPFD on all tops.
On day 4 I adjusted the reservoirs PH from 5.8 to 6.2.
On day 5 I adjusted the reservoirs PH from 6.4 to 6.0. I diluted my nutrients in my reservoir by removing one gallon of nutrients from the rez and and adding 2 gallons of straight tap water to the rez. This brought the nute concentration from 770 ppm to 540 ppm as the plants will be entering the ripening stage in a few days and they have too much nitrogen judging by the extremely dark green leaves and burnt leaf tips on some branches of the left side plant. The buds seem slightly smaller then my last run which may be due to an excess of nitrogen and maybe not enough light as some of my tops are taller then the others making proper PPFD challenging. All in all the girls are coming along nice and I look forward to the final weeks of flowering 😀
On day 6 I adjusted the reservoirs PH from 5.9 to 6.2. I think I have halted the nute burn as I haven't seen it progressing any more on the leaves. I will continue to monitor closely during these final weeks. The trichome production is increasing with some trichs on top of colas starting to go cloudy. The pistils are turning brown with roughly 40-50% are turning brown all signs I'm getting closer to the harvest window 😆. I dimmed my light to give 600-1000 PPFD to tops.
On day 7 I reduced my temps to 75 during the day and 68 at night. I adjusted the PH of the reservoir from 6.6 to 6.1. My reservoirs ppm was too high so I diluted the rez with 2 gal of tap water. This brought it down to 480ppm. The average ppfd to all 14 tops is 604 with no top receiving more than 1000 ppfd
Likes
13
Share


@Silverback_Guerilla
Follow
2/7:
Did a thorough feeding today, and also foliar fed with Microlife Maximum Blooms. Added humic acid.
2/12:
Fed today..no time for anything else..


Likes
60
Share


@STAYINGONMYMAINCBATORUNTWO
Follow
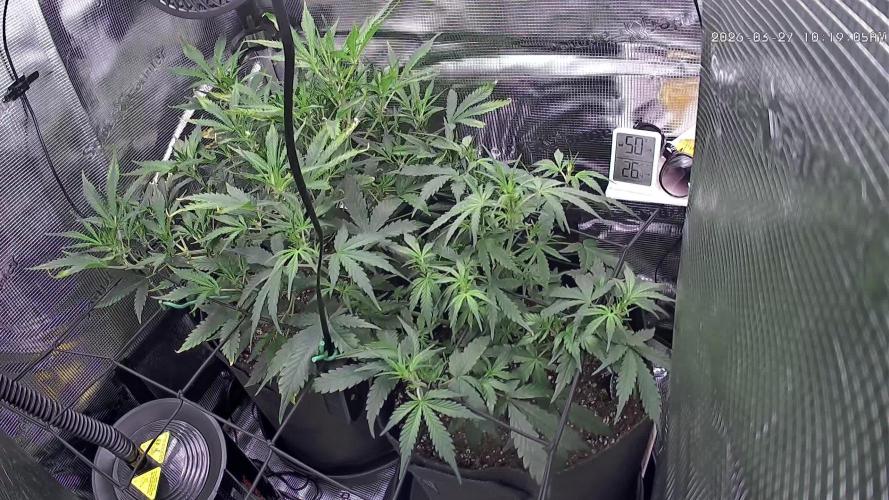
Over the last week I was stressing over overcrowding but I seem to have got this 12-12 timing correct as the stretch has come into play so I’m pretty sure by Friday I’ll have pistols and be able to call it day 1 in flower! I have a nice sea of green coming on now too and as I said I won’t trim anything or top as I want to grow naturally (organic)! If you like hit me with a like thank you buddies merry Xmas! These fastbuds are amazing and have shown why they are a top breeder! Can’t wait.... I’ll flower for Their photoperiodic times and flush as according! It’s all exciting! And anyone following just got to pop out will update my other diaries at around 4-5pm GMT

Likes
72
Share


@Natrona
Follow
Week 11 July 16-22 hello friends and followers, welcome to week 11.
I started seeing trichomes last week on Gaia and Circe. I don't smell anything from them. Only cream caramel gives off any fragrance. After flushing for 3 weeks, I've reintroduced fertilizer. I am using 1/3 to 1/4 the recommended dosage. How do I know what is the correct range for ec and whether I've unlocked the nutritional bind.?
7/16 flushed each with 1 gallon of water.
7/17 flushed each with 1 gal
7/18 fertilized at reduced strength each got 3.5 liters. Tps1 15ml, cal mag 1 top, big bloom 6 tbsp, signal 2.5 ml. Pictures and video.
7/19 no water, tent cleaning day, vacuum, wipe up dried spills. Took the girls outside for a few hours.
7/20 reduced fertilizer in 2 gals Tps1 7.5 ml, signal 1.25ml. Each girl got only 2 liters today. There was very little run off only Gaia with EC .80, ppm 570. Their tent mate cream caramel is very sticky and fragrant.
This week has been very busy. I packed up more geneology albums and shipped to my sister. I found my some of grandmother's award winning photographs and awards, certificates and brass plaques. Until WWII women did not work outside the home. If they did, they were teachers, nurses or secretaries.
During the early 1920-40 she raised her son as a single mother and found work during the depression as an executive secretary.
Her family men were bankers and merchants so she had awareness of business practices. During her employ, she won an award of $2 for a human resource suggestion on the proper attire for women in the offices and women on the manufacturing lines.
She continued working until the 50s. Her family always had cameras . That's how i have so many pictures from 1900. But she immersed herself in photography once she retired.. So when my Dad was in post WWII Japan, he bought her a state of the art camera. I came across so many self photos. She was the queen of selfies. Interesting to see the fashions over the years. Let me know if you would like to see some fashion pics.
7/21 made cookies. See week 1 Natronas recipes. The almond flour cookie is the basic recipe for cookies. The r3cipe calls for chocolate chips but It is versatile in that you can add nuts, dried fruit, caramels etc. If you want to taste my cookies the way I make them, you have to chop Lindt 78% dark chocolate bars and use that instead of chips which are sweeter.This time I added macadamia nuts as well. Yummy.
7/22 light defoiliation , and no water or nutrients.


Likes
12
Share

@Budette_Botanics
Follow
Lots of growth this week, and still nursing the potassium deficiency which looks grim, but she actually seems to be doing okay. Lots of white hairs literally everywhere. A lot more than the Northern Lights growing next to her.. only 3 days apart too. It’s been interesting to see how differently they have progressed. Sb is way taller, her main stem has been tucked 4 squares and she’s still standing tall. We should be coming to the end of her growth spurt soon, but we shall see where she ends up. I’ve kept on the same feeding schedule, upping bloom slightly. Hopefully she continues to do well, it’s been a learning curve every week of growing these autos.. the most important lesson is that they continue no matter what, no time to fix anything unlike photoperiods.. and I kinda like the challenge of that. Both plants have been fed the same, one has shown a deficiency one hasn’t at all. (yet🙈) entering week 7 with hopes of no more deficiencies, and the production on bud.. the smell has started to show, and it’s clearly coming from s/b. Very sweet, if you’ve ever been strawberry picking it smells like when you get to the strawberry fields, mixed with gank cannabis. Quite lush I won’t lie ☺️🍓 Let’s see what next week bring.. hopefully great things for us all. Happy growing everyone. 💚🌱

Likes
3
Share


@Luccannabis
Follow
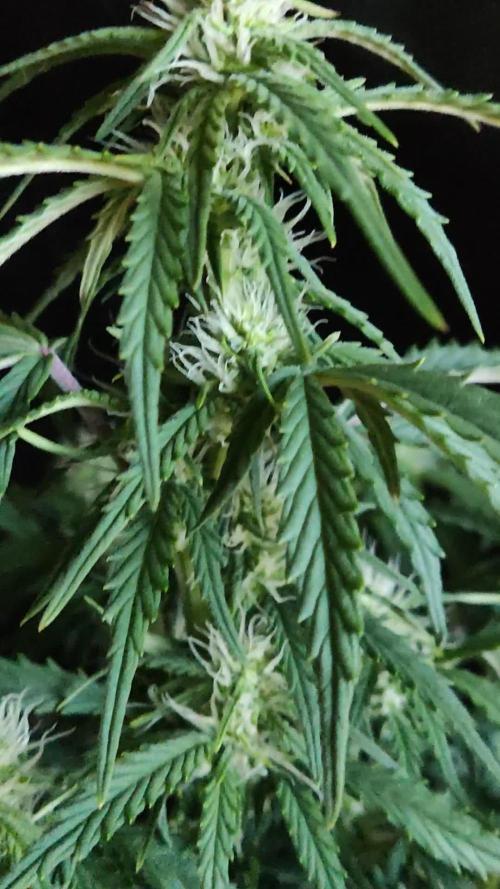
This week the plant grew a lot even when I did her another defoliation (I’m really crazy I know) she’s auto but she didn’t show any stress with that. Is just 4 weeks left to harvest.
I broke the air stone when I was doing the solution change, so I have to buy a new one, the good thing is that the new one works much better. Let’s see how it goes this week, I did another and hopefully the last defo today (last pic) and we’ll se e the next one how she responded.

Likes
13
Share


@Hyperbunny
Follow
das sind die bilder der letzten ca. 2 wochen… ab jetzt gibts passende infos zu den bildern ;)
Likes
38
Share


@LittleBigTrees
Follow
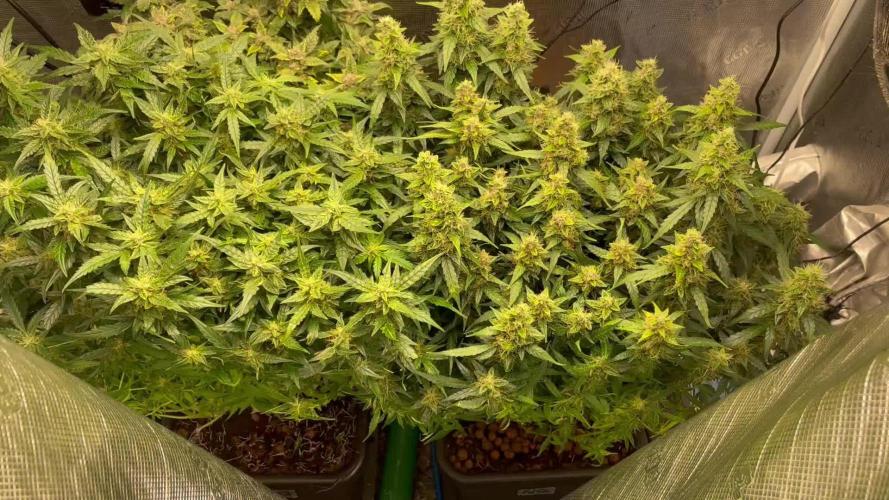
The tallest pheno is ready and being flushed for a couple of days now, rhe others are close but still consuming nutrients at a strong rate , I think they will take at least 1 more week.
They smell very much like gelato as a group but are all very different from one another .


Likes
127
Share


@Tropicannibis_Todd
Follow
💩Holy Crap Growmies , we are outdoors and in the Ground and there Doing Great💩
👉It's been another full week 42 days from seed and she's doing great , very nice Growth, considering shes been up against the wind and rain 👈
No problems 😊 so far so good 👍And she's now in full on flowering 😁👈 DO TO THE AMOUNT OF RAIN , IVE ONLY BEEN ABLE TO TOP DRESS HER😎
I GOT MULTIPLE DIARIES ON THE GO 😱 please check them out 😎
👉THANKS FOR TAKING THE TIME TO GO OVER MY DIARIES 👈
👉NutriNPK NUTRIENTS USED FOR FEEDING 👈rain water to be used entire growth👈
👉www.nutrinpk.com right now get 10% off using SPRING2022 as the coupon code👈
