


Likes
Comments
Share

@Raul2021
Follow
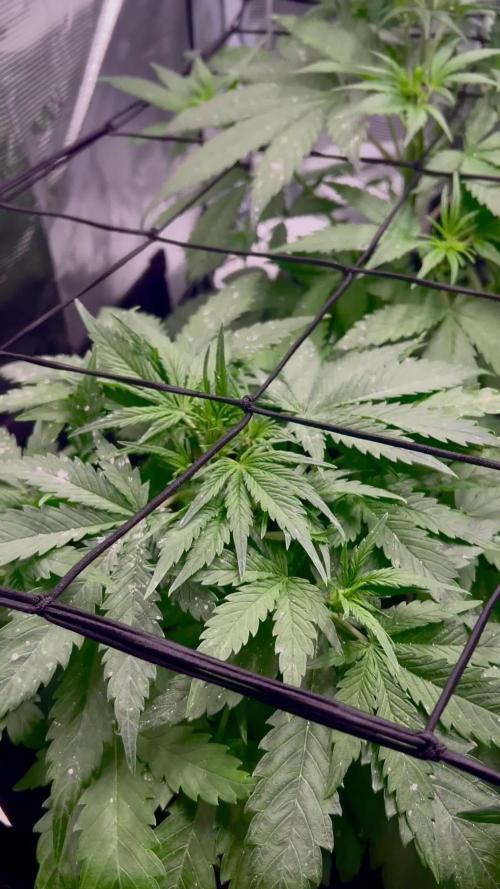
Día 34 de vida de las plantas, con un crecimiento optimo, mas o menos se han mantenido las condiciones de cultivo, se ha regado con agua unos 0,5 litros por planta con un PH de 6,1 y una EC de 0,4. Como preventivo de plagas he polvoreado las hojas con tierra de diatomeas, he aplicado un poco de LST y he colocado la malla SCROG para ir colocando las hojas según vayan creciendo. 2 de las plantas van mas avanzadas entrando en la floración mientras que las otras 2 se siguen desarrollando, la más pequeña de todas tiene un calzo en la maceta para que este a la misma altura de las demás, su tallo no se ha estirado y los nudos entre hojas están muy compactos.
Estas son las condiciones de esta semana:
Ventilación: nivel 50% oscilación 90 grados
Extractor: 45%
Humidificador: Off
Luz: 76% con altura de 40 cm
Ppfd: 550 umol/m2/s
Periodo: 18-6
Humedad: 65% a 70%
Temperatura: Día 23 C - Noche 20 C
Vpd: 0,62 a 0,92 kpa
Co2: 314 a 818 ppm
Temperatura del sustrato: mínima 19,4 C máxima 21,9 C
Humedad del sustrato: mínima 7% máxima 22%
Productos y Marcas usadas:
Indoor: MARSHYDRO 80x80x160
Led: MARSHYDRO FC 1500 EVO SAMSUNG
Ventilacion y extracción: MARSHYDRO
Controlador: IHUB PRO MARSHYDRO + Kit Sensores
Medidor PH: Milwaukee PH 600
Medidor EC: Milwaukee C66
Sustrato: COMPOSANA Semilleros / LIGHT MIX BIOBIZZ
Ph: BIOBIZZ UP / DOWN
-Fertilizantes-
BAC: GROW, BLOOM, PK, CALMAG
ADVANCED NUTRIENTS: VODOO JUICE, BUD CANDY, TASTY TERPENES, BIG BUD, OVERDRIVE, BUD IGNITOR.

Likes
23
Share


Likes
12
Share


@ChitownCannaChica
Follow
Little ipm with green cleaner.
Humming along— flipping on week 9
Very happy so far
Likes
13
Share


@Lazuli
Follow
because shes so huge i can not move her an inch.. so no flush happened and i went straight in to ripen feed. I hope she finishes up by next week because i have to cut buds away every day with mold. Lol its still going to produce a lot
Likes
21
Share


@gottagrowsometime
Follow
Welcome to my Runtz Auto Diary sponsored by Zamneisa and Spider-Farmer co2 ran for whole fattening period.
Days 1-21 early week 7 missing. HST"ed some of her.17th/may 7th/June Power Buds really helped build lots of tight stigmata.
Sorry about missing wk 7 and half of 8. Colas are getting big loving the light. Developing lovely fade around the leafs the past 2 weeks. Drinks like a fish. 2L a day easy on her last 10-14 days. Doing really well.
7th/June foxtailing is happening as you can see. She's very sticky and is still pushing. There's nothing I can do about the heat. Nothing. All I can do is lower the light intensity that now. Its been set at 90%.⁰
Am dealing with crazy temps like 35c on ave can go up to 39c. Am finding it hard to keep the stomata vents going. Seedlings are pushing through. I do see signs of stress. Possible foxtailing coming. Not much I can do with the temp. Stomatas are been kept open with fan power. I've 4 running nonstop. 1 full Osc one and 3 others that blow parts of the plant but its more designed to keep the co2 in the middle of the tent. It's taken me 2 weeks to find thy optimal way to manipulate co2 movement. If you don't have the fans right. You are just wasting money. I've seen s 50-30% increase in rate of just seedling growth that I prove. From 55ish strains that 95% ran from 9-10 Days the rare long one. But, I'm seen seedlings turn into vegging plants in an average of 6 days. Some as early as 4.5-7.5 days. Most are 6. And then they're flying through veg too.
HST & defoliation
HST was done early pre flower the nodes actually split and fell over. Mended itself up. Tbh, there is no real benefit to HST'in autos. I've done it many times now. The nodes that were HST"ed didn't vary much if at all. The whole plants buds are hard. Foxtailing like a bitch. But comes with the environment growing indoors in summer with co2 with 35c temp on average, power buds was used as soon as I seen stigmata and until pre fower ended.
SE5000 light used for co2 growing. Doing a great job. Helps to have a great sensor. This spectrum is great. Even with high temps that should have vents closed if using say 1 spectrum but, this light is able to keep the plants eating with high temps. Has gave all my plants great fade. Next wk. I'll higher the light and lower it and start focusing on the crop this light was issued for. But, its done a great job at finishing my crop.
Thanks to my sponsor from Zamneisa. Hopefully i can do your strains better justice next time if there is. I'm happy with the bud, as its an auto that spent a lot of her life under the SF-1000 before the SE5000 2 wks ago like to thank "Bella" for that upgrade. That allowed me to finish a few of my girls while setting my flying youngsters at a distance. I love everything about it.
Much appreciation to all who stopped by to view, like &/R comment. Look forward to seen your work.
COUPONS
Marshydro.eu/ww "ggs" 3%
Zamneisa "GROWITGD" 20% ww
Spiderfarmer.eu/ww "ggst" 3%


Likes
39
Share

@Growbody
Follow
Herzlich willkommen zu meinem neuen Grow mit der Orange Sherbet Auto von 2Fast4Buds. Die Eltern sind Cookies Auto F5 x Tangie´matic, der Typ ist F3 Feminized Polyhybrid Autoflower. Der Strain war Winner of the American Autoflower Cup 2025, Kategorie Best Auto Hash. Die Aussicht auf frischen Orangensaftgeschmack macht mich wunderfizzig.
Wieder verwendet wurde für diesen Grow der 15Liter Stofftopf von ROOTiES, die Sonnenerde Bio Hanferde, BioBizz Wurmhumus, BIONOVA + zamnesias MonsterBud Mix Living Soil, zamnesias Smart Start Plugs und Plagrons Seedbooster Plus. Hat sich alles bestens bewährt.
Tag 92: 1,5 Liter Wasser.
Tag 94: 2,0 Liter Wasser. Die Blüten der Orange Sherbet Auto von 2Fast4Buds sind sehr schön anzuschauen und duften fein.
Tag 96: 1,75 Liter Wasser.
Tag 97: 1,0 Liter Wasser.
Schön, dass du dich für meinen Grow interessierst. Schau gerne wieder rein 👋😎
Likes
3
Share

@Count-Dooku
Follow
Was up late last night trimming three small plants up to go into the box.
Super fox tail structure, I fked with the light schedule a few times during flower by bringing them inside and taking them back outside to finish. So I think that's why they have that structure.
Ended up being more bud than I thought tho so I'm not upset, trimming was just a pita.


Likes
61
Share


@WhiteEdge
Follow
23.04.2024
Continue into week 8
Replaced all filters in the system and cleaned them.
Mixed a new batch with the following components:
20+25ml AN Connoisseur Bloom A+B
Total volume: 34 liters
Electrical Conductivity (EC): 1.0
Target EC for this week: 0.8-1.0. Adjustments will be based on plant observations.
Performed one long misting session (3 minutes).
Environmental Conditions:
Outside temperatures going up, today is raining but this week start higher temps and humidity
Wedding Cheesecake: One girl is gonna finish in this week, Two others probably in next. Frutti terps in this, Two pheno in total from 3 girls'
Tropicana Cookies: Phenomenal strain; One girl is going to finish this week and second couple days after . Two pheno in Tropicana's girls
Purple Lemonade: Tall plants, massive producer, all three girls will be in 9 week provably. Here so far all three girl share same characteristics and bud structure
Beautiful and high odor in the room!
Lighting Parameters: PAR Map: Maximum PPFD is 950, minimum PPFD is 650.
VPD: Ranges from -1.1 to -1.2.
Daytime Temperature (DT): 23-24°C.
Nighttime Temperature (NT): 19-20°C.
Leaf Temperature: 21-22°C.
Light Distance: 45-55 cm from the plants.
CO2 Levels: 700+ ppm.
HLG Scorpion Diablo: Set at 70%, positioned at a 45-55 cm distance.
Girls drink less water, so for this week and till the end of flowering new misting timing's
Daytime: ON for 70 seconds, followed by 30 minutes OFF.
Nighttime: OFF for 70 seconds, followed by 35 minutes OFF.
Nutrient Tank (NT):
pH: Maintained between 5.80 and 6.00. Stable PH, small drifting up and downs
EC: 1.05.
Temperature: 19-21°C
25.04.2024
TrolMaster toys arrived! Purchase new DST2E, DSP2E, DSH2E, AMP3+probes. Another DSH2E and DSP2E ordered to complete this grow box!
Replaced all filters in the system and cleaned them.
Mixed a new batch with the following components:
25+30ml AN Connoisseur Bloom A+B. Total volume: 17 liters
Electrical Conductivity (EC): 1.05
Tomorrow Tropicana Cookies harvest! Put bucket with this girl on separate line for flushing
Wedding Cheesecake also finish soon, probably in next week, Wednesday think...
Purple Lemonade still need full week or more...Exceptional odors
Temps and humidity outside start to raises, hope i will finish this run before Tropical heat
Lighting Parameters: PAR Map: Maximum PPFD is 950, minimum PPFD is 650.
VPD: Ranges from -1.0 to -1.1.
Daytime Temperature (DT): 23-24°C.
Nighttime Temperature (NT): 19-20°C.
Leaf Temperature: 21-22°C.
Light Distance: 45-55 cm from the plants.
CO2 Levels: 700+ ppm.
HLG Scorpion Diablo: Set at 70%, positioned at a 45-55 cm distance.
Daytime: ON for 70 seconds, followed by 30 minutes OFF.
Nighttime: OFF for 70 seconds, followed by 35 minutes OFF.
Nutrient Tank (NT):
pH: Maintained between 5.80 and 5.95. Stable PH...
EC: 1.05.
Temperature: 19-21°C
26.04.2024
Connect TrolMaster components into the Tent-X system. Program DSP2E, Temperature DST2E, Humidity DSH2E, as well as the AMP3 sensor with PH and EC probes, are all in place.
After calibrating the probes, AMP3 module works perfectly! It has a quick response in measurements, is accurate, and I am very happy about the possibility of online monitoring of liquid values.
After day off use i can tell that all readings are very consistent, compared with Milwaukee, totally without all over the place measurements. Perfectly steady and on spot receding!
The Program device runs flawlessly all day, and I hope it has solved all the problems I had with DH48-S timers.
The humidity control operates without errors throughout the day, and it’s nice to see in the app when the module is active.
Raise light as much as i can..50-55cm from canopy. Set off misting time from 30min to 35min @ day time , and from 35min to 45min @ night time
Flush Tropicana Cookies' for one more day, tomorrow harvest, prepared tent for drying with humidifier , ventilation and temperature and humidity controllers
PAR Map: Maximum PPFD is 850, minimum PPFD is 500.
VPD: Ranges from 1.0 to 1.1.
Daytime Temperature (DT): 23-24°C.
Nighttime Temperature (NT): 19-20°C.
Leaf Temperature: 21-22°C.
Light Distance: 45-55 cm from the plants.
CO2 Levels: 700+ ppm.
HLG Scorpion Diablo: Set at 65%, positioned at a 50-55 cm distance.
Daytime: ON for 70 seconds, followed by 35 minutes OFF.
Nighttime: OFF for 70 seconds, followed by 45 minutes OFF.
Nutrient Tank (NT):
pH: Maintained between 5.80 and 5.95. Stable PH...
EC: 1.05.
Temperature: 19-21°C
28.04.2024
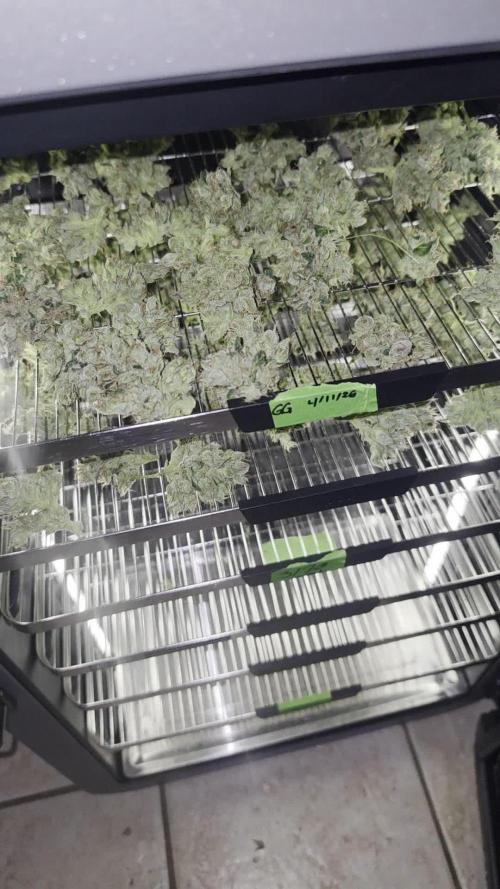
First harvest in this run! Tropicana Cookies No1 is a winner.) First Tropicana Cookies is harvested on 89 day from seed. Total 55 days off flowering.
Fast flowering indeed as fast in vegetative stage. Cut this girl in branches and hang upside-down in smaller tent for drying
Set RH @ 55% , temperatures not able to control so they will be something around 20-21 in drying tent
Second Tropicana will be chopped within a couple off days. Checking trichomes with microscopes can tell that one Purple Lemonade is also going to finish in next days
Somme lady's will take full 9 weeks or so..
Lowering light intensity, EC in tank start to raise slowly so i will start to adjust according to condition. Currently 0.85EC is perfect strength i think
PAR Map: Maximum PPFD is 850, minimum PPFD is 550.
VPD: Ranges from - 0.9-1.0
Daytime Temperature (DT): 23-24°C.
Nighttime Temperature (NT): 19-20°C.
Leaf Temperature: 21-22°C.
Light Distance: 45-55 cm from the plants.
CO2 Levels: 700+ ppm.
HLG Scorpion Diablo: Set at 65%, positioned at a 45-55 cm distance.
Daytime: ON for 60 seconds, followed by 30 minutes OFF.
Nighttime: OFF for 60 seconds, followed by 35 minutes OFF.
Nutrient Tank (NT):
pH: Maintained between 5.80 and 5.95. Stable PH...
EC: 0.85.
Temperature: 19-21°C
Week 8 off Flowering in Summary
80 litter off RO water,
120ml+150ml AN connoisseur A+B
45kW electricity in total for light, Pumps and AC Infinity Fans. 42kW for Light + 2kW Dehumidification + AC Infinity ventilation
Week start @ 1.1EC, nutrient strength., week finish with 0,87EC
Tropicana Cookies is first harvested on day 89 from sprouting , week 8 off flowering
Purple Lemonade is on second place with harvest on day 91, last day off 8 week off flowering
PH was stabile and move from 5.70 min to 5,9 max.
Light distance for this week - 50-55cm from tallest top , PPFD levels around 900 in center, trough whole week. Lowest reading 500 @ corner
Temperature are from 20c at start off day to 24.5c max at some points.
Night temps around 19.5-20c. Outside humidity is generally low
This week i have install TrolMaster AMP3 sensor and humidity, temp and program devices
Day RH is moved from 45% to 55% max, at night times drop to 45-48%
Lighting Parameters: PAR Map: Maximum PPFD is 900, minimum PPFD is 650.
VPD: Ranges from -1.0-1.1.
Daytime Temperature (DT): 24.5°C.
Nighttime Temperature (NT): 20°C.
Leaf Temperature: 22°C.
Light Distance: 45-55 cm from the plants.
CO2 Levels: 700+ ppm.
HLG Scorpion Diablo: Set at 65%, positioned at a 45-55 cm distance.
Daytime: ON for 70 seconds, followed by 25 minutes OFF.
Nighttime: OFF for 70 seconds, followed by 35 minutes OFF.
Nutrient Tank (NT):
pH: Maintained between 5.8 and 6.1
EC: 0.87-1,1.
Temperature: 20-21°C
Likes
23
Share


@Kindbudz
Follow
8/9/2018 - All of these girls are doing great and have all shown their white pistils now! The branching on them has taken off and they responded to being topped really well. I’ve switched them from my 4x4 grow tent into a 4x8. I have to say it is significantly better having the extra space to be able to water, move around and for better air circulation with multiple fans. I also believe this will greatly help with light penetration inventory they bush out. I’ve been having issues keeping the daytime air temperature down due to the extream heat wave we have been experiencing. I think I have tackled this issue by running the lights at night now while the temperatures are cooler. Tomorrow is the official switch to flower and will be on a 13 hours off, 11 hours on light cycle for the next 2 days. Then on a normal 12/12 light cycle. IVE read that this can help the plants switch quicker. I’m looking forward to seeing the growth over the next few weeks!
Likes
7
Share


@JBsTastyBudz
Follow
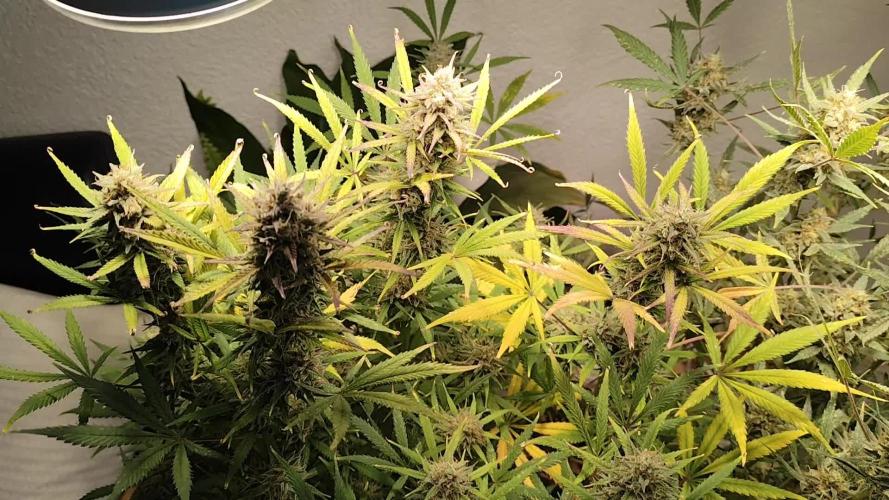
Haven't been staying updated... I know the Girl Scout Cookies 🍪 has got some nute burn... But she'll be alright... Don't know what's going on there.. Have another really new strain I've never grown that's Limited Edition by Green House Seed Co... It's burning up a bit too.. Just must be sensitive.. Everything else it growing good. Try to keep this up to date more now that things are settling down a little bit.


Likes
34
Share


@Kitties_and_Colas
Follow
~_~_~_~_~_~_~_~_~_~_~_~_~_~_~_~_~_~_~_~_~_~_~_~_~_~_~_~_~_~_~_~_~_~_~_~_~_~_~_~_~_~_~_~_~_~_~_~_~_~_~_~_~_~_~_~_~_~_~_~_~_~_~_~_~_~_~_~_~_~_~_~_~_~_~_~_~_~_~_~_~_~_~_
We planted 5 seeds, our goal is 2 plants of this strain for this 4x4 (all extra plants will live out in the 5x5)..we're using a brand new light for this grow, the Solux350 by Hortibloom! 💡🌱(https://hortibloom.com/products/solux-350-led-grow-light)...
This tiny fixture emits a ton of light for its size..we have 20 seedlings under her, hung at the recommended 24inches and at 25% power..I'm really excited to see what this light is capable of! Thanks for dropping by and happy harvests everyone!! ❤️💡🌱😽💨
⚡Hortibloom/Solux 350⚡
Specifications ⚙️:
Diodes: Samsung LM281 Pro / Osram DR (1,440 total)💡
Driver: Inventronics 350 watt🔌
PPF: 1015 μmol/s ☢️
PPE: 2.9 µmol/j 〰️〰️
Lifespan: 50k+ hrs ⌛
Weight: 14.3lbs lbs (6.5kg)
Veg Coverage: 5 x 5 ft 🌱
Flowering Coverage: 4 x 4 ft 🌼
-The Solux 350 uses an aluminum heatsink (no fan) for quiet operation 👂⬇️
-IP65 waterproof ratings, tolerant to high humidity grow environments 💦 ..
-Many units may be daisy-chained via RJ14 and dimmed from a single controller 💡~💡~💡~💡~💡
~_~_~_~_~_~_~_~_~_~_~_~_~_~_~_~_~_~_~_~_~_~_~_~_~_~_~_~_~_~_~_~_~_~_~_~_~_~_~_~_~_~_~_~_~_~_~_~_~_~_~_~_~_~_~_~_~_~_~_~_~_~_~_~_~_~_~_~_~_~_~_~_~_~_~_~_~_~_~_~_~_~_
~_~_~_~_~_~_~_~_~_~_~_~_~_~_~_~_~_~_~_~_~_~_~_~_~_~_~_~_~_~_~_~_~_~_~_~_~_~_~_~_~_~_~_~_~_~_~_~_~_~_~_~_~_~_~_~_~_~_~_~_~_~_~_~_~_~_~_~_~_~_~_~_~_~_~_~_~_~_~_~_~_~_~

Processing
Likes
16
Share


@Naturalist
Follow
Went half/half on feeding on day 119 ppms are still a bit high & a bit acid ph out of range but otherwise things are smelling good.

Likes
2
Share


@420DeepGrow
Follow
📆 Semana 7
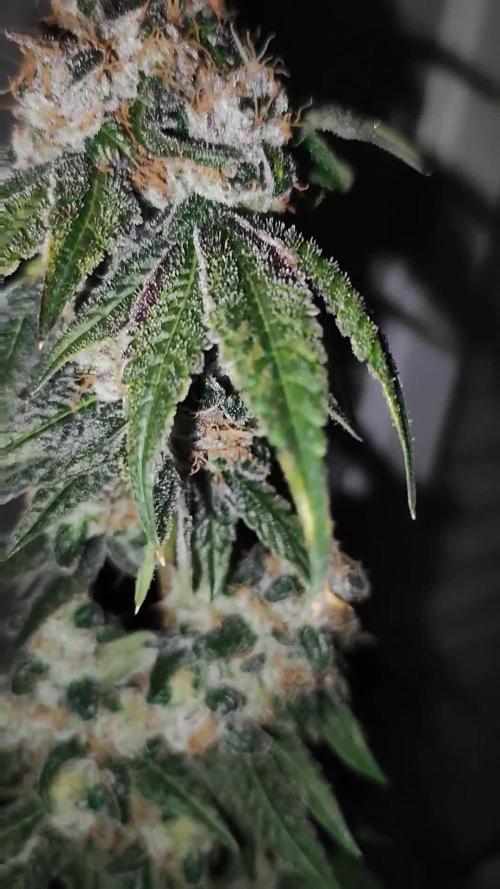
¡La Gorilla Cookies sigue sorprendiendo!
Esta semana la planta ha dado un salto impresionante: los cogollos están mucho más compactos y las flores han aumentado de tamaño y densidad. Cada vez es más evidente la capa de resina que los recubre, con los tricomas brillando bajo la luz como si fueran diamantes.
En cuanto a la alimentación, sigo con la línea de XpertNutrients para floración. Los niveles de PK se mantienen equilibrados, y solo hago ajustes de pH para asegurar que la planta absorba todo lo que necesita sin bloqueos. El riego sigue siendo preciso, ajustando la cantidad según su ritmo de consumo.
Los Adlite siguen demostrando que son una excelente inversión. Gracias a la distribución de luz, no solo las puntas, sino también las ramas inferiores están desarrollando cogollos densos y con buena resina. Cada parte de la planta está aprovechando al máximo la luz.
En el ambiente, las temperaturas siguen entre 23-25°C y la humedad ronda el 55%, lo que está controlado para evitar cualquier riesgo en esta etapa delicada. Estoy ventilando adecuadamente para asegurar que el aire circule bien y prevenir problemas.
Los aromas están en pleno desarrollo: ahora se pueden distinguir claramente esos toques dulces, terrosos y el fondo de galleta que caracteriza a esta variedad. Los tricomas están bastante lechosos, pero aún no veo ámbar, por lo que seguimos en fase de engorde.
Crecimiento fuerte, cogollos sólidos y resina en abundancia...
¡Seguimos creciendo fuerte! 💪

Likes
32
Share


@EBPbyEVD
Follow
Hello world 👋👋👋
According to our deadlines
41vege
14-12/12
4bloom
The guy is actively scattering pollen, even too actively there is a fear that he will shoot back too quickly, I am trying to collect pollen. I am doing this for the first time and have tested different methods:
1) I put the bag on the branches, but condensation collects in these bags and kills this pollen, maybe I don’t understand something, I heard about this method quite often, but I still don’t understand how it works
2) I laid the sheets under the plants, the pollen does not seem to fall off as much as I would like and there is also a lot of debris left on the sheets. The method certainly works, but there are some nuances
3) For myself, I chose to collect pollen by hand from the leaves, simply brushing it directly into the storage container with a brush.
Since this is my first experience, I don’t know how pollen behaves in a box and specifically in my box, so I try to apply it manually to the largest plant, in the end it will be clear whether this makes sense or whether the pollen itself gets to the flowers perfectly.
One of my girls was attacked by a fan, which I turned off and fixed at the very top so that when I opened the box, it wouldn’t blow pollen out for me. As a result, it fell and broke a couple of good branches😭😭😭, now I have a wonderful bouquet of plants in my bedroom
In general, I increased it to 1000, but I continue to give different doses so as not to catch salting. I also removed Plagron Green Sensation food since I ran out of it, I want to change the manufacturer. Plagron generally suits me, but why not try something new, maybe you can recommend something?
Oh yes, the compote, this week it looks like this:
27/11 KalMag 5ml Ab 8ml GS4ml PB 4ml 761/6.2
2) output 848/6.4
1) without exit
29/11 KalMag 5ml ab10ml GS5ml PB 5ml
807/6.3
3) 5l 807/6.3 was not enough
KalMag5ml AB12ml PB5ml
874/6.2 output 706/6.0
1)874/6.2 output 824/6.3
2)874/6.2 680/6.6
41vege
14-12/12
1coIn general, I increased it to 1000, but I continue to give different doses so as not to catch salting. I also removed Plagron Green Sensation food since I ran out of it, I want to change the manufacturer. Plagron generally suits me, but why not try something new, maybe you can recommend something?
Oh yes, the compote, this week it looks like this:
27/11 KalMag 5ml Ab 8ml GS4ml PB 4ml 761/6.2
2) output 848/6.4
1) without exit
29/11 KalMag 5ml ab10ml GS5ml PB 5ml
807/6.3
3) 5l 807/6.3 was not enough
KalMag5ml AB12ml PB5ml
874/6.2 output 706/6.0
1)874/6.2 output 824/6.3
2)874/6.2 680/6.6
41vege
14-12/12
1bloom
2/12 CalMag5ml AB16ml PB5ml 1038/5.9
1)Output 882/6.5
2) output 952/6.4
41vege
14-12/12
3 bloom
(entire solution per 5 liters)
On this note we will end our report.
See you again friends❤️

Likes
16
Share

@Bncgrower
Follow
Overall it was a good harvest, it could have been much better if I hadn't switched to the Cultivator Series line... But as soon as my order arrives I'll be back to Athena again 🙌