


Likes
Comments
Share


@GIJOSE
Follow
Good morning everyone! First off I want to say a special thank you to grow Diaries for Choosing Tutorial "how yo build a scrog" for Second Place!
Now for the update I discovered two males in my grow both of them are Blue Hawaiian. I decided to inspect the root development sence they were going to be destroyed anyway. I was really upset on the how they look. Normally I transplant at least 4 times before I reach my final pot. On this grow I experimented by transplanting from a solo cup to my final pot and also another by just placing the seed directly into the soil. You can see from the pictures that the roots did not develop much at all. I will not be using that method again.
On another note for those of you that have experience using molasses in your feeding schedule for your plants can you chime in and tell me what you would use and how you would mix?
As far as the girls Our concern they are stretching out very nicely! And looking very good. Hope everyone's day goes well cheers! G.I.JOSE


Likes
20
Share

@BUZIMAN
Follow
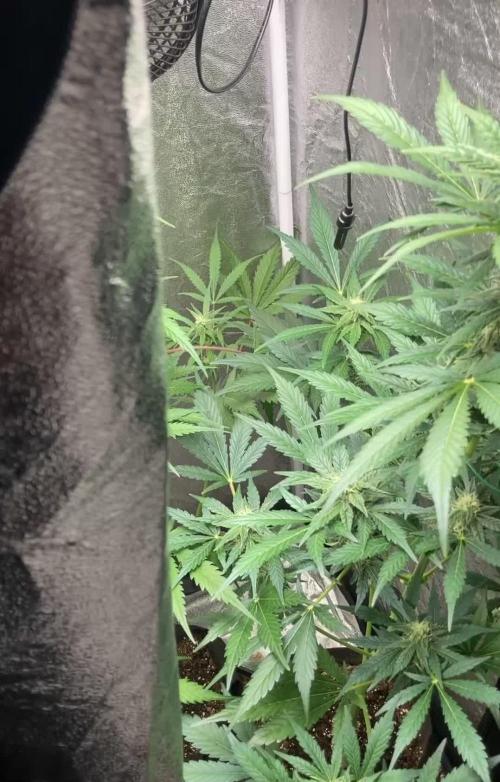
It’s growing good & start to smell😎
💦1 Liter per day of mix
📏 1,13 meter
⛅️ 27,5 celcius 45%rH
💡 70% Light power
💚💛❤️


Likes
10
Share


@MindFlowers68
Follow
Drying ended after 12 days. Trimming took around 1 1/2 hours and was really easy. No real small or larfy buds to speak of. I'm surprised how well it did considering how high the humidity was in flower it is a very resilient plant. Smoked pretty well off the bat, but needs just a little time to smoke the best. After curing for a month is super smooth and makes fore a very nice dubes. its almost gone! My friend loved it.

Likes
24
Share


@eh_eh_eh_buds
Follow
So at the moment im at the end of week 1 flower... i do not own any type of real fans operating in tent other then just a couple house hold fans and no ducting of any type running.. at the moment the smells are getting a bit faint in the air, its similar to a skunky coffee bean when i open the tent, i honestly love the smell personally lol.


Likes
14
Share


@danwho
Follow
9/8/2024
Plant B showing signs of female with hairs coming from the pre-flower formations. Looks to be stretching and starting to push into flower as well. Plant A is growing insanely well! Continuing to defoliate daily by removing larger fan leaves here and there to continue to open up the canopies on both plants.
No complete water change yet since a few weeks ago. I have continued to add fresh nutrient water with an occasional pH-adjusted gallon of filtered water + cal mag.
9/10/2024
Both plants and stretching nicely and developing great canopies! Plant A is an absolute monster, plant B is small and compact but has really good node spacing already. I am expecting some nice flower development over the next few weeks!
Topping off the reservoir with about 1 - 1.5 gallons per day of nutrient water at this point. Continuing to prune a good handful of leaves and smaller growth from the plants to open up the canopy leading up to day 21 final trim. Trying to stay ahead of a huge stress event for the plants.
9/12/2024
Continuing to defoliate handful of leaves and prune smaller undergrowth. Cutting only 2-4 stems per day to avoid over stressing.
9/13/2024
Raised lights over plant A a few inches as it continues to stretch. Also trying to keep the lights low enough for plant B without burning the side branches of plant A.
9/14/2024
All week I have been adding nutrient water to the system. No water change or replacement. However today, I decided to introduce just pH-balanced water to drop the nitrogen concentration in the system as we transition into week 3 flower. Highest PPM throughout the week was around 900, average 800, low in the PM after pH water 700.
Had a minor flow issue with a root plug in one of the drain lines. Blew them out and flow returned.
Humidity in the tent has been slightly higher than ideal this week, although VPD has been around 1 - 1.4 with the lights on. Likely due to the volume of plant matter in the tent. Doing my best to keep up with defoliation and trimming. Day 21 flower will be much needed!

Processing
Likes
57
Share


@Silverback_Guerilla
Follow
2/1 - 2/4:
I ended up feeding the BJ's and GG's once more, and just plain water for the Zenzations.
Moved the to Zenzations into the dark on the night of 2/4 and will harvest them tomorrow (Friday).
I'll flush the others tomorrow and probably harvest them next weekend.
2/5:
Both Zenzations are having their last bit of beauty sleep before they get trimmed up, cut, washed, and hung to dry.
2/6:
Harvested both Zenzations....damn they smell wonderful and have amazing frost!
2/8:
Watered the BJ's and GG's today with LiquidSoil. Will flush them really well in a couple more days and probably harvest this weekend...time's up bitches, better put on your lipstick and get ready for the big party!
Processing
Likes
6
Share


@Moss420
Follow
Got a new light this week, it's basically a HLG 260 R-Spec except locally manufactured using the same Samsung LEDs. Big Mumma got her 60x60cm tent today and will go in there under one Viparspectra 300W blurple (130w from the wall). I trimmed her, super cropped her main stem and added a scrog net in preparation of flowering her in the next couple of days.
Because my other plants were getting up past 75cm after 7 days of flower (100cm is my absolute max) , I decided to supercrop the canopy back down to about 60-65cm - it was pretty scary and I definitely broke the outer stem on some of them. Also gave them a good trim. Fortunately most bounced back strong the next day which are the most up-to-date photos you see (17/4/20).

Likes
12
Share


@ChitownCannaChica
Follow
Did a top dress of some grow powder dry nutes from botannicare. Just giving her rain water for now. Again—- temps, humidity, and clouds have been aalllllll over the place. One day it’s 86 and the next is 66 with nights in the 60s or 40s—- humidity and rain have been 100% down to 50%. All within a week.
Likes
15
Share


@RDWCGrowing
Follow
2/1/2024- Pre-Germination Activities Day 1
I have 21 weeks until final photo is do.. I took 3 seeds out of cold storage and will let them get to room temp for the next 48 hours before I go with Glass of water for germination. I have 3 beans because I will start from the very beginning helping ensure I present the best Pheno. This is going to be a fun one.. I am a few days away from being able to clear my tent out for this run.. I have a breeding run in right now and the Seeds are a few days away from being mature enough for me to take down the girls.
Once I get them down I will need to get my tent cleaned up and turned over right away. This is going to be close, I will have to time them to the water and into the tray at the right time.. because I will need to get lighting on them right away.. I have my 2X2 and my light ready incase I need to hold them in the cloning machine if the others are not done in the next few days.. Glad I have options that can stretch me out for a week or 2 to give me a little more time.
2/2/2024- Pre-Germination Activities Day 2
I checked on my breeding run to see how close the seeds are and if the tent is ready for me to clear and clean but alas I am still going to need a few days. I setup the emergency 2X2 and that should give me 2-3 weeks. The plan is to still wait one more day to allow the beans to warm up to room temp and then drop them in Water sometime tomorrow.
Form my Emergency 2X2 I have the following:
4" inline fan and carbon filter
Fan
VS-2000 light
2/3/2024- Germination Activities Day 0 - Dropped the Beans in.. Today is 0 day.. Go.. Go .. Go..
2/4/2024- Germination Activities Day 0-1 - Checked in on them this morning and no tap roots yet.. covered them back up and back in to the closet they went. I setup the Root Riots and the Seed tray for them. I Ensured my water that I was soaking the root riots in was PHed to 5.8 and I used RO water.
Afternoon Update: Checked on my Breeders and they are done. I started to harvest them, I took down the one I had reversed with STS and I took down the Black African Magic- All but one bud, I wanted to get some pics of that one today.
I was only able to get 2lbs into the Cannatrol because I had to be very careful to keep the bud from the plant that was treated with the STS separated from the other seeded bud that was pollenated from the plant I reversed.
Cannatrol could have held an additional 2oz of wet but not today. Ideally I need 1 more Cannatrol so I can take an entire Tent, but will figure that out. I put an additional 1.5lbs into the freezer to wait it's turn into the Cannatrol, I would have left it on the plant and taken it in 4 days when the dry cycle gets done but wasn't sure how much 2.2 lbs was equivalent to chopped and wet trimmed.
2/5/2024- Germination Activities Day 0-2 - Checked in on them this morning and 2 of them have very small tap roots out.. one still doesn't going to give them some more time. I will check in on them this evening and see if they are more open if so I will transfer the ones that are ready to their medium and seed tray.
2/6/2024- Planting Day TRUE Germination Day 0- Checked in on them this morning and all 3 of them have tap roots out. I broke the bottom of the tap root for #1 which was the biggest.. pretty sad.. I hope she survives.. I tried to be careful it just snapped off when I was trying to get it in the root riot right. Other than that all three are now in their in-between home in the 2X2 while if finish clearing and cleaning out their forever homes.
2/7/2024- Germination Day 1- Checked in on them and no surprise no sprouts yet. Sprayed the dome to moist it and light spray to the tops of the Root Riots.
2/8/2024- Germination Day 2- #3 is popped and it looks like #2 will be popped by this evening.. I got my second Cannatrol today so now I can take down the rest of the tent and get it into the dry/cure.
2/9/2024- Germination Day 3- #2 is popped as well.. so I have #2 and #3 up and still waiting to see on #1 but that might be a loss since I accidently broke off some of the Tap root when transplanting.
2/10/2024- Germination Day 4- #1 has Popped... We have ignition on all 3.. YAY!! I finished clean up and install of RDWC system, this time was unique the back left buckets 3 inch pipe wasn't seated correctly so I had to clean up about 12 gallons of water all of the floor. I also had two leaks coming from one of the Waterfall return junctions, this is why I do a full pressure test before I put anything in. I will continue to monitor it through tomorrow to ensure that I am good to go and then I will finish setting up the baskets and prepping the water to be ready for the ladies planting day!!!
2/11/2024- Germination Day 5- #1 Of course is going to be my trouble plant.. No matter what If she lives through planting in the system and making it, I think I might not cull her at all regardless, she has been such a problem, makes me wonder if she will be super worth it towards the end.. We will see as we go through this grow, but #1 has a piece of the shell on the leaves,
Other than that I set up a new thing I have been doing since last grow converting my Baskets into Sure plants so I can see exactly where the water is when I plant them and ensure I have the water up high enough that they are able to access it and grow but not too high were they are drowning.
2/12/2024- Germination Day 6- Everything seems to be going good.. will just keep them moist and let the roots grow for a few more days before I transplant to forever home.
2/13/2024 - Germination Day 7- Just keeping them Moist.
2/14/2024 - Germination Day 8 - Planting day.. they are now in the system.. :-)I had to fill the water to the bottom of the basket where I could see water on the bottom rocks and just coming up where I had created my whole/ sure plant.
2/15/2024 - Germination Day 9- Top fed just a little to keep them moist and encourage root growth towards the water. I ensured the PH is right at 5.98-6.02 range.
2/16/2024 - Germination Day 10- Top fed just a little to keep them moist and encourage root growth towards the water.
Likes
3
Share

@central_flgrow420
Follow
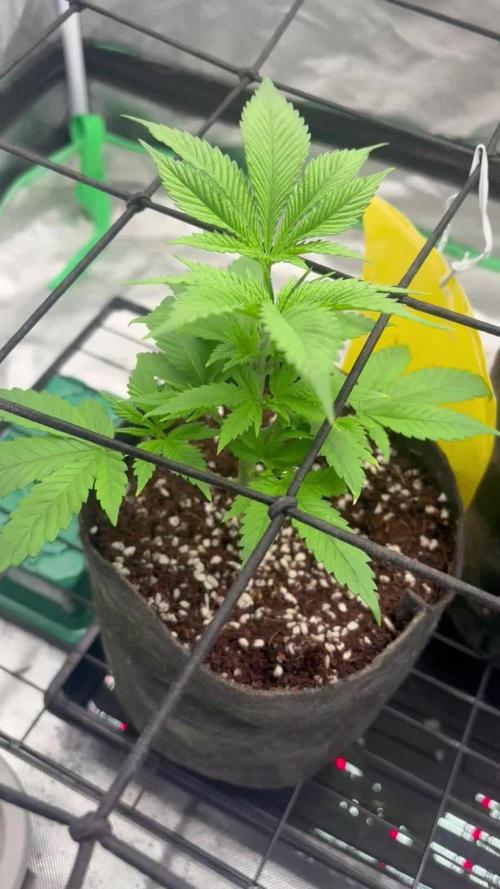
Number two and number three look the same so far one just kind of taller than the other. I also had a bit of a overwatering issue that seems to be fixed but overall she’s pretty.
Processing
Likes
24
Share


@Teamdirtbag2
Follow
Im back with...
Tahoe OGKB × Sour Fire Kush
And....
Sour Patch Kids × Sour Fire
Sprouted 2 / 5 / 20
Flowering 4 / 12
Wtf can't update wtf.... well fuck.
This is fucked up.
Pie Hoe is coming
And... pre 98 Bubba Kush
Welcome Pie Hoe in Dutch Buckets 😈 automatic water system is back up and running. Plants are hammered but that will change. Took clones and 4 are starting flower today. 😁


Likes
16
Share


@Naujas
Follow
116 days!!!!! and here she is ready to reveal her inner beauty, taste, smell, and effect :)It was an amazing journey with @Weedseedsexpress, the girl was just amazing throughout her growth, she was satisfied with everything I gave her :) This is my first girl with such beautiful colors of leaves and flowers, she is simply unique :) Her smell is so strong that a day after she was cut and now, as I write this comment, I can still smell her aroma in my house, it is amazing, it reminds me of a big "party" :D So thank you @Weedseedsexpress for the opportunity, I will be open to your suggestions in the future - you are amazing :) and now I can't wait to taste her :) then I will provide her dry weight, stay tuned :) good luck to everyone :).

Likes
42
Share


@Ukfarmer420
Follow
So this week i will be repotting the ladys in 5gal fabric pots with clay pebbles and a mix of biobizz light mix soil and all mix soil. I will be starting to use 4ml/1l of water of biobizz roots.
I'm thinking of doing a 6 week veg on these ladys as I will be doing a 9 plant auto run in the 4x4.
Happy growing guys.


Likes
51
Share


@Bread_n_Buds
Follow
Here we are, ready, after a week of truly fruitful germination we have 20 beautiful plants all marked with the Z of Zamnesia.
We have moved on to autoflowering, unlike many growers I have no prejudice against this type of plant, it is true that they are the easiest to make but it is also true that they have improved a lot in terms of flower quality and if once ease meant lower quality now even the most presumptuous old school flower children growers struggle to understand if a flower is from an autoflowering or a normal photoperiod plant. There are people who claim to recognize it from the flavor but then never succeed, it's funny how it works. I enjoy making them strip their heads with these magnificent new autoflowering plants. She is the Black Orchid I have never grown her but I have seen some truly phenomenal photos of this plant. I really hope they come out black. I love it.
---- New Home - The ladies have almost all been transplanted into 11-liter pots, which is my favorite size to get the best ratio of plants in the grow box / yield. Especially if you don't have to do excessive topping or you have to grow the plants straight with main cola like I do for catalog needs like I do, 11 liters guarantees you to make excellent plants. Topping with 11-liter pots is recommended up to a maximum of 16 buds (4 main crops) - The pots are square plastic and canvas branded Zamnesia - The soil used is Plagron Promix with peat and worm castings but not fertilized -
--- Start feeding program - A very serious feeding program branded Plagron has begun. We made our own personalized table based on the chosen soil (Plagron Promix 100% organic) that you can all do at the link https://plagron.com/en/tools/grow-schedule-calculator and I started giving:
- Power Roots - 1ml/l
- Alga Grow - 2 ml/l
- Pure Zym - 1 ml/l
- Sugar Royal - 1ml/l
- Vita Race - 1 ml/l
- The 100% Organic pack by Plagron can be found on Zamnesia at the link:
https://www.zamnesia.io/it/11457-plagron-easy-pack-natural.html
We are giving a lot of humidity with a humidifier and we oscillate between 65% and 70%.
// Strain Description // It is said that the orchid symbolizes love, refinement and beauty. Well, we can confirm that the Black Orchid Automatic contains all these attributes and many more. This autoflowering variety has a lot to offer: a particular but very pleasant aromatic profile, and a relaxing and carefree high. Furthermore, this plant is very productive when grown in optimal conditions.
- Get a seed of this fantastic strain --- https://www.zamnesia.io/it/9493-zamnesia-seeds-black-orchid-automatic.html
- Soil and Fertilizers entirely organic --- https://plagron.com/en buy on www.zamnesia.io
- Growbox and air sistem --- https://www.secretjardin.com/
- Light — P2000 - https://www.viparspectra.com
- Music and sound --- I made my girls listen to 432hz frequencies and music from www.radionula.com
- Z --- You can find these seeds, much more from the world of cannabis, mushrooms and an incredible series of accessories and gadgets on the reference site not only mine but of many growers ---- https://www.zamnesia.io
Likes
39
Share


@m0use
Follow
The time is finally here to post the harvest. I waited till it was all done and dry before updating the dairy so will add in the dry weights next on the 2nd half of the harvest entry.
Had some ups and downs with this plant. mainly the extreme yellowing that was happening. I should have treated this faster with a flush but was super reluctant and I feel this has suffered in the end. The top best looking buds could have been larger and the lower ones could have been thicker.
There is some smells with this plant but they are not pronounced. Just smells like mild basic weed, this would be one reason not to grow it, however, the crystals on this plant have been the most I've ever grown before. When trimming them every time the scissors snipped or the brush stroked I saw some falling down onto the tray. This plant would be great for making hash. had a good little ball of finger hash at the end of it and will be giving that to my friends to smoke or make a strong edible with.
I don't plan on growing this strain out again, the lack of smells and the fact I'm only trying to grow cbd dominate plants is the main reason. If my friends really like this I have some clones so can always give them some. Speaking of clones they are doing well outside, greened up a lot and showing signs of revegging.
Took some photos of the weed hang drying on day 1 in the tent and a week later to show how much they shrink.
most of the lower growth is quite larfy but will make good edibles or hash, that will be a fun project to do and may include that in my projects diary.
That's about all I can think of if you have any questions just ask.
m0use
Disclaimers:
1. I have divided the total watts of light in half, 300w(150w) for this diary. It will accurately reflect the g/w ratio as the two plants growing in this tent are listed in two separate diaries.
2. I include any shake/trim in my gross totals as I use them to make edibles.
3. I did not follow any proper ways of listing my nutrients. Some are ml/l of total solution watered, others ml/l of total medium and some are just the total amounts I added, not as a ratio.
If you have any questions let me know!
+++++++++++++++++++++++++++++++++++++++++++++++++++++++++++++
Cost + Time Analysis Of Growing Cannabis. m0use’s Breakdown
+++++++++++++++++++++++++++++++++++++++++++++++++++++++++++++
Light Schedule
===
Veg [Dec 18th 2021 - Mar 11th 2022]
18h on 6h off - 6am-12pm
Flower [Mar 12th 2022 - May 10th 2022]
12h on 12h off - 9am-9pm
This is extra tricky this harvest as I went through 2 different hydro rates in three different periods, plus a veg and bloom switch between them.
Mon-Fri are TOU rates, all weekends are off-peak pricing all day.
Off Peak = 7pm-7am + all weekend
Mid peak = 11am-5pm
On peak = 7am-11am + 5pm-7pm
TOU rates:
Dec 18th 2021-Jan 17th 2022
Cost of kwh with on-peak "17.0c", mid-peak "11.3c" and off-peak "8.2c".
Jan 18th 2022 - Feb 7th 2022
Cost of kwh with on-peak "8.2c", mid-peak "8.2c" and off-peak "8.2c".
Feb 8th 2022 - Current
Cost of kwh with on-peak "17.0c", mid-peak "11.3c" and off-peak "8.2c".
—
Dec 18th 2021-Jan 17th 2022
Weekdays “21 days”
6am - 7am -- 1hr @8.2c/kwh off-peak
7am - 11am -- 4hr @17.0c/kwh on-peak
11am - 5pm --6hr @11.3c/kwh mid-peak
5pm - 7pm -- 2hr @17.0c/kwh on-peak
7pm - 12am -- 5hr @8.2c/Kwh off-peak
Weekends “10 days”
6am - 12am – 18hr @8.2c/kwh off-peak
6h @17.0c/kwh
6h @11.3c/kwh
6h @8.2c/kwh + [email protected]/kwh weekdays/weekends
—
Jan 18th 2022 - Feb 7th 2022
Weekdays “15 days”
6am - 7am -- 1hr @8.2c/kwh off-peak
7am - 11am -- 4hr @8.2c/kwh on-peak
11am - 5pm --6hr @8.2c/kwh mid-peak
5pm - 7pm -- 2hr @8.2c/kwh on-peak
7pm - 12am -- 5hr @8.2c/Kwh off-peak
Weekends “6 days”
6am - 12am – 18hr @8.2c/kwh off-peak
18h @8.2c/kwh + [email protected]/kwh weekdays/weekends
—
Feb 8th 2022 - Harvest
Veg
Feb 8th - March 11th 2022
weekdays “24 days”
6am - 7am -- 1hr @8.2c/kwh off-peak
7am - 11am -- 4hr @17.0c/kwh on-peak
11am - 5pm --6hr @11.3c/kwh mid-peak
5pm - 7pm -- 2hr @17.0c/kwh on-peak
7pm - 12am -- 5hr @8.2c/Kwh off-peak
weekends “8 days”
6am - 12am – 18hr @8.2c/kwh off-peak
6h @17.0c/kwh
6h @11.3c/kwh
6h @8.2c/kwh + [email protected]/kwh weekdays/weekends
—
Flower
March 12 - May 10th 2022
weekdays “42 days”
9am - 11am -- 2hr @17.0c/kwh on-peak
11am - 5pm --6hr @11.3c/kwh mid-peak
5pm - 7pm -- 2hr @17.0c/kwh on-peak
7pm - 9am -- 2hr @8.2c/Kwh off-peak
weekends “18 days”
9am - 9pm – 18hr @8.2c/kwh off-peak
4h @17.0c/kwh
6h @811.3c/kwh
2h @8.2c/kwh + [email protected]/kwh weekdays/weekends
—
Total hours in each peak period
126+144+168 = 438h @17.0c/kwh
126+144+252 = 522h @11.3c/kwh
306+378+288+300 = 1,272h @8.2c/kwh
Lights
===
LED’s I use are 48w and 18w, per stick, they are arranged on an array totaling 300w.
6400k 18w*6 = 108w + 3000k 48w*4 = 192 108w+192w=300w | 300w/1000 = 0.3Kw
* note I am using 150w as stated in my disclaimers to account for the missing plant in a separate diary.*
Using the previous c/kwh numbers above I can find out the total cost of the lamps in the 3 peak periods. I converted the cents into dollar amounts beforehand to avoid dividing by 100. 8.2c/h = 0.082$/h
438h * 0.17c/kwh = $74.46kw * 0.15kw = $11.17 on peak
522h * 0.113c/kwh = $58.99kw *0.15kw = $8.85 mid peak
1,272h * 0.082c/kwh = $104.30kw *0.15kw = $15.65 off peak
The "h" hours and "kw" kilowatts cancel out and we are left with a value of $ dollars per peak period, add all the peak periods up and you get your total cost of running the lights in dollars.
$11.17 + $8.85 + $15.65 = $35.67 for the grow light only.
My light grew for 20 weeks and 4 days, or 144 days. almost 21 weeks total.
$35.67 / 144d = 0.2477$/d average of about 25c a day in electricity
337.2kw for the entire grow.
Using the regular calculation of grams harvested divided by watts used is not accurate to me, it does not account for all the time the lamps are on, the length of grow to the over all cost. The calculation that makes sense to me is this, harvested dry weight of usable cannabis buds/trim/keif/whatever in grams divided by total kw used. Could also combine it with grams per total single use costs “anything you used only for this grow and wont reuse in the next, or fractions of multi use items like fertilizers if they ½ full” and see how much you’re investing per gram.
"kw" ÷ "g" = kw/g
"$" ÷ "g" = $/g
I have harvested 5.34oz or 151.6g on 337.2kw.
337.2kw ÷151.6g = 2.22 kw/g of usable cannabis. This is not an ideal ratio for me and looks like a lot of energy waste happened from the extended veg period.
$35.67 ÷ 151.6g = 0.24c/g
It cost 24c/g when comparing total electricity cost to gross yield, almost identical to the comparison of total electrical cost to the number of days in the grow 25c/day.
Neat!
legend,
kwh = kilowatt per hour
kw = kilowatt
w = watt
h = hour
c = cents
$ = dollars
d = day
LED= Light Emitting Diode
