


Likes
6
Share

@Prilyfe13
Follow
02/14/2026
So I noticed the growth slowed down a bit. I'm guessing it was the low ppm level. Not enough food. So I pumped the water out into another bucket and added more nutrients until it hit 450. I don't want to go any higher yet. Once flower hits, I'm switching to half dose. The thing is, she seems super healthy, if not a bit saggy on the bottom. Maybe that's a sign that she's hungry. Either way, I refilled the bucket with the new dose and we will see how she does. She may be a bit finicky, but I think I got it down. 600 ppm after the flowering stretch.
So far she looks great! Good color, no weird issues. Very happy with this plant.
The environment is fine today. No issues with the equipment anymore for days.
I'll have to keep an eye on her with the new mix to make sure she isn't going toxic. I don't think she will, but you never know.
Readings:
pH: 5.8
EC: 960 cm
TDS: 450 ppm
Temp: 67°
02/15/2026
Not much to report today. I'm not seeing much in vigor anymore. If it was only a few days, I'm gonna be really pissed off. There's no reason this plant shouldn't be taking off now. I don't get it.
Anyway, the plant itself still looks super healthy. Nice big green leaves. Roots look good too if not a little brown here and there. I checked it's not rot. No clue what it is, but it's very watery. Not slimy and doesn't smell. I think it's just stains.
The environment is fine as well. Ranging from 72° to 77° and generally hanging out around 75° just like I have set. The humidity is doing roughly the same thing. Between 52% and 60% while it tends to rest mostly at 55%. Right where I want it.
So I'm thinking I'll need to top off every other day at the rate she's drinking. It'll probably end up being everyday when she gets into flower.
Update:
I raised the light up to 22" and increased the light power up to 60% the DLI is 40 mol.
02/16/2026
Readings:
pH: 5.75
EC: 726
TDS: 362
Temp: 67.7
She's looking really good today. No issues but the TDS is still really low. Not super low anymore, but like 362 ppm. I'm changing the water out in a few days. I'll be doing the bloom schedule from then on.
She got big. Not tall yet. She's still growing. No buds in sight. Just a happy plant. She's a sativa dominant strain, so she should take a little longer. But I thought that was with Flowering. Oh well. I'm not complaining. If she needs an extra week or so to finish growing, by all means, please grow.
The Blue Dream on the other hand has buds at the top already. She doesn't seem to be stretching, but it think it's because she's getting really bushy. Just like this lady here.
The environment is looking really good now. Nothing to report.
The roots are everywhere now. Mostly white with some brown here and there. Not sure exactly what it is, but it doesn't smell and it's not slimy. Must be stains. It also doesn't rub off like algae would. But they are huge. Nice root ball. I can't even pull the plant all the way out of the bucket anymore. With the size of the plant and the roots being very difficult to move gently, I'm stuck pumping out the water. And pumping it back in. Not that it's hard, but I don't have 2 buckets or I'd be able to pump in a new mix and not have to leave her without water for like 20 minutes while I add like 10 different nutrients. Maybe I'll buy a second bucket.
Anyway, that's all for today.
02/17/2026
Not much to report today. She is bigger than yesterday. Slight upward growth, but more outward growth. Bigger leaves and the branches are stretching horizontally.
I also counted the nodes. She has 10 nodes before the stacking began. That's like 20 tops. If I can't keep this lady happy for the next 2 months, we shall see a bountiful harvest indeed.
She'll be getting a full defoliation right after the stretch. I just did it with the Blue Dream. She'll be done well before the Apple Strudel. Maybe even 2 weeks. But that just means the apple strudel will be a better harvest. Especially because it's still stretching and isn't covered in pistils yet. I hope this isn't another hermie and thats why veg is taking longer. I MUST LOOK!
02/18/2026
I wish I had a 3rd hand, cuz then I could show the MASSIVE root ball. It takes up most of the bucket now. And it's not done. At least based on what I'm seeing as she's still not done stretching. Still no buds too, so she's definitely still stretching. I wonder why she's not slowing down. I've checked multiple times for male parts and I haven't seen anything.
Maybe she's just has a longer veg stage. But she has pistils all over the top. Not much on the bottom. So why she's half transitioned to flower. Lol.
The environment is looking awesome now. The heater and humidifier are doing minimal work to keep it up to snuff. Very happy with this. Now to keep her happy. I have to check the light distance again I think. Then move it accordingly.
She did get a half gallon top off today. It was left over from yesterday. Her readings looking decent.
Readings:
pH: 6.0
EC: 750
TDS: 375
Temp: 66.3
02/19/2026
So today we did some defoliation. She's starting to show buds, but just. So I defoliated her. She looks good. Nice and open canopy. Lots of air flow.
A little droopy now, but that's to be expected. Well, kinda. She's a tiny bit droopy. We'll see how she does this afternoon when the praying starts.
The environment is looking really good. Goot temp and humidity. 76° and 55%. I plan on dropping the humidity to 50% next week.
I checked the DLI today. It's 41 mol. I'll leave it there for now. There shouldn't be a problem with that, especially because I have CO2 in the tent. So it should be fine with 41. If it goes any higher, I'll have to realize the light a bit more, and or drop the light power. She's still growing. So that's good.
The water is perfect. pH is 5.8, EC 797, TDS is 442. Temp was 76.6° very happy with those numbers. Next week I'll increase the TDS to 500 I think. She should be strong enough to handle a good amount of bloom nutrients. Hopefully she's not as sensitive to the bloom stuff as she was to the grow stuff. She seems to be happy with the current mix, and when she really needs the bloom nutrients, she should be really hungry.
02/20/2026
Last day of week 6. 6 weeks in veg is quite the long time and not much to show for it. Don't get me wrong, she's a beautiful plant, but she should be much bigger for 6 weeks in veg. Oh well. She'll make up for it with buds. Lots and lots of buds.
The water is really low. Like maybe over a gallon low, but I'm replacing it tomorrow with bloom nutrients. So I don't want to top off and waste nutrients.
Oh, so I tried to lift the roots out of the bucket just to see if I could move the plant. Nope. The roots are heavy. The ball is massive. As I said before, it takes up the whole bucket. So it is confirmed, I cannot remove the plant from the bucket. I thought it would have been from the canopy being held down by the trellis net. Well, this is a benefit. Now I know I can use the trellis net and not have to worry about what if. Lol.
The environment is good to go. Nothing else to say.
As for the plant itself, she looks great! Nice and open. Plenty of light to get to the bottom buds and plenty of air flow.

Likes
68
Share


@Roberts
Follow
Plant grew well outside if a little rot issue. Was operator error. She grew well under the Mars Hydro FC4800, with the Athena blended line nutrition. A berry sour smell with lots of frost. She should be a good 4 to 5 ounces once done. I did use mire then Athena recommend in flowering. I will be back with smoke report in a few months. Thank you Mars Hydro, Athena, and Weed Seed Express. 🤜🤛🌱❄️🌱
Thank you grow diaries community for the 👇likes👇, follows, comments, and subscriptions on my YouTube channel👇. ❄️🌱🍻
Happy Growing 🌱🌱🌱
https://youtube.com/channel/UCAhN7yRzWLpcaRHhMIQ7X4g

Likes
17
Share


@MagicGelato
Follow
I told everything in the pics, smell start to spread in my house so I'm planning buying a grow tent and plug it with a charcoal filter, I'm looking for the best atm


Likes
34
Share


@Dunk_Junk
Follow
Day 98 - still flushing, still waiting for amber trichomes. I've harvested a couple of bits last week & they are drying now. Thats why she looks a bit lop-sided.

Likes
23
Share


@gottagrowsometime
Follow
Was a pleasure to pull this lady this week.
She is 3 days into drying.
18.3c RH 57-63% in a dark bathroom
Buds are big and the plant itself you can smell from downstairs. House is filled with hints of Vanilla & fruity undertones.
Extremely high Calyx to leaf ratio.
More updates & pics coming and reports as it progresses.
20% off KANNABIAS amazing strains with code: ggst
https://kannabia.com/feminized-cannabis-seeds/candy-cream-go-fast

Likes
94
Share


@JUNGLE_B4RNS
Follow
Every beginning has an end ...
The Jumanji by Cellmax is almost over , last few plants left are finishing the fade.
This will be the last week before putting the plants on Harvest.
Greetings to Cellmax for their nutrients, they really rox 👍
I will put details about it on Harvest 😉
N.B: Looking for a job in the Cannabis industry as a mineralogist, plants keeper, master grower, or quality controler 🐞


Processing
Likes
13
Share


@HomeGrownFamz
Follow
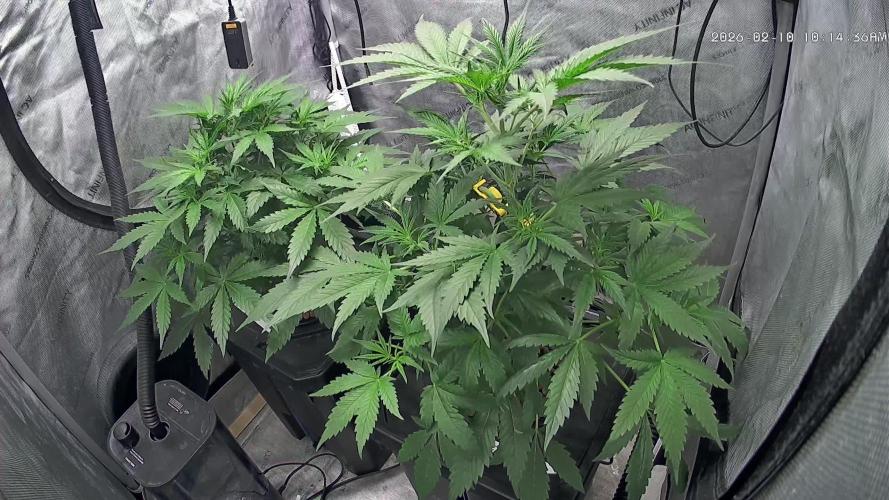
Defoliated and fully leaf stripped. I am going all out to see what happens. Wedding gelato is a fairly tall plant for my tent and future grows will have to be properly trained and tied down. Live and learn. So far happy with the results from hydro grow. Roots have worked their way into the res so I have added an air bubbler to the submerged roots.
Processing
Likes
1
Share


@couchspuds
Follow
Girls are doing great. Im getting great air circulation and it is doing wonders for them.
Going to defoliated next week for better light penetration


Likes
36
Share


@Ganjagrandaddy
Follow
Day 33 from seed : It is evident that this strain is a smaller phenon than the others in the grow room this round. 2 of the. are a decent size but dont show the growth rate of the others at all.
#1 is the biggest of these wimmin , She was happy to be spread out more and will benefit from the amount of light getting in to her original squat structure.. Her paling is getting way better now and the Mc is not being fed to her now.
#2 is the little lady of this group and will be left to grow up with only a little help along the way.
#3 is a similar size to #1 but very very pale still. she has been getting calmag and mc so has improved more and doesnt seem to have been stunted by it.
Likes
4
Share


@TheSurfBud
Follow
Nice sweet smell... could say what strain it is because its from sweetseeds sweet auto mix 10 pk of the best..
Definitely going to enjoy this one ...
Grow went well and fast 62 days flat...
Likes
21
Share


@DRO420
Follow
Almost doubled in height over the last week. Looking good , feeding full formula now. Switching to flower next week right after they are pushed down with the trellis net or scrog.

Likes
32
Share


@THChili
Follow
Day 48 (Day 6 12/12)
Plants grow real strong and all show that they are female. Lamps are on 100 % now. These lady's stretching fast.
Day 52 (Day 10 12/12)
Pushed down the stems in the scrognet
First clone rooted and is now in a p9 on lightmix
Day 54 (Day 12 12/12)
Good stretch. Durban is not stretching to much.
Buds are slowly forming.


Likes
11
Share


@Sup3rNov4
Follow
Decided to give this one another go.
Changes in setup: fresh compost, ph balanced with balanced water before I even placed the seed.
Propagation dome to keep the humidity up.
So today I did a thing Juan will no longer be an outdoor plant as such i have made a hidden garden check out the video
Planning on topping at node 5, then LST up until last 2 weeks of flower with minimum defoliation as we go
We have life new pictures from days 3/4
Now lives in the grow room
Likes
10
Share


@caliboyyy22
Follow
Hey peps another week gone these weeks are moving by fast maybe it has to do with me working nights idk but back to the blue dream she put on a little stretch filled back out needs a haircut but ima wait on that still no bud forming showing sex tho I'll say in the next couple of days she'll bud up can't wait to see those beautiful buds 😊 aight y'all see y'all on the next update which im hoping it'll be a flower update✌️🏿

Likes
45
Share


@AsNoriu
Follow
Day 85. All is good, watering with molasses or pure PHed water. My ppm from tap is 150 , ph 7.4-7.6 , really good water.
Girls are runing nice, checked trich, still clear and cloudy, but on Fattest Tangie i spotted today first few ambers , max a week left for her. All other still far from.
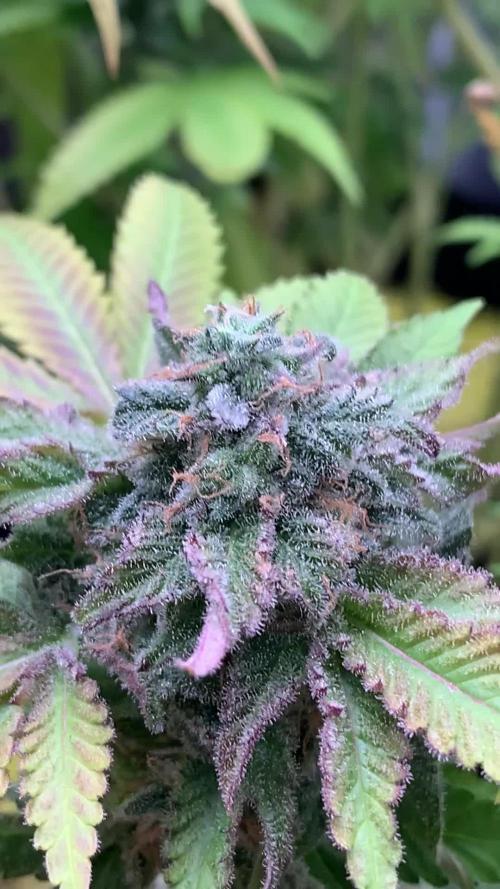
See some purpling starting on top colas of couple plants, end is soon !
Strawbery recovers well, think to give her like 5 days more max and switch to 12/12 on 7 of January latest..
Checked how high are them, still dont get how half of 2 unces + are achieved on this site ....
They will be good, but just so little ... Honestly think that only late fast diesel, early tangie will reach 50g plank. Sad result for so much love, i smoke more in four month than that garden will bring in that time ...
Day 86. Time is changed to 12/12. Late FastDiesel and StrawberyCough got heavy feeding, all other girls on pure Phed water diet ;)
Smell is so fruity and sweet , cant wait till its over ...
Added extra 2liters of soil for late FastDiesel, pot had too much space and i want to water her every 3 days, not every 2 like now.
Day 90. Cant hold Strawbery cough surounded by other girls if i want her to be massive ;)
And i really really want it ;)))
So today Fatty Tangie had last 12 hours sleep and now she is choped.
Tomorrow Early bigest FastDiesel falls, other girls still have a week or two.
In anycase January 23 is last day for all of them except late FD and SC.
Fatty had some amber, but like 5% max, she could go for a week aswell, but i need space and best light for Strawbery girl.
I still think that 90 days for auto is too much ... Buds are very dence, i mean VERY, sticky but cant tell anything decent about smell, have cold again and nose doesnt work. She smells, but cant separate smells, feel fruityness 4sure. Guess after cure is more important then now anyway ;)
Day 91. Strawberry started flowering quick, thats good and today is last day for Early big FastDiesel. No i have space for all of them to bloom till my holidays ! No more molasses, just pure phed water, my ppm is about 150.


Likes
77
Share


@KingSalomonsWeed
Follow
17.11. Day 50 Blüte 11
Hallo Leute.
Pflanze kam in die Mitte des Zeltes und wurde gedreht um 180°.
Bald sollte ich etwas lollipoppen.
Alles sehr zufriedenstellend.
Der Duft ist unbeschreiblich. Soo deep Haschisch Ketama.
Noch 75 Tage bis zum Ende des Wettbewerbs.
Noch 59 Tage ca für die Blüte.
18.11. ? Es waren nur 24 h. Doch jetzt kann ich bereits von Knospen sprechen.
19.11. Siehe Photos. Was das? Egal ,waren nur zwei 2. Sind jetzt entfernt.
20.11. day 14 Flower. Ich müsste auf jeden Fall lollipoppen.
Normal mache ich das nicht, aber es ist ein Contest. 👍
Und ich hätte nix gegen größere Knospen.
Nach dem lollipoppen hängt ein Geruch nach Original Gewürz nelken und Piment an meinen Händen. Ohh😊.
21.11. Invasion der Thirpse Teil 4..
Die Antwort: Arnold Pyrolitenegger.
Und noch 55 Tage Blüte.
22.11. Pyrolitenegger.