




Likes
10
Share


@Kinghaze
Follow
In week 3 of flowering, the ladies suffered from nutrient deficiency.
Due to vacations, they had SPA water only for a week.
I immediately added nutrients to the water tank, with an EC of 1.8
I will also add green sensation starting this week.
I also defoliated them, all the affected leaves are almost all gone.


Processing
Likes
12
Share


@Therbalist
Follow
Coming along, got the temperature down by moving the schedule more into the night and morning. Hopefully have it down enough to get some colour towards the end!
Likes
2
Share


@Grandillustrator
Follow
Having to constantly move the ties as each branch keeps pulling in closer together , keeping on top of defoliation starting to get a weak smell when opening the tent overall plants healthy

Likes
10
Share

@Hempcules
Follow
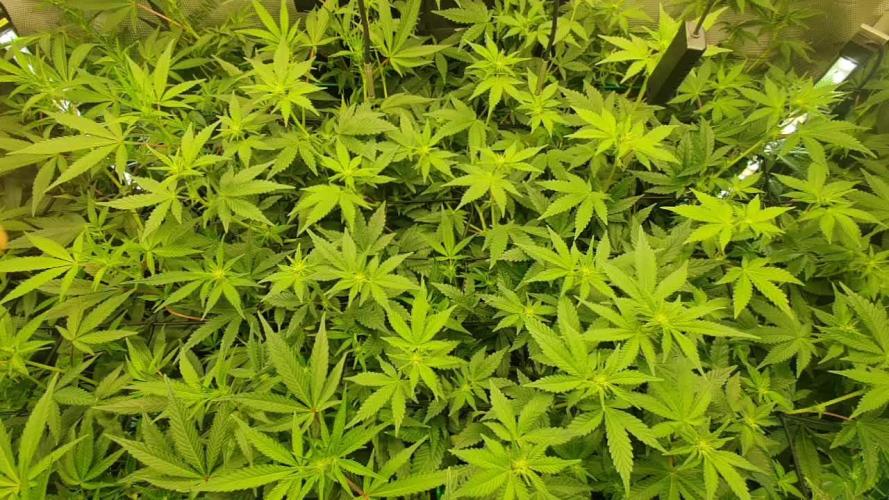
WEEK 13
Both plants have now entered the flowering phase. A large number of pistils have already developed. So far, I’ve managed to maintain an even height, but the plants are currently in the stretch phase and could still shoot up significantly. I’m hoping for compact and balanced growth, as the vertical space in my setup is limited.
I’ve increased my light intensity to around 700 PPFD.
As a result—and due to the dehumidifier—the temperature in the grow room has risen slightly, but it remains within an acceptable range.
The plants are currently watered every two days, with fertilizer added once a week.
To improve air exchange, I pump fresh intake air into the tent every 30 minutes for 30 minutes.
The coming weeks are bound to be exciting—I’m really looking forward to seeing how things turn out
Likes
15
Share


@902EastCoast
Follow
Saturday March 19th GrowUpdate:
Here’s my 10x10 grow setup with multiple strains growing. I am testing my 2 new BloomPlusXP4000’s and so far love them!!
I have TOPGREENER heavy duty smart plugs with energy monitoring hooked up to both my lights and exhaust fan. I can turn on and off from anywhere on my phone.
Govee Wi-Fi Bluetooth hygrometers that send me notifications and I can check the temp and humidity from anywhere on my phone.
Globe smart power strip with 4 sockets that can be run individually from my phone.

Likes
7
Share


@BushDoctor740
Follow
The girls are moving along nicely just watering with water ph to 6.4 this week as I top dressed with Gaia green 4-4-4.Spider farmer Se7000 dialed in at 30 percent and to the ceiling.Noticed some minor deficiencies Day 12 and check soil slurry 50/50 soil/water and the ppm was at 780 lil high at this early stage and the culprit.Going to work on lowering that a bit this week.I did add a top layer of fox farm ocean forest as well which runs a little hot with nutrients rather than the pro mix.I have to remember with these beautiful auto flowers less is better :)

Likes
6
Share


@Nune2021
Follow
Hey Leute die strains machen sich sehr gut man kann gut unterschied Sativa indika /indika sativa sehen das unterschiedliche strain hybride sie wachsen sehr gut die machen keine Probleme bis jetz unkompliziert

Likes
25
Share


@RastaMouse
Follow
Realy looking forward to this grow. Two of my all time favourite blueberry and cheese combined in one plant. Thank you royal queen seeds lol. So I decided to give RQS starter pack a go. But I did modified it a bit. It’s a simple starter you make up 1l of water add the sachets stir then soak the tray for 10 secs and put seeds 5mm into the soil then wait 5 days. Well I grow in hydroponics with jiffy cubes as starting cubes so I just soaked jiffy cubes in the solution then placed seeds right in. Blow me down 3 days and 3 of the lady’s are out the soil well Impressed how well it worked and easy for this noobie grower. So far impressed with RQS got my eye on their pineapple Kush for next gen or the hulkberry maybe even north thunderfuck... to many to pick from will have to think it over lol. But happy with this starter kit and all going good so far.
Likes
6
Share


@Elguacho420
Follow
Buenas a tod@s... Sexta semana de estás tropicanna poison de sweet Seeds.. de momento va todo en orden, la planta ya se hace notar con distintos tonos de verdes, olores y sobre todo resina... Van creciendo muy bien, está semana fue todo tranquilo... Con ganas de ver la etapa final y desgustarlas aún que todas las etapas se disfrutan, la final es la más power y ahí realmente ves si necesitas cambiar algo o no, de momento todo más q bien 🏻. Buenos humos para tod@s.. ⚡⚡⚡🤘🏻🤘🏻🤘🏻⚕️😎
🇦🇷🤝🏻🇪🇦
Likes
12
Share


@Rko41
Follow
Magnifique je remercie vraiment khalifa genetics’pour leur collaboration !!!!


Likes
24
Share


@Mathew
Follow
I feel like she's doing great, loving this batch of living soil. Still a bit confused on how watering at a ph of 5.3 is being buffered by the soil up to a runoff ph of 8. Not going to worry about it, she looks great and smells great and it's day 29-30 since flipped. The soil has her now.


Likes
24
Share


@Basementganja
Follow
Cloning procedure:
Immediately place into water upon cutting.
Remove bottom nodes at base of stem, scratch stem gently with scissors + cut small slit on end of stem.
Dip stem into water, then dip into rooting powder, then firmly plant into moist soil.
Cover with Ziploc bag (humidity dome).
Solo cups have 4 holes in the bottom (Melted gently with a lighter)
(same soil as shown in diary for germination)
The soil was pre-moistened before the seeds were planted. (lightly watered, then top half of solo cup was stirred, to promote absorption (very dry soil))


Likes
10
Share

@GermanGrow182
Follow
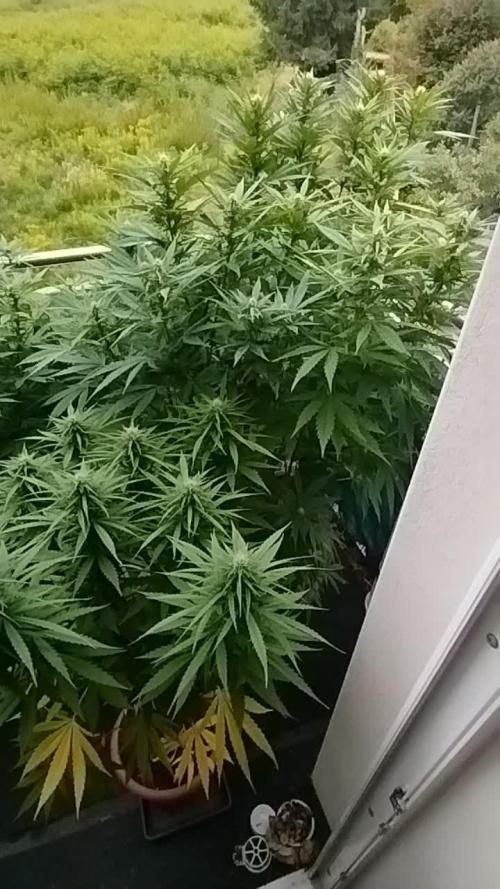
Es war eine gute Woche 👍 Milde Temperaturen und kaum Regen, dazu Wind und Sonne. Die Blüten werden dicker 🙂 die ersten unteren Fächerblätter vergilben und fallen ab. Die Larry og ist in Blütewoche 4, die AK in Blütewoche 2, Lemon in der 3.
Es läuft ziemlich gut 👍 😊 bis nächste Woche ✌️
Likes
35
Share


@Roberts
Follow
Been flowering good. Buds are more then branches can support. Trichromes are on verge of getting cloudy. Likely last week for nutrients, which I been going light on. Thanks again for likes and follows. Thanks again fast buds. Happy growing everyone and be safe
Likes
3
Share

@SWITCH420
Follow
Hi folks,
I'm coming here to start the process of ending this grow journal. I harvested about three months ago and the weed is definitely cured. Photos are about to come — I'm doing a real studio photo shoot for those buds, they deserve it!
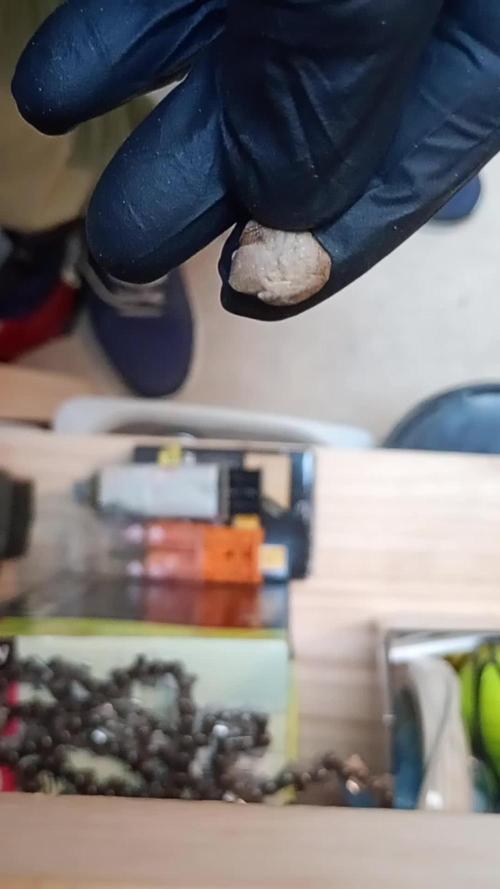
While waiting for the shots, I made some pretty damn dank hash temple balls using the iced water extraction method (solvent-free) with my little washing machine. It's a mix of the 8 strains I grew here — never ideal to mix different kinds of resin... but man, this is some serious dedicated work, so I'm making myself happy with that 14g shiny temple ball in the end 😉
Here are a few details about my process for you guys (and don't forget — you can do it with fresh material! Fresh frozen is always tastier. Also, the drying process is much more efficient and faster with a freeze dryer, but... you need the budget for that. I don't, so I go with the air drying method — check it out below):
1. Get your dry trim, then cure it properly for at least a month (I did 3 months). Smell it — mmh, sweet, dried to perfection. ✅
2. Freeze it, delicately wrapped in a freezer bag.
3. Let a large amount of tap water sit for at least 24h to remove chemicals like chlorine, then use it to make plenty of ice cubes — don't be shy, especially if you're not working in a cool environment.
4. Prep your washing machine: add trim between two layers of ice, fill up with clean water (as much as you can, large vortex is better than a smaller one), then make it seat for 30 min (45 min for thicker buds) the time that the dried green material gets wet again.
5. Prep your filtering tools: catch bag, different mesh bags, spoon, etc.
6. Wash as many times as you can before green contaminants appear, as these lower the quality of your hash — don't hesitate to go up to 8 to 12 washes if the resin still looks clean! Important: each wash has its own specific duration, and they get progressively longer as you advance through the process. Frenchy Cannoli (a true hash legend) provides a detailed timetable for this — from as little as 30 seconds to 1 minute for the first wash, all the way up to around 25 minutes by wash 8. Make sure to follow that schedule rather than using the same duration for every run or running it too long the first wash !! It could breaks to quickly your precious material before you collect all the trich's and the quality would be lower in the end.
7. Collect the wet resin in the mesh bags with a frozen metal spoon, make patties with the resin, and let them sit over some towels in order to drain as much water as possible (place a tissue made for hash collecting over the towel).
8. When the patties are a little dry to the touch, wrap them as they are in the tissue and place them in the freezer for 48h or more.
9. With an iron strainer, microplane your patties over the biggest flat surface you can get! It's important that your micro pieces of hash dry widely and don't get too compacted. Any failure in the air drying process will nucleate rot, ruining your hash in the end and making it a poor product — eventually something to throw away. Sad when you think about all the phases of the process to get to this point!
10. So, in order to air dry properly, you must — it's not optional — lower the RH of your dry room to 35% or slightly below, never above and let it dry as long as needed until the material feels like dry sand. For myself, I found 10 to 15 days is ideal. The room must be very lightly ventilated (not directly on your resin!) and in complete darkness — the goal is to preserve all those delicious terpenes! Ideally, temps around 60°F or 16°C
11. Now that it's dry, collect your resin with a large thin spatula! Make a little mound between two layers of PaperHash, boil some water, and fill up a wine bottle with it!
⚠️ From this point on, to avoid exposing your carefully dried resin to a more humid environment — which could ruin all your hard work — everything must happen in the same drying room. Keep working at 35% RH until your temple ball is tightly and airtight wrapped in PaperHash. (And don't forget to drink water — it's dry in there! 💧)
12. Start to slowly press your resin. Magical moment. Finally....
13. Press 3 times for 10 to 15 minutes in order to really decarb your hash — because that's what it's all about! Between each press, try as best you can to shape a patty... until the final press, when you'll be able to form that magical shiny temple ball (it only shines with gloves on, guys 😄)
14. You are now allowed to try it — for quality control purposes only, of course!
15. Because you want to age your hash for the sweetest 5-star smoking experience: wrap your temple ball in a large piece of PaperHash — if you can get that brand it's ideal, or another kind (check https://thepressclub.co) as long as it's organic!
16. Place the wrapped temple ball in a glass jar and store it in a dark, cool place.
17. Wait a minimum of 3 months before opening it.
18. Open, smell, touch — you'll be amazed. Roll it up with some weed or tobacco or both (I do both) / Or get a Hooka... you are smoking some true primo aged hash made by yourself! Taste the difference and realize all the path from choosing the seeds online until this first amazing puff ... 🙏
I want to credit my inspiration for making this kind of hash to the great Frenchy Cannoli, who has shared all his knowledge through amazingly rich tutorial content that you can find online with a bit of searching. 😉 Peace Frenchy 🕊️☮️


Likes
78
Share


@ClubRiot
Follow
Week 7 ,
pH Perfect Connoisseur Bloom Part A ( 1 ml/L )
pH Perfect Connoisseur Bloom Part B ( 1 ml/L )
CarboLoad Liquid ( 2 ml/L )
Sensi Cal-Mag Xtra ( 2 ml/L )
Sensizym ( 2 ml/L )
Bio-Heaven ( 2 ml/L )
Big Bud ( 2 ml/L)
Nirvana (2 ml/L)