


Likes
Comments
Share

@Piratebay
Follow
Buenas a todo compañer@s,otra semana más de cultivo.
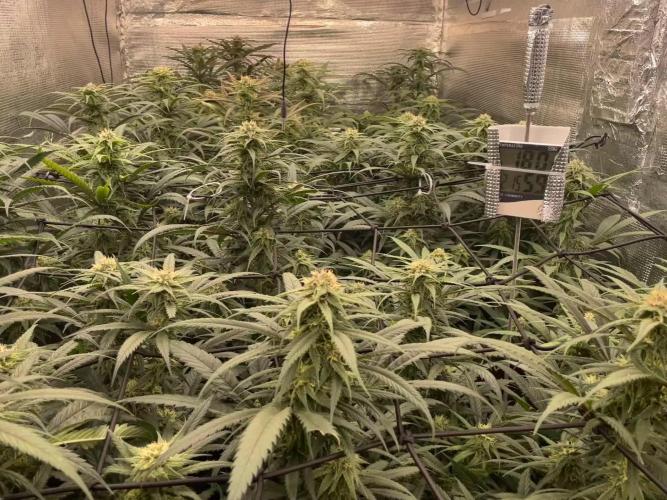
Amnesia haze
Hoy día 3
Finalizamos la semana 5 de floración.
Cambiamos a la semana 6
Aumento de la EC hasta los máximos valores que acepte la variedad,proabado este fenotipo de amnesia haze en varios cultivos con una EC2600 en sustratos.
Una semana bastante jodida de agua,muchas lluvias,con lo que conlleva alta humedad en el exterior y con ello más alta en el cultivo.
Pero seguimos luchando!
Vídeo subido en la madrugada .
Dia 5
Todo bien ,exceptuando una de las niñas que parece tener alguna deficiencia,magnesio pensé en primera estancia,pero otros compañeros me dijeron que podría ser que el magnesio bloqueó el potasio en unos riegos atrás.
Le reduciré el magnesio,y le seguiré dando la misma dosis de potasio que le doy a todas las demás..
El riego es por goteo y no queda otra, a esa pequeña le añado lo que pida de más con una pequeña pistola de agua por debajo.
Va afinando el cultivo con respecto a los olores.
Día 6
Al fin,puedo volver a decir ,tengo todo bajo control!! Al menos por ahora..
Correji,el problema de potasio de la planta con la deoficiencia que no sé cómo llegó a ese punto,tan pronunciado..
hoy quedó la cama regada con una buena cantidad de abono EC2200
En una cantidad de tanque de agua de 44 litros
Un ph6,2 controlado como en todo el ciclo de floración.
Dia 7
Hoy abrí el armario,30segundos en la tarde mientras estaba la noche dentro con las niñas,
12grados era la temperatura dentro de el.
Hoy realmente fue una tarde fría ,aquí.mañana vuelve a ser un día normal ,así que volveremos a tener los 16/17 que tenemos por lo normal.
Buen pronóstico,e podido ver en los noticiarios,hahahah dejando temperaturas aparte.
Regamos ayer, con una buena cantidad de azucares aminoácidos y enzimas,además de su riego base y calmag boost.
Realmente hoy me quedan 10 días,en los que tengo que terminar de potenciar la planta con los abonos.
Ya que en aproximadamente 20 días se finalizará este cultivo.
No busco una cantidad oxidada de tricomas ,busco una buena patada de estimulación activa.
En unas semanas abriré un nuevo pequeño espacio de cultivo con una cama de cultivo de suelo vivo. En un interior.
Por lo demás,pediréis ver alguna deficiencia en una planta,y algo de estrés en otras más debido a
El salto de temperatura de hoy.
Decir que algunas sufrieron un poco de sobrefertilizacion.
-ESO QUE PARECE UN🛰️, es la sonda de temperatura y humedad!
Y ya de paso. aprovechamos la 💡 que pueda rebotar.
Día 8
Parece que ahora piden mucha agua,van a sufrir un poco de estrés con respecto a eso.
Mañana le meteré otro riego con un buen EC
y la próxima semana acabaremos con los abonos.
Están engordando muy bien,un olor a amnesia increíble con el toque lima y fresco de las haze.
En este fenotipo la dominancia es más de la amnesia.
El olor ,me está indicando que voy a tener un producto de gran calidad.
Muy muy dulce,limón,madera cortada y toques a pimienta.
Seguira definiendo más aún en la maduración y el desarrollo de resina empieza a manchar bien la hojas.
Grandes extracciones de jardala nos esperan!
Día 10
En el día de hoy todo va bien con respecto a todo lo general del cultivo en cuanto a alimentación.
Ya hoy el último riego de la semana ,penúltimo del cultivo.
IMPORTANTE.
⚠️
Tuve dos plantas afectadas en las hojas por exceso de iluminación llegando esta a quemarse en las hojas,la flor no se afectó,prácticamente nada .
Subí la lámpara unos 12 cm
Estaba demasiado baja ya que no tuve en cuenta el pequeño estirón de esta semana atrás.

Likes
18
Share


@Islandbuds420
Follow
She got cut in half🤯 lol jk, I did it myself and is now loving it with 8 different tops and will eventually be trained once it is sexed (were hoping for a female) given the structure is looking good so far!🤞 smells of sweet cola and skunk! thanks for looking
Likes
121
Share


@Tropicannibis_Todd
Follow
💩Holy Crap Growmies We Are Back💩
Code Name FBT2307
Well growmies we are at 21 days in and everything is going great 👌
👉 Started to do some light low stress training and its looking good 👈 We got , some Pre-flower showing already 👌Let the stretch begin 💪
Lights being readjusted and chart updated .........👍rain water to be used entire growth👈
👉I used NutriNPK for nutrients for my grows and welcome anyone to give them a try .👈
👉 www.nutrinpk.com 👈
NutriNPK Cal MAG 14-0-14
NutriNPK Grow 28-14-14
NutriNPK Bloom 8-20-30
NutriNPK Bloom Booster 0-52-34
I GOT MULTIPLE DIARIES ON THE GO 😱 please check them out 😎
👉THANKS FOR TAKING THE TIME TO GO OVER MY DIARIES 👈

Likes
23
Share


@Ferenc
Follow
Day 58, 11th of November 2020:
I set the lamp 15 minutes shorter to switch off earlier so she receives 11:45 of darkness. I would like to imitate the nature when longer nights come with time till the 4th week (when she will receive 13 hours darkness a day 15 minutes minus 4 times = 1hour) so every week 15 min longer darkness for 4 weeks and then back to 12/12 to have bigger buds from the 4th week....
I think whe will flower longer I have got that feeling. Nice strain growing properly.
Good job Zamnesia....
Strech should end soon, however she did not strech that much due to training...
Fertilization happens every 2nd day with the mix and ratio above.
Let's go ;)

Likes
52
Share

@squalino
Follow
📖 Chroniques de l'Oasis : La Marque Blanche
🐪 Chapitre 9 : Les joyaux de la sultane
Date : 2 avril 2026
Âge : Mi-Floraison
Taille : 62 cm ( +16 cm )
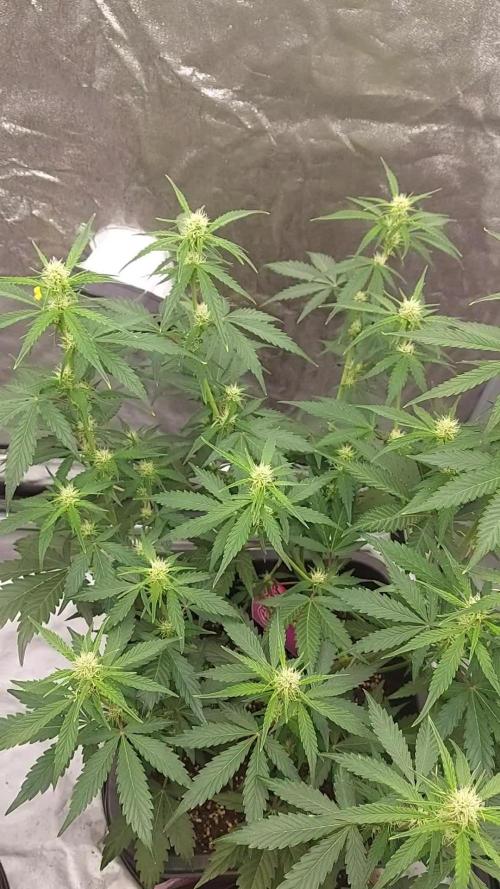
Après des jours de marche dans l'immensité du Rif, j'atteins enfin la lisière. L'Oasis n'est plus un mirage lointain, c'est un mur de verdure luxuriante qui se dresse devant moi. La Sultane a grandi, elle mesure maintenant 62 cm. Ce n'est plus une promesse, c'est une grande dame parée de ses plus beaux bijoux : de grandes perles blanches — ces pistils étincelants — qui s'accumulent sur ses branches comme un trésor ancestral.
Je quitte le sable nu pour m'enfoncer sous son feuillage. L'air change, chargé de son parfum de plus en plus envoûtant. La petite lumière blanche, cette étoile qui me guidait, approche. Elle brille désormais au travers des feuilles, m'indiquant le cœur du sanctuaire. Chaque pas dans cette végétation me rapproche du secret final.
🏜️ État de l'Oasis
Le climat de la vallée est parfait, stable et protecteur :
Température : Jour 25°C / Nuit 21°C (La chaleur idéale pour que la Sultane s'épanouisse sans transpirer).
Humidité : 50% (Un air sec et pur pour protéger les perles blanches de la moisissure).
Lumière : Intensité 75% à 65 cm (Le soleil artificiel frappe fort, mais avec juste assez de distance pour ne pas brûler sa couronne).
Vigueur : Une croissance de 16 cm depuis notre dernière rencontre. La structure épurée porte ses fruits.
L'Élixir de vie (Nutrition)
Pour que la Sultane puisse porter le poids de sa beauté, je lui ai versé un nouvel élixir de force :
Mélange : 2 ml de PK 5-8 dans 1 litre d'eau.
Précision : Ajusté à un pH de 6,3.
Le but : Donner le signal du gonflement. Le Phosphore et le Potassium vont transformer ces perles blanches en diamants de résine compacts.
L'Analyse
:
La Formation des Bud : les "perles blanches" sont magnifiques. Les fleurs se structurent très bien. On voit que les entre-nœuds sont courts, ce qui va créer des têtes denses et continues. C'est le résultat direct du LST passé et de la gestion de la lumière.
La Santé des Feuilles
:Le vert est profond et uniforme. Je remarque sur certaines pointes de feuilles un très léger jaunissement (vraiment minime). C'est le signe que tu es à la limite parfaite de la nutrition : elle mange tout ce que tu lui donnes, elle est au maximum de son métabolisme.
L'Espace et la Pénétration :
le nettoyage du bas (lollipopping) porte ses fruits. On voit que l'air circule parfaitement sous la jupe de la Sultane. À 50% d'humidité, c'est une autoroute pour la santé. Les têtes du milieu reçoivent autant de lumière que celles du haut.
📜 Anecdote du Rif : La "Touiza" et le Chant du Tamis
Dans les villages perchés du Rif, comme à Ketama ou Chefchaouen, la culture n'est pas un travail solitaire, c'est un acte sacré appelé la "Touiza" (l'entraide communautaire).
Les anciens racontent que lors de la récolte, on ne frappe jamais le tamis pour extraire la résine n'importe comment. Il existe un rythme spécifique, presque une transe. Les habitants croient que la plante possède la "Baraka" (la bénédiction divine). Si le cultivateur est en colère ou s'il brusque la plante, la Baraka s'enfuit et la résine perd son éclat et son pouvoir.
Note du Nomade
: "Le sable est loin derrière. Sous la canopée de la Sultane, je ne marche plus, je contemple. Les perles de demain seront les étoiles de mes nuits.
06/04
je lui est apporté son élixir de vie
4 mi de pk 5-8 dans 1 litres d'eau PH 6,3
merci à tous pour votre suivi et vos likes .
thank you all for you likes et follow
danke schon fur alles
à la semaine prochaine

Likes
31
Share


@Lukush
Follow
Hey growmies all is good and mi baby girls are loving life!!
Gonna start giving them some nuts in a couple days 👍
Thanks for passing along have a good one growmies.
Check out this led on website 💪👍💪
https://marshydro.eu/products/mars-hydro-sp-6500-led-grow-light/
SP6500, as one of the huge single bar LED grow lights, installed with top quality Samsung LM301B diodes, designed with enhanced red in broad-spectrum light, emits the highest central PPF and has the superb penetration that its major applications are for high-wire plants and greenhouses.
Wattage – 650w
Veg Coverage – 4×5 ft
Flower Coverage – 3×5 ft
Featuring a thick aluminium passive heat sink and densely arranged chips, the SP Series provides high efficacy but low heat output while minimizing obstruction to natural LIGHT!

Likes
Comments
Share


@AlbStoned
Follow
Die Letzten paar Tage sind gekommen. Ich habe auf beiden Pflanzen braune Trichome, und warte nun das Verhältnis 30/70 ab. Der Geruch ist echt der Hammer! Beide Pflanzen geben eine sehr süßliche Note ab. Die Mango Cream x Cinderella wird momentan noch die letzten Blätter los, und besteht fast nur noch aus Buds.
Likes
Comments
Share

@DogDoctorOfficial
Follow
💜 Purple CousKush Auto by Zamnesia | Pheno B | Week 8 (Flower Week 5) 🌱
Quiet Confidence Is Becoming Something Beautiful
Every grow has plants that demand your attention.
They stretch.
They fill the room.
They need training.
They need cleaning.
They seem to constantly ask you to do something.
And then there are plants like this Purple CousKush.
She doesn't ask for much.
She simply keeps growing.
Quietly.
Elegantly.
And somehow, every time I look at her, I like her a little more.
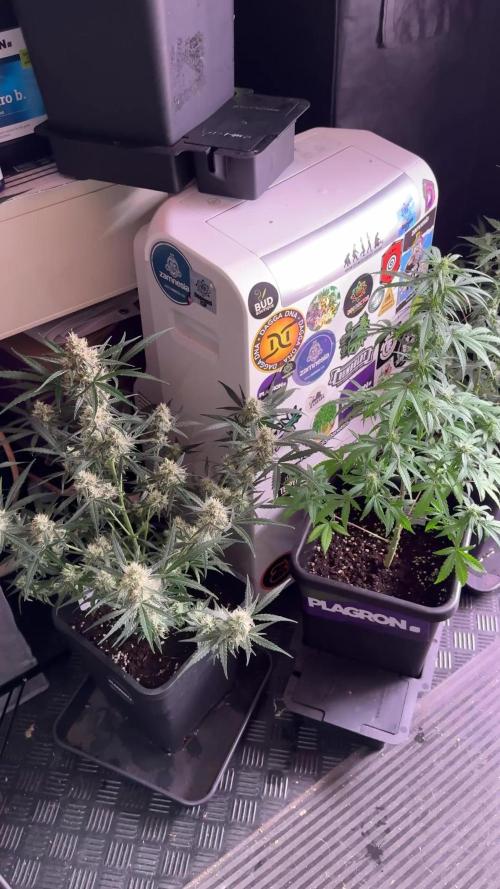
Standing at approximately 96 cm, she isn't the tallest plant in the 8×8 Adventure. She isn't trying to become one either.
But the way she's developing is something I genuinely appreciate.
The structure is balanced.
The flowers are forming beautifully.
The canopy has enough space.
The plant looks healthy.
And most importantly...
she looks comfortable.
Sometimes that's all the confirmation a grower needs.
🌸 Week 8 – Beauty Without Force
One of the biggest lessons this entire project continues teaching me is that there isn't one correct way for a plant to grow.
We're running multiple genetics side by side, under the same general environment, the same lighting strategy, the same nutrition and the same cultivation philosophy.
Yet every phenotype interprets that environment differently.
Some stretch.
Some stay compact.
Some build massive central colas.
Some create dozens of smaller flowering towers.
And this Purple CousKush has chosen something in between.
She's building a wonderfully balanced structure where the flowering sites are distributed naturally throughout the plant.
Nothing looks forced.
Nothing looks crowded.
Nothing looks like it needs fixing.
And that last part is important.
Not everything needs fixing.
🌿 No Defoliation This Week
This is one of those weeks where I decided to simply leave her alone.
She was part of the same general flowering period where other plants in the room received a selective defoliation.
But when I looked at her...
I didn't see a compelling reason to do it.
The canopy isn't excessively congested.
The flowering sites are developing nicely.
There is enough space between the branches.
Air can move through the structure.
Light can reach the flowers.
And the leaves that remain are healthy and actively contributing to the plant.
So why remove them?
Just because we can doesn't mean we should.
That's something I've learned more and more throughout this project.
Defoliation is a tool.
It's not a requirement.
If a plant already has a good balance between foliage, airflow, light penetration and flowering sites, sometimes the best intervention is no intervention at all.
And that's exactly what I chose for this lady.
She's doing beautifully.
So I'm letting her continue doing beautifully.
🌸 The Flowers Are Writing Her Story
And this is where she really starts to shine.
The developing flowers are becoming much more defined now.
The bright pistils continue emerging across the flowering sites, while the individual buds are beginning to take on more substance.
Looking through the canopy, you can see the plant beginning to transition from early flower formation into proper flower development.
The structure she built earlier is now becoming the framework supporting all of this.
Every branch has a purpose.
Every flowering site has room.
And the overall shape of the plant gives the impression that she knows exactly what she's doing.
I particularly like how the flowers are distributed across the branches.
They're not hidden inside a dense wall of foliage.
They're sitting there in the light, developing naturally.
And that's beautiful to watch.
💜 Small Doesn't Mean Small Potential
This is another thing I've come to appreciate during this 8×8 Adventure.
When we talk about plants being "big" or "small", we're usually talking about height or physical volume.
But those measurements don't necessarily tell the whole story.
A plant can be relatively modest in size and still use its available space extremely efficiently.
This Purple CousKush is a perfect example.
At around 96 cm, she isn't dominating the tent.
But look at what she's doing with those centimetres.
She's building flowering sites throughout her structure.
She's maintaining healthy foliage.
She's keeping good spacing.
She's developing flowers evenly.
And she's doing it without needing constant intervention.
That's efficiency.
And honestly, I really like it.
💡 Letting The Light Work
The lighting strategy remains one of the most interesting parts of this entire project.
Above the canopy, the Future of Grow Black Series continues providing the main source of intense light.
Below, the Lumiflora under-canopy lighting continues helping illuminate areas that would otherwise receive much less direct light.
But there's an important distinction here.
Under-canopy lighting isn't a reason to keep every tiny lower flowering site on the plant.
Light doesn't magically turn every low bud site into a major cola.
The plant still decides where it invests its resources.
And that's another reason I don't feel the need to remove foliage aggressively just to expose every little piece of the plant.
We're watching.
We're observing.
We're allowing the plant to show us what she can actually do.
For now, she's showing us plenty.
🍃 Healthy, Balanced & Comfortable
The foliage remains beautifully healthy.
The rich green colour continues throughout the plant, while the leaves maintain good posture and structure.
The stems are supporting the developing flowers confidently.
The plant isn't showing obvious signs that she's struggling with the current environment or feeding program.
And perhaps the biggest compliment I can give her is this:
She looks relaxed.
There is no visible desperation to her growth.
No excessive stretch.
No overcrowding.
No obvious stress.
She's simply progressing.
Sometimes healthy cultivation looks surprisingly boring.
And that's a compliment.
💧 Feeding Program
Purple CousKush Pheno B continues receiving the same flowering nutrition program:
Terra Bloom — 2.2 ml/L
Pure Zym — 1 ml/L
Sugar Royal — 1 ml/L
Power Buds — 1 ml/L
Green Sensation — 1 ml/L
pH Plus / Lemon Kick — as required
Current targets remain around:
pH: 5.8
EC: approximately 1.95 mS/cm
She's continuing to accept the program very well.
There is no reason to complicate something that's already working.
Consistency remains the name of the game.
🌡️ Environment
The room continues running with stable conditions:
Light schedule: 12/12
Day temperature: 29°C
Night temperature: 25°C
Relative humidity: 60%
Solution temperature: 21°C
Root-zone temperature: 21°C
CO₂: approximately 639 ppm
Pot size: 15 L
Watering: approximately 1.1–1.2 L per 24 hours
The environmental stability continues giving every phenotype the opportunity to express herself without constantly having to adapt to changing conditions.
And that's exactly what we want.
The plant should spend her energy growing flowers...
Not surviving her environment.
🌱 Same Room. Completely Different Story.
This is probably my favourite part of documenting individual phenotypes.
Her sister, Purple CousKush Pheno A, has always been more energetic and vertically ambitious.
Pheno B is different.
She has taken her time.
She has built a more restrained structure.
She doesn't dominate the canopy.
She doesn't demand attention.
But now, when you look at her flowers, you can see exactly why she deserves her own diary.
She's beautiful.
And she's becoming more beautiful every week.
This is why I don't like judging phenotypes too early.
At the beginning, you see a plant.
Then you see a structure.
Then you see flowering sites.
Then suddenly, somewhere in the middle of flower...
you start seeing the phenotype.
And I think that's happening right now.
🔍 Looking Ahead
The next few weeks should become particularly interesting.
The stretch is essentially winding down, which means the plant can increasingly dedicate her resources toward flower development.
The flowering sites should continue swelling.
The pistils will gradually become less dominant visually as the calyxes gain volume.
Resin production should continue increasing.
And those beautiful branches she's built should slowly become heavier with flowers.
I'm also curious to see whether her compact, balanced architecture translates into equally balanced flowers at harvest.
I have a feeling it might.
But we're not going to decide that today.
We're going to let her finish the story.
💭 Final Thoughts – Sometimes The Best Move Is Doing Nothing
This week doesn't have a dramatic lesson.
There was no emergency.
No major training session.
No aggressive cleanup.
No big correction.
And that's exactly what makes this week special.
Sometimes the best thing a grower can do is look at the plant and say:
"You're doing great. Carry on."
That's where Purple CousKush Pheno B is right now.
She's healthy.
She's balanced.
She's developing beautiful flowers.
She's using her space efficiently.
She's maintaining excellent structure.
And she simply doesn't need me to interfere.
So I won't.
I'll keep watching.
I'll keep feeding.
I'll keep watering.
I'll keep documenting.
And I'll let her show me what she has inside her.
Because she may not be the biggest plant in this room.
She may not be the tallest.
She may not be the loudest.
But she's becoming one of the most elegant.
And that's a personality worth celebrating.
🙏 Thank You
A huge thank you once again to Zamnesia for these beautiful Purple CousKush genetics, Plagron for supporting the nutrition throughout this journey, Future of Grow for providing the powerful Black Series lighting above the canopy, Lumiflora for helping bring additional light into the lower canopy, TrolMaster for maintaining such a stable environment, and of course everyone following this crazy 8×8 Adventure here on GrowDiaries.
Every phenotype has her own story.
Some stories are dramatic.
Some are explosive.
Some surprise us.
And some simply become more beautiful every week.
This one?
She's quietly becoming something special. 💜
No defoliation.
No forcing.
No unnecessary intervention.
Just a beautiful plant doing what she knows how to do.
And honestly...
I wouldn't change a thing.
Until next week...
Growers Love and happy growing! 🌱💚
Likes
17
Share


@Makers_Mark12
Follow
I start immediately apologizing for not respecting the week in updating the diary, but with work and looking after the plants I had no time.
Now it is the end and I have collected everything. The experiments with ice water went really well and the pollen yield has increased again. The plant is spectacular and I am very proud of my work and what I have achieved. The buds are very compact and smell really exaggerated.
This Cali I cleaned it all out of the excess leaves apart from the sugary little ones and left it in whole branches and hung it on a clothesline that I am leaving in a dark room with the values checked at least for the next week so that I can start a new cycle. But the smell is just too much!!!!
Great FastBud and sure I'll be making more varieties soon.
The monkey has now burrowed on my shoulder and the desire to try this delight is more and more.


Likes
293
Share


@Ju_Bps
Follow
Hello growmies 👩🌾👨🌾🌲🌲,
👋 Plants growing good, look happy and healthy.
I've a good surprise with how growing good with the Tropicana, same structure, same size, will be good for the scrog.
I've reorganized the tent after harvest of other plants,
Down the supply of lamp and Filter Fan Kit.
💪 Have been topped and did a defoliation 🍃
💧 Give water each 2/3 day
And vaporise plant with water + Plagron Roots (1ml/l)
0.5 l Water + Roots + Grow + Zym (1 + 4 + 1 ml/l)
0.5 l Water + Roots + Grow + Zym (1 + 4 + 1 ml/l)
PH @6
💡Mars Hydro - FC 3000
23% 50 cm
Mars Hydro Fan kit
Setting 4
Have a good week and see you next week 👋
Thanks community for follow, likes, comments, always a pleasure 👩🌾👨🌾❤️🌲
Mars Hydro - Smart FC3000 300W Samsung LM301B LED Grow Light💡💡
https://www.mars-hydro.com/fc-3000-samsung-lm301b-led-grow-light
Mars Hydro - 6 Inch Inline Fan And Carbon Filter Combo With Thermostat Controller 💨💨
https://www.mars-hydro.com/6-inch-inline-duct-fan-and-carbon-filter-combo-with-thermostat-controller
Fast Buds - Gorilla Cookies FF🌲🌲
https://2fast4buds.com/us/seeds/gorilla-cookies-fast-flowering
Likes
18
Share


@Hawkbo
Follow
Autos are just starting to flower the photos are dying for some bigger pots. I've been trying to bring up the overall plant health in general since moving everything to a basement the temps are a little lower than ideal. I had a space heater delivered today and monitored the temps but they only went up to around 78°f I want it to be atleast 82°f ideally 85. The heater uses 1500 watt and only increased it about 2 or 3°. I dont think it's worth the extra cost for such little boost. I'm thinking about returning the heater and throwing a 1000w hps in one of the other tents and see if that will raise it anymore. Especially with LED and co2 higher temps would be very beneficial in veg and early flower but the room is so big its gunna be tough to pull off without killing me on electric costs. Any suggestions are welcome. I know this room does decent in flower but I havnt done much veg work down here and I'll have some autos growing this round so it's important I get it up.


Likes
8
Share


@BlazingAngel420
Follow
Well where do I start; they have been growing like crazy and have noticed since I've started collecting rain water they are happier and starting to thank me. They are further along than I have expected unless I forgot a week 😅. But I am happy with how they are looking and can't wait to see their flowers 😊 happy growing's my fellow weedlings🌳🖖🥦.

Likes
8
Share


@Leafy420
Follow
Day 14
After a week from the bottom feed
The pots feels light again
My finger was dry
So i think its time for they first halve dose feed
23c, Ppm 700, ph 6,25
Gave each a dose of 100ml water
Day 16
Last night I saw roots so today I transplanted
Wich didn't really went as plant because something (Hopefully only soil) dropped right before I placed "Jane" into her new home :(
Besides that it went okay
Gave them a good dose of water
Now wait till it dries and then they get their first full feed dose
Day 20
This night they got they first full feed
500ml each
4ml grow A&B
4ml b52, bud candy and voodoo
With a low ph to bring down the ph in soil
Wich is a lil high I qeuss
22,7c 1000ppm 5,8 ph
Day 21
Today we did some LST
Now they lay, next up is sit and then we roll
So far they are cooperating
Day 22
All are now bend and secured and doing well :D
Day 23
Soil was dry gave them some calmag 1ml/l each 700ml 6.10ph
Likes
3
Share


@Green_thumb_pharaoh
Follow
I actually liked this strain! she was easy to grow and didn’t give no issues! just on the short side but the budst are dense and the purple fade was so beautiful 🤩💪 can’t wait to taste
Likes
3
Share


@Briangrowss
Follow
I think she start to look delicious
28/7 she really start to smell good
30/7 give her this morning the first time green sensation and build it up to 0,5 in the next week that starts tomorrow ☘️


Likes
34
Share


@gottagrowsometime
Follow
Welcome: thanks for dropping by. Drop a like so I can check out your grows, or not, I'll leave it down to you.
So, the fun begins with Kosher Cake. Have 6 in the ground FB seeds in the ground only 1 kosher. The 2 Strawberry Gorillas are still not there with germination.
Have started these on the 3 nutes above. These are best known as Voodoo Juice, tarantula and Piranha. These versions are from the ppl who hold the pattens and make a lot of ANs formulas. They have just improved upon most of the AN line up but they kept these the same. As they are tried and tested. Going to be running this lady on the full 19 Terra Power Line up. You can check these out on led-grower.eu/terra-power/ and read up on them for yourself. I'll be adding what's in them as for these 3 if you are interested look up Voodoo, T&P. Hopefully soon you'll be able to click on them and look em up when they join GD in the next wk or so.
Happy with how the nutrients are holding a stable PH at 6 and these aren't even their PH perfect nutrients. So no PH - + needed.
Sprayed each plant expect 1 gorilla zkittlez, for that 1 I used ANs line. These recommend 1ml/l for seedlings, AN I used 1.5ml/L. I use to use 2ml/L but they are seedlings so it's enough. Just a waiting game now. Will update as soon as these ladies start a popping.
I laid a damp towel around the pots hopefully it'll up the RH. (Don't soak the towel it needs to be able to dry easily and in turn increase RH)
Sprayed each 5 plants with this line up to start them off. As soon as leafs show I'll start them on a very very light feed. Will feed again in 2 days with the same mix. Another 100ml 1ml/l of each 3ml/l total 627ppm 6ph 21c temp. Have the smart intake fan at no 4 on 100% of the time. If I can't get desired RH after a day or 2 I'll turn the intake fan on 20/20 on/off and it'll make the RH be above 70% by doing this alone in a small space like 70x70. I really don't think I'm gonna have an Issue with low RH, but I have a feeling I'm gonna pay to have a low RH environment.
30/4/22 VD1. Have started her on jungle juice trio and a mix of terra Power enzymes and all there bud/resin enhancers will be used in conjunction with half strength recommend jungle juice dose. The feed is so low I've made up a 1l mix and that will do this and the 2 banana purple punches also. And I'll move that up to 1ml/L x3 of the jungle juice products next week. But for this week what's up above will be given every 2 days or when needed.
1/5/22 Slow growth on VD2. She's the runt most are reaching 2.5cm 3+ nearly on 2. Let's see what happens she's out of the ground and showing fan leafs, yday she had a crusty head. So all in all, going well. 6-8 FB seeds are up and thriving.
2/5/22 She's picked up fine. Got some height to her. Will continue the same course and watch her grow. Will update once more on on size and daily pics.
4_5_22 All Jungle juice&Terra Power grows are showing deficiency signs. I'm going to push up the EC this week I think. I do not want to stall them but I really think EC will be high in jungle juice because of the micro it has SO MANY TRACE nutrients it's crazy and it sends the EC sky high but there's so much of little bits of this and that I really think it can handle a higher EC. I'm going to 2x it or up it by a 1/3 for their watering 2moro as they were only fed yday. I've added biobizz calmag to help as my tap water is lacking cal mag when it comes into summer or so it stays on our water reports. It drops by 20%.
6/5/22 So, it's begun. I've created a negative pressure environment, 1st time, let's see if it makes an impact. On wk 3 onwards I'll be running the intake extraction for 5mins every 30mins and I'll have 2 co2 bags up. If the RH becomes a problem or temp I'll put the extraction/intake back on 100% of the time. The extraction fan/intake is set at a ratio of 2 to 1. (100% extraction 50% intake) making a negative pressure environment, best way to show you have done this, the walls in your tent should bow in lightly.
Same Day. Okay, so this my last update. Going to run fans the same right up until flower and then I'll be sealing up my tent and adding 2 co2 bags. And will be adding a dehuimifier and setting at 45% And it checks every 30mins and if it's gone up it'll turn back on and bring down to 45 or set RH, so no co2 will escape. The temp will be bordering 30-33c and then when they go into their rest window they'll be transferred to to a negative pressure environment with low temps and 45-50%RH. I'll only be able to do this for the 3 weeks of pre flower. And maybe some more, it depends how hard the dehuimifier will be working, but i want dense buds and only way to improve that is by introducing Co2 and then a negative pressure cold environment for terps. Then I'll be putting them back into full negative pressure environment and the Co2 will be useless, again all depends how it's gonna affect my bottom line. That and I only have 2 intake fans. I'll be going into detail about my Co2 adventures the week before I'll be prepping them to be able to withstand high temps, so I'll gradually bring up the temps the last wk of veg 28c max and that way when I push it to 30-32c in pre flower she won't stress as much
Thanks for reading, this will be it as for updates for this week other than her final 7th wk day. Will adjust EC 5th higher or so.
gottagrowsometime
Processing
Likes
7
Share


@Damonkey
Follow
This girl is so ready god flowering, she’s responding well to all training and continues to move out as wide as she can but now show does start to get taller.
Likes
27
Share

@DivineBuds420
Follow
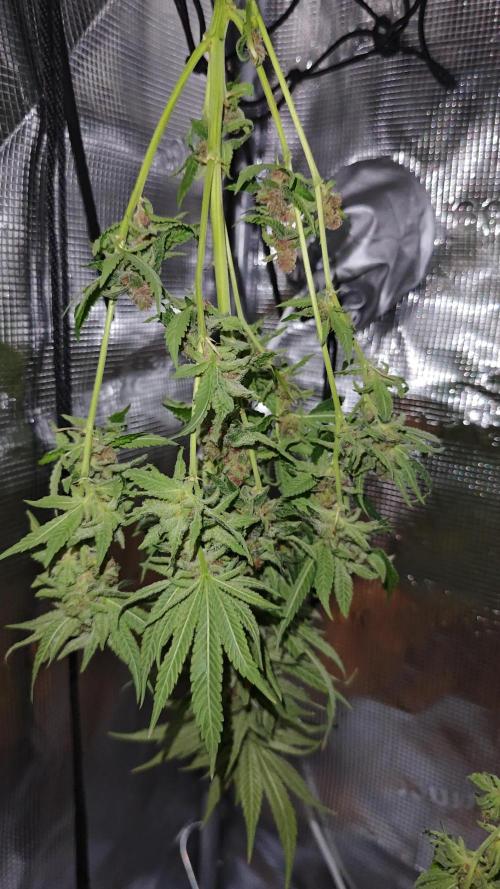
Harvest day has finally arrived.
Looking back, this grow was anything but perfect. There were setbacks, mistakes, pests, equipment issues and plenty of moments where things didn't go according to plan. But that's exactly what made this journey so valuable.
After harvest, the plant was hung upside down to dry inside the tent for 10 days. Once she reached the right moisture level, she was carefully trimmed and transferred into glass jars to begin the curing process.
Seeing the dried flowers after everything this plant has been through is incredibly satisfying. Now it's time to slow things down once again and let patience do the rest.
A huge thank you to everyone who followed along, left a comment, shared advice or simply stopped by. Your support and encouragement have meant a lot throughout this journey.
The journey isn't quite over yet. Now the cure begins, and I'm looking forward to seeing how the aromas, flavors and effects continue to develop over the coming weeks. 🌱💚
