


Likes
6
Share


@Thckaos
Follow
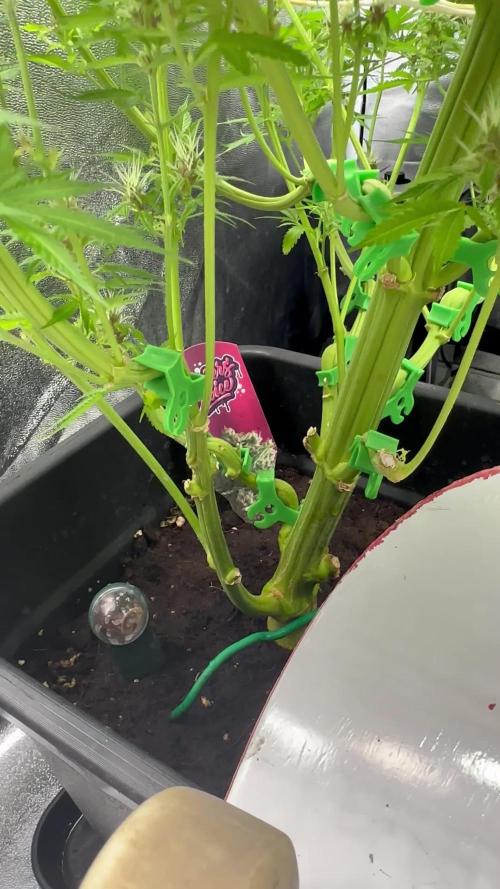
10-08-20 Se comprueba los parámetros y la solución se mantiene bien. No se cambia.
Se realiza a la 2 poda apical y a todas LST
12-08-20 PH: 5.5 y Conduc: 1.7 ms.
Se realiza poda de las ramas más bajas a todas las plantas y de nuevo LST a las que no tiene poda pical.
14-08-20 PH: 5.6 y Conduc: 1.78 ms
16-08-20 PH: 5.5 y Conduc: 1.9 ms
19-08-20 PH: 5.4 y Conduc: 2.25 ms. Se cambia de solución y semana ya que ha llegado a sobrepasar 2.2us

Likes
13
Share


@Marquise_ao_Sul
Follow
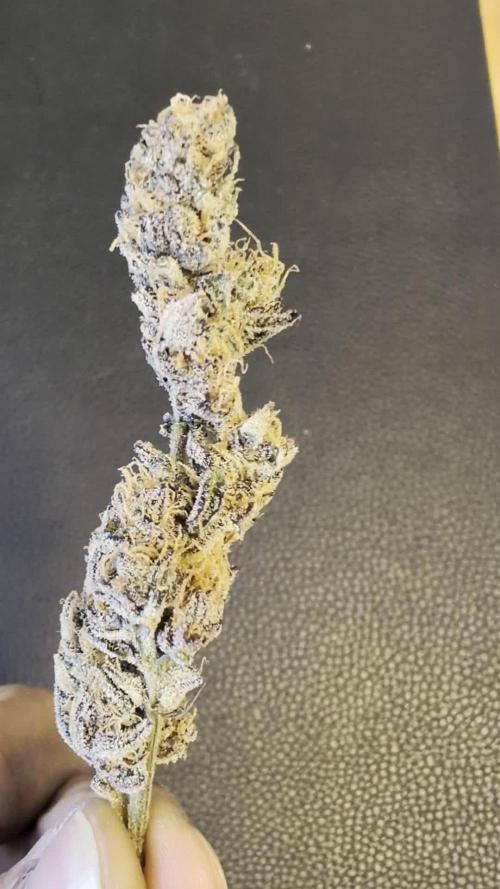
Last week of flowering and will be cut !!! Very well formed by dense heads along the branches. I just cut one top of the plant and it gave very good results! I smell the fruit!
I have made some flush due to nutrients that i gave during flowering...💪

Likes
7
Share


Likes
28
Share


@eldruida_lamota
Follow
Venga familia que ya viene la cosecha de estas Apple Fritter de ZamnesiaSeeds, que ganas que tenia ya de darles machetazo.
No veas que pinta que tienen estas plantas.
Las flores aparte de prietas se ven bien resinosas.
a sido una genética con la que disfruté mucho cultivarla, es algo complicada cultivarla pero merece la pena si eres cultivador con experiencia no te será problema cosechar.
Agrobeta:
https://www.agrobeta.com/agrobetatiendaonline/36-abonos-canamo
Mars hydro:
Code discount: EL420
https://www.mars-hydro.com/
Hasta aquí es todo , espero que lo disfrutéis, buenos humos 💨💨.

Likes
Comments
Share

@TheCalyxLaboratory
Follow
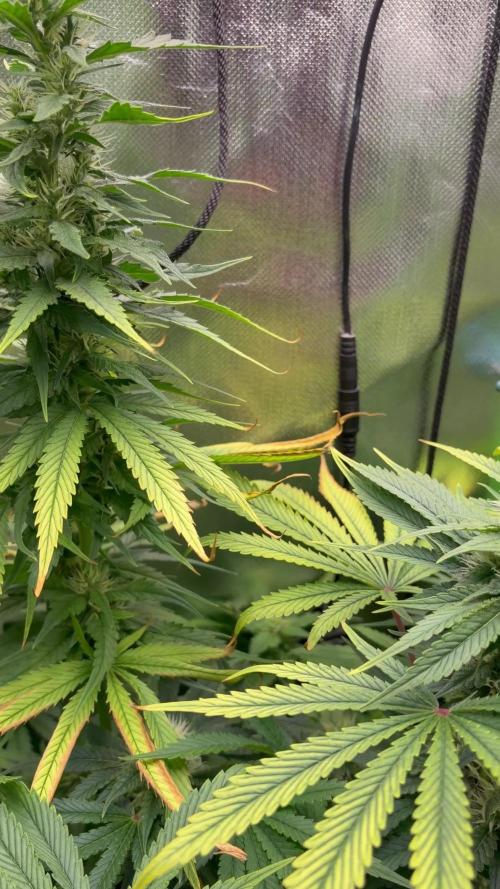
Weekly Update: Dialing it back in and managing the stress! 📊
This week has been a bit of a bumpy ride, but we are back on track! 🚀
Current Setup & Metrics:
pH: 5.7 💧
EC: 1.8
PPFD: 700 💡
What happened this week?
We ran into some visible stress symptoms on the leaves because my EC meter broke, which caused the nutrient strength to secretly spike up to 2.3 EC for about two days. As you can see, the girls didn't love that high-concentration shock, but we caught it, replaced the meter, and stabilized the EC right back down to 1.8. 📉
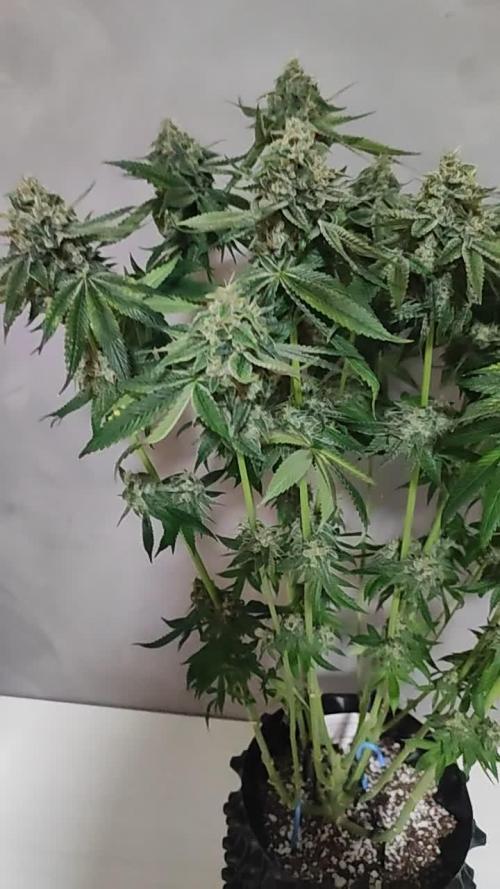
Plant Development & Bud Structure:
Despite the brief hiccup, they are pushing through the flower phase nicely, though they are showing different structures:
The first plant is forming very airy colas at the top, but looking significantly denser and tighter as you move further down the branches. 🌲
The more compact plant is developing exceptionally well overall, putting out really solid, compact, and frosty buds. ❄️
Now that the parameters are locked back in at 700 PPFD and 1.8 EC, we are ready for a smooth cruise through the rest of bloom! Let's see how they swell up. 🔥


Likes
15
Share

@Highsenberg82
Follow
03/28/2026
Sour Fraise is drying now. Temperature fits, humidity not. A little too dry 48% RH). Hope upcoming rain will raise humidity soon.
04/02/2026
Added the AC infinity Cloudforge T3 humidifier to the drying tent to keep RH around 60% (60/60 Method). So far so good. Still too humid for curing. Drying nice and slow.

Likes
4
Share


@GERGrowDesigns
Follow
Welcome to Flower Week 3 of Sweet Seeds Strawberry Cola Sherbet F1
I'm excited to share my grow journey with you from my
Sweet Seeds Project . It's going to be an incredible ride, full of learning, growing, and connecting with fellow growers from all around the world!
For this Project , I’ve chosen the Feminized Photo strain Strawberry Cola Sherbet F1 :
Here’s what I’m working with:
• 🌱 Tent: 120x60x80
• 🧑🌾 Breeder Company: Sweet Seeds
• 💧 Humidity Range: 50
• ⏳ Flowering Time: 7weeks
• Strain Info: 18-22%THC
• 🌡️ Temperature: 26
• 🍵 Pot Size: 16
• Nutrient Brand: Narcos
• ⚡ Lights : 600W x 2
A huge thank you to Sweet Seeds for allowing me to try my Best with this amazing collection from Photo Strains they managed to Sponsore . Big thanks for supporting the grower community worldwide! Your genetics and passion speak for themselves!
I would truly appreciate every bit of feedback, help, questions, or discussions – and of course, your likes and interactions mean the world to me as I try to stand out in this exciting competition!
Let’s grow together – and don’t forget to stop by again to see the latest updates!
Happy growing!
Stay lifted and stay curious!
Peace & Buds!

Likes
56
Share


@Ganjagrandaddy
Follow
Day 35: Good say growmies.
I hope we are all well in these odd times.
The ladies have been very busy this week with plenty of action on the L.S.T training and constant resetting of the stakes to hold them down. Rhe only girl that won't be trained is the sweet cheese. I am curious to see how she does on her own as she has lots of growth tips poking out all over main. She is still low to the pots surface and only about 10 inches at the moment. Most of that has come about from this last week. She is still only displaying her sex pistils ( no not the band!) , at present but is approx 1 week behind the other plants.
Gorilla Girl #3 is doing well and not showing any issues. I did snap her main at the 4th node while doing the video but am hoping she can offer some repair time to the clean snap with my quick repair job..( ooops). Thankfully it is where she would have been topped anyway so the two nodes have now got a chance to flourish more.
Gorilla Girl #2 is still the biggest of the group and has been pushing all her stakes out with her strength. She is in flower now without doubt but only by a few days. I am hoping the stretch period will boost her height now too. she has a lot of growth tips to become buds too.
Gorilla Girl #1 is chasing the #2 for top dog and looks good. she has also just about started to show flowers properly now too. I expect she will put a lot more growth on before she settles into her mid flowering so I have high hopes for this lady.
Gorilla Girl #4 Still the smallest of the bunch but I have given her a nice bend to help get her lower limbs active and wanting..
The whole group had a full watering to runoff a few days ago and so far , are more than happy to be left alone a few more days.
Be safe and well


Processing
Likes
18
Share


@Chitown_grower
Follow
We have reached the final weeks of flowering.. finally! This grow ended up taking waaay longer than I wanted, but live and learn. Probably chopping just about everyone next weekend.


Likes
5
Share


@RoyColt
Follow
Always R.O Water
Watering the plant 3 times for per week
1st Watering with nutriens.
2st Watering with nutriens.
3st Watering with only R.O water & CalMag

Likes
6
Share


@JoseTodoLoco
Follow
I am not that happy with this grow, plants are too small :( I have been very careful this time but looks like something I am doing is not right

Likes
46
Share


@Smokwiri
Follow
Doing great as you can see, flipped schedule to 12/12 hope it goes into flowering in a couple of days.
Plant is loving the rqs organic pellets in the substrate
Likes
15
Share

@Bncgrower
Follow
Another week is coming to an end, and we're getting closer and closer to harvest, and with it, those great results. 💪🍁
In these 15 days before harvest, I start watering only with RO water and a pH of 6.2. At the beginning of the last week, and about 3 days before harvest, I'll flush with RO + Cleanse 10mL.

Likes
5
Share


@BuddyHolly
Follow
Had some build up on roots. Cleaned and flushed with Athena cleanse. Switched to sterile nutrients for now. First week of flower. Strawberry auto is 2-3 weeks into flower. I’ll have better photos next week


Likes
2
Share


@PoppaGreenJeans
Follow
This girl is cruising along no issues. She smells really strong and is already frosty!
Likes
31
Share


@CrazyFlowers07
Follow
Plantas muy facil de cultivar y muy rapida .. en solo 9 semanas me saque en la #1 85g y en la #2 - #3 unos 50 cada una... en cada foto teneis el seguimento de cada planta desde la semilla a los cogollos.. consejo para todos de el banco de sweets seeds ✌️✌️