
Likes
Comments
Share
@SmokinTees420
Follow
Lowered PPM in nutes. Plants are starting to show more colors with a purple hue. Attempting to lower tent temps.

Likes
16
Share


@Sublyme_ness
Follow
To start the week i'm seeing the buds start to swell, i've also had to give a peroxide foliar spray to be sure i'm not going to be ingesting mites... shall see how it goes.
----
sprayed some dilute 3% peroxide mixed 2-1 with water. misted the shit out of it with distilled to get the humidity up afterwards the ladybugs were having a field day on all the water fleeing spider mites. see video


Processing
Likes
55
Share


@Max1973
Follow
Day 37 - Everything looks good.... they are drinking so much.... i built a bit more stable light setup, and i'll need to buy afew more plugs and stuff, to fill it out ...... i organised all the 2700k globes, ready to swap in..... still waiting on the exhaust fan, so i'll keep em in "grow" mode another week or 2 .... i'm vaping a leaf or 2, and drinking "green tea hot chocolates" .... it is so delicious in hot chocolate .... my health has picked up since starting the vape/drinks... the 21 thc/19 cbd is supa healthy ...
Day 38 - Getting them ready for Flower, noticed they are lacking in nutrients, so i started em on the heavier dutch master gold flower nutrients.
Day 40 - Added some pics. (they look droopy because they in night mode, just turned on lights for pic) - Started them on 12/12 flower, still working on getting all the lights, gear, and globes, for the right spectrum and amount of light.... atm got - 7x 2700k (click) , 2x 6400k (osram), + 60w light panel .... i'll go get some more gear today and hope to expand it to 10x 2700k , 2x 6400k ...... I put the exhaust filter fan on seperate power, so it doesn't go on/off with the timer, but stays on all the time.... it totally fixed up any odour problems, haha ....... Added some different pics for my light spectrum ... etc.....
the outside winter temp is now at 40-60oF (5-15oC) so with the 12/12h, the temp inside the tent is dropping to 60-80oF (18-22oC), abit low, but flowering is supposed to be in winter, so idk, see how it goes.....
I'm new to growing, so idk how this will work out....... just working it as i go.... i noticed afew spots on a leaf, so i upped the neuts abit more, they are still drinking like fish, huge amounts....
Day 40 late - new vids - Got the extra gear and installed it all... redesigned the initial setup, refined it with proper measurements, had to get my steel rule out, lol.......
got the 12 leds in and running, 10x 2700k clicks, and 2x 6400k osrams, with the panel..... it's lookin beautiful and got the exhaust on 24 hrs now, all working perfect with 12/12 timer.... they are forming a few spots on leaves, so hammering the nute water into them now... they are drinkin 1-2 litre of nute water a day each.... (nute water = Dutch mater gold one grow/flower, 800-1000 ppm 6 PH)
😎
Some details about lights.... i did some maths on it, and included some handy pics..... because i'm using cheap leds, i'm keeping the distance at 25cm, they are leds so they won't burn, and it massively increases the lumens/lux/Par, and with my home built light setup, the leds are spread out enough to keep it lower.... worked out good..... something of note is that all the led globes are built/made in china... however different marketing/selling companies from around the world... and the german osrams are 1w leds ... by far the most superior, but anyone can design and send the requirements to china to build em, haha) it's not a contest, we all work together.... haha.... the person with the best led light globes gets my business, because i want the best for my babies.... :)
(let me explain- 1w led vs 0.5 w led, the watt of the led projects the light, lumens, LX/PAR etc much further the higher the watt of the led....my 600w panel has 0.5w leds, the philips has 0.75, the osrams have 1w leds..... )
each globe
philips (dutch)- 10.5w
internal - 14 leds 0.75w
1055 lumens
each globe
osram (german)- 10.5w
internal - 10 leds 1w
1080 lumens
each globe
click (cheap)- 9w
internal - 16 leds 0.56w
800 lumens
light panel - 70w - 600w
30 red - 8 red
12 blue - 8 white 7500k
1 ir - 1 uv
= 20x blue 6400k - 38x red 2700k
internal - 60 double leds - 120x0.5w
6000 lm
Likes
9
Share


@Glen1818
Follow
Its Week 9 , i flush them once with AN Flawless Finish, i will cut them when most trichomes are cloudy and a few amber , should be in 7-10 days ready

Likes
17
Share


@Naujas
Follow
116 dienų!!! Tiek laiko praleidau su šia gražuole, kol ji atskleidė visą savo grožį :) Jos aromatas toks, lyg būčiau apsupta citrinmedžių, niekada nejaučiau tokio stipraus citrinos aromato, Visa mergina gavo @Plagron maistinių medžiagų, kurios jai labai patiko :) Už tai gavau 338 gramus šlapių, tvirtų žiedų, ir daug labai saldžių lapų, iš kurių gaminsiu burbulinį maišelį :) Neabejoju, kad ji bus tikrai skani ir stipri :) bet teks dar šiek tiek palaukti, kol ją paragausiu!!!! Jos žiedai labai pilni lipnių, kvapnių trichomų :) Rekomenduoju išbandyti – nenusivilsite :) Sėkmės visoms, o mano spintoje jau išdygo naujos merginos, tad iki pasimatymo kituose tinklaraščiuose :).
Likes
1
Share


Likes
28
Share


@xmackobox
Follow
Bien pues el domingo 15/05/22 hice defoliacion con 66 dias desde la germi. Hoy lunes por la noche, las pongo ya a 12/12 y que empiecen a florecer. Considero que estan robustas y fuertes para la etapa de flora.
Me lie con stories y videos y se me paso hace fotos detelladas para aqui... lo siento, os dejo las stories y fotos de esta mañana
Creo que vamos a ver buenas cosas aqui :D
Son 10 Tropicanna cookies con 48 dias desde la germinacion y 5 MAC, 4 Bannana wafflez y 1 Apple friter con 67 dias desde la germi.
Hoy lunes 16/05/22 por la noche las paso a 12/12
Todo de GBSTRAINS abonado con BOOM NUTRIENTS bajo los paneles LED de GBLIGHTING
GB THE GREEN BRAND

Likes
26
Share


@Mr_und_Ms_Lue_Roots
Follow
Herzlich willkommen in Woche 7
Im Moment sieht es sehr GESUND aus ^^ 😀
Der mS- Wert von 0,8 zu Anfang, war schon echt knirsch 😅 Gestern gemessen war der Bodenwert bei 0.7 mS
Daher haben wir die letzten 2 Tage erstmal mit PH- angepassten Destiliertem Wasser gegossen. Trinken tun sie wirklich gut. Düngen tun wir aktuell nicht.
Insgesamt freuen wir uns auf die kommende Woche und wünschen somit allen eine angenehme und erfolgreiche Woche!
VG ✌️

Likes
4
Share

@Chrisbowa
Follow
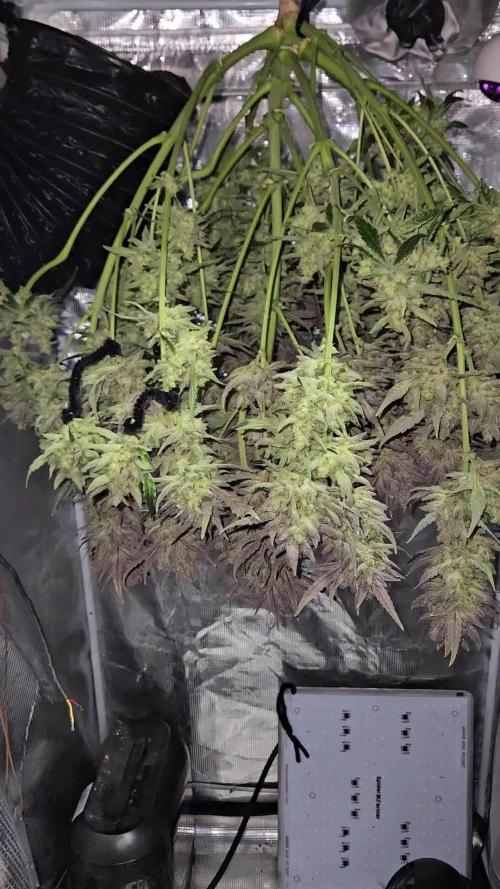
May 3 - 6 Today is Graduation. She went from a little green seedling to a beautiful colorful overweight adult. She smells and looks great 👍. I'm pretty sad to cut her down, but she says she's ready and wants me to taste her sweet flavor. So I'm doing it. I will do some wet trimming and hang the plant as a whole. I also grew an experiment plant in a 16 oz container that I didn't showcase in the same tent. "Tropicana Cookies" I'll show a Pic and vid. I think I have the growing part down ok, So now let's hope 🙏 I get the drying part finished without issues 😅.
Likes
6
Share


@Back_woods_buds
Follow
I don’t know it’s just me but it doesn’t go out there doing much hopefully they’ll start fattening up

Likes
8
Share


@nelgrow
Follow
Ho iniziato ad implementare fertilizzanti perché alcune foglie si stavano ingiallendo...hps agro 150watt
La prima cosa che ho notato è stata la crescita esponenziale della pianta
Processing
Likes
1
Share


@GoochFuzz
Follow
Explosive growth! Seems to be loving the coco. She took off week 4-5. And, alll of a sudden there were pistols showing all over her.
Appears to be doin great, having fun with the daily LST she's requiring with the rapid growth.
Managed not to snap any more branches off.
Got a mars hydro TS100 in the tent now and she's loving it.

Likes
11
Share


@BruceBlack
Follow
This week they started show va lot of yellow leaves, I was addind some more nutrients since I Think they can still fatten a bit more.
On some of them you can see there are some crunchy leaves , which bothers me a bit.. is it normal?
One of them is not drinking that much water lately so I'm just feeding it with water, hopefully I can harvest it within a week a or less, the rest of them are still drinking a lot so I'll keep feeding them with nutrients but with only 2ml/ Lt
Smell is super strong and even with the carbon filter the whole room smells like poison, hahaha, luckily i the rest of the house smell it's barely noticeable
Looking forward to harvest and finish everything, this last period is has been the toughest cuz I need to know when exactly to start the root wash

Processing
Likes
Comments
Share


@Greenbean15
Follow
Growing well, starting to see some trichomes development. This girl really stretched out, loving her size.
Lots of bud sites, I think this PT will be my biggest producer out of the three I’ve grown. Smells very flowery and fruity, loving how vigorous this plant is growing.
Likes
2
Share


@cafer
Follow
When I brought the LED lamp closer than 30 cm, the tips of the leaves of the plants dried up, fortunately they are fine now.


Likes
6
Share


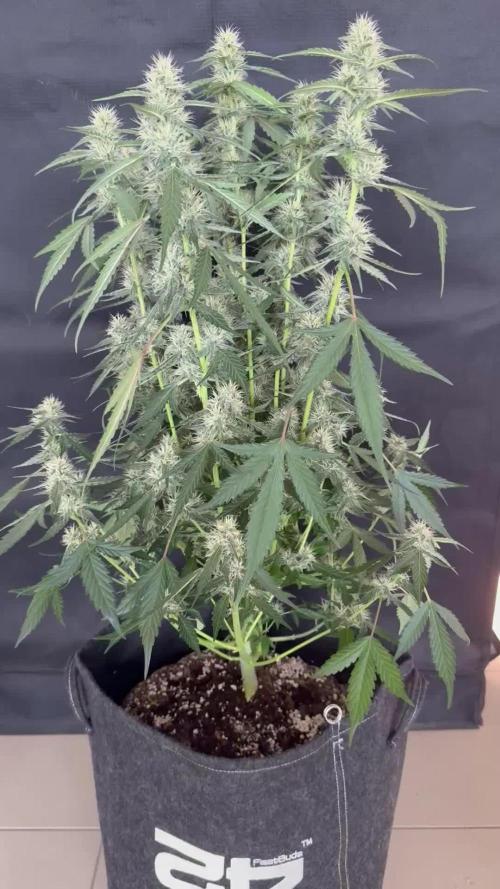
@AestheticGenetix
Follow
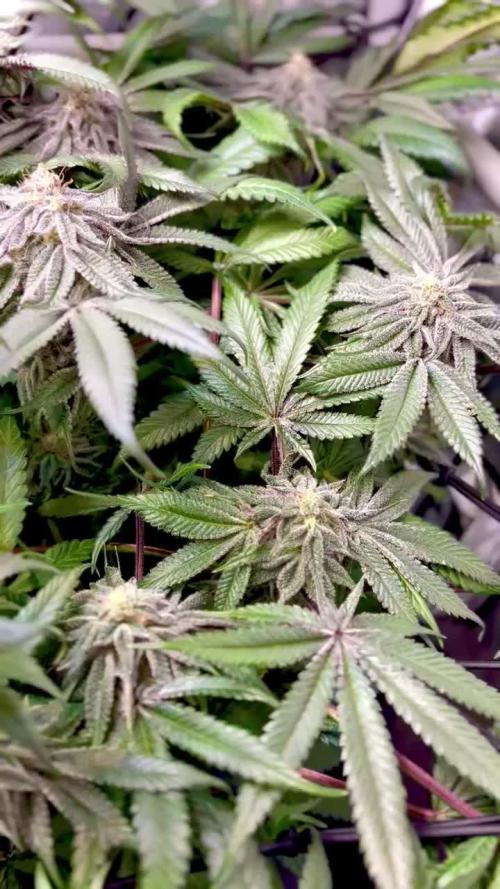
8/16/25 looks like she's gonna produce some chunky buds. Thick white trichomes everywhere on the plant. Seems like she would produce a decent yield


Likes
40
Share

@DE_BW
Follow
The Guava Runtz continues to develop exceptionally well, with strong bud stacking across the entire canopy and excellent overall structure. Frost production is now becoming more noticeable, as the sugar leaves and bud surfaces are steadily coating themselves in resin. With plenty of fresh white pistils still present, she appears to have a lot of potential left for further swelling over the coming weeks.