Likes
Comments
Share
@TechDCo
Follow
04/03/2026 
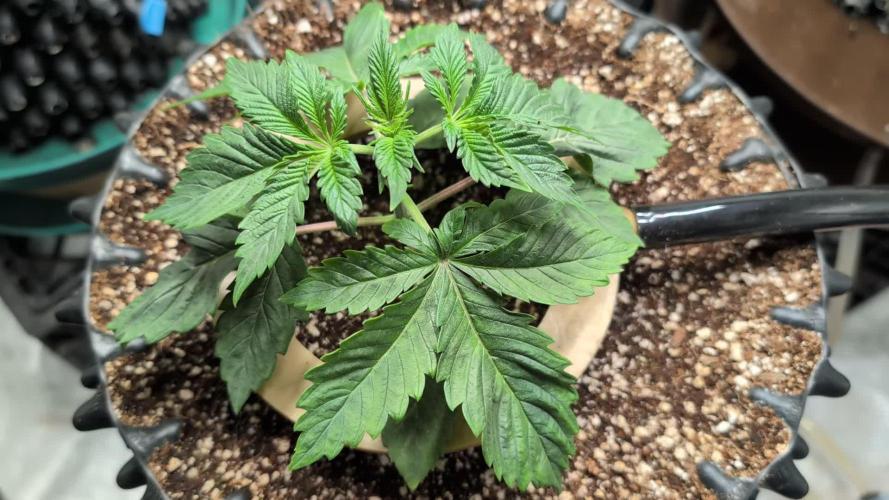
Switched to flower week 10 of vegetation! Now we're off to the races! Finally! .... 05/03/2026 Supercropped some colas and tuck some under the net! Table-Top Canopy! .... 06/03/2026 Added 5L of Sensi Bloom 4ml/L + 20ml of Hydrosol liquid Feed! Suppercropped another 2 colas. 08/03/2026 #Back to The Future - DC Seeds: is already showing signs of pre-flowers it's only been 4 days since the switch over. I defolled a little and tucked the colas under 5h3 netting as she stretches. Bubblegum Femaleseeds No sign of flowering yet and to be honest she ain't ready! 08/03/2026 Midday - Secondary Scrog Net Added! Removed training wires. 09/03/2026 Defolled and tucked! 10/03/2026 Big defoll 11/03/2026
Likes
1
Share
Alla grande, inutile scrive.. le foto parlano da sole!! Ho dato una lavata all'impianto idroponico uscendo tutte le piante e facendo pulizia generale, sono soddisfatto fino ad ora.. un aroma molto buono, la resina è già abbondante
Likes
1
Share
I put the clones into bigger Pots once their roots were fully established. Immediately started LST and put in the clones at an angle so that light is distributed more evenly. Autos also growing well but Panty Punch is lacking because of crippled leaves. I still let her live to see how she develops. I plan to bend the clones in a circular shape so they grow into an even canopy.
Likes
149
Share
Hi all the happy people here in GrowDiaries. This is my second cultivation ever and it will be fun to try a bigger space than my closet grow. First, I'm just going to say I'm done with the construction of my new growroom. I put some pictures on the construction here in week one. The room is 2.14 meters by 1.7 meters and has a ceiling height of 2 meters. It provides a floor area of ​​3.6 square meters. I use a 54 Watt Lightwawe T5 for germination and 2 Pcs 400 Watt HPS lamps. I have a channel fan that replaces the room air about 40 times an hour to get a comfortable theme in the room, the air enters a fresh air intake from the outside. The air is purified through a carbon filter to then leave the room to the rest of the basement. Then I use that heat to heat the rest of the basement. I will use 8 pcs 15 liter Autopots to grow with and a 100 liter water tank that supplies the pots of water and nutrition. I will grow completely organically in soil and will watercure my buds to get the best possible medicine for me. But there are no cultivation rooms to be displayed here, so I continue with what is most important. Today I have put my seeds in my moisture dome and hope the seeds have germinated within a few days. I am very excited to see how the new growroom will work and how this Blue cheese Auto from Royal queen seeds will turn out. Blue Cheese automatic cannabis seeds are a cross of Blueberry Automatic and Cheese Automatic that has been perfected over five years of breeding and careful selection. The result is a feminized, autoflowering strain with superior yield, flavor, and effects to either of its distinguished parent strains. THC: 16% CBD: Low Yield Indoor : 325 - 375 gr/m2 Yield Outdoor: 60 - 110 gr/plant Height Indoor: 40 - 70 cm Height Outdoor: 60 - 110 cm Flowering: 7 - 8 weeks Harvest month: 9-10 weeks after planting Genetic Background: Blueberry x Cheese x Ruderalis Type: Sa 35% In 40% Ru 25% Effect: Cerebral and uplifting Climate: Mild .............................................................................................................................................................................................................................................................................................................................................. Update 2017-08-15. All 4 seeds have germinated and planted in small pots inside the humidity dome. I'm so glad it worked so well and now it's just hoping they'll start growing and become 4 big healthy girls :) ............................................................................................................................................................................................................................................................................................................................................... Update 2017-08-16. I have mixed my own soil today. Its 40% sieved peat harrow H2-H4 0-30 mm, 45% sieved peat harrow H4-H6 0-30 mm. 5% sand and 10% of compost soil. And i use 15% of perilite and mix it all together. ................................................................................................................................................................................................................................................................................................................................................ Update 2017-08.20. Nr1 and 2 grow and thrive. Number 3 just got rid of the seedpod and is folding out the sheets. Number 4 is a bit shy and can only be seen if you look carefully into the soil. ......................................................................................................................................................................................................................................................................................................................................... Update 2017-08-21. Nr 1 and 2 is doing well. Nr3 is trying to catch up and Nr4 is still shy.
Likes
79
Share
Greetings, fellow cultivators and green thumbs! Today, I'm thrilled to share the exciting journey of germinating the Epsilon F1 from the generous folks at Royal Queen Seeds. Buckle up, my friends, because we're diving deep into the art and science of bringing this beauty to life. Step one, the initiation ceremony: I submerged our precious seed in a water bath for a luxurious 24-hour spa session. Why, you ask? Well, it's all about hydration, my friends. This ritual kickstarts the awakening process, encouraging the seed to absorb moisture and activate those dormant life forces within. Now, onto the VIP treatment — the Soil Plug sponge. Picture this: a cozy, nutrient-rich haven where our Epsilon F1 can stretch its roots and prepare for its grand entrance. I carefully placed the seed into the sponge, and lo and behold, within a mere 24 hours, a tiny tail emerged. It's like witnessing nature's own magic show, right in my grow space! And then, the big reveal! Our little Epsilon F1 burst forth, ready to conquer the world. It's like welcoming a new member to the family, complete with cheers and applause. But wait, there's more! I've chosen to dance with Aptus Holland nutrients, my trusted sponsor and the organic mineral line that has never let me down. Because, you see, a plant's gotta eat, and I'm only serving the best. Now, let's take a moment for the traditional shout-outs. Big love to @James and Royal Queen Seeds for the Epsilon F1 hookup; this journey wouldn't be possible without you. Cheers to Grow Diaries for being the virtual garden where we share our victories and lessons. And of course, mad love to all my followers — your support is the wind beneath my plant's leaves. So there you have it, folks. The Epsilon F1 is awake, the nutrients are ready, and the adventure has just begun. Stay tuned for more updates, as we watch this green marvel blossom into something truly spectacular. Happy growing, and may your harvests be bountiful! As always thank you all for stopping by and for supporting me on this journey, i am super passion about growing and fell blessed to have you all with me on this new journey <3 <3 <3 Genetics - RQS EPSILON F1 Ligth - LUMATEK ZEUS 465 COMPACT PRO 
Food - APTUS HOLLAND 
 
All info and full product details can be find in can find @ https://www.royalqueenseeds.com 

https://aptus-holland.com/
 
https://autopot.co.uk/ 

https://lumatek-lighting.com/ With true love comes happiness <3<3<3 Always believe in your self and always do things expecting nothing and with an open heart , be a giver and the universe will give back to you in ways you could not even imagine so <3<3<3 <3 <3 <3 Growers love to you all <3 <3 <3
Likes
10
Share
Here we go, just about done now. Looking to harvest around the 30th. Smells great and is looking great as well
Likes
13
Share
She is growing back out nicely and in a week or so I am starting on revealing her rootsystem First start has begun….🙏❤️
Likes
15
Share
The weather was better this week and the plant grew well :) It clearly tilts towards the window to catch the light. Day 13 picture is missing because I was not at home.
Likes
21
Share
Meine Frau musste gießen. Leider alle ertrunken. Deshalb alle nochmals neu. War aber nicht schlimm. War ja nur 1,5 Wochen alt. Jetzt neue und sehen gut aus. Lets start again.💯 Problem war auch die Kartontöpfe. Trocknen sehr schnell aus. Jetzt Kunststoff.
Processing
Likes
23
Share
* ********* Week 11 - June 20 to 26, 2020 - Days 71 to 77 from germination *********** * It is the end of flush week and she went into darkness on Wednesday night, day 75, for two days. Saturday will be harvest day and start and the dry process👍 She has certainly been going through the beautiful stage of senescence and her fade is gorgeous. The purples and yellows coming out are great......covers up the brown spots😂😂 Her buds are densing this week as we work on bring down the humidity. Running in the mid 60’s for humidity late in flower is a different experience and one that takes some getting used to. Bring down further to low 50’s has really helped to bring out her frost as well. Kept the humidity high to form big buds......now lowering to make them more sticky👍👍 I am feeling very strongly that the big part of the pH issues this run was a change in feed water. I have always used bottled RO water for all my grows, except outdoors, but this grow I switched to tap water. Dechlorinated the water with air stone and gave it 24 hours min before using. Wanted to save some money and tired of lugging bottles downstairs a couple of times a week☹️ This is worked out nicely and a lot more convenient. However, the city must be putting some crap in the water that is causing issues in my media and raises the pH after the watering. Out of the tap it is 8.4pH and 275ppm. Since ppm were not too bad in my opinion I moved forward without filtering the water.......oops🤬🤬🤬 Out of options on what is causing the issue, I switched back to RO water late last week........all the girls are happier!!!! F......missed the cause for weeks. Always learning from this plant and my own mistakes to get better every run😉👍 Also wanted to add a little more stress to girl to help push out some increased resin. I drilled a 5/16” hole into the main stem to cause her stress. I did this rather than trying to break a branch and will see how it goes this run. Sterilized a new bit in Alcohol and went for it. They went into darkness about a couple of hours later. Excited to see what happens when she comes out to get chopped😃😃 Little more detail...... June 20/20 - Day 71 - Rezin and Liquid Weight @ 2ml/L = 285ppm and 4.0ph - 8L given to get a good flush - Runoff in pots already were 7.8pH and 485ppm. - after 8L water runoff was 7.0pH and 370ppm. - she is 29” tall and 30” wide. - tricombs still mainly cloudy.....review again in couple of days. June 21/20 - Day 72 - Dry out day - buds are firming up......squeezed a couple🧐 - temps are nice outside so tent able to hold 75 degrees and 51% humidity. June 22/20 - Day 73 - Rezin @ 1ml/L = 120ppm and pH the water to 2.7!!!!!!!!! - Given 2L watering. - No runoff water and I am good with that as I want the low pH water to stay in the medium. - She will be ready soon. Thinking darkness on Wednesday and harvest on Saturday?? June 23/20 - Day 74 - 2L plain water feed - 80ppm and pH to 2.4!!!!!! - not excited about these crazy low pH numbers but doing what we can - her tops are getting really pointy now and her leaves are very yellow. - checking tricombs, I think we are done and tomorrow will be her last day so that I can take down on Saturday. June 24/20 - Day 75 - 2L plain water feed - 80ppm and pH to 3.0 - Going into darkness tonight so this was her last bit of moisture. - drilled a hole into the stem.....was going to do a couple of holes but not trying this method before I decided to leave it with one hole. - into darkness tonight So we finish up the week with her in the dark. Next update will be the harvest!! Thanks very much for taking the time to review my diary!! Sorry for running behind often on this run.........everyone has had a busy life the last couple of months in the world and its been no different here...........a huge Kudos to all the Growmie‘s that are able to keep up with their diaries on daily basis on GrowDiaries.......its a commitment😃👍👍 Mephisto has bread a very nice girl. She is big and sticky and grown very well considering the environment she has been given. Battling the high pH and still turning out as she has is awesome and much respect!!!! Great job Mephisto, can’t wait to run her again.......just so happens I have several more seeds of her😃👍
Likes
5
Share
@GoodBudz
Follow
Transplant to 3g -----> LOVE TRANSPLANTING!! Gives you a chance to check the root ball, you don't want to your girls to be root bound. The right size pot for the plant is crucial for a plant to remain healthy its entire life cycle. Using a tote works great for mixing the Cocoa Coir bricks in. Transplant went well and root mass looked awesome! You don't want to see your roots wrapped around a million times as that is what is referred to as root bound. I could have transplanted sooner as there was some wrapping of roots. Hard time getting feeding under control. Each plant started to absorb its own different amount each feeding. Mid to end of the week clear signs of overwatering and again was battling the heat issue caused by the lights. Deficiencies were starting to show.
Processing
Likes
20
Share
This is a strain that is very easy to grow and resistant, after the fourth week it sticks a lug, and does not need a lot of vitamins, it grew with only 13 and 12 hours of light and went through cloudy days and a lot of humidity
Likes
18
Share
The cycle of the strain is really easy too grow given the correct conditions. Overall great strain too grow I found a few issues having a mixed strain photoperiod/autoflower tent whichbin future will not be happening again. Flower at end not all there the heats being experience has been hard too control but stil pushed through. The younger bonsai got the chop days earlier with the older tropicana too follow, I'll be returning too the tropicana ff range too run only ff range too get full potential in future and focus on those solely. The end flower was hit with high heat but has been put in for a long cure too see what we can save wheather that be for rosin or flower 🌱 Dry weight after the high heat it's been put through was roughly 38gran for the older girl and just over 26gram for the shorter bonsai with around a total of 64 excluding testing smoke what not...
Processing
Likes
15
Share
Week 5 begins! Plants looks good, the blueberry didn't dry up as much this week, but she's still the hungriest of the bunch. Both OG Kush plants stepped up their consumption, the pots were much lighter than the last 4 weeks come feed time.
Likes
44
Share
love this strain it grows easy just quite tall and dosnt like too much training I expected a lot more than 4oz and 6g of her as she was in a 30l pot had a longer veg, time more space and more light I'm just putting it down to growing in soil lol my first time and as u guys know I'm a coco grower but as said on previous diaries I have dried with a higher temp than usual so maybe lost some weight through that otherwise I'm always happy with some gorilla I love it . thanks again to all the guys n girls that follow chat comment like and help thanks for reading happy growing guys
Likes
1
Share
Beginning of week.. She is doing amazing! Runoff is right where it needs to be.. leaves are looking nice and green with not so much leaf burning on the tips anymore.. new sets of leaves daily! Gonna need to lollipop a bit more. She should produce a decent harvest! So excited to see what she does in flower! So far, I've noticed that she is making some purple striped stiples at the very crown of each (future) cola! So so excited! Need to raise light up a bit.. I think she's getting over 1000 micromols at the center sine she has stretched a bit... Next day.. Whoops.. not sure how the hell she managed to stretch up to 1400+ micromols so quick.. had to raise the light quite a bit and also dim her down just a tad.. now the center is getting exactly 950 micromols in the center and around 650 - 700 micromols around the edges of the tent (footprint). Perfect! I noticed some purpling on a couple of the higher leaves.. these were the leaves getting over 1400 micromols and temps have been another lower than anticipated. So if she starts turning purple this early on, then WOW!.. She should make some pretty colorful colas! Mid week.. She really needs a haircut. She has grown a few nodes on each branch just in the last 7 days or even less. So beautiful! Humidity is being a bitch right now. Up to 70% and my dehumidifier can't even get it to drop a little.. ugh. Cold front blowing through as I type this, so hopefully it'll blow this moisture out by the end of the day. Pistols should be making a crown pretty soon! Still stretching like crazy. She still has plenty of head room for it.. but damn, I really need to get some of these leaves and lower branches out of the way. That should help bring the RH down quite a bit too.. I know she isn't THAT big, but it's still gonna take me awhile to trim her up.. kinda wondering if I could wait till next week and get it all done at once.. cuz I feel like she may need one more with the speed she's been stretching at. Next day... Went ahead and removed ALOT of foliage.. humidity should go down quite a bit.. these leaves give off a very strong skunky scent.. can't wait to see the terp action of this strain! "OoOo.. I 'member"