


Likes
Comments
Share

@DogDoctorOfficial
Follow
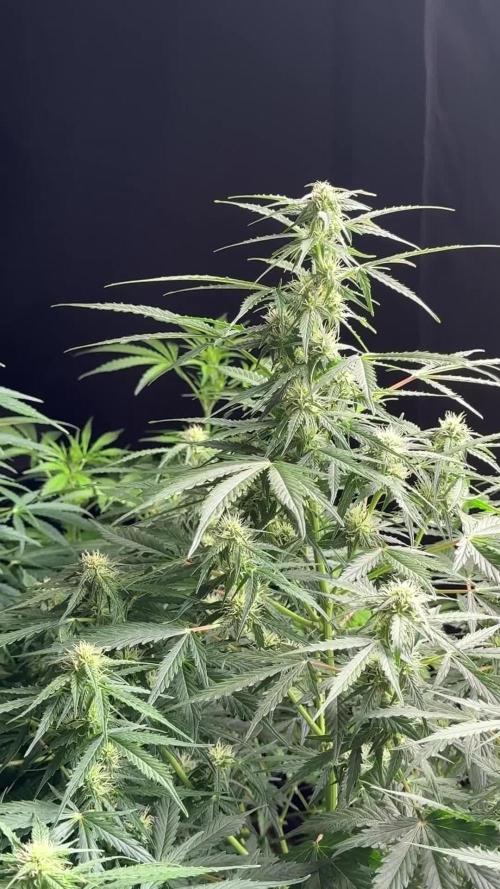
🌱 Ghost Train Haze — Week 9 From Seed
(Week 4 Flower | 12/12 From Seed — No Veg)
This week is one of those moments where you don’t guide the plant…
you observe it.
She’s not just growing — she’s expressing.
⸻
🌿 Structure & Expression
From the very beginning, this run was about letting the plant define itself under a 12/12 cycle — no artificial veg, no forced shaping.
And now we see the result:
• Strong sativa-dominant expression
• Long internodal spacing, but still stacking
• Large, beautifully structured fan leaves
• Upright, confident growth — no signs of stress
She’s currently sitting around ~1.6m, and still stretching.
Not aggressively… but purposefully.
This is what happens when a plant is:
• Not overhandled
• Not overcorrected
• Simply supported
⸻
🍃 The Leaves (Worth Stopping For)
Those leaves… honestly, they tell the whole story.
• Deep green, fully saturated
• Clean veins, no deficiencies
• Wide spread = efficient light capture
• Slight red petioles — genetic expression + intensity, not stress
You don’t touch leaves like these unless they ask you to.
And right now — they’re not asking for anything.
⸻
💡 Light & Environment
To adapt to her vertical push, the whole room was raised slightly:
• PPFD: ~1600–1700 at the top
• Still within tolerance because:
• She’s actively stretching
• Metabolism is high
• No signs of light stress
Environment holding steady:
• 🌡️ 28°C
• 💧 ~65% RH
• Outside contrast: cold + humid (10°C / 87%)
We’re not chasing numbers — we’re watching leaf response (VPD-driven).
And right now, she’s fully comfortable.
⸻
Feeding Strategy (Autopot + Support)
Reservoir (Mineral Base):
• Plagron Terra Bloom
• Green Sensation
• Power Buds
• CalMag (first in solution)
EC: ~2.9 – 3.0
→ High, but clearly within her tolerance
Top Feeding (Manual, occasional):
• Sugar Royal
• Pure Zym
Nothing complicated.
Just consistent availability + letting the plant decide uptake.
⸻
🌸 Flower Development
Week 4 flower and you can already see:
• Clear bud site definition
• Early stacking along the main stem
• Structure preparing for weight
She’s not rushing flower.
She’s building the frame first.
That usually means one thing later on:
👉 Potential for heavy, elongated colas
⸻
🌱 Why This Works (No Veg Insight)
Running 12/12 from seed on a plant like this does something interesting:
• The plant skips horizontal bush building
• It prioritizes vertical structure early
• Energy goes into:
• Stem strength
• Root establishment
• Early reproductive readiness
For genetics like Ghost Train Haze (naturally large, vigorous):
👉 This approach helps control size without suppressing expression
Outside, this would easily become a monster.
Here, we’re letting her be big —
just within a controlled ceiling.
⸻
🔮 What to Expect Next Week
• Stretch should begin to slow down
• Bud sites will start:
• Thickening
• Connecting
• Nutrient demand may stabilize or slightly increase
• Watch:
• Light distance (she’s getting close)
• Airflow through inner canopy
No major interventions planned.
We continue observing.
⸻
🤝 Gratitude
To everyone walking this path with us:
• The OGs who’ve been here from day one
• The new eyes discovering the journey
• The growers sharing knowledge openly
• The communities — inside and outside this platform
• The genetics, the gear, the support behind the scenes
And yes — even the critics.
If you’re here, you’re part of it.
From grower to growers. 🌱
📡 DELETED @ 1K Please stay tuned.we never quit https://www.youtube.com/@DOGDOGTHEDOCTOR NEW
🙏 Thank you for your patience and continued support.
FOR DISCOUNT CODES AND MORE JUST FOLLOW THE LINK https://website.beacons.ai/dogdoctorofficial
📲 Don’t forget to Subscribe and follow me on Instagram and YouTube @DogDoctorOfficial for exclusive content, real-time updates, and behind-the-scenes magic. We’ve got so much more coming, including transplanting and all the amazing techniques that go along with it. You won’t want to miss it.
GrowDiaries Journal: https://growdiaries.com/grower/dogdoctorofficial
Instagram: https://www.instagram.com/dogdoctorofficial/
YouTube: https://www.youtube.com/@dogdoctorofficial Deleted by Youtube
Vimeo : https://vimeo.com/dogdoctorofficial Under construction stay tuned ⸻
Explore the Gear that Powers My Grow
If you’re curious about the tech I’m using, check out these links:
🔆 Lighting & Environmental Control
• Future of Grow — Advanced LED lighting technology
https://www.futureofgrow.com/
DISCOUNT CODE: DOG20
• Lumiflora — Under-canopy LED lighting
https://lumiflorade.com/
• TrollMaster — Environmental controllers and automation gear (past collaboration)
⸻
Genetics
• Zamnesia Seeds — Genetics used in this project
https://www.zamnesia.com/
⸻
🌱 Soil, Substrates, Boosters & Root Support
• Plagron — Substrates, bio mixes, and supportive products
https://plagron.com/en/
⸻
🎒 Storage, Curing & Preservation
• Grove Bags — Curing and storage solutions
https://grovebags.com/
⸻
📸 Photography Equipment & Tools
(Not sponsors, but part of my creative toolkit)
• Sony A6700
• Sony full-frame macro lens + few more
• Stacking photography workflow - learning
• iPhone (for behind-the-scenes shots)
We’ve got much more coming as we move through the grow cycles. Trust me, you won’t want to miss the next steps, let’s push the boundaries of indoor horticulture together!
As always, this is shared for educational purposes, aiming to spread understanding and appreciation for this plant. Let’s celebrate it responsibly and continue to learn and grow together.
With true love comes happiness. Always believe in yourself, and always do things expecting nothing and with an open heart. Be a giver, and the universe will give back in ways you could never imagine.
💚 Growers love to all 💚
📸 P.S. – The Eye Behind the Lens
All photos in this diary (for now — except for the ones showing the camera, which I took with an iPhone) are taken with a Sony A6700 paired with a Sony full-frame macro lens and a few more.
Photography is part of the story — it’s how we share the fine textures, the glow, and the quiet details that words can’t always capture.
I’ve also started experimenting with photo stacking — a technique where multiple images, each taken at a slightly different focus point, are layered together to create one perfectly sharp image from front to back.
It’s not digital enhancement or AI; it’s pure photography — a way to reveal the plant’s beauty in microscopic depth, from trichome to petal.
You’ll even see a few shots of "ghost me" capturing the shots — camera, lens, setup — because every grow deserves not just to be cultivated, but documented like art.
FOR DISCOUNT CODES AND MORE JUST FOLLOW THE LINK https://website.beacons.ai/dogdoctorofficial
NEW DISCORD - Official Server Invite Link : https://discord.gg/ksjAkA5T74

Likes
3
Share


@420cfm
Follow
Haven’t been able to post for a bit. We’re through 16 days of 12/12; a week of transition and now done week 1 onto week 2.
The stretch on these is heavy. I knew this but my clones were taken a month early I figure. So they’re very tall in the tent and lights are as high as they’ll go. We should be close to the end of stretch this week so here’s hoping we can make it work.
Super happy with this grow. Nice and clean and tidy is the game. Bottoms are clean. Lots of nice lush green growth and flowers are really coming on now. Will do a heavy defoliation at day 21. Did a heavy defoliation at the flip.
Let me know your thoughts!!

Likes
11
Share

@Tower84
Follow
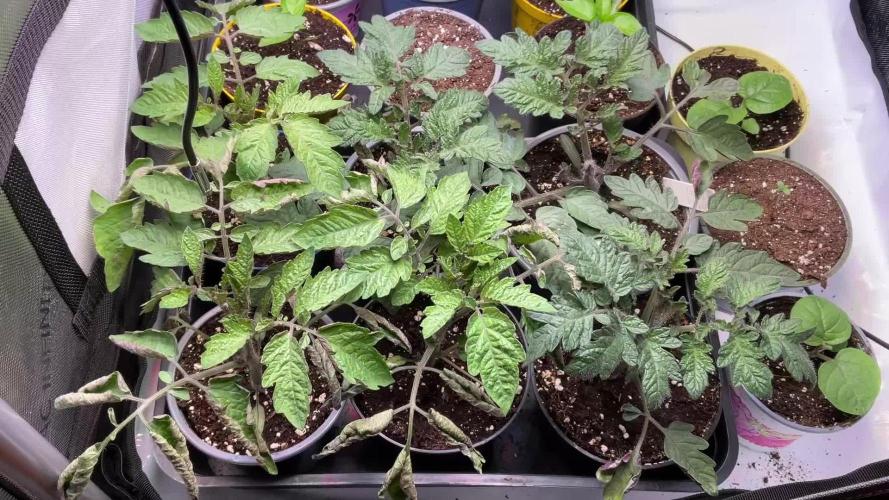
Week 3 – Tomato Grow (Primabella & Sunviva) 🍅🌱
This week I made a selection and reduced the number of plants from 11 down to 6.
I ran into a bit of stress, especially with the Sunviva plants. Some leaves started curling and showed slight damage – most likely caused by too much direct airflow from the fan (wind stress).
Adjustments made:
- Fan reduced from level 2 → level 1
- Fan raised higher to avoid direct airflow on the leaves
- Plant positions rearranged for more even airflow
Since then, the plants seem to stabilize. New growth is coming in healthier, and I expect them to bounce back fully.
Environment & Setup:
- Light: SANlight still running at level 2
- Watering: approx. every 3 days
- Amount: ~250 ml per plant
- Nutrients: water + BioBizz Root Juice
Overall, growth is still solid. Structure is getting stronger and the plants are starting to fill out nicely. The stress slowed them down a bit, but nothing major – should be back on track quickly.
Looking forward to week 4 🌿
Likes
5
Share


@84ruk
Follow
Está 5 semana de vegetación la planta dejó de estar en indoor y fue puesta en el patio, aquí recibe el sol de 11 am a 4 pm, al parecer se está espigando un poco pero en mi indoor estoy cultivando plantas automáticas correctamente desde el principio para mejorar la producción.

Likes
1
Share

@ChronicNerve
Follow
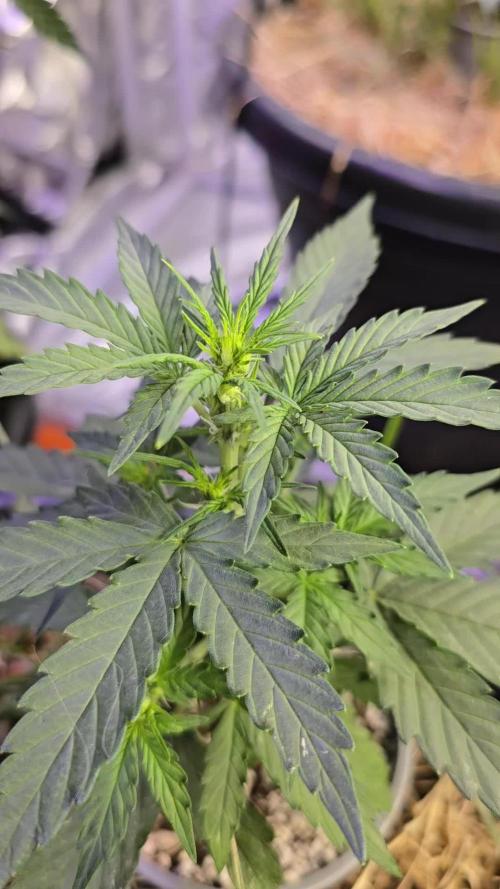
Looking nice and Uniform again. Now that they need more light than the Spider farmer 100w can give I haven now moved them into the main tent. I also sprayed them with a fish mix and alg-a-mic formulae in which they both seem to react to rather well.

Likes
6
Share


@RegadorDeCactus
Follow
BIGGER:STRONGER:FASTER
#OUTDOORGANG
#NITROHAZE
Transplante a 25lts
20 de mayo brotes nuevo en cada nudo.
Necesito consejos de corte apical ... para ver en que semana es mejor
Se comenzó un Stress de riego para que el sustrato seque y pueda luego volver a hidratar. Así puede expandir sus raíces libremente y no se mantiene el sustrato duro.

Likes
16
Share


Likes
33
Share


@BADKUSS
Follow
Hello everyone,
the plants are still very good, no deficiencies in sight and canopee rather homogeneous.
the stretch is soon over and I'm going to be able to stop the growing fertilizer, for which is knitting, I finished and let nature now play ...
Now place to photos ...
Likes
29
Share


@JeyGanesha
Follow
Anche lei è l'ultima settimana di lavaggio radici.......oggi 29/09/2024 taglio questa Ayahuasca purple...ha un profumo fortissimo....
Oggi probabilmente inizierò a pulire tt le cime e poi.via un taglio netto 😂🤣😜👍💪

Likes
2
Share

@kdifiori_
Follow
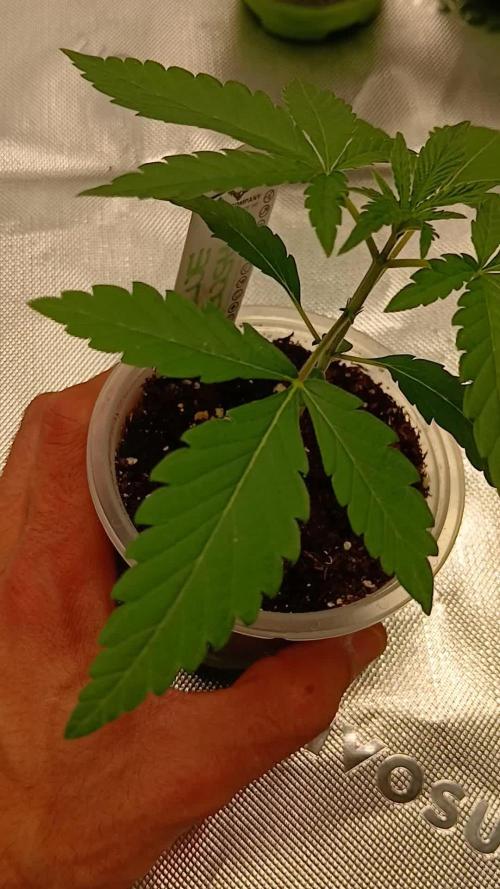
First week after germination. Lamp on 25%.
This little one is healthy and has already drunk half a liter of water this week. She’ll be moving into her new home soon.
The Batmix is ready to welcome her.
Stay tuned!



Likes
10
Share


@Nientjexo
Follow
Hi All,
Week 8 of growing this beautiful plant.
Looking back to week 6 this plant has definitely become bigger and stronger.
Assuming to the size of the buds it is almost ready to harvest. They look healthy and are smelling good.
Still not giving any nutrients since i wanted to see how they turn out without them. In my point of view they look great.
Happy growing!
xo Nien


Likes
10
Share


@Troy_Farms
Follow
I pollinated a side bud of this girl and her seeds are developing quickly. Which is exciting for the sake of future grows. Other then that the buds are not super big at all but look super quality so I am happy with how things are progressing. As the week comes to an end the trichromes are really coming in and she is starting to smell very nice. I think one more week of flowering to fatten up a little more and then I will flush to finish. I learned that I started to feed flowering nutes to early and so my first two autos did not get super tall as a result.
Learning a lot with my first indoor grow and first time with autos, I read a really solid breakdown of Autoflowers lifecycle that was super informative. I'll leave here, and post it with my final harvest post here. Knowledge is power 😎
LIFECYCLE OF AN AUTO
A common question I see is when to switch autos from veg to bloom. Many people are under the impression that as soon as they see the first flowers it's time to switch. Perhaps a little explanation of the life cycle of autos will help to clarify this.
Weeks 1 - 3. Once you've started your seeds and they break the surface of the soil, they are in their seedling stage. The first set of leaves to appear will usually single fingered, followed by a second set that may still be single fingered or perhaps 3 fingered. Once that second set appears growth will start to accelerate as the new leaves provide more photosynthesis. This process will continue, more new leaves, faster growth. Depending on the type of soil in use, mild vegetative nutes can be introduced at week 2. By week 3 most plants will start to show their sex. Males will start to produce pollen sacks and females will display pistils.
Weeks 4 - 6. The plants are now entering a pre flowering stage. During this time the plants should exhibit explosive growth, often as much as a new set of nodes and 1" vertical growth a day. This is the time when they will gain most of their vertical height. Many people make the mistake of switching from vegetative to flowering nutrients at this point, assuming that since they see flowers it must be the proper time. This is incorrect. If the switch to flowering nutes is made at this time the vertical growth will stop and the plant will put it's energy into producing buds. If you need to keep your plants small, or want them to finish earlier, they by all means switch nutes at this point. But if you want to get the most out of your plants continue feeding vegetative nutes until you see the vertical growth slow and stop. Depending on the strain that will usually be sometime during week 5 or 6.
Weeks 7 - 9. By now vertical growth has stopped and the switch to flowering nutrients has been made. The buds will start to fill out and put on weight, becoming hard and tight. Pistols will start to change from white to brown, orange, red, etc. By now the plants will also have developed a strong smell. Toward the end of this phase the large primary and smaller secondary fan leaves will begin to turn yellow. This is an indication that the plant is moving toward the end of it's life.
Weeks 10 - 11. At this time flowering nutes should be discontinued and only plain pHed water fed to flush the remaining nutrients from the soil and improve the taste. Yellowing of the fan leaves will continue as the plant draws the stored energy from them. Eventually they will die and fall off. By the time that the smaller leaves that come from out of the buds will also start to turn yellow. Then it's time to harvest.
I know that many of you are thinking that the seed bank said the plants will finish in 8-9 weeks, so why are you saying they take 10-11? The claims made by the seed banks are somewhat deceptive. If you switch to flowering nutes at week 3 or 4 the plants can finish in the times the seed banks say but they will remain small and not reach their full potential yield. Years of growing by myself and others has shown that autos do best if you follow this time line.
Of course, there will always be variations depending on the strain, the environment, nutrients, etc. This information is meant to only serve as a general guideline.

Processing
Likes
15
Share


@CannabisAprendiz
Follow
Hola con esta semana ya quedamos al dia con el seguimiento ya que estaba atrasado en el tiempo. Se nota una producción de resina notable en esta genética que nos ha gustado mucho por su olor y estructura de las plantas .
hemos creado un video por cada una de las 14 plantas del seguimiento, hay varias muy llamativas que están "pre-seleccionadas" para mantener a futuro, el olor que se llega a sentir es muy florar y dulce, si tienen alguna pregunta no duden en preguntar saludos.
Hello with this week we are already up to date with the follow-up since I was late in time. There is a remarkable resin production in this genetics that we liked a lot for its smell and structure of plants.
We have created a video for each of the 14 floors of the follow-up, there are several very striking that are "pre-selected" to keep in the future, the smell you get to feel is very flowery and sweet, if you have any questions do not hesitate to Ask greetings.
Likes
12
Share


@Mrs_Larimar
Follow
2023-09-19
I had to cut them a little earlier, than planned, because of one Plnat in the Room, that hermied.
Trichomes were milky/ some were amber.
So for me fine.
In the end of the Grow, the Plants had structureproblems, Buds went to heavy for the stems, and they needed
a corsage.
But MSNL mentioned that, i just underestaminated it.
Budswise iam very fine, Buds look crumbely but are dense and frosty.
UPDATE
october, 18th
I harvested the Outdoor Plants, that were finalising Indoors( last 4 Weeks.
and they were perfect!
super structure, solid branches ans stems
Buds HUGE dense and crusted with Trichomes
10 of 10 Points

Likes
105
Share


@Tropicannibis_Todd
Follow
Well growmies , that was fun , I really enjoyed doing a outdoor run this year , it's really too bad about how the weather played out , but still I ended up getting a bunch of jars of some frosty Buds 👈 and thats what matters .....
Thanks to Garden Of Green for the seeds ......
Would recommend to anyone, 👈
👉Big thanks goes out to all my growmies for sticking by me on my growing adventure 👈
And to NutriNPK Nutrients....
Well that's it's folks until next time
👉HAPPY GROWING 👈

Processing
Likes
6
Share


@Greenbean15
Follow
Lots of progress this week. Harvested my oldest purple trainwreck plant and moved the white widow into the ScrOG net in her place. Hoping for a big yield from this younger plant.
The lollipopped older plant is starting to swell, I’m thinking she has about 3-4 weeks left. I harvested the mother plant on day 70 and she had a nice smooth smoke that was great for the day.
Here’s to hoping for a good yield. Happy growing! 👩🌾🏼🌱
Likes
Comments
Share
@DogDoctorOfficial
Follow
💜 Week 7 – Purple CousKush Auto (Pheno A)
The One Who Refuses to Slow Down
Every grow has that one plant.
The one that simply refuses to follow the pace of everyone else.
While some of the ladies in the 8×8 Adventure have already shifted almost entirely into building flowers, this Purple CousKush still seems to have endless energy. She's stretching, branching, stacking flowers, producing fresh pistils and beginning to lay down the first noticeable layer of frost—all at the same time.
It's almost as if she decided that flowering wasn't enough.
She wanted to keep building everything.
Watching her evolve over the last week has been one of the highlights of this entire project. Every day she seems a little taller, a little fuller and a little more beautiful.
Some plants grow.
Others perform.
🌱 Week 7 – A Beautiful Structure Comes Alive
Standing at approximately 90 cm, she has added another impressive burst of vertical growth while maintaining the elegant structure that first caught my attention several weeks ago.
From a distance she almost resembles a Christmas tree, not because she's perfectly symmetrical from top to bottom, but because of the way her side branches rise evenly around a dominant central leader that proudly stretches above the canopy.
The main cola continues reaching for the light while the surrounding branches develop into an impressive collection of secondary tops, creating an architecture that feels both natural and incredibly efficient.
The stretch hasn't completely stopped yet, but it's beginning to slow enough that flower production is now taking centre stage.
Every branch is carrying healthy clusters of bright white pistils.
The buds are beginning to stack along the stems.
The first sparkling trichomes are appearing on the sugar leaves.
The transition into full bloom is now impossible to miss.
🌿 Different Genetics. Different Personalities.
One of the things I enjoy most about growing from seed is being reminded that genetics always have the final word.
Every plant inside this room receives exactly the same care.
The same environment.
The same nutrition.
The same lighting.
The same attention.
Yet every phenotype tells a completely different story.
Some stay compact.
Some stretch aggressively.
Some begin stacking flowers early.
Others spend longer building structure before committing their energy to bloom.
Purple CousKush Pheno A has chosen her own path from day one.
Instead of comparing her with the others, I've learned to appreciate exactly what makes her unique.
That's one of the greatest lessons cultivation can teach us.
Success isn't making every plant look identical.
Success is allowing every plant to express its own genetic potential.
🍃 Plant Health
Health continues to be exceptional from top to bottom.
The foliage maintains a rich, healthy green colour with excellent leaf posture throughout the canopy. The stems have thickened considerably over the last week, providing outstanding support for what will eventually become long flowering colas.
The internodal spacing remains one of my favourite characteristics of this phenotype.
Open enough to allow superb airflow.
Close enough to create beautiful flower stacking.
Combined with the early Low Stress Training, the canopy now feels incredibly open, making light penetration and air circulation almost effortless.
Sometimes less intervention produces the best results.
💡 Lighting – A New Chapter Begins
This week also marks an exciting addition to the grow.
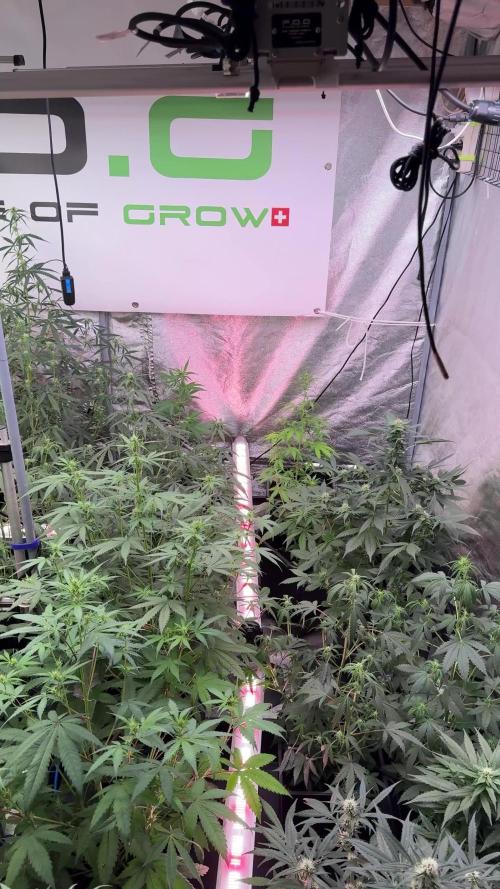
The Lumiflora under-canopy lighting system has officially joined the 8×8 Adventure.
While the Future of Grow Black Series LED continues delivering outstanding intensity from above, the Lumiflora bars now provide valuable light beneath the canopy, reaching lower flowering sites that traditionally receive far less energy during bloom.
For a phenotype like this, with long side branches carrying multiple developing flowers, under-canopy lighting has the potential to become a genuine game changer.
Instead of allowing lower bud sites to develop in shade, they now receive additional light exactly where it's needed.
It'll be fascinating to watch how this influences flower development over the coming weeks.
Sometimes progress comes from adding more light.
Sometimes it comes from placing that light in a smarter location.
💧 Feeding Program
Growing in a 15 L Plagron Lightmix container and hand-watered with approximately 1 litre per irrigation, she continues responding beautifully to her flowering nutrition.
Current feeding:
• Terra Bloom – 2 ml/L
• Pure Zym – 1 ml/L
• Sugar Royal – 1 ml/L
• Power Buds – 1 ml/L
• Green Sensation – 1 ml/L
Maintaining:
• pH: 5.8
• EC: 1.95 mS/cm
The increase in EC has been accepted without hesitation. Leaf colour remains perfectly balanced, flower production continues accelerating, and the plant shows absolutely no indication of nutrient stress.
When a feeding program is working this well, consistency becomes the most valuable nutrient of all.
🌡️ Environment
Environmental stability continues allowing every phenotype to perform at its full potential.
Current conditions:
• 12/12 light schedule from seed
• Approximately 850 PPFD
• Day temperature: 29°C
• Night temperature: 25°C
• Relative humidity: 60%
• Solution temperature: 21°C
• Root-zone temperature: 21°C
• CO₂: approximately 639 ppm
Stable conditions continue making all the difference, allowing the plants to dedicate their energy toward growth rather than constantly adapting to environmental changes.
🔍 Looking Ahead
Although she's beginning to slow her vertical growth, I don't think she's quite finished stretching yet.
Over the coming week I expect the remaining stretch to gradually fade while the flowers begin swelling much more noticeably along every branch.
The open structure she's built over the past several weeks should now become one of her biggest advantages, allowing every flowering site to receive excellent light while maintaining outstanding airflow throughout the canopy.
With the addition of the Lumiflora under-canopy lighting, I'm especially excited to see how those lower bud sites respond.
The framework is complete.
Now it's time for the flowers to fill it.
💭 Final Thoughts
This Purple CousKush reminds me that plants don't wait for each other.
Every phenotype follows its own internal calendar.
She isn't concerned with what the rest of the room is doing.
She's simply following her genetics, growing exactly the way she was designed to grow.
Watching that individuality unfold is one of the greatest rewards of growing from seed.
Every week she seems to reveal another layer of her personality.
Taller.
Stronger.
More elegant.
And now, finally, beautifully covered with the first signs of resin that promise wonderful things in the weeks ahead.
Sometimes the best growers aren't the ones who control every detail.
They're the ones who know when to step back and simply let great genetics tell their own story.
🙏 Thank You
A huge thank you to everyone following this 8×8 Adventure. Your encouragement, questions and shared experiences continue to make every update even more rewarding.
A special thank you to the incredible companies helping make this grow possible:
💜 Zamnesia for these fantastic Purple CousKush genetics.
💜 Plagron for providing the nutrition that keeps these ladies thriving.
💜 Future of Grow for the outstanding lighting from above.
💜 Lumiflora for bringing a whole new dimension to this flowering room with their incredible under-canopy lighting.
💜 TrolMaster for maintaining such a stable environment throughout every stage of the grow.
And finally, thank you to the entire GrowDiaries community. Every comment, every question and every visit makes this journey even more enjoyable.
Until next week...
Growers Love and happy growing! 🌱💚
Processing
Likes
24
Share


@rasta_puri
Follow
Finally did the last topping and achieved the shape i wanted so much! Can see the "H" on top, this gonna serve as base for the next following branches. quite symmetrical.