


Likes
Comments
Share

@zazazilla
Follow
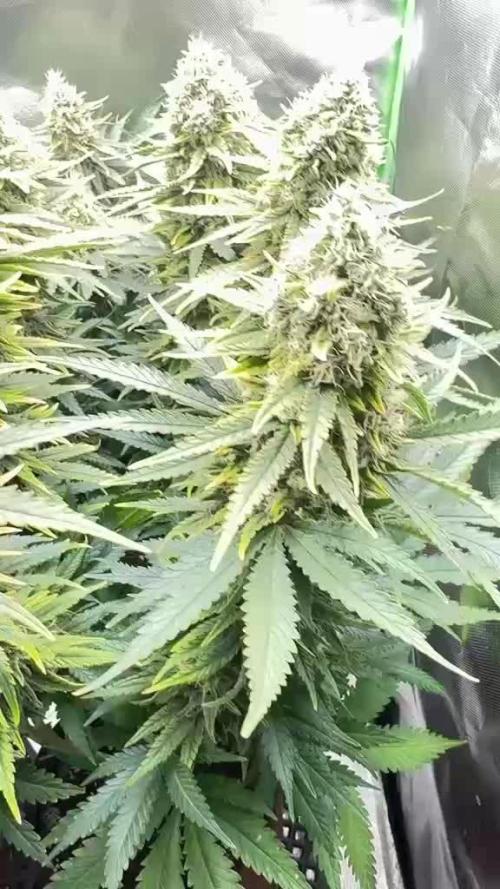
Den 69. Den 42. květu. Tento týden holky ještě pěkně dorostly, ale poslední tři dny už je vidět, že se růst postupně zastavuje a rostliny se soustředí hlavně na zrání a nabírání objemu palic.
Malý a velký Critical Orange Punch vypadají jako dvě úplně odlišné kytky, a to nejen vzhledem, ale i výnosem a vůní. Menší má krásně zbarvené oranžové pestíky a příjemnou sladší vůni. U toho většího jsem musel svázat korunu dohromady, aby se pod tíhou palic nelámaly větve. Manipulace už je docela o nervy, protože ty palice jsou opravdu těžké.
Frozen Biscotti má taky velmi pěkný výnos a palice začínají přecházet do fialových odstínů. Vůně se od minulého týdne zase posunula, cítím v tom zázvor a sladký podtón, připomíná mi to jemné zázvorky. Opravdu zajímavý profil a těším se na výsledek.
Trichomy se začínají pěkně kalit, zatím bych řekl půl na půl mléčné a čiré, jantarové jsem zatím moc nezaznamenal spíš jen na listech.
Na rostlinách je vidět lehké přehnojení, hlavně na sugar leaves, ale zároveň palice krásně nabobtnaly, takže už do toho nebudu nijak zasahovat a nechám to v klidu dojet. Teď už nemá smysl dělat větší změny.
Aktuálně se soustředím hlavně na stabilní podmínky, hlídám teplotu a vlhkost, aby všechno doběhlo bez problémů až do sklizně.



Likes
34
Share


@crystal_garden_0
Follow
End of week 4 , huge difference each week. Buds started fast, strong purple genetics showing instantly. Can't wait to see what happens. So far everyone is healthy and happy

Likes
15
Share


@Greenwolvesfarmer
Follow
Exactamente 1 semana puesta en el sustrato. La genética es bastante estable , ha tenido un buen desarrollo y progreso . Si que promete ! .
Se regó con agua a 20°C / PH 6.2 / EC 0.2
Entre unos 350cc a 500cc
Utilizamos 2ml para 3lts . El mejor bio estimulante del mercado, producto nacional #trichomemania , complementado con 2ml x 3lts de agua de poderoso enraizante / micronutrientes #deltaUno . Que ademas contiene un cóctel de vitaminas de origen vegetal ! Combinando las micorrizas de #quemanta ! Tremendo combo ! Los mejores productos :o

Likes
64
Share


@Prof_Weed
Follow
Heute startet die 9. Woche,nicht wie hier vermerkt die 12. Woche.
In paar Wochen starte ich dann mit Final Part von Terra Aquatica und Flash Clean um zu flushen.
Anscheinend braucht die 11 Wochen Blütezeit laut FastBuds Website.
Die Buds werden langsam fetter und die Pflanze ist super gesund.
Ec Wert des Wassers steigt von anfänglich 1.5 immer auf 2.5 sobald der Wasserstand runtergeht. Muss nach 2,3 Tagen immer ein wenig Wasser dazugeben.
Die Temperaturen sind für Indoor immer noch zu hoch,die Luftfeuchtigkeit ebenfalls.
Werde das nächste Mal Indoor erst im Oktober starten, wollte aber mal sehen wie das im Sommer funktioniert.


Likes
21
Share


@Cali_Grown_420
Follow
Start of week 11, ladies are doing good and continuing to fatten up. Looks like #2 is pretty close to being done. Going to let her run through Wednesday, then check on her trichomes. If we got more amber I’ll begin the 3 day flush and chop her down on Saturday. If I feel she can go longer I won’t start the flush until Saturday/Sunday. Plants #1 and #3 still got another two weeks or so before they’re ready to chop.
Day 72, I moved plants #1 and #2 to the front of the tent for easier access. They’ll be the first two done out of the 3 included in this journal. Also cleaned up some of the leaves on them to open up everything to light during these last 1-2 weeks. Still unsure if I’ll begin to flush #2 on Wednesday or wait till the weekend..
Day 74, checked trichomes and we still aren’t quite where we wanna be before I start to flush. I’m in DWC my flush is only about 3 days tops. We will check again start of next week and hopefully she ready.
Day 76, checked on #2 she still not quite ready. I will probably let her run through Thursday next week, begin flush then chop on Sunday the 6th.
Likes
6
Share


@santos45
Follow
I am very happy with 100% germination, looking to see how well I will do growing in Coco Coir. I also have a new Autopot system with air Domes.
Waiting for AC infinity Controller 69 with 8 ports, new inline fan and the famous Pulse pro.
Likes
13
Share


@NanoLeaf
Follow
Very happy with this strain, fast and frosty! Only going to become a better grower by working hard everyday.
Extremely pleasing smell and terpene profile.


Likes
16
Share


@HegauHillsFarmers_M11
Follow
Tag 63 - Beginn der 10 Woche.
Die Blüte reift! Die Buds sehen super aus, sind dick und sind ordentlich frostig. Der Geruch wird auch immer schärfer und intensiver. Die Blüten duften süßlich und man schmeckt auch das Diesel schön heraus.
Aktuell wird die Pflanze mit Flawless Finish gespült. Dabei gebe ich immer 1,5 - 2ml/l zum ganz normalen Gießwasser hinzu. Dieser Vorgang wurde bis jetzt 4x wiederholt.

Likes
7
Share


@Nikkov
Follow
Since last week I've been doing the normal watering only when they ask and watering once a week with top crop top veg fertilizer and they've responded very well and both are already in 11L airpots that I transplanted during this week
Processing
Likes
18
Share


@DjDaveAtHome
Follow
4 weeks in and all is looking stellar! The stacking on the BHB is stunning, while the Cheese is producing some respectable clusters and the OJ is defining up top and needs a bit of a clean underneath. All the others are producing from top to bottom so as long as light penetration is adequate, I'll let them go. BHB#1 has a most interesting aroma and I'm impatient to see her develop!
Blueberry Headband (1) from Humboldt Seeds, Cheese (1) and Orange Juice (1) from Dinafem Seeds.
https://www.dinafem.org/en/orange-juice/
https://www.dinafem.org/en/blueberry-headband/
https://www.dinafem.org/en/cheese/
Lighting
https://www.horticulturelightinggroup.ca/products/260w-qb-v2-led-kit
Soil Amendments
https://www.gaiagreen.com/product-page/all-purpose-4-4-4
https://www.gaiagreen.com/product-page/glacial-rock-dust
https://www.gaiagreen.com/product-page/mineralized-phosphate
http://www.seasoil.com/
Worm castings
Sunshine Mix #4
Epsom Salts
Molasses


Processing
Likes
2
Share


@Jxymoney
Follow
Some smelling stronger than others all alr pretty strong though
Likes
6
Share


@thenotillwizard
Follow
The Red Hot Cookies are looking beautiful. Very nice looking buds with fantastic colors. Very promising in terms of bag appeal :)
The pheno 1 shares many traits with the GSC. The effect is amazing despite of the quite boring terpene profile which is unidimensional (very sweet base notes along with creamy peach head notes that reminds me of the peach flavored campino hard candys). The high has the soothing and calming effect of the GSC while being more uplifting and energizing.
The pheno 2 is more on the Tangie side for both the effects and the terp profile. The high is energetic but a little bit racy. The limonene content seems far higher than the myrcene, and it translates itself in both the taste and the effect. I will be looking for a Tangie-dom pheno that is richer in myrcene, in hope of getting more of the tangerine taste/aroma and the relaxing effect that we can find in the Tangie and Tangerine Dream strains.
As for the Amherst Sour D, they all share the same woody and tropical aromas with subtle specific nuances (pepper, fuel, skunk/sulfur, lavender). The effects go from slightly sedating to highly energizing and euphoric. A great afterwork hard hitting sativa that tastes awesome, without being the terp bomb of the year.
The Dinamed CBD plus is a very short, bushy and stalky plant. The Pheno 1 smells like straight pine/fir on sweet and fruity base notes. The structure is nice with lots of lateral branching and the buds are looking very good too. I could have got a way better yield be giving her an extra 10 days of veg.
The pheno 2 is more one the fruity/fuely/tart side. Definitely not the best pheno. Very slow growth...

Likes
Comments
Share


@FlavoursUk
Follow
Just a little outdoor test run project with minimal maintenance. Smells divine


Likes
Comments
Share


Likes
2
Share

@hassehujasse
Follow
Les invito ver como me estoy dedicando de lo que hago. 24/7 desde el mes febrero Hagalo-Te Ayudare Siepre😎 PPFD 1500 Co2 1200 28C 60 RH
She is doing well all what I want
Likes
6
Share


@NLHydroponics
Follow
Everything about this strain is excellent. Explosive lateral branching and vigorous growth makes this strain live up to its name. She was daunting to keep up with defoliation at times.
Her smell is pure diesel and tastes of diesel and skunk. Smokes great, comes on smooth then busts your lungs.