
Likes
Comments
Share


@MissSolasolita
Follow
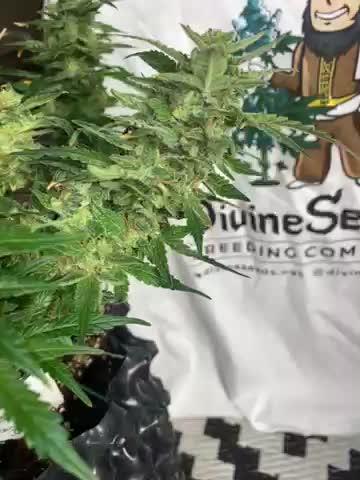
End of week 6 flower
Looking delicious
Flushing for the next week or two
depending how quick she yellows up
Though she looks ready

Likes
6
Share


@GoldenWeedGrower
Follow
Legend
Timestamp: 📅
EC - pH: ⚗️
Temp - Hum: 🌡️
Water: 🌊
Food: 🍗
pH Correction: 💧
Actions: 💼
Thoughts: 🧠
Events: 🚀
Media: 🎬
D: DAY, G: GERMINATION, V: VEGETATIVE, B: BLOOMING, R: RIPENING, D: DRYING, C: CURING
______________
📅 D22/V18 - 07/05/24
⚗️ EC: 0.7 pH: 5.3
🌡️ T: 22 °C H: 50%
🌊
🍗
💧
💼
🧠
🚀
🎬 1 TL video
______________
📅 D23/V19 - 08/05/24
⚗️ EC: 0.7 pH: 5.3
🌡️ T: 22 °C H: 50%
🌊
🍗
💧
💼 Topping and LST
🧠
🚀
🎬 1 TL video of grow and one of the topping
______________
📅 D24/V20 - 09/05/24
⚗️ EC: 0.9 pH: 5.4
🌡️ T: 19 °C H: 50%
🌊
🍗
💧
💼
🧠
🚀
🎬 1 TL video
______________
📅 D25/V21 - 10/05/24
⚗️ EC: 0.9 pH: 5.4
🌡️ T: 19 °C H: 50%
🌊 12 L
🍗 Calmag, Grow A-B, B52, Hydroguard, Rhino Skin, Bud Candy
💧
💼
🧠
🚀
🎬 1 TL video
______________
📅 D26/V22 - 11/05/24
⚗️ EC: 0.9 pH: 5.4
🌡️ T: 19 °C H: 50%
🌊
🍗
💧
💼
🧠
🚀 Out of Home
🎬 1 TL video
______________
📅 D27/V23 - 12/05/24
⚗️ EC: 1.0 pH: 5.3
🌡️ T: 20°C H: 50%
🌊
🍗
💧
💼
🧠
🚀 Out of Home
🎬 1 TL video
______________
📅 D28/V24 - 13/05/24
⚗️ EC: 1.0 pH: 5.2
🌡️ T: 20°C H: 50%
🌊
🍗
💧
💼
🧠
🚀 Out of Home
🎬

Likes
32
Share


@AsNoriu
Follow
Day 77. Maybe a bit early, but no space and one Smoothie went for a date with bud rot ;))) didn't want to loose that nice top. Very frosty, nice gassy smell surrounded by fruits.
Day 82. Second girl is down. Both small as you see, but with few branches will produce seed packaging cover type plant. Maybe second got some purple fade ... First was very nice by structure.
Day 85. First went to jar. How lovely it sparkles and smells !!! Solid strain, even being so small by structure.
Day 89. Second is in jars too !
Happy Growing !!!

Likes
8
Share


@GrowingABushWithButch
Follow
It's Day 54 Week 08 0f Flower For My 02 Kombucha Cream by atlasseed . And For My Snow White and SpliffStrawberry by Spliff Seeds Amsterdam . So Today I Started My Day By Checking My Tricomes On My 2 Kombucha Cream. The 02 Where Looking Fully Milky So My 02 Kombucha Cream Got Flushed TODAY with Some Flawless Finish by Advanced Nutrients . The 2 Received 80ml of Flawless Finish mix with 1OGallons Of Water Ph at 6.0. Tomorrow they will get Rinse off with ph balance water. Yesterday I watered my Snow White and SpliffStrawberry Ppm where down to 100ppm. All 4 Plants will get a nice ice bath in a few days. My plan is to check the Tricomes on the SpliffStrawberry In a few more days she was still Milky when I check her yesterday. I will chop her down next weekend. And the rest will get the chop at 30%Amber Tricomes.
Happy Growing Growmies 🤘🏻


Likes
22
Share


@bypado_farm
Follow
Day 79:
Watered the gorilla cookies with 1.5L with nuts
1481 ppm, 3151 us/cm, 3.1 EC (last week before flush)(same feeding as last week on the diary)
283 ppm, 591 us/cm 0.5 EC (3 strawberry banana, 3 purple punch and 3 wedding Cheesecake) (2L each)
Harvested 2 purple punch
Day 82:
Watered the gorilla cookies with 1.5L with nuts
1605 ppm, 3414 us/cm, 3.4 EC (last week before flush)(last feeding with nuts)
268 ppm, 561 us/cm 0.5 EC (3 strawberry banana, 3 purple punch and 3 wedding Cheesecake) (2L each)
Day 84:
Watered all the plants with 2L each
259 ppm, 551 us/cm 0.5 EC
Day 86:
Watered all the plants with 2L each
272 ppm, 578 us/cm 0.5 EC
Likes
4
Share


@CannaIGrow
Follow
Topped this girl this week. Growing pretty good so far. I’ll be potting up to 3 gal pots next week sometime. I also have a Bison Brew that I’ll be using sometime after transplant.
Likes
22
Share

@SouthGermanGrowGirl
Follow
Week11 now at our first Rapier auto.
He is already very sticky and strong.
Smell is intensive.. Some Lime---Some Candy---Some Gas.
Very hard to explain at the moment.
I will give him 2 more Weeks..
This Week he can do whatever he want.
Next Week i flush him with Amino/Vitamin Water ( PH= 5,7!)
Then comes the Harvest :-)

Likes
Comments
Share

@JNSGenetics
Follow
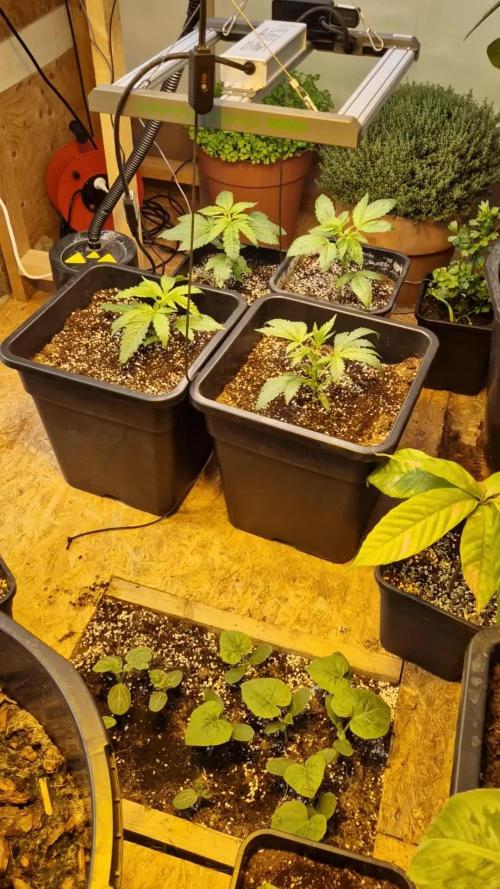
They are growing amazing. I suspect 15 degrees celcius night and 25 - 30 degrees celcius at day. All are growing well. The orange sherbert is the leader though. Lemon tree is a little stretchy and the rest are doing decent with more side branching. I keep 60% relative humidity. All were topped at day 22.


Likes
22
Share


@Spliffi
Follow
Week 10👍🤙👍🌱
This plant is truly beautiful. It is speaking to me in many ways. I will listen!!
Jon Dabs
Check them out here:
https://jondabs.com
@jondabs Instagram
The Sponsors
Check them out here:
Dutch Passion
https://dutch-passion.com/en/
Hydroponic.co.za
https://hydroponic.co.za/hydroponic/harvesting-and-growing-accessories/
Bud Juice
https://www.gohydro.co.za
The Best Grow
https://thebestgrow.co.za
Dynomyco
https://www.dynomyco.com
Nuclear Roots
https://www.nuclearroots.co.za
Photronic
https://shop.photronic.net
Special Thanks to Hydroponic.co.za. I buy all my products from them. Best service.
Daily updates coming...

Likes
2
Share


@FourTwenty_Plants
Follow
Sooo I added a scrog net a few days ago to get the branches more outward beacuse they were growing way to bushy. Seems to be a good solution!
Did a nother update for this week because of the trichome beauty that they have.
They both smell really really fruity and somewhat gassy, if you ever grew a Cherry Cola from FastBuds and you loved the smell then this strain is specially for you. The smell reminds me so hard of the Cherry Cola and I fcking love it
Likes
5
Share


@most_dope
Follow
Did some lst on one of the taller main colas because I started 2 more and needed the smaller light for them. I turned my 150w Marshydro the way it normally goes so it can cover both plants and tried to get an even top canopy for both plants to get the most out of the lamp. I think the 1 is gorilla zkittlez I was thinking stardawg at first but the leaves are very similar to the gorillaz. I keep worrying about giving higher doses of nutrients because it looks like I burned them a little bit feeding twice in 1 week. It’s hard to tell the difference between defeciency and burn sometimes which is making me want to switch to organic lol. The leafy one is starting to bud finally it seemed like even after pre flower was in full bloom it was still pushing out too many Leaves and almost no trichomes compared to the zkittlez. I’m thinking that one may be an afghan kush or something. It was really woody smelling hazelnut almost and now I’m getting some pine hints now that the buds seem to be getting back on track


Likes
49
Share


@Hashy
Follow
Light settings
12/12 on at 9.00am off 9.00pm
Light power= 62% 150w
Radiator settings
LIghts on
Turn on if temp drops below 23c
Turn off if temp goes above 23c
Lights off
Turn on if temp drops below 19c
Turn off if temp goes above 19c
Dehumidifier settings
LIghts on
Turn off if humidity drops below 60%
Turn on if humidity goes above 60%
LIghts off
Turn off if humidity drops below 62%
Turn on if humidity goes above 62%
Extractor settings
temperature 24c with 1c steps
Humidity 54% with 2% steps
Max speed 9
Min speed 4
VPD aim 0.8-1.2
Wednesday 1/3/23 Day 36
Autofeed 5 15 minute runs
Water 10L Ec=0.21 Ph=6.5/7.0
3L left
Roughly 2.3L each.
#2 run 0.1L Ec=3.86 Ph=5.7
7.15pm Lowered light 3cm
#2 DLI= 25.5
Thursday 2/3/23 Day 37
10.00pm
Extractor settings
temperature 24c with 1c steps
Humidity 54% with 2% steps
Max speed 10
Min speed 5
Friday 3/3/23 Day 38
Autofeed 5 15 minute runs
Feed 10L Ec=1.73 Ph=6.3
2.5L left.
Roughly 2.5L each.
#2 run 0.6L Ec=2.14 Ph=6.1
Saturday 4/3/23 Day 39
5.00pm
#2 Height= 30CM Dist= 38CM DLI= 26.6
Lifted lights 3 clicks and Lst and defoliate
Sunday 5/3/23 Day 40
Bit of Lst and scrogging
Monday 6/3/23 Day 41
Autofeed 5 15 minute runs
Feed 12L Ec=1.78 Ph=6.3/6.3
4.5L left
Roughly 2.5L each.
#2 run 0.25L Ec=2.4 Ph=6.1
#2 DLI=26.9
Lifted light
#2 Height= 31CM Dist= 45CM DLI= 20.7
Tuesday 7/3/23 Day 42 (Day 14 flower)
Radiator didn't come on when it should have. It was cold today and I don't understand why the sensor didn't trigger the Radiator.
#2 Height= 31CM Dist= 45CM DLI= 20.7
The 2nd week of flower has gone well. I have tried to keep the canopy of the overall grow as level as I can, the only problem with running different strains is they all have different traits and grow at different speeds. Nearer the end of the week the weather started getting cold again so the radiator is going to be working a bit more over the next week or 2.
#2 Tropicana Cookies FF stil hasn't started stretching, she is mega bushy and has quite a cool funky look to her, I haven't managed to spread her out as much as I wanted to so I'll hope she will be OK.
Power used for week
Light
(1.77+1.84+1.84+1.84+1.84+1.83+1.84)=12.8Kw
Extractor
(0.19+0.24+0.25+0.27+0.31+0.31+0.41)=1.98Kw
Fans
(0.48+0.47+0.47+0.47+0.47+0.48+0.48)=3.32Kw
Dehumidifier
(0.69+0.65+0.0+0.01+0.6+0.02+0.69)=2.66Kw
Radiator
(3.3+3.98+3.38+3.16+3.8+3.31+4.07)=25.0Kw
Water pump.
(0.02+0.0+0.02+0.0+0.0+0.2+0.0)=0.24Kw
Total for the week=46Kw
Back in a week.
Thanks for stopping by.


Likes
22
Share


@Mr_Mister
Follow
Los cogollos empiezan a engordar y los principales empiezan a pesar y las ramas se retuercen y doblan, nada que no se pueda arreglar con cuerda.
Olor bastante fuerte, mucha resina pegajosa en los cogollos.
Likes
144
Share


@TOTEM
Follow
She’s still stretching!
This week I removed Voodoo Juice, Tarantula and Piranha, and added B-52 and Bud Factor X (never tried this one before). Since the princess loves this 2ml/L dosage for NPK nutes, I’ll not be touching that for the moment. That seems to be the optimal dosage for a sativa like this. Very nice!

Likes
Comments
Share


@Robom069
Follow
Day 34/35
ladies lookin great, iam feedin em more now
acid dough in the front and black domina in the back
always lookin for the right topping but not top them too much
tryin to tie them down a lil
and did some supercropping

Likes
11
Share


@Zmtftd
Follow
Leaves are changing, and doing out. Trichomes are starting to get cloudy, as well as the hairs turning orange and curling.

Likes
19
Share


@Papa_T
Follow
This was my very first international trip outside of North America. This was in March 2023.
I’m off to Tenerife. Here are just a bunch of photos from that trip. I had a great time.
Likes
53
Share


@Schnabeldino
Follow
We go into the second week of Flowering...
The plants accepted the fertilizer change very well. Everyone looks very healthy. The strong green just looks beautiful in my eyes
---------------------------------------------------------------------------------------------------
Controller AC Infinity Pro
- connector for the external light control, RJ-12
- 2 plugs with which I can control dehumidifier and humidifier.
- 2 fans run 24/7, 1 Oscillating from spider farmer
Light - 12/12 h
PPFD - 900-1000 nmol
VPD - 1,3 - 1,6

Likes
87
Share


@M420_GROWS
Follow
Cut the plant and let hanging upside-down for 1,5 weeks by 50-55% RH and 17-21°C. Was very easy to trim - wet as well as dry sugar leaves both goes smoothly and fun. Left dried and trimmed buds burp for another week.
Made DME extracts. Tested both weed and extracts, strong pleasure :)
It was handy and fun to grow on GD as always - thank you guys! And thank you very much to the community for being there, spreading love and inspiring!