
Likes
Comments
Share

@SWITCH420
Follow
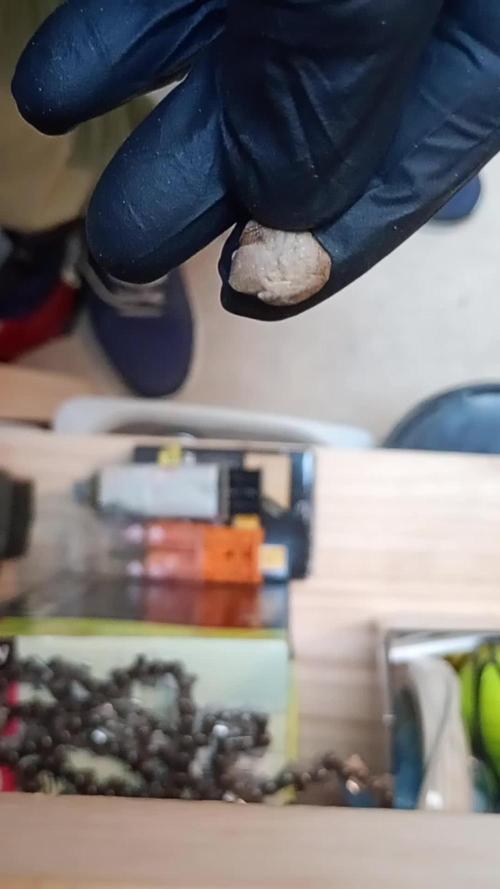
Hi folks,
I'm coming here to start the process of ending this grow journal. I harvested about three months ago and the weed is definitely cured. Photos are about to come — I'm doing a real studio photo shoot for those buds, they deserve it!
While waiting for the shots, I made some pretty damn dank hash temple balls using the iced water extraction method (solvent-free) with my little washing machine. It's a mix of the 8 strains I grew here — never ideal to mix different kinds of resin... but man, this is some serious dedicated work, so I'm making myself happy with that 14g shiny temple ball in the end 😉
Here are a few details about my process for you guys (and don't forget — you can do it with fresh material! Fresh frozen is always tastier. Also, the drying process is much more efficient and faster with a freeze dryer, but... you need the budget for that. I don't, so I go with the air drying method — check it out below):
1. Get your dry trim, then cure it properly for at least a month (I did 3 months). Smell it — mmh, sweet, dried to perfection. ✅
2. Freeze it, delicately wrapped in a freezer bag.
3. Let a large amount of tap water sit for at least 24h to remove chemicals like chlorine, then use it to make plenty of ice cubes — don't be shy, especially if you're not working in a cool environment.
4. Prep your washing machine: add trim between two layers of ice, fill up with clean water (as much as you can, large vortex is better than a smaller one), then make it seat for 30 min (45 min for thicker buds) the time that the dried green material gets wet again.
5. Prep your filtering tools: catch bag, different mesh bags, spoon, etc.
6. Wash as many times as you can before green contaminants appear, as these lower the quality of your hash — don't hesitate to go up to 8 to 12 washes if the resin still looks clean! Important: each wash has its own specific duration, and they get progressively longer as you advance through the process. Frenchy Cannoli (a true hash legend) provides a detailed timetable for this — from as little as 30 seconds to 1 minute for the first wash, all the way up to around 25 minutes by wash 8. Make sure to follow that schedule rather than using the same duration for every run or running it too long the first wash !! It could breaks to quickly your precious material before you collect all the trich's and the quality would be lower in the end.
7. Collect the wet resin in the mesh bags with a frozen metal spoon, make patties with the resin, and let them sit over some towels in order to drain as much water as possible (place a tissue made for hash collecting over the towel).
8. When the patties are a little dry to the touch, wrap them as they are in the tissue and place them in the freezer for 48h or more.
9. With an iron strainer, microplane your patties over the biggest flat surface you can get! It's important that your micro pieces of hash dry widely and don't get too compacted. Any failure in the air drying process will nucleate rot, ruining your hash in the end and making it a poor product — eventually something to throw away. Sad when you think about all the phases of the process to get to this point!
10. So, in order to air dry properly, you must — it's not optional — lower the RH of your dry room to 35% or slightly below, never above and let it dry as long as needed until the material feels like dry sand. For myself, I found 10 to 15 days is ideal. The room must be very lightly ventilated (not directly on your resin!) and in complete darkness — the goal is to preserve all those delicious terpenes! Ideally, temps around 60°F or 16°C
11. Now that it's dry, collect your resin with a large thin spatula! Make a little mound between two layers of PaperHash, boil some water, and fill up a wine bottle with it!
⚠️ From this point on, to avoid exposing your carefully dried resin to a more humid environment — which could ruin all your hard work — everything must happen in the same drying room. Keep working at 35% RH until your temple ball is tightly and airtight wrapped in PaperHash. (And don't forget to drink water — it's dry in there! 💧)
12. Start to slowly press your resin. Magical moment. Finally....
13. Press 3 times for 10 to 15 minutes in order to really decarb your hash — because that's what it's all about! Between each press, try as best you can to shape a patty... until the final press, when you'll be able to form that magical shiny temple ball (it only shines with gloves on, guys 😄)
14. You are now allowed to try it — for quality control purposes only, of course!
15. Because you want to age your hash for the sweetest 5-star smoking experience: wrap your temple ball in a large piece of PaperHash — if you can get that brand it's ideal, or another kind (check https://thepressclub.co) as long as it's organic!
16. Place the wrapped temple ball in a glass jar and store it in a dark, cool place.
17. Wait a minimum of 3 months before opening it.
18. Open, smell, touch — you'll be amazed. Roll it up with some weed or tobacco or both (I do both) / Or get a Hooka... you are smoking some true primo aged hash made by yourself! Taste the difference and realize all the path from choosing the seeds online until this first amazing puff ... 🙏
I want to credit my inspiration for making this kind of hash to the great Frenchy Cannoli, who has shared all his knowledge through amazingly rich tutorial content that you can find online with a bit of searching. 😉 Peace Frenchy 🕊️☮️


Likes
22
Share


@Stork
Follow
Day 79 Mon
PH 6.0
EC 0.2
DLI /11h/
PPFD/
Water 21c
Day 80 Tue
PH 6.1
EC 0.2
DLI /11h/
PPFD/
Water 18c
Day 81 Wed
PH 6.1
EC 0.2
DLI /11h/
PPFD/
Water 18c
Day 82 Thu
PH 6.0
EC 0.2
DLI /11h/
PPFD/
Water 20c
Day 84 Sat
Add big bud and overdrive 5ml
PH 6.1/5.9
EC 0.2
DLI /11h/
PPFD/
Water 20c
Day 85 Sun
PH 5.8
EC 0.2
DLI /11h/
PPFD/
Water 20c

Likes
9
Share


@TPBzh
Follow
Hello, this week was good, all is on track. They are drinking quite a lot, and I had to defoliate a bit. The 2nd one is a bit late and must be different phénotype. I think they are very nice.

Likes
5
Share


Likes
13
Share


@Johnnypotgrowr
Follow
UPDATE DAY 79, LAST DAY OF
ETHOS Pineapple Runtz Autoflower 🍍
Fed 1/2 tsp of Winter Frost
The smell hasn't been too overwhelming, which I'm hoping translates to terpene preservation, or I'm nose blind. Fatty nuggs, resin stacked , big trichomes. Nice yellow fade 💛
The seed pack called for 70-80 days, I anticipated these taking every bit of that. Which they are! Super excited for these resin Pineapple bud.

Likes
5
Share


@TheBulldozerSicily
Follow
Risultato finale inaspettato! Questa è la prima volta in outdoor, e pensare che le volevo regalare perché non me la sentivo di farle crescere a casa perché troppi vicini di casa, poi mi sono affezionato ed eccole qua, le più grandi piante mai riuscite!! Sono molto contento!!


Likes
48
Share


@pifflestikkz
Follow
This plant was an absolute dream to. Grow, no issues at all with health of plant, just struggled to tame her as she was a a thick strong climber 💪💪.
I'm so impressed with how this turned out, I could have flushed for another 3 days to make it 12days but I needed the space.
After The 2 days of dark I was recommended I can definitely say it has vastly boosted her trichomes and the smell when I opened the tent blew my head away 😍😋
Aiming for a 10-14 day hang dry,
The 10-12 weeks curing in jars with humidity packs.
I will update with a dry bud weight and smoke test 👌
Bud wet weight is just 500g+
Final bud dry weight is 298g.
Of juicy resinous purple and orange buds 😍 smells like sherbert and hang dry smoke test revealed a candy sherbert, no banana yet but hoping like the grow it matures with cure process now.
Hits eyes straight away, sandy bottom kids, giggles, munchies, fun time with Mrs, bed. Full cycle with this one very happy over here 😉😁💚
FAT BANANA AUTO FROM ROYAL QUEEN SEEDS, big thank you to the team, and the breaders. What a pheno I received. I appreciate you all
Likes
6
Share


@midnitrtoker
Follow
Found 1 hermie in the tent from the last 2. I will be taking it out and fixing the last one as I was scrogging these girls. The Nutrients are in Grams please I hope that doesn’t confuse anyone. I am feeding at a 3.0 EC smell is minty can’t really explain it I suck at describing terps. See you all next week thanks for watching.
Likes
13
Share


@Jocolope
Follow
32 one foot colas . This will be a long trim. Not too many leaves I was happy with the outcome

Likes
15
Share


@YouCannaBlowMe
Follow
Seems to be taking well to being moved to the 5gal pot. Growing a lot faster after the 2nd day in the bigger pot. Watered for the first time since planting in big pot after 5 days with 1L distilled water (Ph 7) mixed with 1/2 tsp. fox farms grow big and 1/2 tsp. big bloom. Since my soil is considered hot soil I wanted to use less than the recommendation on the bottle.

Likes
10
Share

@Prilyfe13
Follow
02/07/2026
A new week and the last week of veg. The stretch is just around the corner. So before hand, I did a tiny bit of trimming. Just the main stem fan leaves and a couple lower hanging leaves. I also took the lowest branch off. It wasn't gonna make it anyway.
She's still super full, but has plenty of open space for air flow.
I'll be increasing the light intensity at some point this week. However if she starts to stretch like I expect, I shouldn't need to increase the power much. I'm just trying to get to the bottom of the canopy. Currently she's short enough. So all the light is reaching. But when the stretch starts, I'll need a deeper penetrating light source. Mine. Turned up.
I'll also be changing the nutrients out at some point this week. I'm pretty sure we start transitioning from grow nutes to bloom nutes. Adding in some bud ignitor, bud factor x and big bud in small doses. I'm just waiting for the bud ignitor to come in.
It's absolutely frigid outside today, so the environment in the tent is off. The humidity is fine, but the temp is low. And I already overheated one heater. Hopefully the other one gets the tent back up to snuff. Once that happens, the devices will level off finally and run at low settings if at all. We just gotta get there.
As for her looks, she looks full and vibrant. Beautiful green color. Super strong branches standing straight up. S couple of them are starting to spread out now, but the majority of them are standing up close to the main stem. They are too thick to use the bud clips and I don't have tie downs, so it's all natural for her. Maybe a little push down on the top just to get the lower branches pumping.
02/08/2026
Looking good today. She is really starting to look like a little fat Christmas tree. Still no training though. The branches are long enough, but too thick. So I'm still waiting for the stretch to start. Although, I'm pretty sure it started already. Maybe. It could be a couple more days.
The water is low. I was thinking about topping it off, but I'm changing it tomorrow when my bud ignitor gets here. I think that's what I'm gonna do. Either way, I'm waiting for tomorrow. She might need a gallon or so if I were to top her off. I'm not sure now. Maybe I should top off.
I will say that she is hungry. She's sucking up all the nutes in the water. She'll be fine. When I swap the water out, I'll make sure to give her enough food. However, I don't really know what she needs for nutes. Maybe 550 ppm? She's drained the nutes down below 300 ppm from 450 ppm or something like that. At least she's not overfed this time.
The fucking environment. No matter what I do, it just stays fucked up. There pardon the language, but it's definitely needed. So I set the humidity ton55% now it's stuck at 52%. Where yesterday it was at 57% with no problems. I don't get it. And the temp is just low. AGAIN! It was 75° yesterday. WTF.
02/09/2026
I still haven't decided what to do about the water change. I'm definitely doing it today, but I'm still waiting for a nutrient to show up. I can't decide if I want to stay with the current feed or start the transition from grow to bloom.
I think I'm going to start the bloom nutrients. Just at a really low dose. So I'll be adding big bud, bud factor x and bud ignitor. We'll be keeping the voodoo juice, Tarantula and Piranha out for the rest of the run.
She looks absolutely amazing. Beautiful vibrant green, thick branches and side branching coming out everywhere. She's definitely gonna be a bushy one and I'll need to defoliate a good amount. That's ok. She's healthy enough to take a pretty good hair cut. But I won't be doing so until after the stretch.
I moved the humidifier around and put a hose it came with on it. So now the humidity is put in above the canopy. Hopefully it keeps the humidity in check and not constantly running. The temp is also kinda good. So no complaints there today.
I also took measurements. She's 14" tall now and about 21" from the light. I was considering lifting the light up and increasing the intensity for a bigger footprint, but I don't think I need to quite yet. I'm thinking in the next couple of days I'll need to adjust it anyway. Especially because of the Apple Strudel which is 16" tall and only starting to stretch now. She's gonna be a beast. This little lady won't be small either. I don't think she is beast material though. Well, who knows maybe she is.
02/10/2026
So instead of swapping the water out today, I topped off with a half gallon of the new stuff. She's drinking about a half gallon a day, so I'll continue to feed the normal dose but in half gallon intervals over the course of the week. Then I'll change out the water with the regular dose. Regular as in 1/3 dose from what the manufacturer says. It should be fine.
Update: I decided to swap out the water. Lol
Readings:
pH: 5.8
EC: 898
TDS: 450
Temp: 64.7°
We will have to see how she likes this mix.
A couple hours later:
So far it looks good.
I'm not exactly sure what to look out for. According to both the Advanced Nutrients app and the FastBuds autoflower schedule, I'm perfectly in range.
Anyway, she looks fantastic! Beautiful colors. Strong side branching. Best of all, it's starting to spread out. So more and more bud sites may be grown. I'll just have to cut some select leaves after the stretch. We'll see how it goes. I have a good feeling about this plant. Not sure how big she'll get, but her buds should be POTENT.
02/11/2026
So I forgot to add an ice bottle last night. Now there's big bubbles on top of the water and on the roots. Not really sure what it means, but both plants did it. This one and the Apple Strudel. Maybe it's the mix with the new nutrients, like bud ignitor and bud factor x. Maybe the water was too warm and I screwed up. We'll find out at some point today or tomorrow. I'm gonna have to check the EC and TDS to make sure it's staying the same. If it's raising, I know I have too much nutrients. But I don't think so. I hope it's not another algae bloom. It didn't look like this before though. Maybe a new issue? I'll keep an eye on it.
Other than that, she looks amazing. Taking a very nice shape all by herself. She has clear layers of leaves and branches. Directly from the side, you can see them. It's very nice.
Don't get me wrong, unless she stretches considerably, I'll definitely be defoliating after the stretch. Plus I'm expecting bigger leaves.
The environment seems pretty decent as well. Doesn't seem any equipment is having issues either.
Something I'll note is the color of the leaf tips. They are dark, but barely. No claw either. So I'm only noting it. Not too worried about it. We'll see how things go throughout today. It's not like I'm pumping her with like 1000 ppm or anything. It's like 450. There shouldn't be any issues whatsoever except for maybe being a little underfed, but this doesn't seem to be the case. She seems very happy and healthy. Wanting for nothing. She has all she needs.
02/12/2026
Not much to report today. She's stretching and her leaves are all filling out making her explode with growth. She looks amazing. Still growing one main cola though. I can tell. It's gonna be short I think, but the rest of the plant will have caught up by then.
I don't expect small buds from this plant either. She's definitely gonna pack them on. But, if this is in fact a blue dream, the buds will be pointy and long. Let's hope these branches grow long enough for a hand full of foot long colas.
The environment looks pretty good too. Equipment is running just fine.
The water this morning wasn't warm, so that's good. I did however replace the ice bottle. The pH is fine. I haven't taken it, but I'm guessing with the pH perfect technology, it's 6.1 to 6.3. perfectly within range. I'll check numbers this afternoon and report then. Also, from the looks of it, the water seems fine. No films, no smells, just bubbles. I wonder if they make a styrofoam bucket insulation thing. That'd be nice to have instead of always swapping out ice bottles. Oh well.
I also have to top her off today. I just checked. Looks like maybe a half gallon? Maybe a little more? I'm trying to wait for a gallon, but the water looks so low. Oh well. I'm still topping off today. Lol.
Update: So I added a half gallon of the current dose and the EC and TDS are lower than what they were when I swapped out the water. Am I supposed to increase the dose as needed? But I don't know what I need exactly. I'm pretty sure she is hungry and needs more nutrients, but I don't want to overdo it.
Plus I have to figure out a way to not take the plant out of the bucket. She's getting big and cumbersome. Plus with the other plant in the tent, maneuvering around without pressing too hard against the other plant and the walls is damn near impossible. The heater is in the way. Like really in the way. I would need to take the heater out, move all the wires and hoses just to put the reserve bucket in place. I suppose I can pump out a gallon, add more mix and then dump it back in and let the bubbles and top feed system mix it in. I'd rather mix it in by hand, but again, I can't lift the plant from the bucket. I mean, maybe I can pump out the full bucket, dose it properly and then pump it back in. That wouldn't be too bad. 🤔. I might do that. At least with this plant. The other plant has a lot more space to move around. I can lift that one out... for now. She's gonna be big.
Anyway, that's all for today.
02/13/2026
Lookin good today. She definitely exploded in growth. No height yet, but definitely filling out. I expect the height to come soon enough. She's only like 15" tall. I need double that. Lol
I swapped the ice bottles out. She wasn't warm so that's a good thing. Keep it cool.
I'm starting to think that maybe this isn't the stretch or just the very beginning. The upward growth is like a vegging plant. Not one that in a super stretch mode. Maybe I was off by my stretching timing.
We'll see.
The environment looks good today. Or well, has been looking good. I guess not that it was all that bad, but a little cool. It's fine.
I've still got the humidity at 55% and temp at 75°. I think when I start to see actual buds, I'll drop it to 50%. Oh, I won't be turning the humidifier off. It's staying right where it is because the humidity in the house is like 29%. Unless the plants get big enough to start putting off their own humidity. Then, well, it'll just turn off and do nothing except sit there. I'd much rather not use it, but it's ok if it turns on a little bit. I doubt it will turn on much. It still might even at 45%.
Readings:
pH: 6.35
EC: 777 cm
TDS: 382 ppm
Temp: 66°
Likes
6
Share


@Weedman268
Follow
Week 7 of flower,room is a bit to cold but they are very close to finishing. 👍🏾
Likes
11
Share


@Bread_n_Buds
Follow
Our Jet Fuels are plants that promise very well, we have always loved the strains of the Diesel family, a bit gassy and for this particular taste we have great expectations. You could say that it is the favorite taste in the BreadandBuds house I have to study the terpenes a bit better to tell you better but one thing at a time we will delve into everything.
Never stop at the first good results guys, always improving is fuel for the next day, to keep the passion alive and have results.
Growing Projects ----- I will follow this procedure, it has given birth to a plant before that will be worked with topping x16 buds and various LST and I have just germinated the second plant that will be born about 13 days after the first and will go straight to the conclusion with the main cola. I have to tell you in the past I was a topping maniac, then I felt nostalgic for the main cola. It is always a major sacrifice to give up the Main Cola. To avoid depression and to give a better vision to our super trusted breeder, home breeder and Zamnesia heart breeder we make a plant in topping and a straight one preserving the main cola. Those videos with the rotating Main COla were liked and we produce the best Maincola of the situation-
The first week went only with Power Roots 1 Ml/l and Pure Zym 1ml/l from now on we start with ALga Grow. The plants were transplanted shortly after germination because the biodegradable pots were very small. The soil is Plagron Pro Mix 100% organic renewed with 30% new soil and 20% Perlite added. (Pro mix don't have perlite but is airy we added anyway)
Plagron fertilizers are available on Zamnesia in convenient Pack formats for all growing styles. I used this with a simple search you can find the other products.
---- https://www.zamnesia.io/en/12119-plagron-top-grow-box-100-natural.html
Try a seed of this strain that drives us crazy...
---- https://www.zamnesia.io/it/11258-zamnesia-seeds-jet-fuel.html
Zamnesia Description // Jet Fuel (also known as G6, Jet Fuel OG, and G6 Kush) is a modern hybrid rich in THC and terpenes with a diesel aroma. Originally created in Colorado by crossing Diesel with Aspen OG, this 60% sativa-dominant hybrid is a must-have for any smoker who enjoys an uplifting and energizing high. Now, thanks to the hard work of our breeders, the original Jet Fuel is even easier to grow at home. Order your seeds, plant them in soil, and enjoy their rapid growth. After just 9–10 weeks of flowering, you can expect a generous harvest of premium sativa buds!
Growbox and Air System - Secret Jardin DS120w + fans + Exhaust fans and filters DF16 kit ---- https://www.secretjardin.com
All the best that mother nature can offer is on ----www.zamnesia.com
Call for collabo: I am available for collaborations with companies of Lights and various equipment for growing (No Seeds and Nuts company please) I would like to renovate my 120x120 space that has slightly obsolete lights, and I would like to try some controllers. If you have proposals available.
Likes
31
Share


@BioGrowBayer
Follow
Die ersten 4 sind schon im 11 Liter Topf mit Bio Bizz All Mix
1 mal wöchentlich gibt es Wurmtee

Likes
13
Share


@DudeGrowsWeed
Follow
Bent her a little too hard (or too late) and snapped the main stalk, but taped it up and she seems fine now. Also gave her some defoliation. Fed Recharge for the first time too, seemed to like that, I think it helped with the fast healing of the snapped stalk. Bud sites starting to develop. AVT is front-right in the group shots.

Likes
2
Share


@High_Grade_Dadli
Follow
Girls are doing well....seed looking like she earning her name..have some cutting off her n am please with the first week of flower....one got super stress n she dont even look like it jus watchin to see how things look later


Likes
63
Share


@TheFairyBudMother
Follow
It’s so warm today! Of course I pulled all my plants out to spray with spinosad and feed/water.
*********
I use a Hudson 2L sprayer. My partner used to work in the film industry and they found this brand of sprayer gets the most thorough even coverage for makeup or whatever movie magic they use sprayers to create. It’s great.
*********
The larger gorilla glue has come around but I lost a few nodes. I’m seeing a little PMD, but I’ve been knocking it back when baking soda and water. I’ve been taking scalps, defoliating the big one gently and the little ones need almost daily lollipopping. I’m watching my ph and using more cal mag. I definitely feel like they are two different phenotypes.I have them on individual diets.
**********
Some fungal gnats come with the humidity so I topdressed with gnat nix. I don’t believe I overwater so I hope that’s the solution! I think I may wait another week or two and get things more stable before moving to flower. I will update video tomorrow when I have access to faster upload speeds.
**********
Added videos!
Likes
14
Share


@MrReeferMadness
Follow
Massive root growth this week!
I Started week 5 on Saturday past, I've let some of the branches that were held Down for a while free, I manipulated some other branches to work on the symmetry as well as some selective de faning on all the gorrila zkittlz. As the three all look like different phinos I've treated them separately to suit the growth of each plant.
The Psychosis was the skiniest and smallest from week 1-4.. Now its the tallest. I had to pin her down harder with the lst this week and she reacted really well growth wise. 3 days later lots of fresh branches shot up so I decided to take clones for a new diary I will be starting next week 😎
