
Likes
Comments
Share


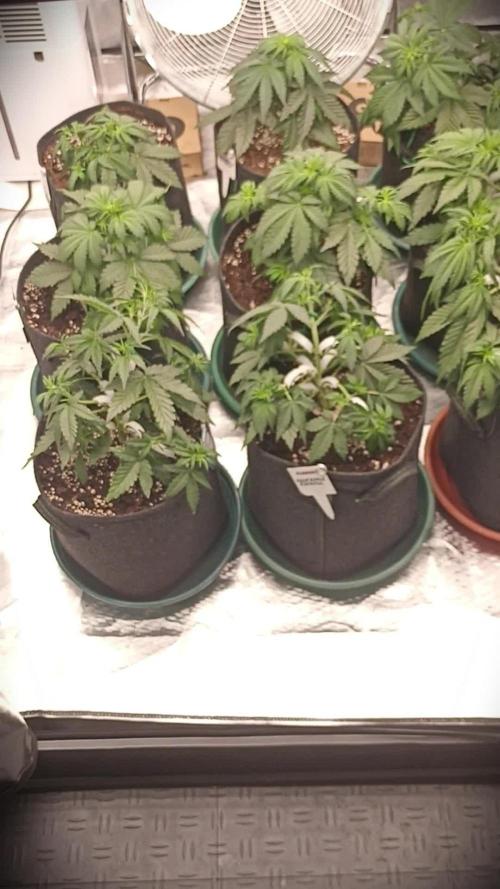
@Brookillinit
Follow
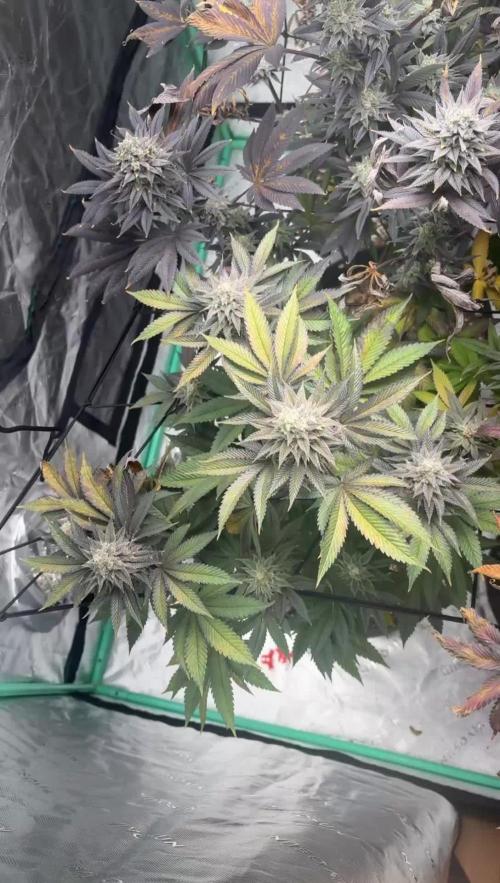
I started the week super cropping. Each of these babies is looking great now.


Likes
69
Share


@nonick123
Follow
Día 59 (29/07) Este cultivo no es muy entretenido con solo agua, asi que...
Le hago supercropping a todas! 😁 A ver como reaccionan!
Día 60 (30/07) Las plantas se están recuperando muy bien del supercropping! 😁
Todos las puntas hacia arriba! 💥
Come onnnnnnn! A por esa floración en 2-3 semanas!
Riego 500 ml H2O pH 6,75
Día 61 (31/07) Las plantas se han recuperado genial del supercropping y están lanzando TODAS las ramas hacia arriba 😍
Un espectaculo la fuerza de estas plantas! 💥
Redistribuyo las plantas, para ver si OnionOG está más protegida del sol, ya que consume muchisima agua y voy a estar en unos días fuera...
También reubico ligeramente la malla de sombreado, debido a que en mi latitud el sol empieza a incidir lateralmente por las tardes...
Riego 500 ml H2O pH 6,55
Día 62 (01/08) Vuelvo a redistribuir las plantas en el invernadero dejando a OnionOG todavía más protegida del sol directo, para tratar de disminuir su consumo de agua estos días que no voy a estar...
Pongo una protección "visual" en el invernadero en el lado que da a los vecinos (cara norte), porque he "cazado" miradas indiscretas...
Riego 500 ml H2O pH 6,55
Día 63 (02/08) Debido a que me voy de vacaciones unos días, adelanto el riego semanal con Té y la aplicación foliar de Kelp
Riego con 1 Litro de Té Vegetativo de Lurpe Solutions. Preparación: 24 horas con bomba de aire (oxigenación) con ingredientes:
Green Sunrise 8 ml/L + Insect Frass 16 ml/L + Hummus Lombriz 8 ml/L + Melaza 1 ml/L + Kelp Hidrolizado 0,25 g/L
Aplicación foliar Kelp hidrolizado de Lurpe Solutions a 0,25 ml/l
Día 64 (03/08) Cerrado por vacaciones
Día 65 (04/08) Mi amigo viene a casa a hacer un riego con 1 Litro de H2O pH 6,5
💦Nutrients by Lurpe Solutions - www.lurpenaturalsolutions.com
🌱Substrate PRO-MIX HP BACILLUS + MYCORRHIZAE - www.pthorticulture.com/en/products/pro-mix-hp-biostimulant-plus-mycorrhizae

Likes
16
Share


@Hempface86
Follow
Well, looks like this girl is on her way to stretch, which should be interesting.She has extremely tight internodal spacing... I love me a good haze.And I really hope this turns out to be a good one.. Thank you do the good people at Herbies Seeds for making this run possible, I hope everyone is doing well.God bless and happy growing ✌️
Likes
2
Share


@toriyama
Follow
Sie wachse weiter, aber diese Woche werde ich ein Netz kaufen und aufstellen.
成長を続けていますが、今週はネットを購入して張る予定です。
Likes
14
Share


@GanjaReaper
Follow
Day 56:
Like I said in the 2 weeks before this one, I was on vacation and a friend took care of my plants.
This is the last week he helped out, I will be taking care of them again in the upcomming week.
Well what can I say about this week;
- Weather/climate was still bad. Lots of rain and cold temps.
- They kind of failed with Low stress training, they went up and stretched without proper bending.
- One plant has already mature looking buds but still on the small size. Two/three of them are going well and one is falling behind flowering wise.
- They look nicely green tought.
Until next week.

Likes
4
Share


@Farmer_Plaps
Follow
The final week. I need to fill in some earlier weeks, but here it is.

Likes
11
Share


@Ninjabuds
Follow
I started with three Blackberry Moon Rock seeds, and two of them sprouted – awesome! These girls are loving life, reaching for the sky as the tallest plants in my tent. They're already about six inches tall, and they're taking up all the nutrients very well without any nute burn.
Both blackberry moonrocks plants are very similar height although they have very different looks to them. The one of the 2 definitely going ti strech alot more than the other. One has internodes about 1 cm apart rn and the other is about 3/4 to 1 inch between nodes.
Happy late turkey day grow diaries world!!!! It's now day 24 from seed for all the seedlings I have going. The past few days the plants have really started to take off. There roots have really started to dig in. Every other water I am still giving 2ml per gal of fox farm grow big. I keep having to tell myself not to add any more nutes other than that. I don't want to fry my plants but I also want they to start jumping. I'm quite excited for the coming week, I think the next 7 days or so is when the plant really starts to transform and look more like a pot plant than just some random little green thing.
A few days ago I decided to move the plants from under my 55w cheep amazon light to under my spider farmer 100w newer version light with the good leds in it. The plants will hopefully be ready to up pot them here soon and get them in the large tent.
Sometimes when growing multiple different strains it can be really hard to balance giving to much or to little light. You don't want the faster growing plants to get to stretched out waiting on the slower plants to catch up
I spend Thanksgiving day morning transplanting the plants into 2gal pots. I am useing spme promix potting soil it's my 1st time tring this soil. It is actually doing really well the roots were all white and nice looking. I think next time I'm going to add some worm casting, kelp, granular mycos, and a little bit extra perlite. I just didn't have the money with christmas coming to splurge for all the extra stuff. I got rid of 2 plants 1 of the bubble og and 1 skunk apple runtz. There is only room for 10 pots in the 2x4 tent. I will peob only bring 8 of them to flower, always good to have back ups. Yesterday I also stuck the plants back under the 500w medicgrow mini sun 2 in my 2x4 tent. They did great under it the 2nd half the day I was happy they didn't get stressed. I had put them under that light a little early about 10 days ago or so. I am expecting in a week these plants will ge going crazy with growth

Likes
2
Share


Likes
90
Share


@OrganicNature420
Follow
Germination date 🌱 29/11/2021
Day 98 09/03/2022
Strain 🍁 SinCity seeds Frosted Biscotti
(Biscotti Sundae x Whitenightmare)
THC% • Unknown
💡 Mars Hydro FC-E6500
• Power draw 650W + 5%
• Max coverage 5 x 5
• LED 3978 pcs high quality chips
• Max Yield 2.5g / watt
• Noise level 0 DB
• Removable Driver & Light bars
• Daisy chain
• Fast cool system
https://marshydroled.co.uk/ 🇬🇧
PROMO CODE • (organicnature420) DISCOUNT
https://www.mars-hydro.com/ 🇺🇲
PROMO CODE • (ORG420) DISCOUNT 👍🏻
⛺ Mars Hydro 150 x 150 x 200cm
📤📥 AC infinity 6inch
💧 10lt dehumidifier
❄️ 3.1kw air con system
💉 Nutrients Living soil (dry amendments)
Grow
Bloom
Bloom2
MycoBoost
Barley
🌱 Growing Media • Soil
Notes 📝
It's not been a good week. Had some family time last week and unfortunately caught covid with all the symptoms. I've been bed bound since Monday and today I'm starting to feel slighty better. Not asking for sympathy 🤣 but this explains why some of my girls have switched on me...
Looks like all 3 Frosted Biscotti have gone into reveg. Obviously have a light leak but think I've sorted it now. The mystery is just well under feed as I've run out of Bloom and big Buds and its also gone into reveg. The other coco ones haven't gone into reveg and almost look done. Biscotti Mintz and Bahama Bussdown look 🔥 well impressed. The mutant Biscotti Mintz (soil) has come along nicely and looks amazing. I don't get why that hasn't revegged as its surrounded buy the others that have. The 2 at the back, (Bahama Bussdown) ones taken a slight knock and revegged and the other one has just got to heavy and collapsed. Again looks near enough done so now need to think of a plan of action for curing as tent will be occupied for at least another month. So I think that's it with the problems 🤣 ..
Apologies again for not getting back to anyones dairys over the last 2weeks. I'm going to spend the weekend catching up with you all and sorting out the tent as long as I'm covid clear. My partner has been doing so much for my son and I I couldn't ask her to maintain the tent aswell. She did give them a water but no nutrients 🙈 half effort still wins my heart ❤️
Discount codes in bio for Mars hydro

Likes
47
Share


@Cannabeast40
Follow
Finally harvest time arrived 🤗
It’s been a great run, though I had to improve a lot along the way. But as usual there was a way to get things done and finished up😎
After a long heatwave I decided to chop the whole tent, just a bit before I actually wanted to. But I see amber trichomes and heavy buds, so I think it’s safe to chop now, so here we go. 🤩
Can’t wait to taste this after so long watching over it🤤
More details to come.


Likes
172
Share

@Natrona
Follow
NYC Diesel Auto (Was Hey Abby)
W12 F1 12/7-13
12/8 Since I flipped NYC Diesel to flower last week, I gave only ph 6.3 water ppm 194 temp 64.5. Her budsites are showing flowers now and pushing more hairs. I had to bend her over as she grew taller than the box. She looks like a porcupine with the spines running up her back. train her She is drinking a lot more, so I increased to 1.5 gallons on 12/10 & 13
Calmag 5ml/g
Flower time 1.5 tsp/g
6.42ph, ppm 648, temp 64.2f
You will see in the pics the main stalk has stems about an inch apart and the stems have bud sites 1/2 inch apart going up the stem.
This multi stem and branching is not how I like my plants. It makes it very hard to trim. I defoliated again. I stripped the lower 25% off all the stems and I cut off all the under branches because the tent is too small for NYCD and the tomato. The under branches are shadowed and there is not enough light. The root ball must be huge, when I stick in the soil probe there is resistance and not many places where it inserts easily.
Stay green, growers love 💚🌿
💫Natrona💫

Likes
91
Share


@MrCOCO
Follow
The girls grew 10 cm during the first week of flowering ... So far everything is going well and I am happy to see them 🍃🍃🍃

Likes
15
Share

@Sebb_growt
Follow
Die wunderschöne O.G. Kush hat ihre Arbeit getan. Heute war der große Tag.
Ein Teil ist in dryfembags.
Ich werde das erste mal ein drytrimm machen, habe erstmal nur große Fächerblätter abgenommen und so aufgehängt.
Ich hoffe mein DIY Trockenkarton wird mir ein weiteres mal gute Dienste erweisen.
Likes
76
Share


@DogDoctorOfficial
Follow
🌸 Week 8 Flower – The Trichome Symphony Begins 🌸
Eternity Grow Cup
This week… it’s all about the frost. ❄️
We are diving deep into the universe of trichomes, those magical crystal-like structures that define potency, aroma, and visual beauty. Each pheno this week is presented with its own dedicated video — so everyone can witness the uniqueness and evolution of these genetics firsthand. The photos? Focused close and true on the trichomes and their stalks, the very essence of the plant’s protective and expressive language.
💎 What Are Trichomes?
Trichomes are tiny resin glands that cover the surface of cannabis flowers and sugar leaves. They’re responsible for producing and storing cannabinoids (like THC and CBD), terpenes, and flavonoids — the compounds that create the plant’s effects, scents, and flavors.
They act as the plant’s natural defense — from UV rays, pests, and environmental stress — and in return, they gift us with beauty, medicine, and art.
Why So Many Trichomes Here?
This room has turned into a crystal forest thanks to a harmonious mix of tech, care, and nature:
🔹 Spectrum Tunings:
Using the TrolMaster system, we’ve dialed in a spectrum rich in reds, far-reds, and UV at precise times to stimulate trichome production. The plants are responding in full.
🔹 Lighting:
The under-canopy power of the ICL 300s, combined with the canopy-level intensity of the Model 1s, is creating full-spectrum saturation from top to bottom. Buds are stacked, frosty, and glowing from every angle.
🔹 Nutrition Synergy:
The tag-team of Aptus Holland and Plagron has been flawless. The clean base, balanced micro and macro elements, and biostimulants have driven these girls into full expression mode. You can see the nutrition working in every crystal.
🌿 Where Are We Now?
We’re likely one week to ten days from harvest, but of course we’ll follow the plants’ signals. They’re still swelling and building — it’s the final stretch, and they’re sprinting.
Nerdy Note:
Trichomes can be bulbous, capitate-sessile, or capitate-stalked — and in this run, the capitate-stalked ones are standing tall and loaded. Expect a full cannabinoid and terpene profile when it’s time for analysis.( bro talk not lab hihihihi)
🌟 Let’s take a moment to recognize that we’re witnessing the peak of this cycle. This is living art, frozen in time by a camera lens but alive in scent and energy.
This Week’s Feeding Program
To support this explosive trichome production in Week 8 Flower, we’re feeding with precision and purpose. Every drop counts now, and here’s the clean, efficient mix we’re running:
• Aptus Holland – Regulator: 0.15 ml/L
• Aptus Holland – System Clean: 0.25 ml/L
• Aptus Holland – RO Water Condition: 0.8 ml/L
• Aptus Holland – All-In-One Liquid: 1.25 ml/L
• Plagron – Green Sensation: 1 ml/L
• pH set at 6.2
💧 We’re keeping it clean, clear, and consistent. No extra PK boosters or unnecessary additives. Just smart nutrition, tuned spectrum, and stable conditions to let the plants express themselves naturally. The synergy between Aptus Holland’s Clean Program and Plagron’s Green Sensation is clearly showing in every frosty bud.
This week, we’ve fine-tuned the spectrum to push the plants into full resin-production mode. I’ve reduced the white light intensity to 40% while keeping the reds and UVs running at 100%. This shift focuses energy on the wavelengths that directly stimulate secondary metabolite production—especially trichomes. Red light enhances flower development and density, while UV exposure encourages plants to produce protective compounds, like cannabinoids and terpenes, as a natural defense. This balance between lower photosynthetic pressure and high-spectrum stimulation is helping the girls finish strong, frosty, and full of character.
🙏 Massive thanks to all sponsors, followers, friends, and growers in the community. To the ones competing, to the ones just watching — THANK YOU. This is almost the end of the road, and every diary, every plant, every effort deserves respect.
💬 Don’t forget to follow the full 4K experience on YouTube, and for behind-the-scenes action and updates, join us on Instagram.
With Grower’s Love,
DD 🌱
Genetics - Runtz https://www.zamnesia.com/6000-zamnesia-seeds-runtz-feminized.html
Nutrients - Plagron https://plagron.com/en/hobby
- Aptus Holland https://aptus-holland.com/
Controls - Trol Master https://www.trolmaster.eu/
LED - https://www.futureofgrow.com/en
LED - https://www.thinkgrowled.com
Soil - https://www.promixgardening.com/en
Germination - Cannakan https://cannakan.com/?srsltid=AfmBOopXr-inLXajXu3QFgKXCXXos4F1oEvScjMKIB5MR5dk8-GJ-F49
DOGDOCTOR 15% off
Smoking Papers - https://ziggioriginal.com/
Terpene saver - https://grovebags.com/
As always thank you all for stopping by, for the love and for it all , this journey of mine wold just not be the same without you guys, the love and support is very much appreciloved and i fell honored with you all in my life
With true love comes happiness Always believe in your self and always do things expecting nothing and with an open heart , be a giver and the universe will give back to you in ways you could not even imagine so
As always, this is shared for educational purposes, aiming to spread understanding and appreciation for this plant. The journey with nature is one of discovery, creativity, and respect. Let’s celebrate it responsibly and continue to learn and grow together!
Growers Love To you All 💚
#EternityGrowCup #RuntzHunt #GrowersLove #CannabisCommunity #AptusHolland #ProMixSoil #TrolMaster #Zamnesia #Plagron #ZiggiPapers #Grovebags


Likes
41
Share

@Miketama
Follow
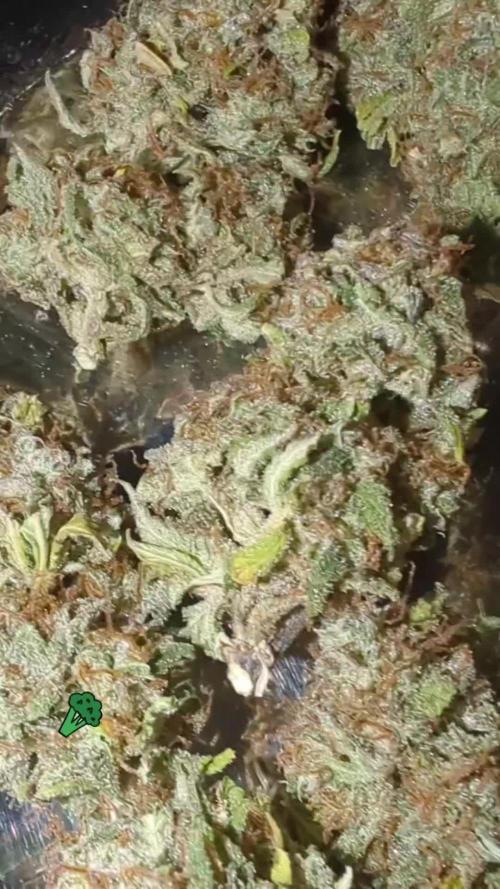
Harvest Day 83
Big thanks to Zamnesia for letting me run this strain in the Eternity Grow Cup 2026, and to Plagron for the Green Sensation doing its thing in the final weeks and really packing those colas.
Joining the cup definitely brought some good vibes: 373g wet, my best pull ever from an 11L pot. Can’t complain.
Good luck to all the growers still running 🥦 and massive respect to everyone who followed, liked and commented throughout the grow. That support kept the diary alive. 🥦
Likes
9
Share

@Marijuanaut
Follow
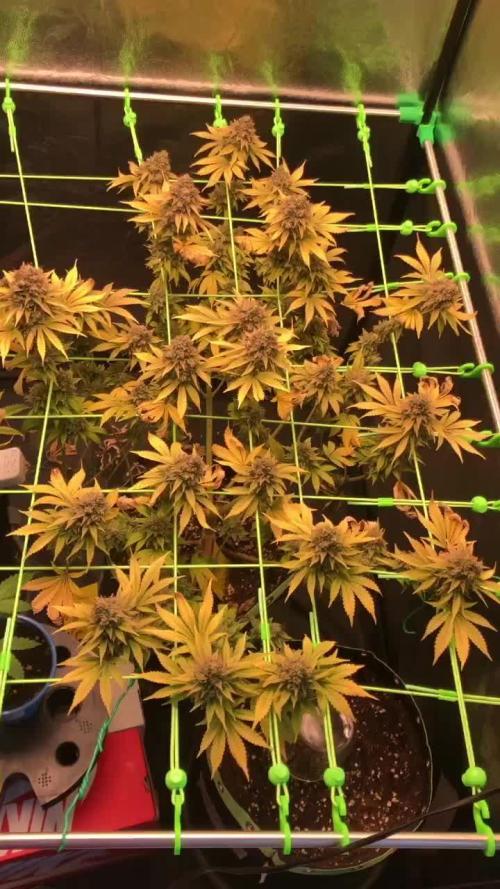
Training week for the girls! 💪
Not a big fan of bending clips but some of the plants seem a bit stunted with slow grow and not much branches to work with! 😕
Hoping they bounce back and have a nice late stretch next week 😅
Likes
2
Share

@Ninjabuds
Follow
My Skunk Apple Run plant is still a bit young, but I can see those buds starting to form. It's a bit of a slow starter, with buds popping up all over the place instead of a nice even line. We'll see if adjusting the light cycle or its food might help it along. I'll keep you posted on any changes.
The past few weeks have been so beautiful, watching the plants grow and change. It's amazing how something so small and fragile can turn into something so strong and vibrant. Now that they're getting ready to bloom, it feels a little bittersweet. I'm so excited to see the finished product, but I'll definitely miss having them around while they're growing.