
Likes
Comments
Share

@Zdenda
Follow
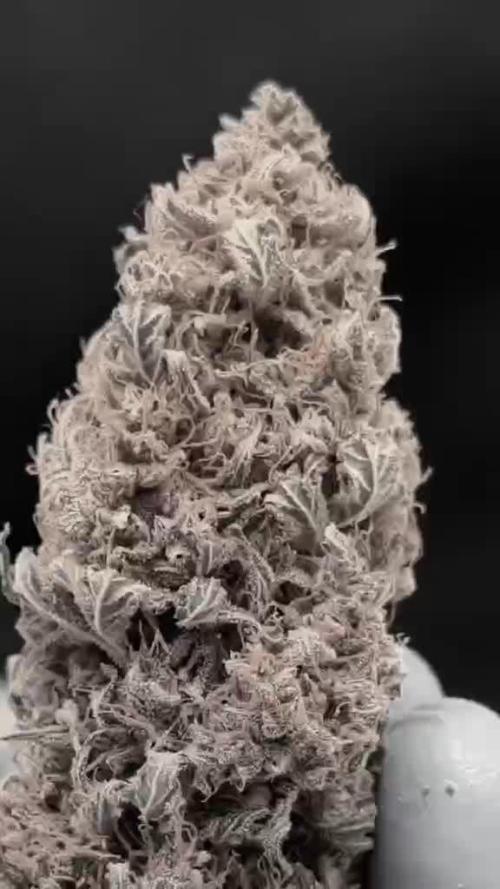
Před čtyřmi dny jsem sundal která jednu už byla.. trichomy už začaly mít i jantarovou kterou nechávám jen trochu..ani né třetinu.Světlo jsem dal na 75%..No a dneska jsem sklidil zbytek. Prorostlé a tvrdé. Lepkavá brokolice mi voní a vypadá to pěkně.. těším se na kouř. Pověsil a nechám schnout.. potom zvážím až suché a ostříhané.

Likes
7
Share


@HeavyHead
Follow
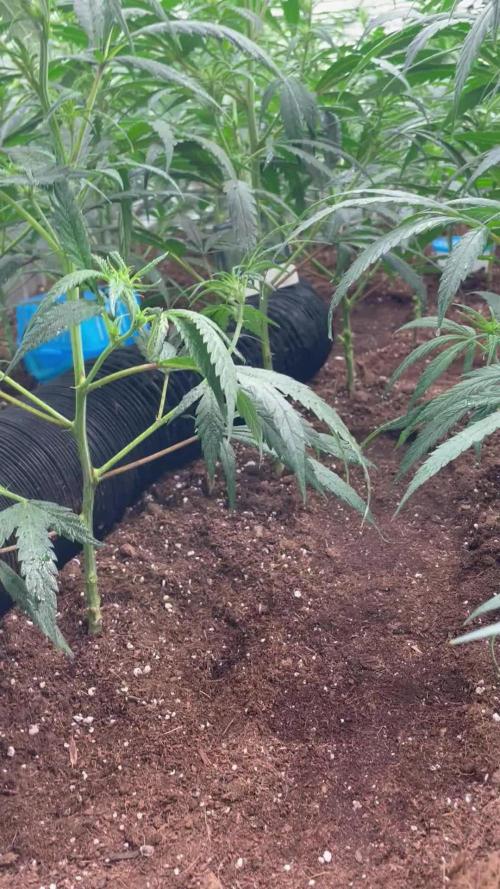
Starting to really be thirsty. Soon as I started the nutrients they started drinking almost twice as much water.
Did some low stress training this week and probably continue tying back and levelling through the next two weeks.
Since it’s an empty tent right now really letting them stretch out ;p

Processing
Likes
19
Share


@eldruida_lamota
Follow
Vamos familia, empieza lo bueno, y es que estás gorillas si han estirado, la primera semana de floración, aportamos algo de big bud para ir amoldándolas.
Es una cepa que se comporta bastante bien en indoor, tallo grueso y bastante distancia entre internudos, deseando ver que flores nos da.
ph controlado en 6,5 ahora va todo fenómeno, temperaturas ideales, humedad correcta 50 % , y pronto la bajaremos a 40 %.
Hasta ahora lo que hay, próximamente nos vemos familia.
Likes
27
Share


@Endriu
Follow
Here we are again Bros&Sis!
During my first indoor grow with Bubblegum XL I've had took some cuts to keep them alive and have some good plants to play with and exploring a little more the vaste world of growing cannabis...
Long story short, 5 of them has radicated (some with plain water technique, some in rockwool cube) and then I started to play with them and tested my chinese Meizhi R300W LED panel (real wattage is 136w) it was full of dust, so why not? 😎
Now, the plants. They are in good conditions, some are in the same pot by weeks now (soil and coco), and try to keep them alive, so maybe they shows sign of suffering. Except for the One:
In the video you will see my REALLY HIGH SCIENTIFIC METHOD (😂) wich I use to choose the best clones that will goes directly under a Scrog net (i am a DIYer) to fill the entire area lighten by the panel, it's a bit ambitious, but it will be fun for sure!
I choose that one because she is the only one that gives me really good vibes and shows me she is strong enough to pass through hst, crop, supercrop and so and so... even if my original intentions was to keep them as a bonsai mothers, I've decided that this project have priority!
10weeks old Bubblegum XL clone
Pot 11lt NetPot
Coco brick with mycos
Canna Coco A+B
Liquid silicon from Growth Technology- guys, this thing is magical, besides the great effects on the plants' roots and system, after a couple of apply the plants were much more flexible and resistant to mites (yes, they are still there, fu**inmotherfu**ers, but this time they will die. forever gone, bye!)- I will never stop to thank @Mr_Di for his precious tips😘Higly basic product, it will raise your solution's PH, so watch out!
Let me know what you think about, mates! CIAO! 😀


Likes
6
Share

@carlitoshaze44
Follow
Así es como empezamos la tercera semana,seguimos con humedad alta pero la vamos controlando..
Estos días da buen tiempo la humedad en la calle será mucho más baja así podré meter aire sin tanta humedad..
De momento todo bien en el cultivo ningún problema hasta la fecha.
Ya podéis ver,y comentar sobre algo que veáis que yo no!
Como dicen! Ven veinte ojos mejor que dos!
🖖
Día 12
Último fungicida prevención mutritis,hongos humedad.
Primer riego foliar hormonas producción de flores.
🌹
Likes
7
Share


@XoticGROW666
Follow
( RUNTZ X F1DURB X GUSHERS )🍬🌈🍨🍧
PURP KICKIN INN END #WEEK4
CANT WAIT TILL THE BUDS SWELL UPP!!
SUPA INTENSE CANDY TERPS THIS ROUND
NOT BIG BUDS BUT SUPA HIGH IN BRIXX LEVEL WITH ALL THE ORGANIC CARBON INPUTS!! PPM 900/1200 1.2 max
(Face Off OG x Watermelon Zkittlez) X (Runtz x F1 Durb x Gushers) 🍉🍬🌈🍧🍨🍦
LIL PRUPLE TINT WIT MOUTH WATERING SUGARY TERPS KICK INN END #WEEK4 BY WEEK 7/8 SHE WILL BE PURPLE PURPLE WIT SUPER INTENSE CANDY MOUTH WATERING TERPS CANT WAIT TILL SEE THEM BUDS SWELL UPP!! PHENO A/B
NOT BIG BUDS BUT SUPA HIGH IN BRIXX LEVEL WITH ALL THE ORGANIC CARBON INPUTS!! PPM 900/1200 1.2 max

Likes
6
Share


@XanHalen
Follow
Nov 29:
They seem to be accelerating in veg growth but I see a small portion of the leaf on the smaller plant either grew in mutated or somthing cut it, I haven’t seen a single bug in the box so I don’t think it’s that but you never know, and the bigger plant has some issues near the base of its stem, I noticed it before I did the LST and now I’m wondering if I should have addressed that issue before starting the LST. Let me know what you guys think!
Dec 2:
Walked into the room and noticed a faint smell, wasn’t any smell last night when I started the LST on the slower girl. Further inspection showed some white pistols on the bigger girl, I believe she is the culprit for the smell as the other seems about a week behind. They are both now LST‘d and leaf tucked. Enjoy the pics and vid’s!
Dec 6:
I have tied down some of the longer chutes on the bigger plant (will see in week 5 update) to create more airflow and light penetration as I didn’t even realize how bushy the stem and node sections had gotten. I have also cut the chutes coming off the first true leaf. I don’t think I will make any cuts to the smaller one as it’s already a slower growing pheno. Going on a trip starting the end of week secede to late week 8, so I have a automatic feeder coming from Amazon, and I will continue using it through flower to reduce open tent time.


Likes
245
Share


@Roberts
Follow
I cut THC bomb auto down today. I think I lost the half hour harvest video. Was a huge plant for a 100 watt spiderfarmer SF-1000 grow. Thanks again spiderfarmer, and Bomb seeds. Will place harvest week when it is dry in about 2 weeks.
Thank you grow diaries community for the likes, follows, and subscriptions on my YouTube channel. I greatly appreciate the support.
To purchase a SF-1000 please follow the appropriate link below:
US:https://amzn.to/396hXXb
CA:https://amzn.to/3ol4oK4
DE:https://amzn.to/3q15SJT
UK:https://amzn.to/2L7NVKN
AU:https://amzn.to/3pZD6ZQ
FR:https://amzn.to/2Xkomsi
IT:https://amzn.to/3nk7A7h
ES:https://amzn.to/2XhtGwB
Discount code: saveurcash

Likes
20
Share


@AsNoriu
Follow
Added first time molasses during feeding will be doing it for last 3 weeks before flush.
For couple plants with redish leaves stems gave epsom salt. Thinking to give it to all of them.
To me they look too skinny, but its aftermath of strech i quess ...
Would love to have one more hlg 240 ...

Processing
Likes
5
Share


@GrowLegend
Follow
Bien aquí esta el día esperado la cosecha, es mi primer cultivo y considero que lo logre. En muchos medios de lectura y en especial en vídeos mencionan que no puedes esperar mucho es tu primer cultivo. En mi caso es falso y lo demuestro ya que si aprendes, investigas por cuenta y lees lo suficiente, obtendrás un alto porcentaje de que los resultados se den. Muy contento con mi plantas y sus tonos morados. Puntos a mejorar tener una carpa de cultivo y por su puesto un extractor de humedad para que baje la humedad preferiblemente a 45 grados
Vendrán mejores contenidos y cosechas mas abundantes. Gracias a todos por su vistas y comentarios. Saludos y bendiciones!


Likes
120
Share


@NugLife420
Follow
Well I had been running my dehumidifier, which blows hot air out the top. The fan then blew that hot air over the canopy resulting in some heat stress on the front plants 😭. I think I caught it in time and made appropriate adjustments. One a good note, the Red Hot Cookies in the back are so heavy with buds, the branches are almost touching the ground (gotta string 'em up). Lol


Likes
2
Share

@Ninjabuds
Follow
Lemon cherry gelato is a good little plant., I like the structure. It has been in the large pots for a significant less amount of time that the others and it is already about the same size so it’s fast growing plant. It’s from Barney’s and everything from them has been amazing so I have high hopes

Likes
27
Share


@Hawkbo
Follow
This is what's left in the tent, the gelato is comin down tonight and maybe the 2 smaller lemon aks maybe tmm. The cream cookies and other lemon AK will come down soon too and then I can get some pics. The pineapple and blue dream get 1 more flush
Likes
14
Share


@snzln2010
Follow
10/18, day 74
While only getting a tiny bit taller, the colas are bulking up, trichomes are developing, and the colors are amazing. She's so pretty! We're starting to take more stemmed leaves off in preparation for harvest, and they are ready to come off, with beautiful yellow fading. There are sooooo many reddish-orange hairs, and it seems most of the tops are being taken over by purples now.
10/21, day 77
Violet's leaves are turning brown and beginning to curl now. When looking at her trichomes, it seems there is not as much amber today as there was yesterday somehow. Every time we open the cabinet, it seems she has changed.
10/23 day 79
Violet has been exploding with trichomes the last couple of days, and I'm just like WOW!! Upon doing more research on trichomes and their development, I found an article that explains things so nicely
(Link: https://www.greencultured.co/cannabis-trichomes-overview/ )
In this article, I learned about the three different types of trichomes: bulbous, capitate sessile, and capitate stalked. The stalked being the tall pretty ones we like to see, which also contain the most resin. At a certain point, the short sessiles develop into the stalked, increasing from 30% to 80-90%. This is kind of far down the article in the section titled "Latest Cannabis Trichome Research." It also explains that the stalked trichomes contain 16 cells while sessile trichomes only contain 8, so the stalked trichome explosion Violet has been having is doubling her medicinal value. I believe that her increasingly strong smell is a sign that this is good information, so I encourage you to check it out. I do not know them, nor have any arrangements with them, I really did just find the article that helpful.
Oh, Violet, our time together is going to be over soon!!
Likes
10
Share


@Fatzoe15145
Follow
Great week continued flowering did notice diet went from one feed to two feeds growing beautifully starting to see crystals on leaves or whatever makes leaves sparkle there is a lite smell but nothing to crazy

Likes
90
Share


@DreamIT
Follow
I've already said a lot about this particular plant, but I'm sure I'll have more to say in the future. Try it !!! : 1:😉🦄
Likes
33
Share


@Belverde
Follow
Welcome growers
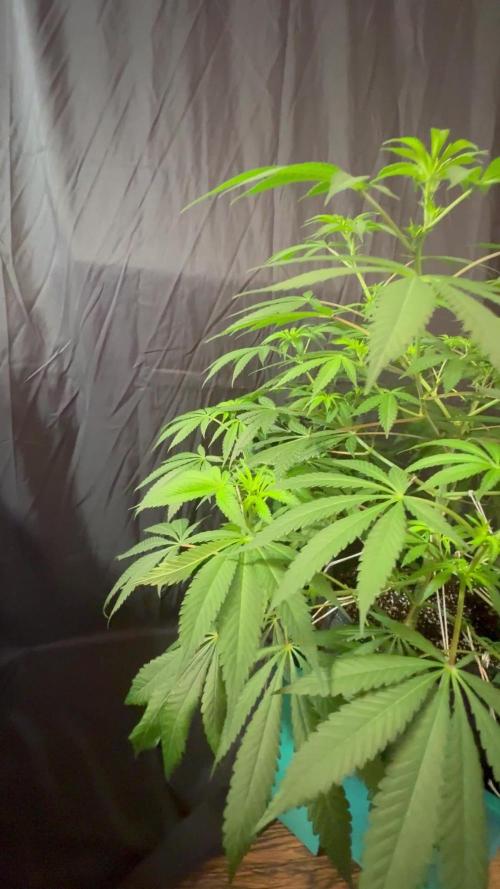
This is the last week in vegetation for my two BLUEBERRY CHEESECAKE 🍰
Last week's topping had a positive effect on one of the two, while the one that is growing in its most natural form has started to develop the lower branches a lot, also thanks to HST techniques...in this case Supercropping..
Both have a very sturdy stem, also given by the 24/7 ventilation from the first weeks of life 🌱🌿🌳
The color of the leaves is a nice green, the one wich is griw in most natural one is perhaps in a slight excess of nitrogen...but that's ok
The general appearance of both is of full health 💪
In a few days I will probably go to defoliate a little ✂️✂️
Anyway
In this week i have reduced the lights cycle from 16/8 on/off to 14/10 on/off 💡
At the same time i have increase the intensity of my two led SP3000 from 50% to 75% and im going to put them at the maximum potency after the switch at 12/12
The two led panel are connected with a cable and i have only to adjuste the dimmer of one of them for change the intensity of each one, in just one move..
About nutrients 👇
In this seven days i still giving their always organic/veganic nutrients..
A little bit of silicium (Bionova) / Activator (Biomagno) / Crescita (Biomagno) / Activera (Biobizz) / Grow vegan (Bionova) / The Missing Link (Bionova) / X-Cell (Bionova) / Bioheaven (Biobizz) for the first time and a little bit of P-K 3-5 (Bionova) {not in spray solution but mixed with the othersone in to the water}
Like i usually do, a little bit of everything at any watering 💧
And that's all..
This was the last week before flowering..
So stay tuned, maybe we will see some fire 🔥
Thanks for watching 😎👍👍
FC ✌️
🇮🇹
