
Processing
Likes
Comments
Share


Likes
2
Share


@dwotTV
Follow
Transplanted in the afternoon of 10/23 because they were rooting out of the pucks. Got some humidity dome cups coming tomorrow and another inline fan to handle intake to try to dial in things a bit more. Fugue State #2, in the black pot is still a bit shell shocked, hopefully it opens up soon.
Well both #2 and #3 damped off / shell shocked to death, so there's just one left, c'est la vie. #1 is trucking along well and ready for week 2.
Sprayed with Neem Oil on 10/24
Fed Light Fox Farms Blend on 10/25
Treated with NemAttack on 10/26

Likes
8
Share


@Tonysmile
Follow
Smell is picking up a little but not bad as she is almost finished. Definitely getting stickier to the touch and honestly an easy grow. Loving it

Likes
1
Share

@TTerpz
Follow
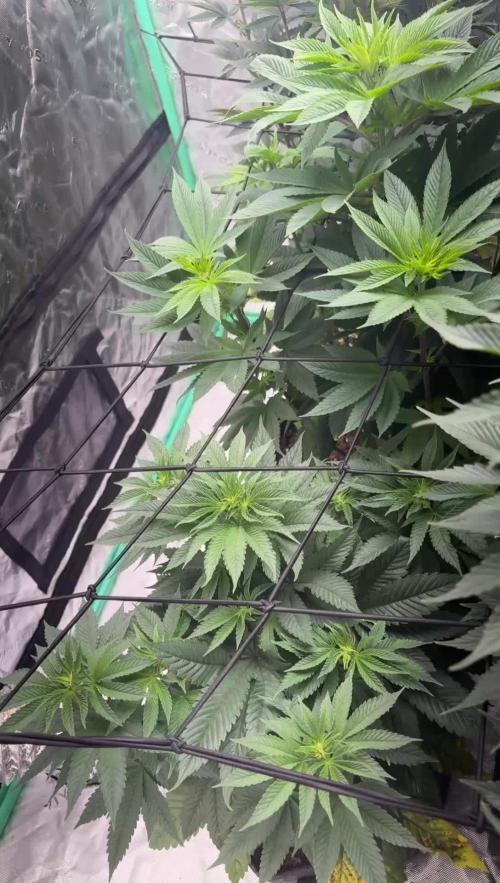
Week 1 of flower lights have been switched to a 12/12 schedule
Back pot is plastic so she was fed nutrients 8/5 because it takes a little bit longer to dry up
Likes
82
Share


@UnorthadoxDude
Follow
Hello growmies! Welcome to week six of An Epsilon Adventure! Massive thanks to both Shogun and Royal Queen Seeds for sponsoring this grow!
So here we are at week six and every one of these girls are at a slightly different stage, it is quite fascinating to watch them develop one after the other.
Today I made the last adjustment to the light possible. I removed the adjustable hangers and affixed a carabiner which I tightly tied to the top of the tent bar. There is about 1.5 inches of space between the top of the shade and the tallest part of the roof of the tent. Plant 1 is already taller than this, and it looks like plant 6 and maybe even plant 5 are going to join it. It's a madness. I am sure you have already looked at the photos but just in case you do what I do and read the diary first...
Here is my assessment at the beginning of week 6:
Plant 1:
Height: 1st (137cm) - what can I say about this ridiculous plant? Day 36... 137cm tall. I have had to raise the light to as high as it is physically possibly to raise it and it's still not high enough. She is done stretching now, she may add 3-5cm over the next week or so but I don't expect more than that, so her top of her main cola going to have to develop above the level of the light. Nothing I can really do, nothing wise anyway. What a monster plant.
Maturation: 4th - early into flower - bud sites developing, pistils just starting to explode.
Plant 2:
Height: 4th (111cm) - this plant has been there or there abouts as the tallest plant for most of the grow, but she has topped out at 111cm. She will gain some during flower but not much more than a few centimetres. Very impressive plant, loads of bud sites, really big strong secondary branches. This one is going to be colas galore.
Maturation: 3rd - well into flower - all white pistils
Plant 3:
Height: 6th (95cm) For some brief days the tallest plant in the room, she peaked early and is now the "shortest" at "only" 95cm for this "50-70cm" strain. She is utterly dwarfed by four of her five sisters in just about every department, being quite a bit smaller even than plant 4 (although I have removed the most lower nodes from this plant). Compared with her sisters she is almost a runt... except that she is 25cm taller than the strain top-end average and matches the maximal height of the previous tallest Epsilon F1 plant I am aware of. It's not that she is small, actually she's pretty big for an Epsilon F1, it's just that the rest of the girls are on another level altogether. Plants 1, 5 and 6 are all absolute beasts.
Maturation: 1st - well into flower - first shades of brown in some pistils.
Plant 4:
Height: 5th (98cm) although only 3cm taller than plant 3, overall she is a much larger plant. Her secondary nodes are the same height as plant 3.
Maturation: 2nd - well into flower - all white pistils
Plant 5:
Height: 3rd (113cm) - one of the two thick/short girls who have grown at a similar pace all along - she is further ahead than plant 6 but not by much and I think she will probably exceed 120cm this week, though I do not think she will outgrow plant 1 or 6.
Maturation: 5th - early into flower - bud sites developing.
Plant 6:
Height: 2nd (120cm) - my predictions were correct about this girl and her continued growth. I now think she might actually outgrow plant 1, which is quite worrying.
Maturation: 6th - early into flower - bud sites forming - by far the least mature plant of the six.
###
Week 6 Day 2 23:00 30/7
Photographed. Raised the light. Rotated the plants. Inspected, measured and reported on each plant.
###
Week 6 Day 3 23:00 31/7
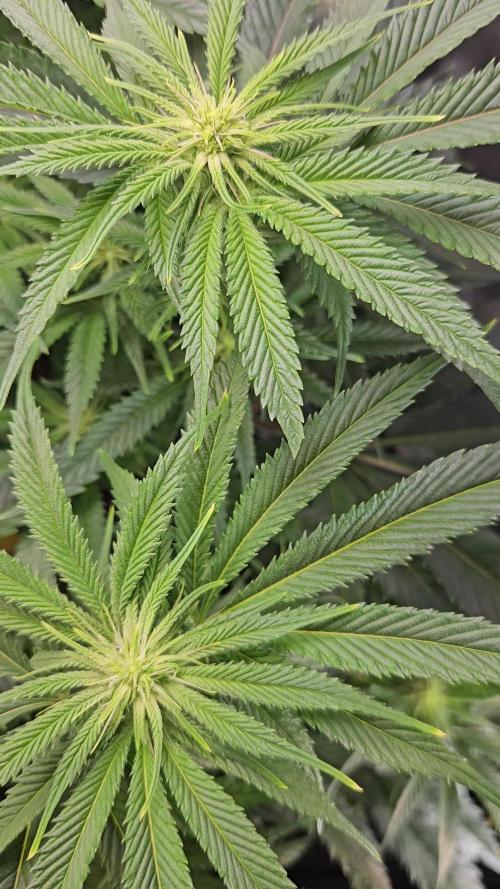
It has not escaped my attention that the plants that are more advanced into flower have darkened and have some burnt tips. I need to flush them and lay off the base nutes a bit. These plants are just growing and maturing so quickly that I cannot keep up.
###
Week 6 Day 5 02:30 2/8
Fertigated 3l of nutrient mix, without either COCO A or B.
###
Week 6 Day 6 01:30 3/8
photographed
---
Thanks for reading growmies! 👊
==========
Tent: 120cm x 120cm x 180cm
Light: 600w HID Elite Dual Spectrum HPS + Angel Wing Reflector
Air: 5" duct fan system with carbon filter ~300 m3/hour + RAM 9" floor fan + 4" intake fan
Pots: Air Pruner Fabric Pots 30l - UGro XL Coco + horticultural grade perlite (~20%)
Seeds supplied by Royal Queen Seeds https://www.royalqueenseeds.com
Nutrients supplied by Shogun Fertilisers https://www.shogunfertilisers.com/en
==========


Likes
11
Share


@Paflucy
Follow
Hello everybody :)
End of the tenth week of flowering.
Power Plant already harvest at day 69
Wild Thailand and Critical Haze gets Final Solution - last two waterings only water and harvest - probably another week.
SSH, AMG and Pallezino Ghost Train needs aroudn 10 more days so they get their last doses of fertilizers, than Filan Solution and then only water
Ghost Train Haze X Pellezino make some fox tails and probably it's in genetics because clones react the same and they are in different medium under different lighting


Likes
59
Share


@TheCannaProphet
Follow
~ AirCube Active Oxygen Ebb/Flow System sponsored by GrowAce, featuring Tropicana Cookies by FastBuds ~
Well guy's and gal's here we go again on another exciting Autoflower run together! This time will be different as I will be doing a 'Hydroponic' run utilizing the AirCube Active Oxygen Ebb/Flow System by GrowAce, who were kind enough to sponsor me for this run, so it should be interesting to see what results I get and have some fun along the way!
•Let me first tell you about this 6 Pot Ebb/Flow system from GrowAce:
"The AirCube system is the one and only Ebb & Flow grow system on the market that combines the benefits of air pruning with a fully automated Ebb+Flow system! With the AirCube's proprietary fabric pot in bucket design, this system is guaranteed to outgrow any other Ebb + Flow system on the market. The results speak for themselves- grow MASSIVE roots that result in MASSIVE fruits!
Air Pruning- Air Pruning only happens with fabric pots. As the roots reach the fabric walls of the pot, they penetrate and grow into the breathable fabric. Once penetrated, the roots are exposed to air, which causes the tips of the root to dehydrate and naturally prune themselves. This natural pruning process forces the roots to grow tons of lateral fibrous feeder roots. This results in a plant that utilizes the entire root zone and fills the entire pot with tons of roots. These fibrous feeder roots are incredibly effective in uptaking water and nutrients, resulting in a plant that grows healthier and more vigorously!
Oxygen Benefits- Without oxygen, nutrient absorption cannot occur. On a molecular level, oxygen is needed to transmit nutrients across the cell walls and into the roots of a plant. With the AirCube's proprietary bottom lifted draining design, the system actively draws all of the water out of the bucket pulls vital oxygen into the root zone.
Maximum Versatility with Any Grow Medium: The AirCube System is the only system on the market that allows you to use any growing medium you like. Use coco coir, soil, peat moss, perlite, vermiculite, hydroton, rockwool or any other medium you wish! This system is the most versatile Ebb and Flow bucket system in today's hydroponics industry.
Temperature Control- with the fabric pots constructed with highly porous polypropylene fabric, heat dissipates easily and effectively. Unlike standard plastic pots, heat isn't trapped in the root zone. Heat in standard plastic containers can reach temperatures of up to 125 degrees. When this type of heat is trapped and unable to escape, it can damage your plant's health and limit the potential of your harvest. Growing in the AirCube System, plant roots grow cooler, healthier, and more vigorous.
Largest Pots in its Class- this system features 5 Gallon grow buckets, the largest pot size of any other ebb and flow hydroponic system in the market.
Modular and Expandable- start with 6 grow buckets and expand up to 36 grow buckets with the optional 105 gallons PopTank reservoir!"
For my medium and nutrients I decided to also switch things up from my regular Organic runs, going with Plagron Nutrients and Root Royale 70/30 Coco/Perlite. When filling the fabric pots with medium, I first added just under a gallon of horticulture perlite from Nor-Cal as a base layer to ensure good drainage and then filled the remainder with the Root Royale.
•Now for the outstanding, award winning strain from my friends at FastBuds... Tropicana Cookies Auto:
I'll be running Tropicana Cookies Autoflower which is a 60/40 Indica/Sativa Hybrid. "Tropicana Cookies Auto is the perfect variety for growers of all levels, especially beginners as this strain performs very well outdoors and indoors, and can produce up to 500 gr/m2 in 56-63 days without needing extra maintenance. Reaching up to 110 cm, this strain grows fairly tall with medium-sized branching, showing its mixed heritage. Definitely the right choice for those with a high tolerance looking to get their hands on the strongest autoflowers out there. You can expect an extremely powerful and long-lasting high that’ll boost your mood and give you that extra push you need to start your days on the right foot. This variety offers the whole range of citrus and woody flavors with a strong candy-sweet background that will keep you coming back for more and more."*
*References: GrowAce.com, 2fast4buds.com
______________________________________________________________________________________________________________________________________________________________________________________________________________________________________________________________________________________________________________________________________________________________________________________________________________________
The Setup:
• AC Infinity 4x4 tent
•AC Infinity Cloudline T6 Exhaust Fan w/ Controller 67
•HLG 650R w/UVA Bar
•AirCube Active Oxygen Ebb/Flow 6 pot System
•TrolMaster Hydro-X Controller for light
•AutoPilot APC8200 co2 controller fed by a 50# tank
•16" Hurricane oscillating fan and 8" floor fan
•Tent cooling via filtered outside air delivered by AC Infinity Cloudline T6 fan
•BlueLab instruments: PH Pen and Truncheon Nutrient Meter
______________________________________________________________________________________________________________________________________________________________________________________________________________________________________________________________________________________________________________________________________________________________________________________________________________________
Weekly Updates:
10/1- Setting up the AirCube system when off without a hitch, with very easy to understand directions. I did have one issue, the Drain Petcock on the 25g reservoir was broken during shipping. After a phone call to GrowAce, they had a replacement one on its way to me which I received in just a couple of days! I did however make one addition to the system. I placed a pair of air-stones, one in the Reservoir and the other in the Distribution Bucket to really oxygenate the water.
I started all my seeds by first soaking them in tap water for 12 hours, then transferred them into pre-moistened (6.3ph) peat pellets. I placed the pellets in half Solo cups in the tent with 24hrs of light under which they sprouted within 48 hours. I kept the tent temperatures between 80-84℉, the RH at 65-70% and made sure that the pellets stayed moist, not wet.
10/3- All of the Tropicana Cookies are looking healthy and have good color and vigor! I'll be moving them into their fabric pots which have already been pre-moistened in the next day or two, or as soon as I see roots emerging from the pellet.
10/5- Today I moved all three Tropicana Cookies into the fabric pots, adding some Xtreme Gardening's Mykos into each hole before placing the peat pellets. I have the HLG 650R set to 15% and hung 30" from the seedlings. Tent temperatures are 80-84℉ with RH running 65-70%.
10/7- Well there's the first week on the books for these three little ladies and they're looking fantastic. I'll be giving them their first feed this coming week and they should start to really take off... stay tuned! 😎👍❤️
💚 Thank you for checking out my passion in life! Please visit as often as you wish and I hope you enjoy this journey as much as I know I will! Grow what you love, Love what you grow!💚
Likes
23
Share


@eldruida_lamota
Follow
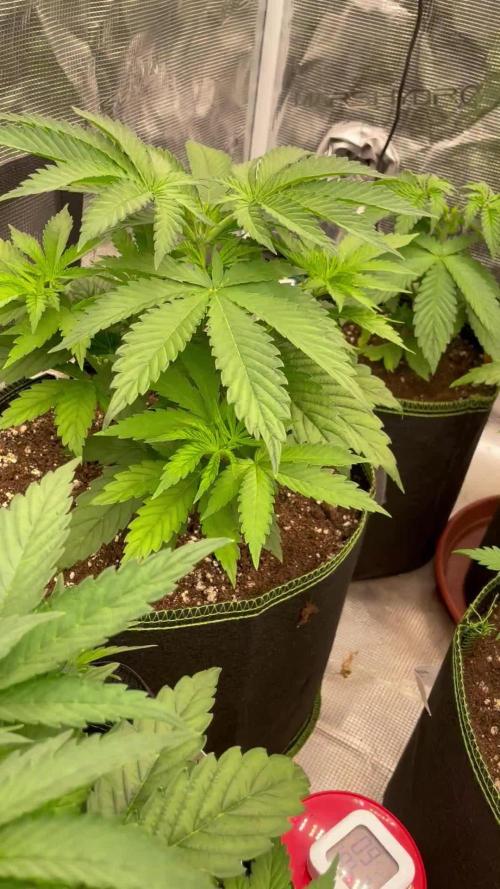
Buenas a todos familia, 4 semana ya.Recta final del periodo de crecimiento,conforme cambiemos el foco cambiamos el fotoperiodo a 12/12 .
El trasplante fue un éxito, no hubo complicación ninguna.
La tierrra que usamos fue PLAGON LIGHT MIX.
Todo va sobre ruedas , la condiciones en crecimiento fueron óptimas , las power plant xl, aún que parezca que no, acabarán recuperando, solo les falta ese pequeño estirón y ale.


Likes
3
Share

@sunshinegroww
Follow
Well very good looking too very happy and healthy so far so good i think one more week and goes to flower lets see 🏝️
Likes
5
Share

@Salokin
Follow
Week 4 | Glookies Auto
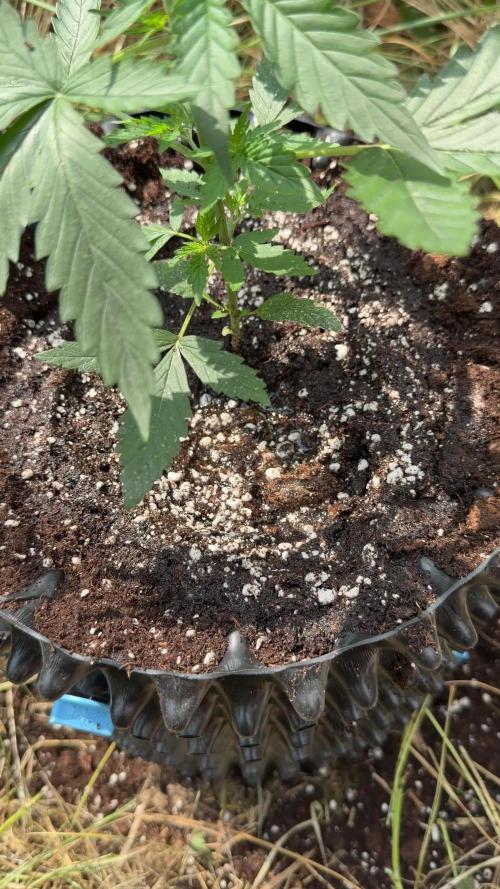
Decision made. After three weeks of side-by-side comparison, one plant clearly outperformed her two siblings in vigour, structure and overall development. The other two have been discarded, and the winner has now moved outside — straight into a 12L airpot, bottomless, set in the garden next to the 46 Kush.
**RootX** was applied again at this transplant, delivering mycorrhiza (*Glomus intraradices*), *Trichoderma harzianum*, 13 strains of *Bacillus spp.*, humic acids, amino acids and vitamins straight into the new root zone — giving her the same strong start outdoors that got her through the indoor selection phase.
Last recorded indoors before the move: Week 4, height 18cm, light schedule at 17 hours, EC 1.5 mS/cm, pH 6.2. Now she's outside and adjusting to natural light and the elements.
She's settling in well, leaves looking healthy and well-watered. Updates every Sunday. Stay tuned.
Likes
4
Share

@BobbersDown
Follow
This plant is an absolute beast. Have trimmed up all the lowers I need to I think, left several that should make good colas and even out the canopy. Starting to smell a bit sour in a good way, expect it to swell up over the next week. Favorite time now that we're in flower and most of the trimming and training is done! Stay tuned folks!


Likes
48
Share


@Focus420
Follow
focus smells and tastes very nice.😘👍
sweet earthy taste. 🌱🌱
very earthy effect. 🙃👌 100% forest
I RECOMMEND🌶️

Likes
32
Share


@Doubleb84
Follow
Great week again with this plant! Going to let her go as long as she takes, waiting for a little more amber in the trichomes.

Likes
3
Share


@bigsmoke42069
Follow
Great strain, would recommend.
Nice smoke/vapor, friends love it, stupefying and euphoric, no heavy couch lock like heavy indicas.
Taste great in The Mighty vaporizer, citrus with a hint of pine.
Likes
228
Share


@StarLorr
Follow
Welcome to my Pablø Escøbar diary.
In this diary:
Seeds: sponsored by Ðivine Șeeds
Media: Promix HP
Nutrients: Advanced Nutrients, Diablo Nutrients.
Light and Weather: Şun☀️and Mother Earth.🌎
___________________________
Feeding:
Wed 12Jun: 4L nutrients pH'd 6.5
Thu 13Jun: 2L water not pH'd in bottom saucer only.
Fri 14Jun: 4L water not pH'd
Sat 15Jun: 4L water not pH'd
Mon 17Jun: 4L water not pH'd
___________________________
We had a beautiful week with fresh days and nights, nothing out of the ordinary besides Thursday's wind gusts followed by thunderstorms during the evening and night. Pablo handled it no problem.
___________________________
Thanks for stopping by, likes and comments are appreciated!👊🏻😎
Keep on growin!
Keep on tokin!!!
😙💨💨💨💨💨

Likes
33
Share


@Titoff
Follow
Cette semaine grand changement, une de mes tentes étant enfin prête à être coupé, après bien entendu avoir eu au moins 10 jours de rinçage, a donc subis une petite permanente, suivis d’une coupe été. Un travail de titan, commencé à 14H et finis à 6h du matin ! Je pense pour la prochaine session à investir d’un appareil de type trimmer pour faciliter le travail. Par contre étant un peu dépassé par ce travaille, je me suis un peu emmêlé les pinceaux et je me retrouve donc à présent avec les filles coupées mais impossible de dire qui est qui ! La poisse, petit manque d’organisation, je l’avoue, ferais mieux la prochaine fois. Je me pose tout de même la question de comment estimé au mieux le poids mouillés car sur la balance, j’ai pour l’instant 2kg, je vous donnerais donc le poids final sec par la suite qui correspondra donc plus au fameux gramme par watt que tout le monde recherche. Bon Grow à tous
J’ai laissé semaine de floraison car j’ai toujours une tente en floraison et ma semaine de récolte sera donc compléter de manière plus juste et plus précis par la suite.
Likes
14
Share


@Wenz004
Follow
my first coco grow...2 plants
1. northern light auto untopped in spider farmer tent 150x150 cm (5×5) with Aptus nutrients...this one goes out of control...let see if I can repeat this crazyness
2. northern light auto topped in spider farmer tent 70x70 cm and mainly TA nutrients
Nutrients mentioned above are for NL topped (2.) in smaller tent (pictures follow)
NL untopped (F-MILF) got this week the following:
Aptus Topbooster 6 drops/l
Aptus P-boost 12 drops/l
Aptus K-boost 6 drops/l (this week added new)
Aptus regulator 3 drops/l
Aptus All in one 0.6 ml/l
Aptus CaMg 0.6 ml/l
TA Silicate 0.4g/l
End of week 10 installed some self-watering (3 days off)...with coco problematic let see...final two weeks will be completely without any manual influence (2 weeks off)...hopefully staying alive
Processing
Likes
31
Share


@MadeInGermany
Follow
Hey everyone ☺️.
She has developed well this week, but still wants more food.
Although I'm already at 5 ml per liter of water 🙈😃.
topping was also used this week 👍.
Otherwise everything is going great and everyone is on schedule 😃.
Have a nice week, stay healthy 🙏🏻, and let it grow
You can buy this Strain at
https://www.barneysfarm.com/blue-cheese-34
You can buy the fertilizer at
https://www.greenbuzzliquids.com/
Type:
Blue Cheese
☝️🏼
Genetics:
Blueberry
X
Original Cheese
👍
Vega lamp:
2 x Todogrow Led
Quantum Board 100 W
💡
Bloom Lamp :
2 x Todogrow Led
Cxb 3590 COB 3500 K 205W
💡💡☝️🏼
Soil :
Canna Coco Professional +
☝️🏼
Fertilizer:
Green Buzz Liquids :
Organic Grow Liquid
Organic Bloom Liquid
Organic more PK
More Roots
Fast Buds
Humic Acid Plus
Growzyme Big Fruits
Clean Fruits
Cal / Mag
Organic Ph - Pulver
☝️🏼🌱
Water:
Osmosis water mixed with normal water (24 hours stale that the chlorine evaporates) to 0.2 - 0.4 EC. Add Cal / Mag 2 ml per l water every 2 waterings . Ph with Organic Ph - Pulver to 5.8 .