
Likes
Comments
Share

@CCGS1mon
Follow
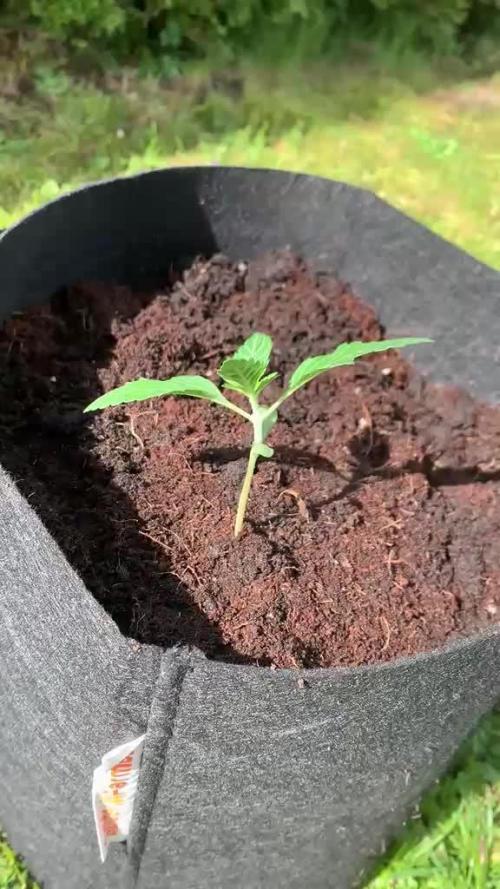
Heute bekam unsere Runtz Gum endlich ein neues Zuhause. 🌱
Das Umtopfen lief zwar nicht ganz so entspannt wie geplant und danach sah sie erstmal etwas gestresst aus, aber sowas gehört beim Growing einfach dazu. Die Wurzeln müssen sich jetzt erstmal an die frische Erde und den größeren Topf gewöhnen, bevor sie wieder richtig Gas geben kann.
Jetzt heißt es: Ruhe bewahren, nicht zu viel gießen und der Pflanze etwas Zeit geben. Mit stabilem Licht, guten Bedingungen und ein wenig Geduld sollte sie sich schnell wieder erholen und bald noch stärker weiterwachsen.
Jeder Grow bringt kleine Herausforderungen mit sich, aber genau daraus lernt man jedes Mal etwas Neues. Die Runtz Gum hat auf jeden Fall Potenzial und wir freuen uns darauf, ihre Entwicklung weiter zu verfolgen.
Update coming next week 👽

Likes
3
Share


@Naujas
Follow
63 days!!!! the girl is growing and maturing fantastically :) of course I would like a bigger room for her, but I grow it in the conditions I have :) the girl drinks 3 liters of water with nutrients biobiiz 6.3ph (I also give advancet nutrients micro) she likes it :) since I have two different species growing in my tent, I don't understand the aroma of the trivia :D their terpenes smell very delicious, I just don't understand which one smells better :D good luck to everyone :).


Likes
7
Share


@BIYEI
Follow
Floracion (Tiempo estimado 64 dias)
Segunda Semana de Floracion
15/01/2024 - 5:00hrs y 22hrs: Se verifican parámetros básicos del agua, mantener cuidados específicos.
Agua de osmosis: Ph 6.0, PPm 1000-1250, Ec 2.0-2.5, Temperatura 20°C - 26°C, Humedad 75%
Ambiente: Temperatura 24 °C, Humedad 65%, Ventilación 15%, 12 hrs de luz , 12 hrs de obscuridad.
16/01/2024 - 5:00hrs y 22hrs: Se hace cambio de solucion nutritiva, con los mismos parametros de la semana, Se lavan recipientes, Se verifican parámetros básicos del agua, mantener cuidados específicos.
Agua de osmosis: Ph 6.0, PPm 1000-1250, Ec 2.0-2.5, Temperatura 20°C - 26°C, Humedad 75%
Ambiente: Temperatura 24 °C, Humedad 65%, Ventilación 15%, 12 hrs de luz , 12 hrs de obscuridad.
17/01/2024 - 5:00hrs y 22hrs: Se verifican parámetros básicos del agua, mantener cuidados específicos.
Agua de osmosis: Ph 6.0, PPm 1000-1250, Ec 2.0-2.5, Temperatura 20°C - 26°C, Humedad 75%
Ambiente: Temperatura 24 °C, Humedad 65%, Ventilación 15%, 12 hrs de luz , 12 hrs de obscuridad.
18/01/2024 - 5:00hrs y 22hrs: Se coloca una red extra para separar los tallos secundarios y entre mas la luz entre las ojas, Se verifican parámetros básicos del agua, mantener cuidados específicos.
Agua de osmosis: Ph 6.0, PPm 1000-1250, Ec 2.0-2.5, Temperatura 20°C - 26°C, Humedad 75%
Ambiente: Temperatura 24 °C, Humedad 65%, Ventilación 15%, 12 hrs de luz , 12 hrs de obscuridad.
19/01/2024 - 5:00hrs y 22hrs: Se verifican parámetros básicos del agua, al acomodar bien los tallos secundarios por la red por accidente troce una rama, coloque savila para ver si reconstruia la pared celular rota, queda en observacion, mantener cuidados específicos.
Agua de osmosis: Ph 6.0, PPm 1000-1250, Ec 2.0-2.5, Temperatura 20°C - 26°C, Humedad 75%
Ambiente: Temperatura 24 °C, Humedad 65%, Ventilación 15%, 12 hrs de luz , 12 hrs de obscuridad.
20/01/2024 - 5:00hrs y 22hrs: Se verifican parámetros básicos del agua, no se observa mejoria asi que se procede a cortar ese tallo segundario, mantener cuidados específicos.
Agua de osmosis: Ph 6.0, PPm 1000-1250, Ec 2.0-2.5, Temperatura 20°C - 26°C, Humedad 75%
Ambiente: Temperatura 24 °C, Humedad 65%, Ventilación 15%, 12 hrs de luz , 12 hrs de obscuridad.
21/01/2024 - 5:00hrs y 22hrs: Se verifican parámetros básicos del agua, mantener cuidados específicos.
Agua de osmosis: Ph 6.0, PPm 1000-1250, Ec 2.0-2.5, Temperatura 20°C - 26°C, Humedad 75%
Ambiente: Temperatura 24 °C, Humedad 65%, Ventilación 15%, 12 hrs de luz , 12 hrs de obscuridad.
Likes
21
Share


@medicalflyer
Follow
Will gladly take any comments or criticism. Thanks for visiting!
Day 50 Started the week off with a nutrient change and just keeping an eye on growth and formation! Dropped the light down but will bring it back up if theres any burn. Temps are averaging 75F and haven't seen any issues.
Day 52 lowered the light to 10 inches above canopy and will see if it impacts negatively. I feel like she's getting too crowded.
Day 53 I feel like the buds are starting to thicken up. Some tops are frosting up but most aren't showing.
Day 54 Added more ph water to the reservoir.

Likes
18
Share


@VI_Cannabis
Follow
May 31st
Everything is looking good after the LST from last week, I said I was going to swap them into flower and I realized that I should wait another week or so as they will be going into a new home so to speak. Updates coming next week for that. Doesn't look like to many PH issues anymore or whatever was happening but the plants seem a bit happier now
June 1st
I Figured today would be a good day to do a bit of defoliation on these girls in order to get some more light down to the newer growth. I didn't take a ton off as you can see, but for the size of the plant I suppose it was a decent amount. I read somewhere that a general rule of thumb is only defoliate roughly 30% of the plant at most. I'm not to sure if it is true but I tried to stay within that general rule.
June 2nd,
I decided since I would have them in veg for at least a little while long I would top them again. After topping I gave them some water and nutrients. I know I said I would do straight water for the next one but I went for it anyways as it seems the flowering mixture may be giving it some deficiency's. So I gave them the recommended feeding for heavy veg growth. I gave about 3L to the bigger plant and around 2L to the smaller plant (as it was still a bit moist but it wasn't damp). My crappy soil tester was saying my soil was at around 8PH so I figured I would aim to feed around 6ph. With the small amount of runoff from the smaller plant I did A PH test and the PH seemed to be around the 4.5-5ph area. My liquid ph meter arrived broken so I am waiting for the new one, therefore I am using the general hydroponics liquid test kit. I presume my soil ph is lower then the water I have given seeing as it went from 6ph water to around 4.5. Next feeding I will aim to feed at 7PH. With the defoliation I just made sure that the tie downs were decently tight still and moved what I thought needed to be moved.
June 3rd,4th
Not a ton to update on. I didn't get any pictures for these 2 days.
June 5th
Some obvious problems going on with the bigger plant. I am guessing it is the PH issue but I am still unsure. The one browned leaf I accidentally squished in the tie down while I was low stress training it so it got a bit damaged. Other then that the plants are growing decent. Im not sure why I didn't have more pictures for today but I mainly took problems of the problem areas.
June 6th
Not much going on still. They are still just hanging out not doing to much. It was a busy work week so pictures in general were a bit lazy. I will try to get more for the upcoming weeks. Big news for next week!
Likes
3
Share


@mquintero7
Follow
Very big plant, growing very well, nothing negative to report. Responding well to training.
Responding well to fertilization too.

Likes
2
Share


@fabialien
Follow
13 Agosto 2024. selección de semillas y colocación en vaso con agua ph 6.0 con agua Oxigenada.
14 de Agosto se ponen en agua las semillas por 24 horas para hidratación.
15 de Agosto, con las semillas con muestra de radicula procedemos a pasarlas a papel absorbente.
16 de Agosto se muestra la radicula avanzada.
17 de Agosto en la mañana se puede apreciar el crecimiento de la radicula.
17 de agosto en la noche trasplantamos a "Peat Pallet" y una a maceta de cartón ya que la radicula creció bastante.
18 de agosto ya en los "Peat pallet" se pueden mostrar qué las semilla se cayo por completo e iran abriendo en el transcurso de las horas, las tenemos en un domo germinador dentro del Indoor.
🌡️ 27.1 ⁰C
💨 75% Humedad
🌫️ 0.9 VPD kPa.


Likes
41
Share


@TerpTurtle
Follow
-Set up a 4x4 with the mars hydro FC6500 and planning to do a more hands off grow style the first run with clones in auto pots
-Swapped my older model AC Infiniti T4 exhaust with the cloudline T6 equipped with the new controller 69 for complete grow automation.
-Ordered the adapter to connect my HLG 350R with the controller 69 allowing automated light control dim switches between RH & temperature and sunrise/sunset effect.
-Flipping to flower
-Heavy selective defoliation /start lollipop cleanup
-Foliar fed


Likes
8
Share


@Chronicbastard
Follow
Well the stretch is done.2 of these girls have big nice nuggs that will be done in a couple weeks and the other 3 have much small nuggs and they look like they have about 4 to 5 weeks left .

Likes
2
Share


@Mrniceeguy
Follow
Week 3 for two of them week 2 for one topped two out of the 3 plants transplanted about 2 days ago and out under air cooled 600 w hps euro light 💪🏼


Likes
4
Share


@Blazin69
Follow
Hard not to play with them but i did anyway. These girls look ready being all golden. Close inspection of tri shows a couple of golden tips (not many). Top of heads look good but down low are still white hairs and no cloudy tri. I will wait another week. Having pulled a small cola I plan to try in a week after drying to see how it tastes.

Likes
6
Share


@emeraldlabs
Follow
Did a lot of defoliation this week so while growth is still obvious, they are exploding. Getting the number of future colas up! Working on getting all the main ones level and outside of rings.
Lowered light a little bit and increased cal/mag this week.
I have a sunroom with ~200 succulents and buy ladybugs a few times a year to minimize any pests. Put a few in with the girls to keep them company.
Photos/video are day 36 since breaking the soil. My little helper in last pic.

Likes
62
Share


@nonick123
Follow
Día 29 (18/11) Subo a DLI 45
CBD Auto 20:1 #1 sigue sin mostrar las preflores... ¿será una auto tardía o será una fotoperiódica?
Cada planta empieza a tomar su ritmo de riego personalizado, así que allá vamos:
CBD Auto 20:1 #1 1000 ml
CBD Auto 20:1 #2 0 ml
LSD-25 Auto 750 ml
OG Kush Auto 750 ml
He observado que regar 1 litro de golpe provoca escorrentía (llevándose nutrientes del Super Soil), de modo que riego primero 750 ml, y a los 5-10 minutos añado 250 ml adicionales y el sustrato es capaz de absorberlo todo😁
Día 30 (19/11) CBD Auto 20:1 #1 sigue sin mostrar las preflores...
Debido a que no para de crecer CBD Auto 20:1 #1, decido hacerle una buena defoliación y algo de Lollipopping. A ver como reacciona!
Riego H2O RO
CBD Auto 20:1 #1 750 ml
CBD Auto 20:1 #2 750 ml
LSD-25 Auto 500 ml
OG Kush Auto 500 ml
Día 31 (20/11) Por fin CBD 20:1 Auto #1 muestra las preflores (femeninas)! 😍 Parece que va a ser una Late Bloomer!
OG Kush Auto están empezando a estirarse, parece que va a ser un monstruo!
Riego H2O RO
CBD Auto 20:1 #1 750 ml
Día 32 (21/11) CBD Auto 20:1 #1 se muestra imparable en su crecimiento a pesar de la defoliación y el Lollipopping de hace dos días
De modo que me decido a hacerle Supercropping!
Dicen que NO se debe hacer Supercropping a las Autos, pero siempre me gusta experimentar y ver que ocurre. Come on!
Un día muy divertido! 😁
Riego H2O RO
CBD Auto 20:1 #1 750 ml
CBD Auto 20:1 #2 500 ml
LSD-25 Auto 750 ml
OG Kush Auto 750 ml
Día 33 (22/11) CBD Auto 20:1 #1 se ha recuperado estupendamente! No deja de crecer y estirar cada una de sus ramas!
OG Kush Auto está estirándose muchísimo (4 cm / día), de modo que decido hacer LST a la cola principal para buscar una nivelación de la canopia
Riego H2O RO
CBD Auto 20:1 #1 750 ml
CBD Auto 20:1 #2 0 ml
LSD-25 Auto 0 ml
OG Kush Auto 0 ml
Día 34 (23/11) OG Kush Auto se ha recuperado muy bien del LST! 😍 La rama principal ya está apuntando hacia arriba y creciendo!
El resto de ramas de OG Kush Auto empiezan a estirarse igualando la canopia
Le aplico un ligero LST para espaciar y distribuir las ramas
Riego H2O RO
CBD Auto 20:1 #1 1000 ml
CBD Auto 20:1 #2 750 ml
LSD-25 Auto 750 ml
OG Kush Auto 750 ml
Día 35 (24/11) Lollipopping & Defoliation day! 😍💥💨😁
CBD Auto 20:1 #1 Lollipopping de todos los nodos y hojas quedan por debajo del plano "virtual" que marca el supercropping
CBD Auto 20:1 #2 Defoliación de algunas hojas de abanico que tapan a cogollos inferiores
LSD-25 Auto Defoliación de algunas hojas de abanico que tapan a cogollos inferiores & Lollipopping de una par de nodos de las 2 ramas inferiores
OG Kush Auto Eliminación de las ramas del 1er nudo (eran enanas y débiles) y defoliación de algunas hojas de abanico que tapan a cogollos inferiores.
Riego H2O RO
CBD Auto 20:1 #1 1000 ml
CBD Auto 20:1 #2 0 ml
LSD-25 Auto 0 ml
OG Kush Auto 0 ml
💦Nutrients by Bio Tabs - www.biotabs.nl/en/
🌱Substrate PRO-MIX HP BACILLUS + MYCORRHIZAE - www.pthorticulture.com/en-us/products/pro-mix-hp-biofungicide-plus-mycorrhizae
"GDBT420" 15% DISCOUNT code for the BIOTABS Webshop https://biotabs.nl/en/shop/
Likes
31
Share


@Endriu
Follow
Hello Bros&Sis! Ciao!😊
this time I've decided to made a video update, from the start of the week to the finish, we're gonna see some BIG differences! (The longest is from the end)
About the ladies:
Girls in coco
Royal AK- she's drinking every single drop op solution and has literally exploded! I'm really happy about her training (top/lst/hst). A very strong strain.
OG Kush- I don't get this girl, she's definitely not an heavy drinker.
Speedy Chile FF- when I re-potted her into 6lt pot, some of my Bros hoped for a Baobab, what do you think?😂 (has some mutations, has a growth of 3 leaves and then 2 branches have joined together and the other has grown normally)
Ladies in Soil:
UK Cheese auto- I've broke a branch due to heavy crop. Lesson learned.
Pink Doc CBD auto- she's growing good, finally! The only thing I'm worried about is that she will not grow so much, because switch is near.
Candy Kush Express- A really nice lady, not too tall, good side branches and she take everything with no care less (one of the most "broken" in the tent)
Special Kush#1- She likes her new pot, but there's something wrong (see leaves) maybe related to VPD or RU?
I've used different techniques on this ladies, but the one I like the most is cropping the branches and the main stems and also broke the branches where meets the stems, to give'em more power, and more "space" for nutrients transports in sight of bloom!
That's all mate, we will see soon for the next update! Ciao!😙
(hey @Growdiaries if you want to use my video, feel free to do it, but please, don't change the music, it's already on YT and for CC use)


Likes
49
Share


@Guerilla_Jack
Follow
End of fifth week of flowering!!All four girls looks really fine.Cant't wait to smoke 😋😁


Likes
11
Share


@TOTEM
Follow
I don’t say I’m impressed, because it wouldn’t be enough. This plant stretched in a way that I’ve always dreamed about. She’s a REAL sativa, but not all the phenotypes are the same. My other Dance World is not as strong as this one, and she’s not going to become as tall as this as well.
The heat lamp is now very close to her pot, and this makes the soil to drain up faster. This means that I have to water (+ nutrients) twice a week, instead of one like all the other plants inside the grow room. But this is not a problem since she’s very big and needs a lot of food to manage all that stuff.
Likes
17
Share


@Salgeezi
Follow
All WAS well until I noticed severe foxtailing I guess you would call it on 2 of the girls :(. This leads me to believe it can be 3 possible reasons. My thermostat was mostly between 70-75 the past two weeks I'd say
I added a cheap heater BC my temps were steady in the mid to high 60s. Thermostat isnt the best and I opened the tent twice where the temp was at 86, for how long who knows. I check my tent several times a day tho.
Im running Bridgelux led strips which I brought up to 140watt last week at 15inches from canopy from the tallest branch. Doesn't seem like much at all for a 3x3 tent so I'm not sure about that. Brought it back down to 120W just in case
Not enough air flow. I had one computer fan (100cfm) running in one corner. That I had in my 2x2 tent which seemed to be sufficient. I forgot I was over doubling the space in the 3x3. Added another 2 fans.
From what I read there's no turning back from this issue. I hope I read wrong lol. Gave a nice heavy feeding of B52 aswell. Any comments would be greatly appreciated