Likes
Comments
Share

@DogDoctorOfficial
Follow
Animal Mints — Legends of the Frozen North
Part 2 — Drying, Trimming & Preserving the Harvest
Before we begin, once again, we want to apologize for dividing this harvest into multiple reports. We know it can feel like a long journey to follow week after week, but honestly, this is the only way we can properly document everything in the level of detail that these plants deserve.
Harvesting, drying, trimming, curing, resin collection, storage methods, smoke reviews… all of these stages are part of the final medicine. And instead of rushing through it in one giant post, we prefer to slow down and share every step in the most educational and transparent way possible.
So welcome back to the frozen north.
This is Part 2.
⸻
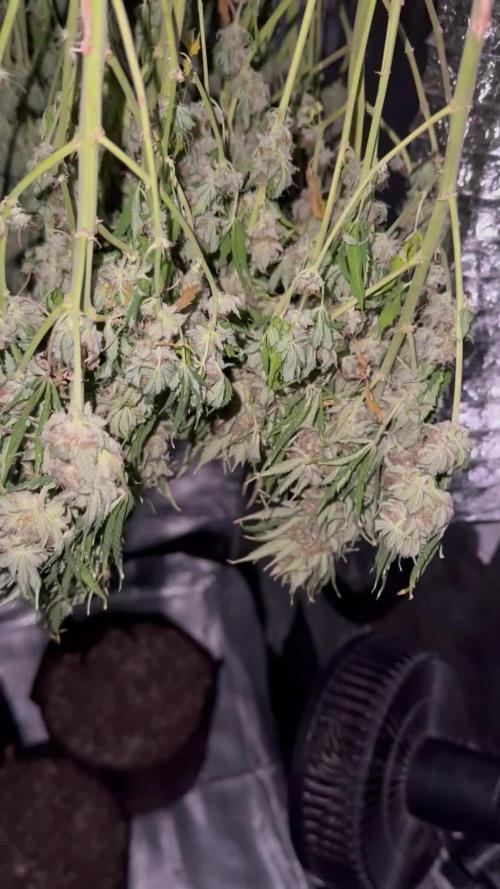
Ten days later, the room had completely changed.
The giant living plants we harvested in the previous report had now transformed into hanging medicine. Slowly drying in darkness, at around 18–20°C and roughly 60% humidity, allowing the moisture to leave the flowers gradually instead of forcing them dry too quickly.
For the first couple of days, humidity was brought slightly lower to help remove excess external moisture, but after that, conditions stabilized again for the slow dry we love so much.
And then came that moment every grower knows.
That little click.
That beautiful snap in the branches that tells you the plant is finally ready.
Not too wet.
Not too dry.
Just right.
And honestly… after seeing these girls hanging there for days, fully intact, massive branches swinging slowly in the dark, it was finally time to begin the next ritual.
Trimming day.
⸻
Gloves on.
Scissors ready.
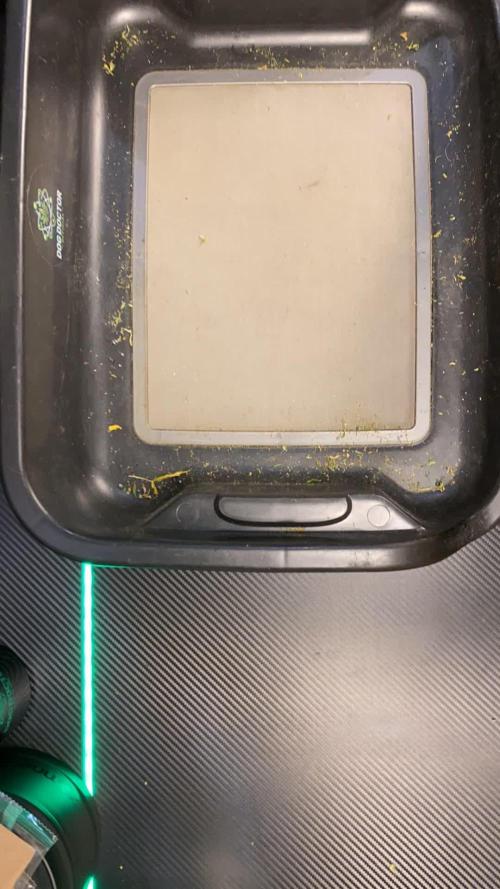
Trim bin prepared.
Medicine beside us.
Mr. Baggy supervising operations as always.
One branch at a time, we carefully broke the plants down by hand, slowly removing each flower from the stems before shaping every nug individually.
No rush.
No machine trimming.
No shortcuts.
Just patience, resin, and respect for the plant.
And these Animal Mints girls absolutely covered everything in trichomes.
The moment trimming started, the gloves became sticky almost immediately. Thick resin building layer after layer until eventually it rolled naturally into small dark hash balls directly from the fingers and gloves themselves.
This is one of those little moments we genuinely love about harvest season.
That sticky resin coating the gloves is essentially concentrated trichome resin — cannabinoids, terpenes, waxes, oils, and all the aromatic compounds that make the plant what it is. With a little warmth from the hands and gentle pressure, it naturally rolls together into traditional finger hash.
Simple. Ancient. Beautiful.
And of course… we also continued our little Moroccan-style “drums” with the trim.
By gently agitating the dried trim across the screens, we collected an absolutely beautiful amount of dry sift. Bright golden-yellow resin, soft and sandy, full of aroma and life. No exact scale numbers this time — this was more about enjoying the process than chasing statistics — but the quality spoke for itself immediately.
Honestly, this type of hash is one of our favorite ways to enjoy the plant.
A little inside a joint, slowly melting together with the flower, enhancing both flavor and depth without overpowering the experience.
Pure magic.
⸻
Now let’s talk numbers.
And honestly… these girls performed beautifully.
Plant A gave us:
127g
Plant B gave us:
247.8g
Plant C gave us:
287.9g
For dense, compact, heavily resinous flowers grown 12/12 from seed, this is an outstanding result in our eyes.
Especially considering the morphology of these plants.
This style of growing continues to impress us more and more every single run. The plants remain relatively compact vertically, but the flower production becomes incredibly efficient. Tight node spacing. Massive bud stacking. Heavy trichome production. Strong support structure. Dense flowers without absurd plant height.
The frozen north delivered once again.
And standing there in the studio holding entire branches in both hands… honestly, it was impossible not to smile.
Happy grower moment.
⸻
Once trimming was complete, the next mission began:
Preserving the terpenes.
Because harvest means nothing if the cure is bad.
So this time we decided to test multiple storage methods side by side.
Some flowers went into traditional glass jars — still one of our absolute favorite methods for long-term curing. Stable, simple, reliable, and something we continue to trust deeply.
Some flowers went into vacuum-style Zamnesia metal containers, where air can be partially removed while maintaining stable conditions inside.
Others went into vacuum plastic containers with pressure-sealed lids.
And finally, part of the harvest also went into Grove Bags, since the yield was simply too large not to use multiple preservation systems.
Inside several containers we also added 62% humidity control packs.
These packs are not “magic terpene creators” or anything like that — they simply help stabilize relative humidity inside the container, preventing flowers from becoming either too dry or too moist during curing.
The flowers themselves were already dried correctly before storage. That part is important.
Humidity packs are not there to fix bad drying.
They are there to help maintain stability afterward.
And honestly, one of the most exciting things now will be revisiting these exact same flowers months later to compare how each storage method affected aroma, texture, smoothness, and terpene expression over time.
Because curing is alive.
Medicine changes.
Terpenes evolve.
And that journey is part of the magic too.
⸻
One thing we also want to mention is how much easier trimming became with the curved point Zamnesia scissors.
It might sound like a tiny detail, but those curved tips genuinely help reach deep into dense flowers without damaging structure, allowing cleaner trimming while preserving the natural shape of the buds.
Small tools. Big difference.
⸻
By the end of this session, trays were full, jars were packed, hash was collected, gloves were destroyed by resin, and the studio smelled absolutely unreal.
pine, diesel and earthy.
Animal Mints is looking amazing.
And honestly… looking at those giant trimmed branches in the studio lights, it was one of those moments where you simply stop for a second and appreciate the entire journey from seed to harvest.
Because this is more than growing plants.
This is preservation of flavor.
Preservation of resin.
Preservation of time, patience, and intention.
⸻
But we are still not done.
Not even close.
The next report will be the final chapter of this frozen journey:
the smoke review, terpene breakdown, curing evolution, flavor analysis, effects, and our complete final thoughts on Animal Mints from seed to harvest.
And trust us…
This girl still has a lot to say.
⸻
Huge thanks once again to everyone following this journey:
Zamnesia for the genetics, Plagron,FOG Lighting, the gear sponsors, the community, GrowDiaries, the growers supporting from day one, the silent followers, the commenters, the critics, the legends, the OGs…
And of course, thank you to everyone taking the time to read these reports week after week.
The frozen north continues.
📡 DELETED @ 1K Please stay tuned.we never quit https://www.youtube.com/@TheDogDoctorOfficial NEW 🙏 Thank you for your patience and continued support.
FOR DISCOUNT CODES AND MORE JUST FOLLOW THE LINK https://website.beacons.ai/dogdoctorofficial
📲 Don’t forget to Subscribe and follow me on Instagram and YouTube @DogDoctorOfficial for exclusive content, real-time updates, and behind-the-scenes magic. We’ve got so much more coming, including transplanting and all the amazing techniques that go along with it. You won’t want to miss it.
GrowDiaries Journal: https://growdiaries.com/grower/dogdoctorofficial
Instagram: https://www.instagram.com/dogdoctorofficial/
YouTube: https://www.youtube.com/@dogdoctorofficial Deleted by Youtube - https://www.youtube.com/@TheDogDoctorOfficial NEW
Vimeo : https://vimeo.com/dogdoctorofficial Under construction stay tuned ⸻
Explore the Gear that Powers My Grow
If you’re curious about the tech I’m using, check out these links:
🔆 Lighting & Environmental Control
• Future of Grow — Advanced LED lighting technology
https://www.futureofgrow.com/
DISCOUNT CODE: DOG20
• Lumiflora — Under-canopy LED lighting
https://lumiflorade.com/
• TrollMaster — Environmental controllers and automation gear (past collaboration)
⸻
Genetics
• Zamnesia Seeds — Genetics used in this project
https://www.zamnesia.com/
⸻
🌱 Soil, Substrates, Boosters & Root Support
• Plagron — Substrates, bio mixes, and supportive products
https://plagron.com/en/
⸻
🎒 Storage, Curing & Preservation
• Grove Bags — Curing and storage solutions
https://grovebags.com/
⸻
📸 Photography Equipment & Tools
(Not sponsors, but part of my creative toolkit)
• Sony A6700
• Sony full-frame macro lens + few more
• Stacking photography workflow - learning
• iPhone (for behind-the-scenes shots)
As always, this is shared for educational purposes, aiming to spread understanding and appreciation for this plant. Let’s celebrate it responsibly and continue to learn and grow together.
With true love comes happiness. Always believe in yourself, and always do things expecting nothing and with an open heart. Be a giver, and the universe will give back in ways you could never imagine.
💚 Growers love to all 💚
📸 P.S. – The Eye Behind the Lens
All photos in this diary (for now — except for the ones showing the camera, which I took with an iPhone) are taken with a Sony A6700 paired with a Sony full-frame macro lens and a few more.
Photography is part of the story — it’s how we share the fine textures, the glow, and the quiet details that words can’t always capture.
I’ve also started experimenting with photo stacking — a technique where multiple images, each taken at a slightly different focus point, are layered together to create one perfectly sharp image from front to back.
It’s not digital enhancement or AI; it’s pure photography — a way to reveal the plant’s beauty in microscopic depth, from trichome to petal.
You’ll even see a few shots of "ghost me" capturing the shots — camera, lens, setup — because every grow deserves not just to be cultivated, but documented like art.
FOR DISCOUNT CODES AND MORE JUST FOLLOW THE LINK https://website.beacons.ai/dogdoctorofficial
NEW DISCORD - Official Server Invite Link : https://discord.gg/ksjAkA5T74

Likes
9
Share


@musashi_miyamoto
Follow
Both popped after 36 hours, then put in soil - they popped out of the soil in less than 24 hours - literally none of my seeds (probably germinated 10 seeds) have failed in intratuin soil, it's amazing. Since i'll be transplanting in a few days anyway, i put them together in a 5L pot. made sure to get a good amount of water in the bottom 2/3 of the soil so the roots have something to reach for.
Now they're "under" (more to the side lol) my 45W LED, which seems to have worked for other seedlings. 16/8 light schedule, need my sleep

Likes
15
Share


@dinni5yn
Follow
Day 16: New grow week and took some sitting time to kind of adjust the soil and plant locations within the tent. Like I said in the beginning didn't fill the pots
so kind of scooped out soil to a stand-bye pot and compressed the soil some near the stalks. I got so really nice healthy stalks that I'm gonna post so check em.
Been probably overfeeding but at this point I need nutrient's and these ladies seem to be taking it pretty well so not really worried about it and adding GREASE into
my batch of feeding this week. I left a gallon of pre-mix in the tent and am a bit worried so kind of went for a fresh batch and tossed the one sitting in the tent.(Damn it)
Raised the light's also just because I want them to reach up. I love to stockiness of my plants right now but need more height.
8ish..got a great pair of paring scissors so trimmed and topped my girls...not sure if that was a good move this early in the grow but this is where the learning and experience comes from I guess. Leaving one alone to have comparisons.
Think I'm gonna leave em be for a few and see what happens!
Day 17: greeting growth spurts like "wow"
Finished off second week batch with a all around watering using a 2 cup pouring cup. Giving each plant about 1 1/2 cups per plant around the main stem outwards.
Gonna be mixing my 3rd week feeding probably with 2morrows watering of VPT sesezym and Carbo load for watering but no feeding until Sunday afternoon.
Day 18: The gloves are off and I'm swinging for the fences at this point. Watering every day it seems like just trying to keep thing moist and in growth. Watering diameter increasing and going for bottom root watering if that makes any sense. I knocked over one of my babies twice and she is soo rooted, didn't even phase her so think my stems are pretty strong.
Took away the milk crate training wheels and giving my plants healthy doses of nutrients to keep them vegging out.
Day 19: 7ish Heavy feeding and went up on all my nutrients to full 8ml per gallon. I have 7 plants and usually go through that gallon per feeding at this point. Expanding the watering and not quite
to the edges yes but sure i'll be there in a few days give or take.
Sat with the plants while watering listening to B.M. and just enjoying the expressions and melodies of life while learning the finer points of growing. os
Clipped my tops and am getting those branches to grow out so happy about that. I was a bit nervous seeing those pretty tops laying in the dirt but was happy to see the results of the training.
Gonna start with a bit of twine training in the comings days and watching for cal and mag deficiencies as I go. I see a few leaves looking a bit off color so will mist in the coming days.
On another note got a pack of Fast Flowers from 420Fastbuds!!!! The Buds look soooo beautiful and enticing that I just couldn't resist!!! My next grow is gonna be so legit!!!!
Day 20: lightly misted with some Golden Goddess and gonna seszyme vpt with AE,GI,MT rhino and b2....not alot since soil moist but enough on the outsides to keep the root zone going.
Plants are getting really bushy and snipping but not too much.
Day 21: Watering today and just thinking bout this 4th week. Watering with some sensi cal. Also going for another humidifyer in tha tent for more even humidification.
My plants look pretty strong but looking for more roots to get bigger plants. Gonna stay with the vtp mix. I got 5gallon pot so we got the space. Didn't put any clay @ bottom of my pots so once these pots flush, hope I get good drainage.
Been defoliating...smh. like trimming my hair always too much so just hitting the bottom parts of plants so that they can get air.
8ish: thinking I may need to go up on my PH a bit just to prevent my roots from locking from all the nutrition. I want them to be able to get all these nutrients in a get some decent sized plants.
Not sure if it's the cutting of the lower fan leaves. Just have to wait until morning to see how my plants respond.

Likes
23
Share


@SonomaSungrown
Follow
Skipped a week in my journal due to travels.
Had my neighbor water my plants.
Having some minor early deficiencies with my photoperiod plants (particularly the chem brulee)... so I decided to go ahead and give everything a solid feeding of Foop Bloom 1, 2 and Sweetener. This is their first ever bottled feeding. Have been running on supersoil and a prayer.
Also top dressed everything and mulched with rice straw to help with the soil drying out a bit too quickly.
Leaves have been yellowing on all three. Mostly relegated to the interior of the plants.
Chem Brulee is looking a bit too yellow overall, as well.
French Macaron is a 66in. Chem Brulee is 56in. Pineapple Meatball is 45in.
I have a sneaking suspicion that my neighbor didn't water them quite enough while I was gone.
Will probably continue with the Foop feedings... probably at least once per week. Don't want to overdo it.
Also top dressed with my flowering top dress mix and mulched all plants with a thin layer of rice straw.
8/4 Sprayed with Neem Oil and Castile Soap
8/5 Sprayed with Gravenstein Apple FFJ and OHN
8/6 Sprayed with Neem Oil and Castile Soap (this will likely be the last time I spray with Neem Oil, as I don't want residual oils as buds start swelling. Also fed 1/4 strength FOOP to ensure we head off any deficiencies.


Likes
4
Share


@kdifiori_
Follow
We are also at the end for the last two girls. Cheese enters darkness for two days, and then it's time to harvest. For Bubblegum, it's time to flush, so she has another week to go.

Likes
17
Share


@UncleRemus
Follow
Flicked them over to 12 a few days ago they are getting really big and starting to stretch. I have used bendz to train the canopy. No Scrog or netting hoping the buds will support themselves. Any small deficiencies have disappeared although the “dwarf claw“ plant has been stunted Since day one so she’s back in the greenhouse where she seems to prefer it.


Likes
11
Share


@Ninjabuds
Follow
The Blackberry Moon Rocks are looking promising. One of them is growing into this beautiful little bush, and I think it's almost ready to harvest. The other plant is stacking up buds, but I'm thinking it's still a couple of weeks away.
The past few weeks have been so beautiful, watching the plants grow and change. It's amazing how something so small and fragile can turn into something so strong and vibrant. Now that they're getting ready to bloom, it feels a little bittersweet. I'm so excited to see the finished product, but I'll definitely miss having them around while they're growing.


Likes
Comments
Share


@Jbcultivates
Follow
The grow was smooth, employed some new techniques when growing and they performed well! Nice bush plants

Likes
14
Share


@ConspiracyFly
Follow
Week 8 Amnesia
Amnesia 1 (Seedstockers)
With LST
4 weeks of flowering
It has 55 centimeters
14L
LED 25 cm
Lux 60.000
Amnesia 2 (Seedstockers)
Without LST
2 week of flowering
It has 60 centimeters
14L
LED 20 cm
Lux 85.000
Gorilla Cookies Auto (Fast Buds)
(24 days) 3 Week
It has 8 centimeters
16L
LED 56 cm
Lux 23.000
Godzilla Cookies (Herbies)
(14 days) 2 Week
It has 6 centimeters
15L
LED 60 cm
Lux 20.000


Likes
14
Share


@JamieKnolliver
Follow
Einige Triebe wurden nun durch reiben und drücken umgeknickt(HST) weil sie aus dem Netz rausgewachsen ist und ich unbedingt das höhenwachstum eindämmen muss, da die Pflanze noch ihren Stretch machen wird und ich sonst keinen Abstand zur Lampe bekomme.
In der ersten Woche deutliche Veränderung des Wachstumbildes, die ersten weißen Härchen sind erkennbar.
Biobizz Bloom und TopMax werden ab jetzt auch hinzugefügt.


Likes
12
Share


@rickhaZe
Follow
-hemos comenzado la 3ra semana desde germinación
-día 21 fue aplicado vitamax pro de grotek nutriens en solución de 1 ml x litro
-fueron regadas con 400ml o 0.4 L cada planta
Dia:24 fue aplicado bud fuel pro para ayudar la pre floración

Likes
19
Share

@TrickzGrowz
Follow
Servus Moin!
Diese Woche wurde entlaubt und gelollipoppt. Die Blucci OG hat aufjedenfall schon dicke Blüten entwickelt.
Likes
18
Share


@Budhunter
Follow
Day 108 of cycle, day 60 of flowering
Looking close at the trichomes I believe it could handle few days more to get more amber but I am satisfied with what I am seeing ✨
Harvesting day finished

Likes
346
Share


@Canna96
Follow
This week went pretty well, other than she stretched like crazy and I am now getting worried about running out of vertical space. I also had a few of my bottom leaves get a few brown and yellow spots on them. I did post some pics and asked a question, thank you for the responses, much appreciated! I am thinking about adding my Spyder Farmer LED 100 Watt light into the tent for the nebula auto because it is about 23 inches shorter than the sour diesel. I believe it would only raise my temp about 2 degrees, and possibly lower the humidity by one or two percent. I must say my dehumidifier has been a freaking stud, running 24X7 and not complaining. I should look into adding another unit, it has been in the mid 90's and muggy for about a week. So far I have to say I am super impressed and excited with this setup, the genetics, and with growing this wonderful plant in general. Already planning ahead to my next grow, and what I can do better. I have been enjoying myself and I really appreciate everyone who has taken the time to answer my questions! I am having a blast and am excited to see what this lady will give up in a few weeks!


Likes
83
Share


@MrJones
Follow
mrjones Gorilla Cookies === IN TENT DRYING PLEASE CHECK BACK IN A FEW WEEKS!===
🔹🔹🔹🔹🔹🔹WEEKLY GOALS🔹🔹🔹🔹🔹🔹
PREHARVEST REPORT
🍃 Harvested 5 Gorilla Cookies from FastBuds today, the Buds looked amazing and put about 1500 grams into the Drying Tent!
🔹🔹🔹🔹🔹🔹🔹🔹🔹🔹🔹🔹🔹🔹🔹🔹🔹🔹
Rambling - Going to be shooting for a week to 10 days, the dry tent variables will be 55/60% RD and 65F Light Air Movement.
🔹🔹🔹🔹🔹🔹🔹🔹🔹🔹🔹🔹🔹🔹🔹🔹🔹🔹
▶️Saturday 02.06.21 / Harvested today these buds are sticky, sweet, and just beautiful!
🔹🔹🔹🔹🔹🔹🔹🔹🔹🔹🔹🔹🔹🔹🔹🔹🔹🔹
SOIL MIX
COCO - 70/30% Tupur Royal Gold 30 GALLON
WORM CASTINGS 5 GALLON
LOBSTER COMPOST 5 GALLON
PERLITE 6 GALLON
INSECT FRASS 2 CUP
ORGANICALLY DONE GROW 5 CUPS
BUILD A SOIL COCO MINERAL MIX 6 CUPS
Likes
3
Share


@Snazur
Follow
moved outside on balcony for less humidity an more air flow.. supp. light .. hoping for the best.. got her on drip feed 2x notes 1x rain water also started ipm... started to take off this week,, still feel she is a week behind from transplant...