
Likes
Comments
Share

@MyLittleGarden
Follow
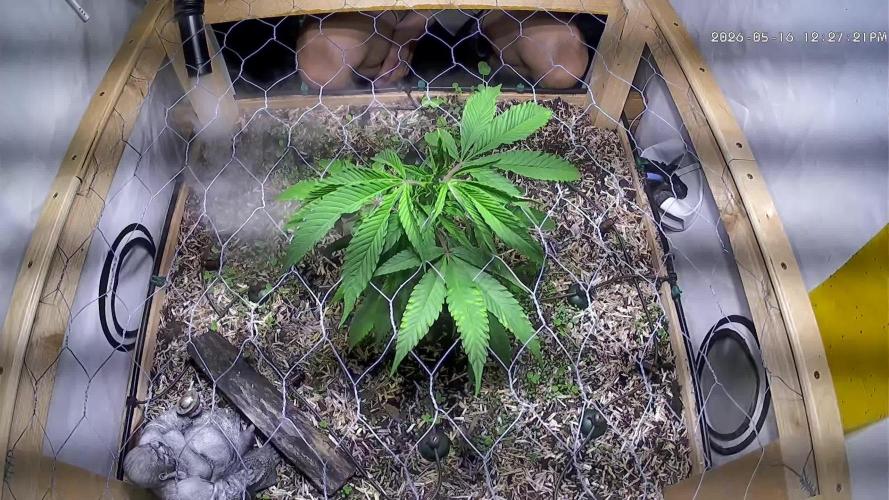
Vegetationswoche 6 - 16.05. - 22.05.26
Ich habe im Grunde nicht viel gemacht die Woche, außer die Pflanze wachsen zu lassen. Einmal wurde sie getoppt und leicht entlaubt, damit mehr Luft und Licht ins Innere kommt und sie sich langsam übers Beet ausbreiten kann.
Die Utopia macht mittlerweile einen richtig vitalen Eindruck. Satte grüne Blätter, schönes buschiges Wachstum.
Das Klee-Cover-Crop wächst ebenfalls ordentlich und hält die Oberfläche schön lebendig. Gegossen werden musste bisher kaum noch, die Feuchtigkeit hält sich überraschend gut im Beet.
Durch das wärmere Wetter draußen sind die Temperaturen im Zelt zwar etwas gestiegen, aber alles noch absolut im grünen Bereich. Insgesamt läuft die Woche richtig stabil und ich hoffe jetzt, dass sie in der nächsten Zeit nochmal ordentlich Schub macht, damit ich anfangen kann die Triebe langsam durchs Netz zu führen. 😋

Likes
47
Share


@DreamIT
Follow
⏳🌳The Endless GREEN Garden🌳⏳
____________________________________________________________________________________
🌳 18.3 ...
🌳 19.3...
🌳 20.3...
🌳 21.3...
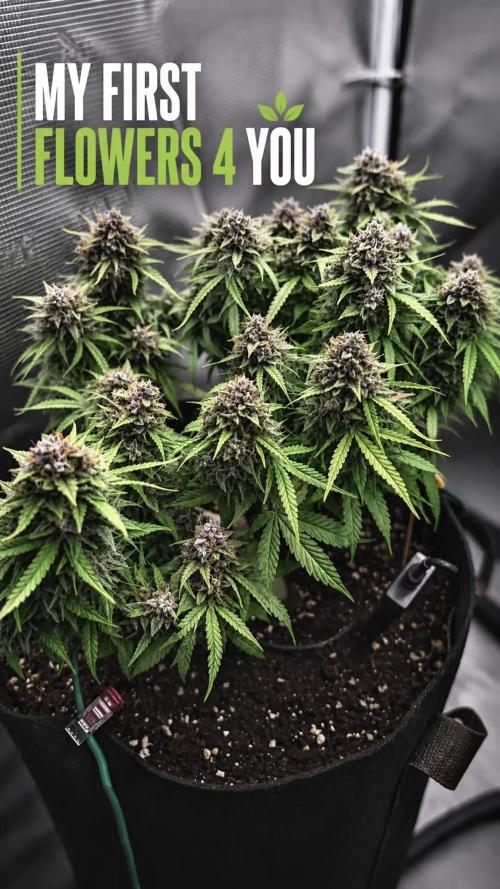
🌳 22.3 ❗❗❗ We have come to the end of this cycle with these beauties. Today I have collected everything, removed the leaves for sunbathing and put aside the sugary leaves. 501 grams total, excluding the 181 of the bowl in which they barely fit. I emptied 7 jars. I am quite satisfied, considering that they grew in a 120x120 box with a 150w led lamp, which proved to be exceptional! Viparspectra P1500. a real beauty, as soon as I can I take another one, certainly from the XS series! bestial, and it doesn't even cost that much. today day 1 of drying in a wedryer .... it is not a little stuff, but there was just right. the final review of this trip soon, yeah!
____________________________________________________________________________________
📜👀 A look at the details of what I'm growing 👀📜
✌️Dos-si-Dos 33✌️ 🌞🚜 Barney's Farm 🚜🌞
📋 Details 📋
⚧ Gender
▪️ Feminised
➰ Genes
▪️ 60% Indica / 40% Sativa
🎄 Genetics
▪️ Dos Si Dos x Gelato #33
🚜Harvest
▪️ 800 g/m²
🌷Flowering
▪️ 60 - 65 days
✨THC
▪️28.0%
✅CBD
▪️ N/D
🏡Room Type
▪️ Indoor
🌄Room Type
▪️ Outdoor
🕋Room Type
▪️ Greenhouse
🎂Release Year
▪️ 2019
________________________________________________________________________________
👀📷🥇 Follow the best photos on instagram 🥇📷👀
https://www.instagram.com/dreamit420/
🔻🔻🔻Leave a comment with your opinions if you pass by here🔻🔻🔻
🤟🤗💚Thanks and Enjoy growth 💚🤗🤟

Likes
422
Share


@Crashoverite
Follow
Hi all🧑🌾
Welcome to my final 🍌💜👊 week update.
First of all. I would like to thank you all for such an amazing support on this bananas journey. I am amazed of the amount of love received from community here. Thank you Grow Diaries and Fastbuds for opportuniy to share and grow this amazing genetics. Love you all❤️💜💚
Was looking for strong indica dominant strain and after reading and hearing so much about this one. Just couldn't resist to not give a go. Was a bit worried before planting seeds that my final yield outcome may not be satisactionary as only have 0.26msq and Fastbuds advertising this strain as 450-550g msq but thankfuly my result was way above this scale.
My 2 beautiful ladies
Athena - right corner lady. She was slighlthly more dominant over entire grow cycle. She got more space on scrog earlier and that's why she developed the most.
Xena - left corner lady, I belive that she could outgrew her sister if she just have more space and another week of time. Did not expect her to turn so well on the end.
Both girls were put in darkness for 48h before chop. Wet trimmed and hang for a week. Daily jars burbing for 10 days and every 2-4 days now.
Weights
Wet trimmed
Athena 870g
Xena 632g
Total 1502g
Dry trimmed
Athena 172g
Xena 147g
Total dry 319g
Bubble hash 6g (37g of trims)
I am very happy with this result.
In my opinion Banana Purple Punch Auto its a masterpiece.
Thank you so much for all the support, likes, follows and comments 🙏❤️💜❤️
Peace and love brother and sisters ✌️💚🧑🌾
Smoke review coming in shortly
Links
https://2fast4buds.com/seeds/banana-purple-punch-auto
https://plagron.com
https://www.biobizz.com/
https://fishheadfarms.com/

Likes
50
Share


@DogDoctorOfficial
Follow
Week 8 Vegetation Report – Eternity Grow Cup
Welcome back, everyone! We’re diving into another exciting update for our Eternity Grow Cup journey. This week marks week 8 of vegetation, and our girls are thriving! Let’s break it down:
Growth & Structure
All five phenos continue to impress, with strong, bushy growth and uniform structure across the board. They’re praying to the ThinGrowLED Model Ones, which have been running on channel one only, and they’re absolutely loving it. The leaf development is lush and vibrant, a sign that they’re thriving under the current conditions.
Environmental Conditions
We’re keeping things dialed in with stable environmental parameters:
Temperature: 20.7°C
Humidity: 57.2%
CO2 Levels: 1569 PPM (a bit high but manageable)
VPD: 1.05 kPa
PPFD: 355 µmol/m²/s
Each of these factors plays a crucial role in maximizing plant efficiency, and we’ll go deeper into why these values are set as they are.
Featured Grow Gear – WCS2 Substrate Sensor
This week, we’re also highlighting part of the grow gear in use—specifically, the WCS2 substrate sensor. This sensor measures:
Soil temperature
EC levels
Water moisture
It's currently placed in the Autopots, which are not yet connected. For now, we’re still top-feeding to encourage root expansion. By allowing the roots to reach the bottom of the pots before activating the Autopot system, we ensure they establish a strong foundation for optimal nutrient uptake. We’ll go deeper into this method and why it’s an essential step in the process.
The Bigger Picture
As always, this journey wouldn’t be possible without the support of some incredible people and brands. Big shoutout to:
Zamnesia, Plagron, and GrowDiaries for making this competition a reality.
Aptus Holland, TrolMaster, CannaKan, Grove Bags, and Ziggi Papers for their continued support.
The entire community—supporters, followers, lovers, and haters alike—because everyone plays a role in making this grow series truly special!
Stay Tuned & Get Involved!
Don’t forget to follow along on YouTube and Instagram for exclusive content, behind-the-scenes insights, and in-depth discussions. Like, comment, and subscribe so you don’t miss the next updates—it’s only getting better from here!
Let’s keep pushing forward, and best of luck to all the competitors—we’re all growing something incredible together. Until next time!
Genetics - Runtz https://www.zamnesia.com/6000-zamnesia-seeds-runtz-feminized.html
Nutrients - Plagron https://plagron.com/en/hobby
- Aptus Holland https://aptus-holland.com/
Controls - Trol MAster https://www.trolmaster.eu/
LED - https://www.futureofgrow.com/en
LED - https://www.thinkgrowled.com
Soil - https://www.promixgardening.com/en
Germination - Cannakan https://cannakan.com/?srsltid=AfmBOopXr-inLXajXu3QFgKXCXXos4F1oEvScjMKIB5MR5dk8-GJ-F49
DOGDOCTOR 15% off
Smoking Papers - https://ziggioriginal.com/
Terpene saver - https://grovebags.com/
As always thank you all for stopping by, for the love and for it all , this journey of mine wold just not be the same without you guys, the love and support is very much appreciloved and i fell honored with you all in my life
With true love comes happiness Always believe in your self and always do things expecting nothing and with an open heart , be a giver and the universe will give back to you in ways you could not even imagine so
As always, this is shared for educational purposes, aiming to spread understanding and appreciation for this plant. The journey with nature is one of discovery, creativity, and respect. Let’s celebrate it responsibly and continue to learn and grow together!
Growers Love To you All 💚
#EternityGrowCup #RuntzHunt #GrowersLove #CannabisCommunity #AptusHolland #ProMixSoil #TrolMaster #Zamnesia #Plagron #ZiggiPapers #Grovebags
Episode 10 week 8 veg UPDATED

Likes
7
Share


@Killer_Grow
Follow
after 20 weeks.
The weather is wet and moldy, pests and diseases, so I took my scissors to harvest the plants
I hope the weather can be better, but I can finally harvest mangoes, too long. Trees take a lot of time to VEG, with experience learning through social networks (Tea brewed)
The varieties yielded much higher than normal, this is my best harvest.
2kg of fresh flower


Likes
3
Share


@djsalin
Follow
Added one gallon of water with 1 tsp of MaxiGro mixed in.
Topped/defoliated.
Fixed grow light, and replaced 3 dead LED chips with full spectrum LED chips.

Likes
17
Share


@DIVINE_GROWING
Follow
the center was broken, during LST.
I hopee it will survive and continue to grow or will not receive severe stress. otherwise we will have to continue growing without it
Likes
324
Share


@Teamdirtbag2
Follow
Some pics would not resize 😂 sorry...
So I'm battling caterpillars I'm sure this will continue..
She is looking good , colas are filling out nicely ,
I had some good pics sorry... the epic outdoor battle will continue ❗😎


Likes
10
Share


@Unnamed
Follow
Added KMPS once a day to the Reservoir to reach ~450 mV ORP.
Added Yara Kristalon Blue and Calcinit 1:1, no ml values, used the fertilizer to reach stated EC values.
PH correction with Phosphoric Acid.
Some roots are showing but hard to see on pictures due to my bad endoscopic camera.
Noticed that the plant is spinning, kinda funny :)
PPFD 300, DLI 19
Values are average of the day.
DATE - °C - RH% (Tent Temp/RH)
20241007 21.7 63.6
20241008 24.1 63.0
20241009 24.1 63.1
20241010 24.0 60.6
20241011 24.1 58.5
20241012 23.5 58.3
20241013 23.7 58.0
DATE - PH
20241007 5.50
20241008 5.67
20241009 5.52
20241010 5.40
20241011 5.53
20241012 5.86
20241013 5.81
DATE - ORP (mV)
20241007 263
20241008 192
20241009 289
20241010 230
20241011 194
20241012 131
20241013 202
DATE - EC(us/cm)
20241007 664
20241008 687
20241009 714
20241010 734
20241011 837
20241012 981
20241013 992
DATE - CF
20241007 6.64
20241008 6.87
20241009 7.14
20241010 7.34
20241011 8.37
20241012 9.81
20241013 9.92
DATE - °C (Reservoir)
20241007 20.5
20241008 21.8
20241009 22.4
20241010 22.5
20241011 22.0
20241012 21.7
20241013 21.6

Likes
5
Share


@RunWithIt
Follow
Hit these girls with a topping at the end of their 3rd week. Also started them on liquid seaweed for added support.
Update day 23: Transplant
Update day 25: Defoliation

Likes
4
Share


@LittleBigTrees
Follow
This week I've been pulling the top fan leaves to stop the plant growing taller and to allow the side branches to catch up. I also started feeding them.
I will probably repot and switch to flower next week now they've all outgrown their mutations.
Likes
Comments
Share


@GreeneScene
Follow
Day #24 I gave her some water although she wasn’t asking for it and did not absolutely need it . I will try and wait until she’s positively thirsty before I water her again. My tent humidity has been dropping as the pots dry out but when I check the moisture levels it shows “normal” also as my pots dry out the ph of the “medium” has risen to 6.8-7.1 . Deeeeeeeep at the bottom of the pot it is 5.5.
I’m curious about the fluctuations of “soil medium” .
Thought to check the accuracy of my ph pen today before watering & discovered it is out of calibration 2 weeks after initially setting it up . I think I’ll look for another PH pen that I can rely on however I’m glad I had the foresight to acquire ph solutions to be able check the accuracy of the calibration of my pen.
I don’t want to feel the need to recalibrate before each use nor the desire to check the accuracy each time which is why I sprung for a
more expensive pen this time rather than a “ super value “ ph . Back to the drawing board to find a better product .
I am still happy with the performance , accuracy & reporting of my smart hygrometer. I am very glad I sent back the original one and replaced it with a competitor brand .
I’m wondering should I be getting ready to give her a top dressed feeding in one week . Orrrrr will I wait until she starts showing hunger signs . I premixed more than the recommended amount of plant food when I transplanted her from her starter pot day #9. I’ll think on it a little more.
Day 26 Update: She has EXCELLENT structure without any LST, Topping, or SuperCropping. Ponytailing has definitely brought out great growth. I’m a little sad. I believe that I’ve misused the total flower time of the 3 autos finishing in this tent. They have all been in flower since week 2 & 3 of their life . They are currently in weeks 7 & 8 of their life.
I was thinking an 8 week flower but these look as if they can go 12-15 weeks. Sooo put simply, these autos may remain in my 5x5 the entirety of my 3 month vegging of “Cellie” Cereal Milk by RQS.
The best shots will come once the tent gets harvested & she gets scrogged down . I’ve plucked 2 fan leaves finally although I really don’t want to defoliate any yet . Her lateral growth shoots are healthy and tenacious. I’m super happy with the number of arms & equality of height in the arms . I may eventually be interested in topping this naturally bushy plant . I really want a dramatic filling of this tent so I’m encouraging an over abundance of multiple branches. Branches that I will eventually tie down .
Day#28 Update: she finished the week well & is becoming voluptuous . Given her majority indication indica leaning pheno is taking up this Gaia Green like a champ & I was questioning just how tall I think she’ll grow before growing/being trained to grow as wide as the tent . She may be a squat but wide bush 😂 . It’s too soon to tell, the lights are still between 40%-50% & watering is only sparingly as needed the last watering age received was day # 24.
Give us a like. Week 5 has began !

Processing
Likes
7
Share


@CityFarmer
Follow
Hello everyone,
The girls are finally outside in 20 gallon fabric pots. This season I have a greenhouse for them and I hope it goes good. Still have to build the first cages around them and start stretching them. 🎊🎉 finally, summer is here 🎉🎊
See you guys next week 🤞🤞🤘🤘👊👊👊

Likes
17
Share

@masterofsmeagol
Follow
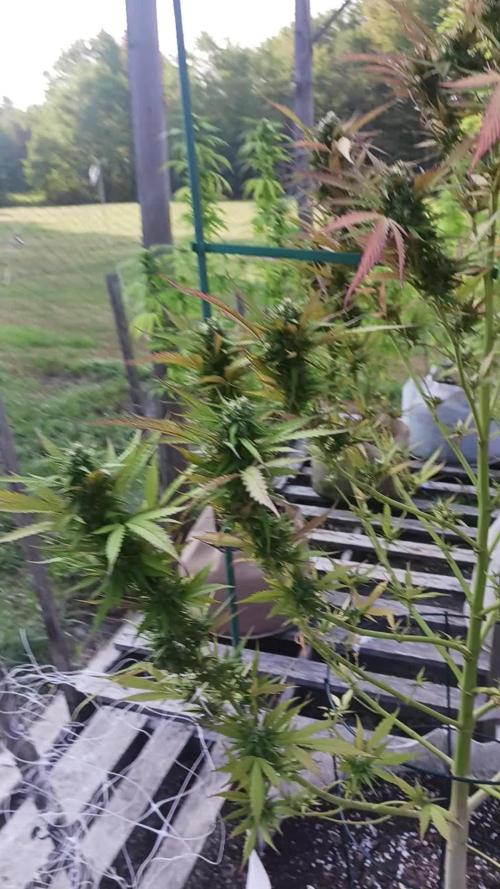
8/30 Rained yesterday and pretty much all night. Plants looked happy this morning. I'm thinking about feeding today or tomorrow. The late flowering special kush doesn't have much longer and it will be done. I'm going to need to do another treatment for the thrips. Nights are so cold that I think they aren't a major problem. No signs of septoria either. No signs of ANY molds or mildew. Even where I took the pillar out but I removed a lot. I am noticing (especially on the pink kush and the special kush in the back) the wierd "top hat" lower buds like I previously did. I don't think it's the chipmunk. It's like they eat fresh buds and leave the top there. I think it might be earwigs but I haven't seen ANY. Birds have been keeping my garden pretty clean. Almost everytime I walk down there it's like a flock of birds takes off lol. I was watching the little finches all perched on my cage. I've seen them dart in and grab a snack. It's pretty cool how it works. Symbiotic relationship. I feed the birds amd they help keep my garden pest free.
EDIT: Went to check the girls around 430. It seems like everytime I see the flowers they've swelled in size. Especially the natural mk ultra. Everything is really coming together. Pink kush is behind but it's starting. I'm getting lots of fall colors but I'm losing lots of leaves too. I wouldn't have defoliated as good as I have if I hadn't had problems. I thought the plants were done getting taller or stretching but after this rain they ALL seem taller. The buds are swelling as well. I'm on the home stretch with the early special kush. Few more weeks. Everything looked amazing tonight. I wanted to take some pictures but I left my phone. Smell is greatly increasing.
8/31 I don't get how we got NO rain the ENTIRE summer but it's rained the past few nights? Maines bipolar weather I guess. I see the same shit as prior years. Something crawls up and eats small shoots and developing buds but leaves larger ones alone. I thought it was earwigs before. I'm not sure now. I'll have to go look at night and figure out what's eating shit. It's just small secondary shoots mostly. Stuff I should've pruned but I leave on so the won't eat my fucking colas. I got some work to do but I'm getting closer.
9/1 Well we made it to September. Pink kush is finally STARTING to form little buds. After some research (and watching those fucking locusts try to fly into my cage but can't because they are to fucking big. I was lucky I found that enormous one on the stalk of the furthest special kush right where the tip cola starts. Luckily I was able to get him. Didn't have to take pics or a video or even check if they need water. It rained a little last night and the buds were a little wet. I'm planning to feed when I get back. If they need water I'll give it to them. My early special kush is getting real close. I want to harvest at peak timing but sometimes exigent circumstances screw that up. However i think I'll be able to let this girl finish properly.
EDIT: Went back over to check weights and everything was super heavy. Plants are all turning fall colors. I checked the trichs on my special kush, mk ultra and 10th planet. Everything looked great in the sun! Everything is swelling and getting frostier everyday. I'm hoping that the pink kushs will finish. My early special kush LOOKS like it should be done but it's not. Looking at the trichs and stigmas it needs more time. I've found on several plants that between the; giant caterpillars, earwigs and pillars that they can take a whole branch and pretty much decimate it in a night. I chased one of those giant locusts around my Cafe and it finally got out. Bastard was almost the size of a small bird! I should feed tonight and possibly do a treatment for pests.
9/2 Had to shake to plants off again. Bags are still heavy. I'll probably feed tonight. I'm noticing tons of damage on lower and interior branches. The grasshoppers or locusts or whatever they are can strip a whole branch! They can even bite through little stems. I'll never grow outside without floating row covers again. The special kush is getting really close. Sometime this week I'll look for a mature tester bud. Both MK ULTRAS are exploding in flower and getting frostier daily.


Likes
2
Share


@Seldom_Seen
Follow
Day 64: (Mon) All looking good.
Day 65: Watered small plant.
Day 66: Watered big plant
Day 67: Watered small plant
Day 69: Watered small plant with phd water. Watered big plant with nutrients 1ml B, 1ml GS, 1ml SR
Likes
1
Share


@Dendegrow
Follow
🍬 Sweet Mandarine Skittles (Sweet Seeds) – Week 7 | Flowering Day 1 🌸
Here we go! 🚀 Yesterday I flipped her to bloom, so today is officially Day 1 of flowering. She’s growing in Sonnenerde (yes, real “sun soil” 🌞🌱) and has already stretched like crazy. Honestly, she smells phenomenal – a strong sweet citrus candy vibe in the air 🍊🍬.
I’m a bit worried she might turn into a giant later on, but that’s part of the fun 😅. I didn’t catch the moment right after transplanting to see how she reacted, but hey – it’s all part of the experiment. Luckily I’ve got a few more seeds of her in the stash, so we’ll see what this one can teach me 🌿.
Stick around, follow along, and let’s see how big this Sweet Mandarine Skittles rainbow will shine 🌈🔥.
---
🍬 Sweet Mandarine Skittles (Sweet Seeds) – Woche 7 | Blütetag 1 🌸
Jetzt geht’s los! 🚀 Gestern habe ich auf Blüte umgestellt, also ist heute offiziell Tag 1 der Blüte. Sie wächst in Sonnenerde 🌞🌱 und hat sich vorher schon ordentlich gestretched. Der Duft ist jetzt schon phänomenal – süß, fruchtig, richtig nach Citrus-Bonbons 🍊🍬.
Ein bisschen Sorge hab ich schon, dass sie nachher ein richtiger Riese wird 😅. Leider hab ich den Moment nach dem Umtopfen nicht getappt, um zu sehen, wie sie reagiert hat – aber egal, ist ja ein Experiment. Zum Glück habe ich noch ein paar Samen auf Lager, also mal sehen, was dabei rauskommt 🌿.
Bleibt dran und vergesst nicht zu folgen – das hier könnte ein richtig süßer Ananas-Rainbow werden 🌈🔥.

Likes
164
Share


@Silky_smooth
Follow
First week of flower and she is looking very lush and dark green no deficiancies what so ever and no real problems or anything
Day 35 removed the bigger guidehooks and the flux is tough enough to stand on its own
Also removed a couple of fanleaves and rehooked her 1 node further up the line systematicly doing this for duration of the first week of stretch so she can widen out a tad bit🙏🙏

Likes
Comments
Share

@THEFROZEN710
Follow
These photos represent the first week of my first indoor cycle. I'd like to emphasize that if the GMOs don't appear at the end of the cycle, it's because they're seeds from a flower I purchased without provenance. The other seeds are all from trusted seed banks. The soil is 100% organic. For further information, Terro Super Soil offers a similar recipe, with the addition of various flours and other ingredients to encourage microbial and fungal activity. In the first week, mycelia began to form on the soil surface, indicating good fungal activity. Along with the mineral addition of lime and nit, Tricoderma Hazarium, a beneficial fungus for rooting and root health, was also added. Just 1 ml per week is sufficient for now.

Likes
21
Share


@MadeInGermany
Follow
Hey guys :-)
First of all I have to say that all 5 strains I have in the tent from Amsterdam Genetic are beautiful genetics 👍 .
This week they were repotted into 8L fabric pots.
When repotting, 2 g of Green House Powder Feeding Bio line were added per liter of substrate :-) .
That's enough until the first flowers start 👍.
Watering was done twice this week with 0.8 l each.
Otherwise everything was cleaned and checked and fresh osmosis water was mixed.
Stay healthy 🙏🏻💚
👇🏼👇🏼👇🏼👇🏼👇🏼👇🏼👇🏼👇🏼👇🏼👇🏼👇🏼👇🏼
You can buy this Nutrients at :
https://shop.greenhousefeeding.com/us/
👇🏼👇🏼👇🏼👇🏼👇🏼👇🏼👇🏼👇🏼👇🏼👇🏼👇🏼👇🏼
You can buy this strain at :
https://www.amsterdamgenetics.com/product/double-blue/
Water 💧 💧💧
Osmosis water mixed with normal water (24 hours stale that the chlorine evaporates) to 0.2 EC. Add Cal / Mag to 0.4 Ec Ph with Organic Ph - to 5.8 - 6.4
MadeInGermany
