


Likes
Comments
Share

@squalino
Follow
🌿 Journal de Culture : Mac 1 – "Spirit" (Plante #2) – Pleine Floraison
Date du jour : 27/05/2026
Âge de la plante : J+53 (Semaine 8)
Taille actuelle : 1m15
Évolution : +21 cm par rapport au dernier suivi (Le stretch ne s'arrête plus !)
C'est un départ improvisé ! Sur un coup de tête, je pars en vacances avec ma petite famille du côté de Rimini. Ce matin, c'était la course avant le grand départ, j'ai fait de mon mieux pour prendre quelques clichés rapides et administrer les derniers soins à la va-vite.
📊 État de Santé & Évolution de la Structure
Une poussée incontrôlable : Spirit a officiellement dépassé le mètre pour culminer à 1m15. Sa croissance est tout simplement monstrueuse, voire même un peu trop par rapport à l'espace dont je dispose. Visuellement, elle reste magnifique : une structure vigoureuse qui continue de se couvrir de têtes de haut en bas.
Développement des fleurs :
Les pompons se densifient nettement par rapport à la semaine dernière. La formation des buds s'accélère et la plante montre un excellent potentiel de rendement sur l'ensemble de ses branches secondaires.
Le repère visuel :
Notre figurine "Spirit" est toujours fidèlement installée au pied du tronc pour identifier cette championne.
⚙️ Paramètres Environnementaux & Culture
Lumière :
Intensité fixée à 75%. La gestion de la distance devient un art millimétré puisque la plante continue de manger l'espace vertical.
Climat :
Les températures restent stables (24°C jour / 21°C nuit). Le déshumidificateur tourne pour essayer de contrer l'humidité ambiante causée par le réservoir et le système de la pièce.
Arrosage & Ajustement :
L'Autopot gère l'autonomie en eau claire pendant mon absence.
Nutrition & Entretien (Aujourd'hui)
Apport anticipé :
J'ai donné 4 ml de Bio PK 5-8 de Biotabs dans 75 cl d'eau ph 6,3
Ajustement de planning :
J'ai dû avancer ce repas de 2 jours à cause de mon départ à Rimini. Le but est de lui donner le carburant nécessaire pour qu'elle puisse continuer à gonfler ses fleurs sereinement pendant que je profite de la plage.
📝 Résumé de la situation
Spirit porte définitivement bien son nom : indomptable et sauvage. À 1m15, elle demande énormément d'énergie et l'apport de PK 5-8 tombe à pic pour soutenir l'explosion des bourgeons.
La canopée est bien verte, aucun signe de stress majeur, le run suit son cours de manière spectaculaire. Place à quelques jours de repos en Italie, la nature va faire son travail en autonomie !
le 31/05
j'ai posté une nouvelle video tellement que j'étais impressionné de sa transformation 😍😍😍😍 au retour de mes 4 jours de vacances.
🙏 Remerciements
Un grand merci à @mia_biotabs et à Mrs_Larimar pour leurs précieux conseils horticoles, ainsi qu'à vous tous qui suivez les aventures de Spirit et sa sœur depuis le début.

Processing
Likes
5
Share


@Mr_nugs_lover_David
Follow
Very good looking just like her sister, powerful citric and sweet aroma, very good strain, and starting to smell seriously at the start of 2nd week I'm noticing the same thing on both plants! Awesome strain

Likes
11
Share


@ChiefSmitt
Follow
This week is going pretty good too! the bugs seem to be swelling up a little more and getting a little more sugary. I added in a video of another one of my purple punch plants (the one with he purple nugs growing)

Likes
24
Share


@MadeInGermany
Follow
Flowering day 42
since time change
to 12/12 h .
Hey guys :-)
A lot happened this week :-).
The buds develop really nicely .
The scent wafts through the whole room when I open the tent 💚.
This week was poured 3 times with 1 l each (nutrients see table above) This week there was the maximum amount of fertilizer, which will be slowly reduced from next week :-) .
Have fun with the update and stay healthy 🙏🏻
👇🏼👇🏼👇🏼👇🏼👇🏼👇🏼👇🏼👇🏼👇🏼👇🏼👇🏼👇🏼
You can buy this Nutrients at :
https://greenbuzzliquids.com/en/shop/
With the discount code: Made_in_Germany you get a discount of 15% on all products from an order value of 100 euros.
👇🏼👇🏼👇🏼👇🏼👇🏼👇🏼👇🏼👇🏼👇🏼👇🏼👇🏼👇🏼
You can buy this strain at :
Clearwater Seeds
Water 💧 💧💧
Osmosis water mixed with normal water (24 hours stale that the chlorine evaporates) to 0.2 EC. Add Cal / Mag to 0.4 Ec Ph with Organic Ph - to 5.8 - 6.5
MadeInGermany

Likes
24
Share


@GrowGuy97
Follow
I am honestly blown away with how amazing all 3 plants done! I didn’t really have any deficiencies or issues with any of them the entire grow & it really shows in the quality & weight these ladies put off! Bud smells almost like licorice & has a very sweet taste when smoking! If you havnt already make sure to go check out New420Guyseeds, he has extremely fast shipping, great prices and quality genetics! Thanks for following & happy growing friends!🙏🏼✌️🏼🌱

Likes
92
Share


@gottagrowsometime
Follow
D91 Still a couple of weeks to go at least. She is putting on nice long bud mass as all bud I'll get off her will have very few sugar leafs. And with the top 30cm of the nodes bent outwards it's allowed the light to reach down deeper into the plant itself, and well, you can see the results, bud sites galore. Not much left to do with her. I threw her into a heavy flush for 24hrs first flush run-off was coming back at 2900, way too high, salt and nute residue is been left behind because of the poor P-K uptake that control the spread and uptake of nutes. Got her down to 980 today with her final flush before going into her rest. After the flush I poured 100ml of 2ml/l of cal to help break down the nutes behind so the plant can uptake them, this is very important when doing a flush to lower your TDS add some cal to it as this will keep the plant sucking not only thr water and leaving the nutes behind, cause you need cal espically in subs with nute build up it has to be broken down and will help to avoid nute lock or going into an unwanted flush to early.
I'll be dropping her next feed by 200ppm down to around a 1000. I will still give the nutes I've been given just a little less and she needs to get ready for a flush but be kept with enough to keep her mass of growth going. RH is between 55-60%:air been blown in is reading at 48-50% temp is 22c in tent it's 21.7c in the dark and 27-28c with the light on. With my new 4inch intake smart fan im going to set it up so it blows 100% air in at the top and a 4inch intake fan will suck out 80% I'm hoping by doing this it will change the RH of the room 48-50% into the tent creating the same environment. The air that is brought in is filtered by a carbon filter, no need for 1 to blow the air out.
19/3/22 As you can see I have the RH as best as I can get in my grow room, I've installed the smart fan and inserted the sensor giving me 57%RH 75F in the tent, with the light off, it's rather hot today, much hotter than normal, it's normally 21c in my room it's 24.5 today. RH is at 50% in room, hopefully by installing my old intake fan in the lowest part of my tent and suck out 80% While 100% gets blown in on top will bring the tents RH to the same as the room, that's the hope anyways. But 57%RH is still okay, not optimal but not too bad neither
21/3/22 So, I tried out my new method. Of having my smart intake fan suck in 50RH and a bottom intake fan at the end sucking out older air at a lesser speed had it running for 8hrs, no change in humidity whatsoever just dropped the temp by 1.5c. I think the fact I have a 70x70 with so many plants has set the RH and thankfully it's not what it was which was touching on 80rh at some days. A bigger tent and I'll really be able to dial in my grows now I have all the tools to control RH/TEMP from S/H. For now 57%RH when it's low and 62% when the lights are on for a few hours. Stays around 57-60% atm for around 85% of the time. Temp is constant and doesn't change without my control within a range of 4-6c change difference, this number I have no problem in changing and I'll be making my tent a lot cooler after this wk ends. I'll be keeping her at 18c with lights off and 28 with lights on. As for the plant, she has fully turned the corner and I can say whatever the issue was, which no 1 can still tell me what it was not do I know. It wasn't a def because it was so random and hit all different levels of growth. But, thankfully she has passed it, am really dialing in this coco grow. I know exactly how much water she takes without spilling a drop of run-off unless I want it to. The buds, well, they are small at the moment but they are so fucking dense and hard I really hope they get at least 30% bigger of the next 2 wks. The last few days some has but on at least 10% bud mass and all sites have moved out of pre-flower (stigma), so growth is over for the plant, it's just bud sites now, how you can tell is your sites will start to give off their aroma and will start to get sticky to the touch. 85% of the plants buds are all in the same range mature wise or only a few days out from their sister buds. Still some 15% that still has stigma but as this is at the bottom of the plant I know she will not grow anymore but maybe a little if any around these sites.
21/3/22 GRRRRRR stupid rust spots all over her again today, yday she got a mix of all the nutes above, one of these nutes is causing this, I am 75% sure it's overdrive. Really annoying, as there is no deficiencies, no signs, just these poxy rust spots. So annoying, as NO 1 can tell me exactly what they are, it's not a def, the plant ozzs health, she's the pic of it, every leaf stands tall, very good color, slight old nute burn very little on about 10% of the leafs but these stupid rust spots are stupid. Overdrive, or 1 of the nutes is doing this, I reckon it's this as it's only been given that the past 10 days and I'm nearly sure this is the cause, but I can't be sure, and until I figure it out I really don't feel comfortable moving forward with the AN line. Sadly I think I'll be dropping everything but big bud, bud candy&voodoo juice.
22/3/22 Was going through my buds and man, they are so sticky you would nearly say they are done until you look close at them, there still full of pistils, white hairs, the bud growth will come past them, so there is still a big push yet to come so I was hoping to start dropping the micro nutes but I think that would be a massive mistake and cost me dearly on harvest day. Fuck it, I'll flush the shit out of it for 2 weeks on flawless finish and then a week on water and 2-4 days in the dark just on water. With much thought I pushed the PPM back up to 1450. I've decided to drop overdrive. After 24hrs of flushing my coco like crazy I'll be happy to start her back on nutes in 24hrs when she's drank the 2.8-3.2l of water she's currently holding, the run-off from that was 1800 btw, but with salts and so on from the last feed I've learnt with AN the PPM reading is what you give it, not always the Run-off. Yeah I'd trust the PPM reading 2moro if i was doing another ppm run off test, but as im not ill go by what im putting into it, cause my weekly flushes/flushing in general in pretty good, very little nute lock experinces with mixing so many nutes
22/3/22 Messaged AN and sent them pics and info, by going through my nutes and the fact that I gave some big bud in the same window as overdrive causes these rust spots. Thankfully I finally have an answer as to the rust issues. Just a bad mix with nutes that shouldn't come into contact with each other. Thanks AN
Thanks for reading, drop a like and I'll know u drop by and I'll do the same
gottagrowsometime

Likes
9
Share


@bigolebuds
Follow
Week 2 Day 2: Things are going well. We had some high humidity and a little algae, so I increased the fan level. There was also some slight bubbling in the leaves which could be due to the humidity, so I'm keeping an eye on that. Otherwise, things are looking good. Planning to water today (8/8), and keep an eye on them for the rest of the week. Feels like patience is key at this point. Will need to decide on feed schedule soon, and will be PH'ing my water for the first time today. Will also continue researching LST methods.
Week 2 Day 7: Still struggling with high humidity. My grow is in my basement, and in the summer it stays around 70% RH. When the tent was at 80% RH I opened the vents and had the airflow running pretty high. I couldn’t come up with any other way to decrease it, so I went to Facebook marketplace and got a dehumidifier. Ran it overnight in the basement yesterday and the humidity has not really changed and there were barely droplets of water in it 😭. I’m going to try putting it in the tent if things don’t change.

Likes
39
Share


@Roberts
Follow
Bubble OG Gum is doing great. 7 days old, and already found the solution. Beside that nothing else to report. She is off to a great start. Thank you Ganja Farmer, Athena, and Spider Farmer. 🤜🏻🤛🏻🌱🌱🌱
Thank you grow diaries community for the likes, follows, comments, and subscriptions on my YouTube channel. I greatly appreciate all the support. 🌱🌱
🌱https://youtube.com/channel/UCAhN7yRzWLpcaRHhMIQ7X4g

Likes
8
Share


@artems
Follow
Despite a slight salt buildup, Scrooge is thriving. After measuring the drainage, it showed 1200ppm, so I'll be flushing it out. Increased the feed to around 1000ppm to ensure it gets the nutrients it needs. Let's keep those vibes positive! 🌿🌟

Likes
Comments
Share


@Batista
Follow
We are a couple who decided to plant cannabis for the first time during the covid-19 quarantine, and it helped us get through it, during and after grow =]
Before deciding to plant, we studied a lot and saw many diaries here, so we didn't have many surprises during the cycle, also because we were able to see, compare and know what to expect from our plant. It was really cool to see the result of what we had studied happening in practice, we learned a lot from Grow Diaries.
Definitely we will do a lot of different things next time, but overall we were satisfied to be able to smoke our own weed.
Grow diaries helped and motivated us a lot, both to learn new things and to organize and register our grow.
Our intention is to continue growing and sharing our experience here.
Weed love you to leave comments and tips in our diary, it helps us to learn and improve more and more. Thanks and see you all next grow! 👽😜👌

Likes
52
Share

@Salokin
Follow
GMO × Triangle Mints BX – Week 21 Veg | First Pistils, Transition Begins
It's happening. The first white hairs are showing at the nodes — subtle still, but unmistakably there. After 21 weeks of veg, she's finally reading the shortening days and starting to transition. With 16 hours of daylight and counting down, flower is now a matter of weeks away.
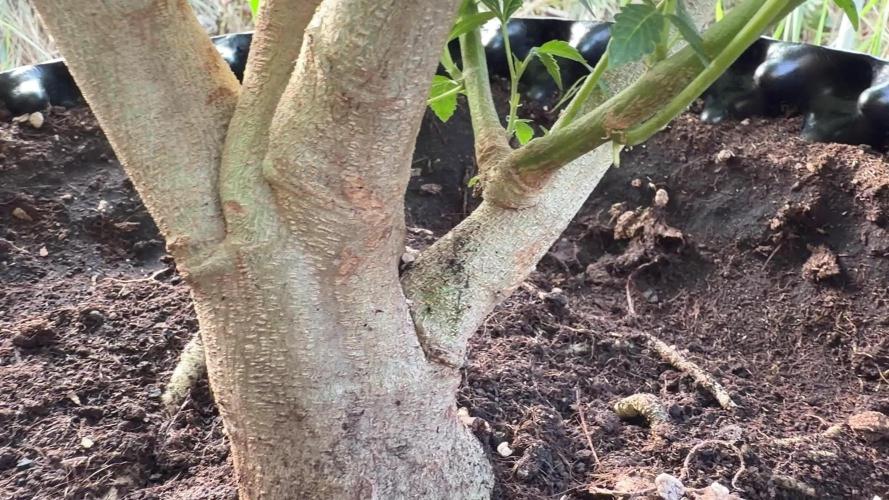
At 170cm she's still adding height, and the ScrOG net is filling out exactly as intended. Looking at the canopy from above, tops are distributed evenly across the frame — dozens of future cola sites lined up and ready for flower. The view from below through those woody stems up into the net is a reminder of just how much structure she's built since April.
The pot top-down shot tells the same story — thick, bark-covered trunks radiating out from a single base, a root system that by now extends well into the native soil below the airpot.
Nutrients unchanged: CANNA Aqua Vega 3ml/l, CalMag Agent 1.1ml/l, Aptus Regulator 0.1ml/l, EC 1.2 mS/cm, pH 6.2. Watering holding at 25L per feed. Day temps 25°C, nights 18°C.
The coming week looks warm and mostly dry with some afternoon thunderstorm potential — temperatures up to 29°C, winds light. Ideal conditions for her to keep pushing into the net before flower locks in.
Updates every Sunday. Stay tuned. 🌿
Likes
Comments
Share


@Barzenegger
Follow
first issue, one of the plants has some spots on a leaf, which started popping up around the time of a watering, but I was also away for a few days and only got around to watering a few days after I had planned to. so I suspect that it might have been too dry which might have caused the EC in the medium to rise too much? No idea, let's carry on.
Likes
15
Share


@DevelGrow
Follow
Hallo Freunde 👋 Frost Banger von Fast Buds ist 42 Tage Alt! Sie steht schön in Blüte und baut schön ihre Buds! ✌️🍀💚🍀
Likes
34
Share


@rhodes68
Follow
10/24 Week 10 Third of Flower
Clones building daily stretch looks very manageable on target for 36 inches or less.
Leaving nuets as is
From what I am seeing I could grow 8 plants a grow using 3 gal pots. This would give a much better canopy and use of the lights
10/28
Increased PK slightly
10/29 Pics all is well new light is holding down the right side real well making another for the left, 120 watts @3000k out of her, can go as high as 160 watts if I like.

Likes
Comments
Share

@Growfather1
Follow
Hello everyone,
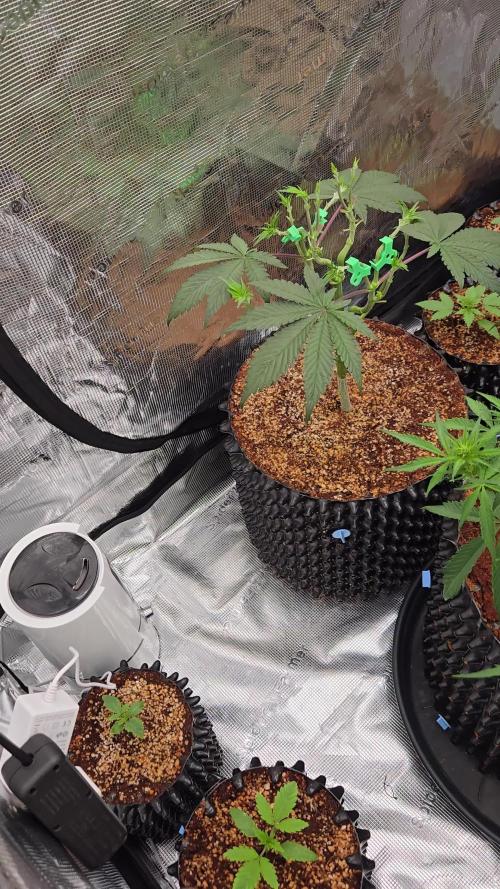
The tangerine dream is doing it's thing, i gave her a defoliation.
At this point in veg it's all about root development so leaves and internodes are being removed.
Let's see next week if she is ready to go in flower.
Thanks for stopping by and have a nice day.
Growfather

Likes
19
Share

@MadeInGermany
Follow
Hey everyone 😎.
This week they have grown significantly in buds ☺️.
They already smell very good 😍.
Canna Bio Flores has been increased to 4 ml per liter of water.
The color slowly changes to autumn 😃.
Otherwise not much has changed this week.
I wish you all a lot of fun with the update, stay healthy 🙏🏻 and let it grow 🌱
You can buy this Strain at :
https://greenhouseseeds.nl/
Type:
Wonder Pie
☝️🏼
Genetics:
Wedding Cake x OG Kush
👍😍
Vega lamp: 2 x Todogrow Led
Quantum Board 100 W
💡
Flower Lamp : 2 x Todogrow Led
Cxb 3590 COB 3500 K 205 W
💡💡☝️🏼
Earth: Canna Bio
☝️🏼
Fertilizer: Canna Bio
☝️🏼🌱
Water: Osmosis water mixed with normal water (24 hours stale that the chlorine evaporates) to 0.2 EC. Add Cal / Mag to 0.4 Ec Ph with Organic Ph - to 6.0

Likes
15
Share


@Shizzlemanizzle
Follow
Now tent is here ! plants are exploding:) little one starts to catch up ! Trust in the process👍🏽


Likes
32
Share


@Weediz
Follow
Day 55: I have finally moved the girls inside the tent :) On 1 of the 2 girls I see some brown spots, and some yellowing and are thinking something is wrong here? I think it might be a Mag + Calcium Deficiency and I think I should up the PH a bit, but what du you guys think? The other girl looks healthy and fine, although I see some light-green color, but not too much. It might be a beginning of what the other girl is suffering from. I have not measured my run-off water for some time, as I am having trouble with my meter, and are falling back to the color-tester (drops) which are far from accurate. I also got my reverse osmosis system, and I now get 0.08 EC water. My water was 0.9 EC before so I'm happy with that. Also the PH has dropped from 8.5+ to around 7.0-7.5 so I think I am able to make a more stable PH change with acetic acid
Thank you for all the answers!. I am now going for ph 6-6.5, and I have also increased the nutrients I use, as I am now using RO water. I am also setting up my lamp from Mars Hydro today, pictures follows tomorrow
Processing
Likes
13
Share


@Cheesefarmer420
Follow
Another week done, finished up week 6 of flowering, week 10 of the whole grow. The buds are continuing to fatten up, inching closer and closer to harvest. Noticed the first few Amber tricombs on some of the upper buds, going to be leaning off the big bud and switching to overdrive to help aid in ripening and the final bulk. I’d like the run them another 4 weeks giving them a full 9-10 weeks in flower. But will judge harvest on a near 45/55 or 50/50, Cloudy/amber tricomb production.
Likes
16
Share


@Bendedknee
Follow
Light is on 50% for another week. Everything is really recovering well from transplant, topping and pruning. Try 75% until flower time then give them hell
