Likes
Comments
Share
@rommyu
Follow
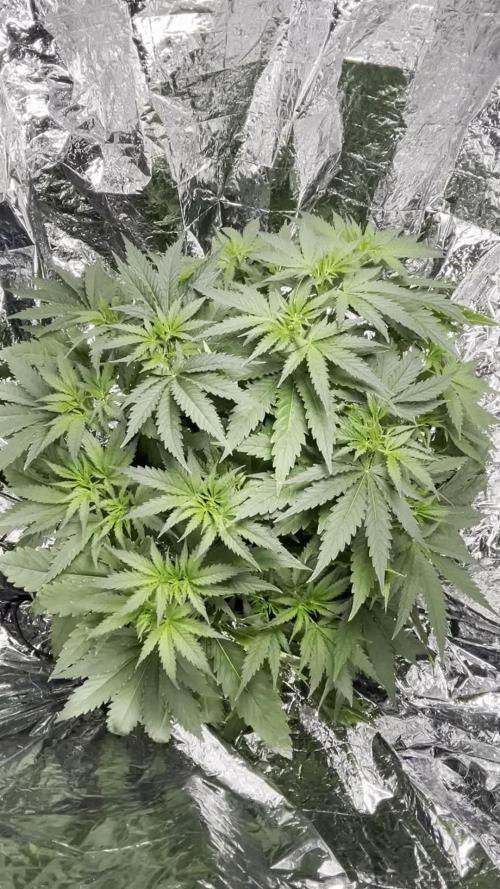
Moved to a bigger tent. My intention is since I have this tent for sawing aluminium, and not using it at the moment, that id see how a space would reduce my need to dehumidify (since i am using co2 - fans are on only at night). Its now at a stable 1.1 without a need to de-and humidify. going to finish off this week and then start to flower next week. I plan to have 32 total apical tips. 4x4x2 = 32. and letting those grow out to about 3 nodes b4 flipping to flower or maybe in a week. we'll see.
Likes
17
Share
@Bobo_Zion
Follow
This is the first week of the plants being above soil, we did lose one but we are germinating another to replace that. I think the one we lost was due to heat stress, the others are holding up pretty well, there is another one that showed signs of heat stress, we just moved it a little deeper in the tent and it seems to be doing okay.
Likes
19
Share
Legend Timestamp: 📅 EC - pH: ⚗️ Temp - Hum: 🌡️ Water: 🌊 Food: 🍗 pH Correction: 💧 Actions: 💼 Thoughts: 🧠 Events: 🚀 Media: 🎬 D: DAY, G: GERMINATION, V: VEGETATIVE, B: BLOOMING, R: RIPENING, D: DRYING, C: CURING ________________________________ 📅 D105/R01 - 28/02/24 ⚗️ EC: 0.9 pH: 5.2 🌡️ T: 21-25 °C H: 50-65 % 🌊 🍗 💧 💼 🧠 Ripening starts 🚀 🎬 Added timelapse and screenshots and monthly rate of T-H and VPD 📈📈📈 from TrolMaster App Translate ________________________________ 📅 D106/R02 - 29/02/24 ⚗️ EC: 1.2 pH: 6.7 🌡️ T:21-24 °C H: 50-65 % 🌊 🍗 💧 Added pH+ 💼 🧠 If someone who followed the diary from the beginning is asking himself what about mother plant "Mamma Aglio", here I posted some picture of her which demonstrate the difference between a bad and a good grow 🚀 🎬 Added pics of Nicole and pics of "Mamma Aglio" to show the difference between a bad and a good grow with sounds and TrolMaster logo. Added usual timelapse and screenshots. ________________________________ 📅 D107/R03 - 01/03/24 ⚗️ EC: 0.8 pH: 6.4 🌡️ T: 20-24 °C H: 45-65 % 🌊 2L 🍗 💧 💼 🧠 🚀 🎬 Added Timelapse and screenshots. 4 pics added ________________________________ 📅 D108/R04 - 02/03/24 ⚗️ EC: 0.8 pH: 6.7 🌡️ T: 20-25 °C H: 45-70 % 🌊 1L 🍗 💧 💼 🧠 🚀 🎬 Added Timelapse ________________________________ 📅 D109/R05 - 03/03/24 ⚗️ EC: 0.8 pH: 6.7 🌡️ T: 21-25 °C H: 45-65% 🌊 RES Changed 💦💦💦 🍗 💧 💼 🧠 I'm starting the flush, as trichomes look milky and quite ready. In this last week the ripening will be complete and th girl would be ready for harvesting. 🚀 Flush started 🎬Added 8 pics of trichomes, Timelapse and sceenshots. Two pics and two videos of my "garden's pre-harvest magic" 😋😋😋 ________________________________ 📅 D110/R06 - 04/03/24 ⚗️ EC: 0.2 pH: 7.5 🌡️ T: 19-25 °C H: 55-65% 🌊 🍗 Flawless finish 💧 💼 🧠 1 day with pure water and now I added Flawless finish 🚀 Flushing 🎬Added Timelapse and sceenshots ________________________________ 📅 D111/R07 - 05/03/24 ⚗️ EC: 0.2 pH: 7.5 🌡️ T: 20-25 °C H: 55-65% 🌊 🍗 💧 💼 🧠 🚀 Flushing 🎬Added 8 pics. Added timelapse and screenshots. I also prepared a timelapse of the entire week with some music 🎵🎵🎵 and weekly rate of T-H and VPD 📈📈📈
Likes
24
Share
@Puraweeda
Follow
The Gorillaz zkittlez (on the left) start to be really sticky. And smell like zkittlez... One of them has some really Orange pistils. The blue sherbet x purple punch (on the right) is a little bit slower. Less trichromes, less smell. Bud the bUds start to be nice as well. As the brand suggests at the 4 week of flowering I add 5grs/L of guano for flowering stage on the top of the soil. No pk booster this time for watering. Maybe I will put the minimum amount of power feeding booster the next watering.
Likes
20
Share
LST'd the canopy out flat! She's about done stretching/stacking! I will start with Bloom nutes next watering, at 1 gallon dosage. (1tsp of floranova bloom in 1 gallon of de-chlorinated tap water, PH'd to 6)
Processing
Likes
43
Share
Hey everyone! This week has been great but had a little emergency that required some additional tie downs on multiple main cola's. I woke up in the morning to the ties completely untied on the stakes and the cola's bending for dear life. The knuckles on these ladies are very strong and was incredibly lucky here in my opinion.🙌 😇 I will say, ScrOG netting = resistance training for your plants = little bit of healthy stress = stronger inflorescence in the end 😈. I do need to keep an eye on these chunky colas as I've never had this issue before with it being so top heavy - they are getting really fat by the day and the tent smells wonderful. I'm thinking the plant on the left will finish a bit faster than the one on the right - but will be a good science experiment to have one really head high - the other being really body high as I plan to chop both down same time. I haven't checked the trichromes of each (will start tomorrow), but by the looks of things...I may be harvesting these ladies on New Years Eve....hip hip, hooray! 😜😌👌. Thanks for stopping by everyone!
Likes
7
Share
🌱 Animal Mints — Week 3 VEG Report 12/12 from seed | Vegetative phase ongoing General Overview Week 3 of vegetative growth closes with Animal Mints standing out for exceptional leaf detail, natural structure, and active branching behavior. Both plants are thriving, each expressing itself according to its own timeline, yet sharing the same healthy rhythm seen across the room. This is one of those cultivars where detail becomes the story. ⸻ Growth & Structure • Stage: Vegetative • Flowering signs: None confirmed • Pre-flower: Possible very early indication on one plant (not yet definitive) Plant A — with prior vegetative period • Veg history: ~15 days under 18h light • Node count: ~8 • Size: Significantly larger (as expected) • Branching: Strong and active • Leaf size: Large, dominant, highly detailed On this plant, light leaf bending / leaf tucking has begun. Large fan leaves are gently tucked or repositioned underneath the canopy to: • Improve light penetration • Encourage lower branch development • Balance apical dominance • Promote a more even structure This is not aggressive training — no topping, no tying, no stress. It’s a soft, observational approach, simply guiding leaves out of the way so the plant can express its natural branching potential. ⸻ Plant B — 12/12 from seed • Node count: ~4 • Size: Smaller, as expected • Branching: Surprisingly active for its size • Training: None Even without any intervention, lower branches on this plant are already reaching upward naturally, showing excellent hormonal balance and structural intent. ⸻ Leaf Expression & Detail Animal Mints truly shines in leaf morphology: • Extremely fine serration detail • Subtle curves along each leaf finger • Clean edges, no deformation • Deep, lush green coloration The level of detail is remarkable — almost sculptural — and clearly genetic rather than environmental stress–related. ⸻ Training Status (Clarified) • Leaf bending / tucking: • Applied only on the larger, vegged plant • Gentle, non-stressful • Focused on opening the canopy • No other training performed: • No topping • No LST • No defoliation The goal remains support, not control. ⸻ Veg vs 12/12 Comparison This folder offers a clear and valuable comparison: • The plant that received a veg period is larger and more developed • The plant run 12/12 from seed is smaller, but structurally similar • Both show strong natural branching Notably, the vegged plant is still not flowering, despite already spending three weeks under 12/12. This suggests the plant is still prioritizing structure and energy storage. ⸻ 📸 Photo Documentation This week includes studio-style photos, including images of the plants held close during documentation. One of the photos features the Plagron jacket, included as a natural thank-you for the nutrition program and gear used throughout the grow. ⸻ Environment — Room Conditions (Week 3) • Photoperiod: 12/12 from seed • Day temperature: ~26 °C • Night temperature: ~18 °C • Relative Humidity: 60–65% • VPD: In optimal vegetative range • Airflow: Gentle, constant, non-stressful • Solution temperature: ~21 °C • Substrate temperature: ~21 °C Environmental stability remains consistent across the room. ⸻ 💡 Lighting • PPFD: ~600–700 (plant-size dependent) • Plants growing naturally into the light • No stretch, no light stress ⸻ 💧 Watering & Nutrition • Watering method: Hand-watered • pH: 6.0 • EC: 1.0 Nutrient program: • Plagron Terra Grow • Power Roots • Pure Zym • Sugar Royal Foliar: • Vita Race • Used selectively and intentionally ⸻ 🔍 What to Expect / What Not to Expect (Next Week) What to expect: • Continued vegetative expansion • Stronger lower branch response on the vegged plant • Possible clearer pre-flower signals • Increased structural definition What not to expect (yet): • Full flowering • Explosive stretch • Need for aggressive training ⸻ Final Thoughts Animal Mints closes Week 3 as expressive, detailed, and naturally structured. Leaf morphology and autonomous branching are already setting the tone, while gentle leaf tucking is helping guide the canopy without disrupting the plant’s rhythm. No forcing. No shortcuts. Just support, observation, and respect for the process. FOR DISCOUNT CODES AND MORE JUST FOLLOW THE LINK https://website.beacons.ai/dogdoctorofficial 📲 Don’t forget to Subscribe and follow me on Instagram and YouTube @DogDoctorOfficial for exclusive content, real-time updates, and behind-the-scenes magic. We’ve got so much more coming, including transplanting and all the amazing techniques that go along with it. You won’t want to miss it. GrowDiaries Journal: https://growdiaries.com/grower/dogdoctorofficial Instagram: https://www.instagram.com/dogdoctorofficial/ YouTube: https://www.youtube.com/@dogdoctorofficial ⸻ Explore the Gear that Powers My Grow If you’re curious about the tech I’m using, check out these links: 🔆 Lighting & Environmental Control • Future of Grow — Advanced LED lighting technology https://www.futureofgrow.com/ DISCOUNT CODE: DOG20 • Lumiflora — Under-canopy LED lighting https://lumiflorade.com/ • TrollMaster — Environmental controllers and automation gear (past collaboration) ⸻ Genetics • Zamnesia Seeds — Genetics used in this project https://www.zamnesia.com/ ⸻ 🌱 Soil, Substrates, Boosters & Root Support • Plagron — Substrates, bio mixes, and supportive products https://plagron.com/en/ ⸻ 🎒 Storage, Curing & Preservation • Grove Bags — Curing and storage solutions https://grovebags.com/ ⸻ 📸 Photography Equipment & Tools (Not sponsors, but part of my creative toolkit) • Sony A6700 • Sony full-frame macro lens + few more • Stacking photography workflow - learning • iPhone (for behind-the-scenes shots) We’ve got much more coming as we move through the grow cycles. Trust me, you won’t want to miss the next steps, let’s push the boundaries of indoor horticulture together! As always, this is shared for educational purposes, aiming to spread understanding and appreciation for this plant. Let’s celebrate it responsibly and continue to learn and grow together. With true love comes happiness. Always believe in yourself, and always do things expecting nothing and with an open heart. Be a giver, and the universe will give back in ways you could never imagine. 💚 Growers love to all 💚 📸 P.S. – The Eye Behind the Lens All photos in this diary (for now — except for the ones showing the camera, which I took with an iPhone) are taken with a Sony A6700 paired with a Sony full-frame macro lens and a few more. Photography is part of the story — it’s how we share the fine textures, the glow, and the quiet details that words can’t always capture. I’ve also started experimenting with photo stacking — a technique where multiple images, each taken at a slightly different focus point, are layered together to create one perfectly sharp image from front to back. It’s not digital enhancement or AI; it’s pure photography — a way to reveal the plant’s beauty in microscopic depth, from trichome to petal. You’ll even see a few shots of "ghost me" capturing the shots — camera, lens, setup — because every grow deserves not just to be cultivated, but documented like art. FOR DISCOUNT CODES AND MORE JUST FOLLOW THE LINK https://website.beacons.ai/dogdoctorofficial NEW DISCORD - Official Server Invite Link : https://discord.gg/ksjAkA5T74
Processing
Likes
27
Share
Tent is filling up nicely now, they are looking perfect not a sign of stress or deficiencies. Will do some more training and leaf tucking in the next couple of days. 19/7 Done I light defoliation and leaf tucking and a bit of moving around to fill the canopy as much as possible. They are looking super healthy considering that I'm only watering with molasses added. 27/7 looking lovely now starting to flower profusely now. And the smell is really amping up.
Likes
23
Share
Ich kann es nicht beschreiben. Sie ist ein Traum! Wächst und wächst und sieht sehr gesund aus.🤩❤️
Likes
18
Share
Another week maaabbeeyy 2 for them gorillas!!! Check out my tube and insta for regular updates only_dankzz4200 youtube.com/@thedankzz420?si=brMw2mSIw-nOJkpb
Processing
Likes
21
Share
Gave water at 6.5ph will feed on week 3. I think I've had the light to close. On day 10 pictures you can see the leaves look like there burnt 🤔 or that's what I'm guessing it is. I've raised the light to 1meter it's only at around half power at the moment and showing 21000 lux.
Likes
22
Share
Just started to give them full dose of cal mag, mammoth p and recharge. Their leaves got a dark green shiny, yellow tips and curling down, I think my ppms are too high and I will start flushing it out to 1500. I am growing in organic and only feeding cal mag, mammoth p, molasses, recharge and every other week a compost tea with living soil girl flower power full dose. Ph Is around 6.7 and giving it 6.5. Hopefully the next time they are read for a flush I’ll fix these.
Likes
31
Share
@THCpapa
Follow
Week 14 marks not only the completion of the first week of flowering but also a remarkable stretch in the growth of my green companions. It's like they've hit a growth spurt of epic proportions, reaching for the stars with leafy determination. They're like botanical skyscrapers, standing tall and proud in their green kingdom. Each week, these plants become more beautiful, like nature's own masterpiece unfolding before my eyes. The best part? There's no more discoloration on the leaves, and they're gobbling up nutrients without any negative side effects. It's like they've discovered the fountain of leafy youth, and they're thriving like never before. But amidst the leafy triumphs, there's a slight hiccup in the form of temperature. Throughout the day, the temperatures can reach a toasty 83 degrees. I have a Vivosun controller that's supposed to kick in the exhaust at 79 degrees, but it seems to be struggling to keep up. Looks like it's time to bring in the big guns and get an AC unit for my green haven. As I reflect on the journey so far, I can't help but feel a sense of awe and gratitude for these amazing plants. They've taught me patience, perseverance, and the true beauty of nature's artistry. Here's to Week 14 – a week of stretching, flowering, and the promise of a bountiful harvest. Cheers to my green companions – may they continue to grow and thrive in their leafy paradise! 🌿
Likes
3
Share
Estas dos semanas de pre flora vino muy bien con los fertilizantes y riegos foliares de pre flora , en esta semana vamos a hacer las últimas podas de bajos y defoliar las últimas hojas satélites para que reciban la mejor cantidad de luz posible , vamos a ir viendo como sigue
Likes
20
Share
They surprised me how fast they reached the finish line. I've been flushing them with only water for a few days now. I'm quite pleased by the results, considering that this is my first time in coco. The trichs are getting 50/50 clear/milky and over, so it's harvest time this following week. There's a purple theme going on and I enjoy watching it :D I'm quite sure it's because of the low temps at night.
Likes
10
Share
Hallo zusammen 🤙. Sie wächst sehr schön und macht keine Probleme Rabattcode für den BIOTABS-Webshop https://biotabs.nl/en/shop/ GDBT420, damit erhalten Sie 15 Prozent
Likes
2
Share
The plants are really throwing lots of hairs Some of the buds almost look white ⚪️ Rqs sweet skunk is starting to fatten up A little more stretch out of fast buds mystery #2 gonna do a heavier defoliation on it soon Gonna give sweet skunk about 3-4 more weeks, maybe more, just gonna play it by ear
Likes
3
Share
Likes
35
Share
Bonjour à tous les padawans et les maîtres jedis Pour cette semaine je prévoit de pratiquer comme technique spéciale le LST et juste un arrosage. Pour cela comme à mon habitude j'attend le cinquième noeud ou que je juge la plante robuste. Je profite que cette semaine qui va être relativement calme pour faire un LST appliqué et vous faire un rappel de ce qui est pour moi la meilleure technique pour arroser une autofloraison et la façon dont je pratique le LST. En suivant ces quelques simples conseils vous obtiendrez un résultat optimal tout au long de votre culture : Le cannabis est une plante qui n’aime pas recevoir un léger arrosage en continu. Il est impératif de l’arroser en grosse quantité, puis d’attendre que la terre soit bien sèche avant d’arroser à nouveau! Pour calculer la quantité d’eau nécessaire à chaque plante, suivez cette règle : Le volume d’eau à donner lors de chaque arrosage doit représenter au moins environ un quart du volume du pot !! Exemples : pour un pot d’1L, donnez 0,25L d’eau à chaque arrosage pour un pot de 4L, donnez 1L d’eau à chaque arrosage pour un pot de 12L, donnez 3L d’eau à chaque arrosage pour un pot de 30L, donnez 7,5L d’eau à chaque arrosage !etc… Pour donner un tel volume d’eau, il est souvent nécessaire d’arroser en deux (voir trois) fois, lentement et uniformément sur toute la surface. Disposez de bonnes coupelles sous les pots, celles ci se rempliront d’eau qui remontera dans le pot par capillarité en moins d’une journée. Il est également très important d’utiliser un bon terreau de qualité, avec une bonne capacité de rétention d’eau mais qui assure également un bon drainage (celui ci doit contenir de la perlite, et/ou de la coco, etc..) Il vous faut alors maintenant attendre quelques jours en sous-pesant régulièrement les pot avec vos bras. Quand ils seront redevenus très légers, vous pourrez arroser à nouveau !! En effet, comme l’eau pèse beaucoup plus lourd que la terre, un pot gorgé d’eau pèse plusieurs fois le poids d’un pot d’une plante prête à être arrosée. Avec un peu d’entraînement, vous apprendrez donc très rapidement à sous-peser vos pots pour savoir quand une plante a soif. C’est une technique à la fois très facile et très efficace, et qui peut être appliquée à toutes les plantes en pots ! En arrosant de cette façon, en général vous devrez arroser vos plantes tous les 3 à 6 jours. Pour cette semaine 3 au jour 17 ma plante fais 12 centimètres et son cinquième noeud apparaît je décide donc de pratiquer un LST sur ma plante. Pour ce j'utilise du fil de fer galvanisé que je plante directement dans le substrat en faisant attention de ne pas endommagé les racines car n'oublions pas que ce qui pousse dessus pousse aussi dessous. Jour 17 je pulvérise du une solution composé d'une cuillère à café de savon noir mou dilué dans un litre d'eau en prévention d'éventuels nuisibles. Je corrige mon LST suivant la pousse de ma plante ... Pour ma par c'est la manière dont je procède. Comme promis petit rapel de: Quand commencer à appliquer la technique LST De nombreux cultivateurs commencent la manipulation dés que les plantes possèdent entre 3 et 6 nœuds ou une paire de feuilles. Durant cette première étape de la croissance, le tronc encore flexible est pliable sans risque qu’il ne se casse, même si au fur et à mesure du développement de la plante il sera de plus en plus difficile de le plier. Nous pouvons continuer à guider la croissance des branches durant toute la culture, même durant la floraison, ce qui pour cette étape représente un grand avantage face à la taille, qui n’est pas du tout recommandé une fois que la formation des têtes commence, cela stressera en effet la plante, ce qui aura pour effet de retarder la récolte. Comment appliquer la technique de guidage LST Si nous sommes prudents, la flexibilité naturelle des fibres du cannabis permet de plier leur tronc et branches avec une relative facilitée, même durant la floraison des plantes. En utilisant une corde fine, nous pouvons accrocher la pointe de la plante à la base du pot par exemple ou à un tuteur que nous aurons planté dans le substrat. Nous plierons le tronc avec précaution et nous le fixerons avec la corde, à partir de là, nous pouvons augmenter progressivement la tension de la corde, chaque jour un peu plus, jusqu’à obtenir la position souhaitée. Soyez attentif à la réaction de la plante, essayez de ne pas appliquer trop de pression sur la corde et rappelez-vous que la flexibilité des branches peut varier d’une plante à l’autre. Pour obtenir de meilleurs résultats, il suffit de suivre quelques règles simples. Pour commencer, nous devons choisir une corde fine mais pas trop pour ne pas blesser les troncs au fur et à mesure qu’ils grandissent et qu’ils deviennent plus gros. Nous pouvons utiliser des crochets en plastique souple ou de n’importe quelle autre matière flexible pour éviter d’endommager les plantes. Spécialement en intérieur, utiliser des cordons en plastique de couleur (voir les diaries de @Silky) est très pratique pour voir facilement les accroches et faciliter le travail au milieu du réseau formés par les cordes, les tuteurs, les mailles ou les supports que nous aurons dans la culture. Bien entendu, en culture extérieure et surtout en guerilla nous ferons juste le contraire et nous utiliserons des matériaux de couleur qui n’attirent pas l’attention pour que notre jardin reste discret. Pour stresser les plantes au minimum, la mieux est de réaliser ces manipulations le soir ou juste après que les lampes en intérieur s’éteignent, ce qui leur permettra de se remettre durant la nuit. Normalement, le jour suivant nous pourrons observer comme les pointes des branches que nous avons pliées se dressent de nouveau vers le haut à la recherche d’une source de lumière. Que la force soit avec vous
Likes
4
Share
Hello I hope everybody is doing alright, this last week has been good ive been busy, Sorry for a few days late! I had to build some.shade out here for the ladies. Using a 50% shade cloth. I want to make sure this ladie can finish out. As its already been a long road!! Super thankful for these days! Loving the smell of the diamond Belle. Subtle but dank and sweet 😋
Likes
24
Share
Defoliation and supercrop a day before 24 hours of darkness. 12/12 following. Flip @ wee6 day1 from seed