
Likes
Comments
Share


@after13weeks
Follow
То как я делал гров в этот раз полная фигня, условия максимально экстремальные, растение зацветет карликом. С помощью тиосульфата серебра была применена смена пола.
Смена пола произошла успешно, теперь это сильное мужское растение отправиться на селекцию для создания нового сорта "Tropicana Ultra".

Likes
18
Share


@Borndlkramer
Follow
Die Pflanzen fühlen sich pudelwohl in den 15 Liter Töpfen. Jetzt habe ich alle vier Planzen getoppt.


Likes
24
Share

@MadeInGermany
Follow
Flowering days 27
since time change
to 12 / 12 h
Hey guys :-)
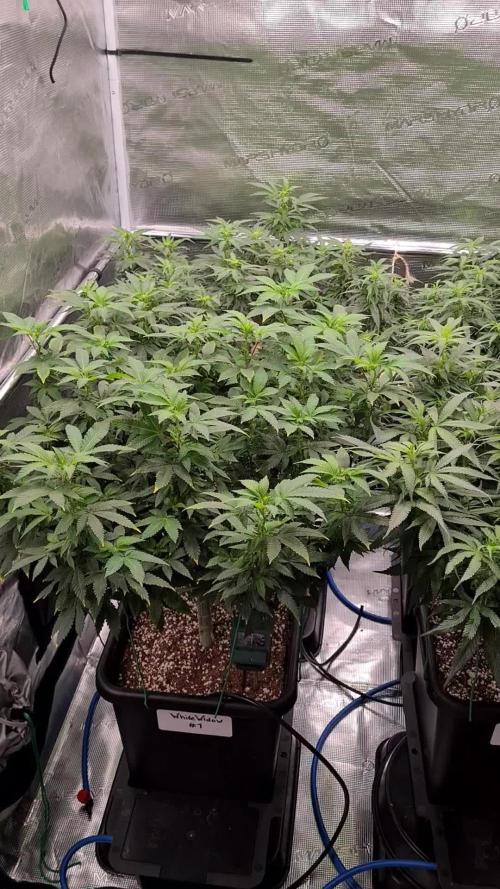
The ladies look beautiful and are growing very well.
The sweet smell starts to blow through the whole tent :-) .
This week it was watered 3 times with 1l each (nutrients see table above)
Nothing else happened this week. Everything has been checked and verified.
A lot fun and stay healthy 💚🙏🏻
👇🏼👇🏼👇🏼👇🏼👇🏼👇🏼👇🏼👇🏼👇🏼👇🏼👇🏼👇🏼
You can buy this Nutrients at :
https://greenbuzzliquids.com/en/shop/
With the discount code: Made_in_Germany you get a discount of 15% on all products from an order value of 100 euros.
👇🏼👇🏼👇🏼👇🏼👇🏼👇🏼👇🏼👇🏼👇🏼👇🏼👇🏼👇🏼
You can buy this strain at :
Clearwater Seeds
Water 💧 💧💧
Osmosis water mixed with normal water (24 hours stale that the chlorine evaporates) to 0.2 EC. Add Cal / Mag to 0.4 Ec Ph with Organic Ph - to 5.8 - 6.5
MadeInGermany
Likes
9
Share


@Mr_nugs_lover_David
Follow
It's been a beautiful plant to grow, I thought she was gonna be a little bigger, however she has produced an amazing quality flowers, very sticky, terpy and stinky, the citric aroma it's absolutely wonderful just because of that I could grow her again and again. You definitely need to try this strain if you lovd weed.💚🌱🤤
Likes
2
Share


@Ultraviolet_
Follow
Wakíŋyaŋ, I am who I am, the salt of the earth.
Thunderbird is an allegory; his conflicts with other forces in nature are then an attempt to allegorize relationships observed in the natural order, such as the changing of the weather. He is essentially an attempt to represent the patterns of activity of a powerful, mysterious force in a way that can be understood simply and easily – sort of the way in which a weather map functions today.
Moving from18x60x60 = 64,800 seconds in 18 hours.
64800x860(ppfd) = 55,728,000 umol per daylight.
Into Flower
12x60x60 = 43,200 seconds in 12 hours.
43200x1145(ppfd) = 49,464,000 umol per daylight.
It's asking a lot of Rubisco regeneration to maintain 50 DLI in the 12 instead of 18. Raised the ambient CO2 to 1200 to 1500 ppm to achieve efficient gas exchange.
Not particularly recommended, but adding sugar to an indoor growing medium is a highly effective way to stimulate microbial activity, which rapidly breaks down the sugars and releases CO2 through cellular respiration. You can safely capture this CO2 to fertilize indoor crops and boost photosynthesis. While this process works, the setup requires precise understanding and management to avoid common indoor growing hazards.
The plant Carbon to Nitrogen C:N ratio defines the balance between structural carbon (sugars/cellulose) and nitrogen (proteins/enzymes). It acts as a master regulator of plant health, growth, and metabolism.
Rubisco (Ribulose-1,5-bisphosphate carboxylase/oxygenase) is the engine of photosynthesis responsible for fixing atmospheric CO2 into sugars. It is intimately tied to the C:N ratio for three primary reasons. It is the Plant’s Biggest Nitrogen Sink, Drives the Carbon Side, and it is the Nitrogen Control Knob. Understanding this relationship allows you to predict how plants respond to environmental stress or fertilizer.
Rubisco acts as the primary storage sink for leaf nitrogen, accounting for up to 30% to 50% of a C3 plant's soluble protein. Deep Green Leaves signal a rich abundance of both chlorophyll and Rubisco proteins. The plant possesses the heavy enzymatic machinery required to handle 1145 PPFD. Pale or yellowing leaves indicate a nitrogen deficiency. The plant is actively breaking down its own Rubisco to salvage nitrogen for newer growth, drastically reducing its light-tolerance threshold. Subtle difference, but understanding is important in order to be able to judge when to dial light intensity up and light intensity down, when to push, and when to back off. An extra dose of magnesium is vital if a plant is going to push through the growing pains of high-intensity lighting.
Foliar application of magnesium is an excellent and rapid way to assist with Rubisco regeneration within a plant, so long as it is applied correctly.
Spray strictly in the early morning or late evening, mixing your magnesium with a little fulvic acid or chelator, but only when she gets a little limey on top.
This, for me, is the experience of growing, akin to "riding the surf" maintaining efficient Rubisco regeneration through visual identification of the shade of green. Surf a razor-thin wave when balancing light intensity, nutrient availability, and transpiration to maximize Rubisco enzyme efficiency. Keeping the Calvin cycle fully charged without tipping into nutrient toxicity, light stress, or the dreaded chlorosis requires paying close attention to the visual cues the plant provides. By monitoring these subtle shifts in color, turgor pressure, and leaf posture, you adjust your environmental controls and surf that exact razor-thin wave.
Nute recycling acts as the vital execution mechanism for autophagy, which defines senescence. Natural senescence is a genetically programmed developmental stage aimed at nutrient recycling, whereas triggered autophagy is a rapid survival response activated by environmental stress. While both processes utilize the vacuole to break down cellular material, their triggers, selectivity, and overall goals are entirely different. Cannabis plant senescence is not separate from nutrient recycling protocols; rather, nutrient recycling is the primary physiological purpose of senescence, and autophagy serves as the core switch mechanism executing both processes.
Takes about 24 to 48 hours to notice visible changes once the signals have initiated the autophagic response. Not too late at all. A little bit of fade from senescence 2 weeks from harvest is normal and genetically expected. Send the C:N 32:1 signal 1 week from harvest for the best effect in your organic grow.
Understanding what makes leaves fade is not always senescence, but also strongly linked to Rubisco regeneration. That's a whole other subject. Vital to understand the differences if you want a correct diagnosis and to transition from hobby grower to master stoner, differentiating between a true genetic fade and a decline in photosynthetic proteins.
Nitrate is nitrate, whether it oxidizes or not is not up for debate. If it's not sunk by the plant you are smoking some if not all of, it's regardless of what your feelings are on the matter. Senescence is highly critical. It is the natural end-of-life stage where the plant redirects energy to ripen flowers. Properly managed, it breaks down harsh chlorophyll, allowing the terpenes (which provide taste and aroma) to peak. Harvesting outside this window leads to an "unripe" or degraded flavor comparable to going without.
To initiate the response you seek, you can trigger it multiple ways, when growing synthetically its triggered by nutrient starvation, generally when the entire medium is flushed. This is more to do with N starvation than being entirely empty. Nonetheless. PK boosters are N starvation through maximizing P and K. (Generally only works for synthetic grows)
Normally, a medium only holds 10-30% of its nitrogen as ammoniacal ta part boosts this to 50% as it triggers the "ripen" signal, but you don't want to keep ammoniacal above 30% for more than 7-10 days if you can help it. Its a trigger mechanism no more.
PK BOOST with 50% ammoniacal N signals floral maturation.
PK BOOST with N starvation signals nutrient recycling/sinking.
Because you are using organic nutes and you want to maintain the rhizosphere, what you want to do is add carbon in the form of sugars (powdered molasses). It's almost impossible to empty a medium enough when microorganisms are constantly releasing nutrients into the direct EC. Very difficult to initiate starvation responses with ammoniacal nitrogen. Manipulating the C:N ratio is the key to triggering an autophagic response and resulting nutrient recycling in the last days using organic nutes and without having to flush.
Generally not recommended for new growers. So do what you want. But if you don't trigger the plant to dump its nitrates into root zones, you will smoke nitrates as NO3- does not oxidize during the dry and cure no matter what you do or how long you dry or cure. Doesn't matter what anyone "feels" about it, how many grows they had with no fade.
"Clover steals valuable nutrients."
Crop and drop the clover come flipping to flower, its benefit comes from creating an airy and porous rootzone. I don't need to crop and drop once the plant fills the canopy, she blotches out the light, and the clovers die. This is the nitrogen the microorganisms use to convert carbon for respiration throughout the flowering stage.


Likes
40
Share


@TheCannaBrit
Follow
Just time to finish these guys with a flushing agent then we HARVEST!!

Likes
4
Share


@smoking_hills9
Follow
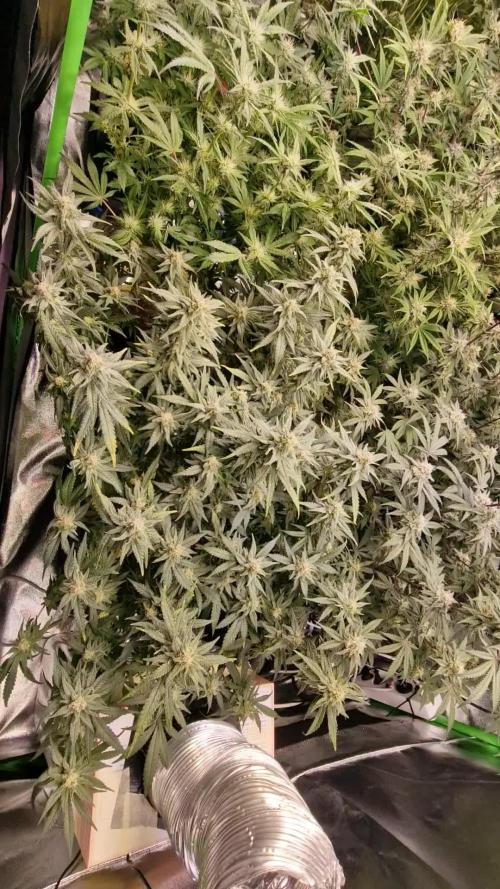
Last final defoliation done, now buds are fully exposed to the lights and the best part, harvest trim will be easier. Still it took me around 8 h altogether to defoliate all of them. Tones of buds and frost , amazing smells. Won't rush will give it a bit more to swell.

Likes
1
Share


@Barzenegger
Follow
Transplanted them into the AutoPots this week, humidity could be higher. Maybe I can turn on the reservoir next week already.

Likes
31
Share


@AbroCadabro
Follow
I have been very busy over the last week so I haven't had much time to do any documentation. There isn't much going on at the moment so you aren't missing out on much. There have been a couple of leaves on this plant showing some strange markings. Nothing that is uniform nor reoccurring. I think these defects I show in the video are localized to just two or three leaves so I am not too concerned at the moment. I will keep an eye on her for the time being. Other than that, the plant looks really happy and is growing very well. Good color all around and getting very bushy.


Likes
1
Share


@Sativa_Juice_Grows
Follow
She got really stout and bushy like a Christmas tree, you can tell by the stem structure that the colas are gonna be thick and dense, but boy did she have a Crazy couple of weeks. First it was little spots of powder mildew. Then She kept getting spider mites and i couldnt seem to keep them away. i have a lot of other plants and veggies growing my garden so i moved her. Little did i know that her being near my sunflowers meant that some type of sunflower worm would get to it and one burrowed inside the stem of the main cola so i had to trim that way down to keep it from rotting. The mold and the mites were friggin persistent so i moved her to a different location and shes doing so much better. im almost positive i stunted her by trimming the main cola. Im not mad though cause it looks like she has 4 different colas growing in its place so im ok with that. Most descriptions say she finishes flowering around 10-11 weeks and I'm there now with a lot of maturing left to do. Shes looking healthy so well see how she matures!

Likes
34
Share


@PEAKYPLANTERS
Follow
hi to all, brothers of the weed!
my orange juice is nice and ready to be harvested!this beautiful plant was really very strong and resistant, in a short time it dominated all the cousins that were in the room! as always we will perform a dry trim and we will do a lot of good content and other reviews on the smoke so stay up to date!
Likes
17
Share


@420DeepGrow
Follow
Gracias al equipo de Kannabia Seed, Marshydro, XpertNutrients y Trolmaster sin ellos esto no sería posible.
💐🍁 Moby Dick 🐋:
Criada a partir de dos parentales icónicos, como es el cruce de White Widow y una Haze pura G13, este choque de titanes provoca un híbrido que golpea a las puertas de las sativas más fuertes disponibles en el mercado.
Estamos ante una criatura impresionante en todos los sentidos, con ejemplares que florecen en solo 9-10 semanas en interior y arrojan un peso en lonja de 550 gr./m²
Al igual que su padre Haze, nuestra Moby Dick ofrece agradables notas cítricas, pero con efluvios de vainilla y eucalipto, una mezcla de aromas que genera una combinación intrigante, que puede llenar cualquier habitación con una fragancia inolvidable.
El sabor es muy parecido a su olor, con toques de limón agrio que harán que tu lengua cosquillee al inhalar, convirtiéndose lentamente en un humo dulce y terroso, con pinceladas de madera e incienso que se adhieren al interior de la boca al exhalar.
💡TS-3000 + TS-1000: se usaran dos de las lámparas de la serie TS de Marshydro, para cubrir todas las necesidades de las plantas durante el ciclo de cultivo, uso las dos lámparas en floracion para llegar a toda la carpa de 1.50 x 1.50 x 1.80.
https://marshydro.eu/products/mars-hydro-ts-3000-led-grow-light/
🏠 : Marshydro 1.50 x 1.50 x 1.80, carpa 100% estanca con ventanas laterales para llegar a todos los lugares durante el grow
https://marshydro.eu/products/diy-150x150x200cm-grow-tent-kit
🌬️💨 Marshydro 6inch + filtro carbon para evitar olores indeseables.
https://marshydro.eu/products/ifresh-smart-6inch-filter-kits/
💻 Trolmaster Tent-X TCS-1 como controlador de luz, optimiza tu cultivo con la última tecnología del mercado, desde donde puedes controlar todos los parametros.
https://www.trolmaster.com/Products/Details/TCS-1
🍣🍦🌴 Xpert Nutrients es una empresa especializada en la producción y comercialización de fertilizantes líquidos y tierras, que garantizan excelentes cosechas y un crecimiento activo para sus plantas durante todas las fases de cultivo.
Consigue aqui tus Nutrientes:
https://xpertnutrients.com/es/shop/
📆 Semana 9:
El engorde de los cogollos está prácticamente terminado y solo falta que maduren un poco antes de ser cosechada.
Gran trabajo por parte de mis colaboradores, estoy bastante contento con este grow, el próximo tendré más atención en la etapa de crecimiento, la cual es muy importante si quiero obtener una cosecha de calidad.
A partir de ahora agua hasta el fin.

Likes
9
Share

@BLAZED
Follow
Week 15 (23-9 to 29-9)
23-9
Temps: 21.2 to 24.4 degrees
Humidity: 54% to 65%
Watering: Both 500 ml.
Dry Weight #1: 4.0 kg. #2: 3.9 kg.
24-9
Temps: 19.8 to 23.3 degrees
Humidity: 55% to 61%
25-9
Temps: 19.8 to 24.2 degrees
Humidity: 59% to 65%
Watering: Both 500 ml.
Reinstalled the tubes of the autopots, The tubes connected directly to the AutoPots had some cloudy water in it.
I installed a valve between the autopot and the tubes so there is no room for water to stand still.
Dry Weight #1: 3.6 kg. #2: 3.7 kg.
26-9
Temps: 20.7 to 24.5 degrees
Humidity: 62% to 71%
Watering: Both 500 ml.
Dry Weight #1: 3.7 kg. #2: 3.9 kg.
27-9
Temps: 18.6 to 24.5 degrees
Humidity: 52% to 70%
Watering: Both 500 ml.
Decreased the light's intensity from 60% to 50%
Dry Weight #1: 3.8 kg. #2: 4.0 kg.
28-9
Temps: 19.2 to 23.6 degrees
Humidity: 52% to 68%
Watering #1: 500 ml.
Dry Weight #1: 4.1 kg. #2: 4.4 kg.
29-9
Temps: 18.9 to 23.2 degrees
Humidity: 56% to 63%

Processing
Likes
65
Share


@Dedon
Follow
Hi everyone !
Everything's is OK.
Roots are still growing for second Tank. Plants in First tank have nice roots, i think they are ready to switch in bloom. i give a few day for the second tank and i'll start flowering 😁

Likes
27
Share

@GrowBro1981
Follow
Hallo liebe Growfreunde 💞
Ich bin zurück mit dem neuen Wochenbericht 🤗
Danke an die neuen Follower, ich hoffe es macht euch Spaß meinem Grow zu Folgen
An alle anderen, für immer aktuelle Updates auch Folgen😁😁😁🤗🤗🤗
So jetzt zum Wochenbericht. Alles läuft sehr entspannt, kaum was zu tun, aber es ist einiges passiert🤩🤩. Die Buds werden fetter, der Geruch ist einfach himmlisch und die Farben sehen toll aus. Leider kann man die Farben nicht so gut erkennen auf den Bildern, aber es purplet ganz schön🤗😁
Die Sweet ZZ erholt sich von ihrer Calmag Blockade und die neuen Blätter zeigen keine Anzeichen mehr auf Mängel. Die Gorilla Zkittlez holt an Größe auf und ist jetzt etwa so groß wie die Sweet ZZ, aber mit deutlich weniger Nodien. Ich denke die Peyote Critical wird als erstes reif sein, sie wirkt am weitesten entwickelt und auch die Blütezeit ist die kürzeste von meinem Setup. Danach wahrscheinlich die Sweet ZZ und evtl. Die Green Gelato. Die Runtz und die Lemon Shining Silver Haze werden am längsten brauchen. Ne quatsch, die Gorilla Zkittlez wird am längsten brauchen da sie erst seid etwa 2 Wochen blüht.
So das wars für diese Woche meine lieben💞
Ich hoffe euchvgefällt was ihr seht und lasst likes und Kommentare da🤗🤗🤗
Tut gutes💞
Cioaiii👋👋👋
Likes
22
Share


@herbalistssword
Follow
First day of week 6, I will be adding content as the week progresses, have a look at week 5 as that is now complete.
Status:
Candy Kush #1 d36 - Looking awesome, some pistils showing. Was too bushy so did some LST and slight defoliation today with supercrop on 1 branch.
Candy Kush #2 d36 - Looks like nitrogen deficiency is sorted, now I have excess? :D see the clawing tips? Gonna stick with the current feed, hopefully she'll overcome otherwise I'll flush her once if things get worse.
Bubble Kush d32 - Amazing, nothing to report, some tucking done
Fastberry d32 - Looking as weird as ever, some tucking done
Sugar Mama d36 - growing and getting really bushy, shame about the mess I did with the roots/stem but she is doing ok now.
----
Fed 2nd day of weeks 6 (day 37), 3ml biogrow 2ml calmag. pH was at 6.5 Ec was at 1.5.
New leaves are really yellow in candy Kush 2, iron deficiency? Not sure what is happening, will be monitoring.
----
Day 38, Removed the yellow leaves and a little defoliation on all the plants
----
Day 39, Raised the shorter plants so they get some more lights. All of them have finished 35 days (5 weeks from seedling today) and are looking great. Feed the same, although they still look very bright, brighter than I am used to.
----
Day 41, Feeding time, started giving them bloom at 5ml/l and the other normal dosages as in diary.
----
Day 42, End of week 6
The girls are all looking great, there is is so much hair on the buds, haven't seen so much with outdoor grows. Exciting :D
Sugar mama is way too bushy and not getting taller. The new blades are too thin, maybe I'm overfeeding her (only biogrow+calmag)? defoliated her, lots of fan leaves removes, she is asking for some training, I've ordered plant tie and will do some LST when delivered.
Fastberry also had a couple of leaves removed
All kushs doing great
Thanks for reading and happy growing!


Likes
19
Share


@Mazgoth
Follow
If you need a strain that is resistant to cold and have a good yield just don’t think about it,just try it.
Likes
8
Share


@HighOhioAn
Follow
She is a little hungry going to try to give her some Cal mag buds are forming nicely stacking is on point nice dense snugs🔥