
Processing
Likes
Comments
Share


@GrowerGaz
Follow
Day 28 today
The girls are stretching out to a decent size. Except the Cheesy auto which is 10 days behind. They have only had half a scoop of Greenhouse biogrow so far. I am going to try out Canna Flores Organic for flower , boosted by organic Iguana juice from Advanced nutrient, is did a little bit of lst today just tying four branches down on each plant. I'm interested how much I can yield from a 100w led.


Likes
10
Share


@CrazyFlowers07
Follow
Ciao a tutti oggi 3/06/2022 è il primo giorno di vita della pianta ✌️🏼✌️🏼 Buon seguimento 😝😝

Likes
12
Share


@eldruida_lamota
Follow
Buenas noches familia, sorpresa, jueves noche por aquí , actualizamos las power plant xL.
Es la última semana antes de nuestra cosecha, el tiempo se nos echó encima y las Flores ya están echas, se preparó un lavado de raíces y tijeretazo,para sucesivamente colgarlas.( PRIMERA VEZ que se me echa el tiempo encima con la floración, jurao)
Me habría gustado darles algo de estrés hídrico, pero lo veremos con las lemon kush y las northern light xL.
-power plant xL es una cepa con predominancia sativa, con una corta floración,es un ejemplar fácil de cultivar, fuerte, y vigoroso.
Estos ejemplares se cultivaron en 7L en sustrato light MIX de plagrOn, controlando en todo momento el PH de nuestras plantas, y dándoles de comer una gama advanced nutrients bastante básica.
-PROS: facil cultivar, flores llenas de resina , flores compactas, ramas laterales largas.
-CONTRAS: hay que tutorar por el peso de la flor, floración demasiado rápida a mi gusto (no te das ni cuenta).
*Aquí ya me despido hasta la cosecha familia.

Likes
22
Share

@Michijardinero
Follow
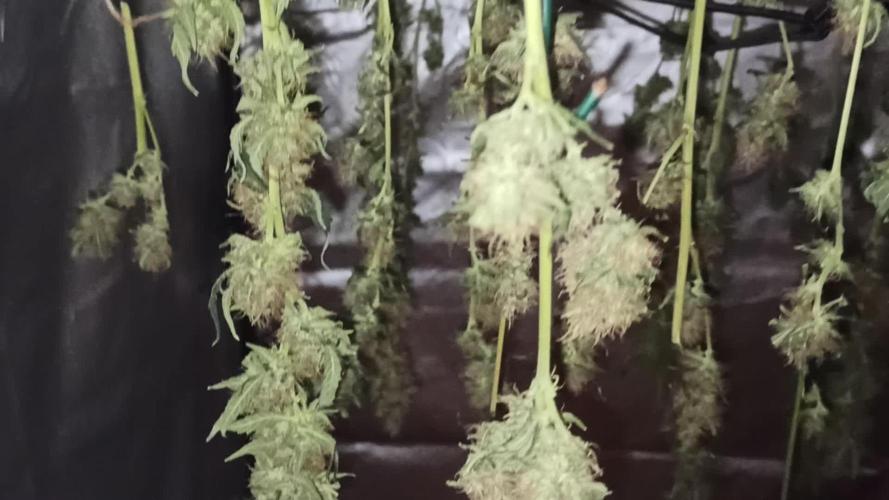
En el siguiente les mostraré cuanto quedó al final del secado y les diré que tal ha quedado la cosecha espero y estén así como se ven 😋😋😋muchas gracias por acompañarme con este cultivo los espero en el siguiente familia un abrazo
Buenos humos paz familia

Likes
7
Share


@Learntogrow818
Follow
Drying and curing always the biggest challenge for me due too constant climate change in my area, living near the mountains have its flaws too..🧐 Oh well still love growing..✌️


Likes
53
Share


@cheetah844
Follow
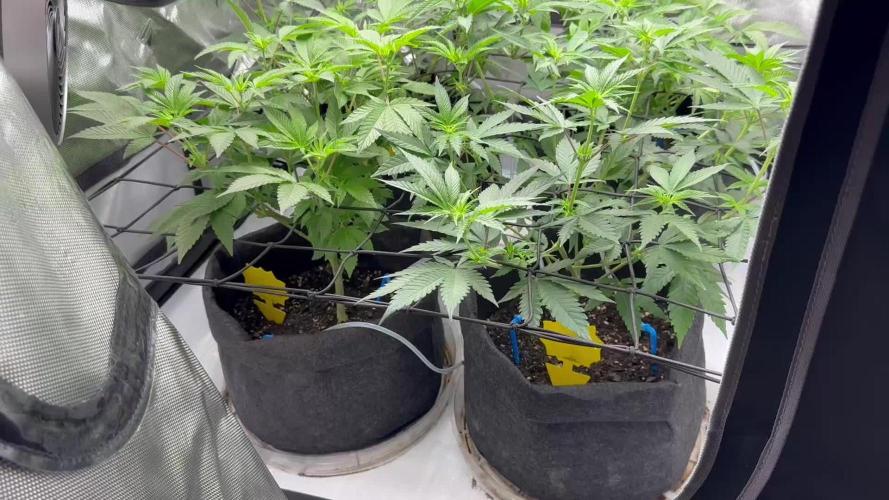
Yay! Finally they get space in the bigger grow room, been waiting for weeks. The few mother's that were still flowering were able to fit into the tent.
Many of the seedlings were ready for transplant so I made room for them in the clone closet as well.
Likes
35
Share


@ZariRat_Grow
Follow
- Semana de Equilibrio
• Apical ( Primera y Segunda Ronda )
Comenzamos realizando el primer apical a las plantas más adelantadas. La idea era clara: romper crecimiento vertical y forzar el desarrollo horizontal.
Días después, completamos el apical en las restantes hasta dejar las 9 plantas trabajadas.
La respuesta ha sido muy buena. En 48–72 horas ya se notaba activación lateral y redistribución hormonal .
• Defoliación Ligera Selectiva
Retiramos entre 2 y 4 hojas grandes en las plantas más desarrolladas.
No fue una poda agresiva.
Después de eso, no se ha vuelto a tocar estructura.
• Primer Riego con Fertilización Controlada
Realizamos el primer abonado suave tras el trasplante y topping.
-Mezcla aplicada (media dosis):
Crecimiento y enrraizador de 33PRO
Silic Pro de 33PRO
CO₂ Pro LED de 33PRO
-Parámetros finales:
pH ajustado a 6.3–6.5.
EC final por debajo de 0.9.
Decidimos empezar a media dosis para evitar acumulación de sales y observar respuesta real de la planta.
-La reacción ha sido positiva:
Hojas firmes.
Mejor turgencia.
Bordes más definidos.
Sin nuevas puntas quemadas.
• Ajuste Fino de Clima
-Día:
25–26°C
60–65% HR
-Noche:
23–24°C
57–65% HR
Las plantas han empezado a mostrar hojas erguidas y postura activa.
• Iluminación
El foco lo mantenemos al 50% de potencia.
Distancia al dosel: aproximadamente 45–50 cm. Unos 400PPf aproximadamente.
Las genéticas más vigorosas las hemos colocado en las esquinas traseras para controlar estiramiento.
•• Estado Actual del Canopy
Las Zkittlez han dejado de dominar.
Las Blueberry Cupcake mantienen estructura compacta.
Las Strawberry Banana están igualándose progresivamente.
El dosel empieza a verse uniforme.
El cultivo ha pasado de fase vertical a fase estructural horizontal.
•• Plan Próxima Semana
No tocar estructura durante 5–7 días.
Alternar riego agua / abono suave e ir subiendo
Mantener estabilidad climática.
Ahora a cruzar los dedos para que todo salga bien y a esperar. Buenos cultivos y buenos humos compañeros 🌱💚


Likes
5
Share


@thevalar007
Follow
Week 1 of flower and she started her stretch. Using General Hydroponics Trio for feed along with TPS Signal and Recharge for soil. I'm considering adding a 2nd trellis, but it depends on how the next week or two goes. Did some light and final defoliating. Could have went more but I didn't want to risk overdoing, not until I'm more experienced anyway. Plus I recommend having a plant to experiment on and take some high-reward risks concurrent with your main grow.

Likes
2
Share

@Daves_Garden710
Follow
🌿 Week 4 — Bushy & Thriving! 🌿
#PermanentMarker #ZamnesiaSeeds
The girls really filled out this week — super bushy and thick growth all around! I topped them once and gave them a good defoliation to open things up, as they were getting quite dense.
I bumped the feed up slightly to 600 ppm @ pH 6.0, still running the Aptus Clean Program with R.O. Water Conditioner, Regulator, and All-in-One Liquid. 💧
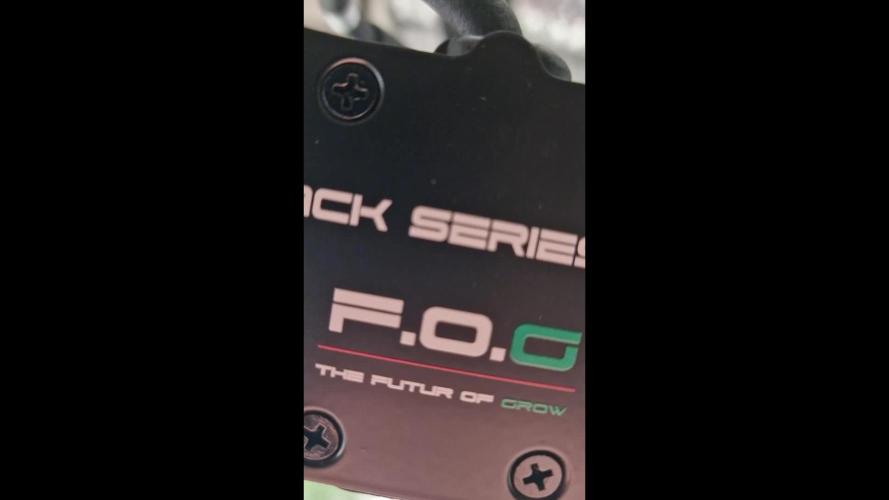
Raised the Future of Grow Black Series 600 a bit to encourage some stretch before the flip. I’ll be adding an under canopy light (UCL) as soon as it arrives, and later this week I’ll set up a trellis/net for support. The plan is to flip them after week 5.
So far, they’re looking really nice and healthy — one pheno is even showing a bit of color on the tops already. Excited to see how they develop from here! 🚀

Likes
Comments
Share

@MrGrOH1008
Follow
Snapped a maint branch but we’ll see if I can save her. Other than that just plucking here and there. They’re raving pretty good.

Likes
4
Share


@Huckleberry39
Follow
Strawberry banana is coming along great!! Buds are really getting fat and frosty. They feel super hard to the squeeze! Smell is amazing...its a fruity gassy smell. Pistols are really starting to turn. @420fastbuds delivers again!!
Likes
44
Share


@Roberts
Follow
Casey's Rollex OG has a sweet fruity aroma. She is loaded with frost. She is in the mist of her bulking. Everything is looking good. A few more weeks left and she will be ready for a harvest. Thank you DutchFem Seeds, and Spider Farmer. 🤜🏻🤛🏻🌱❄️
Thank you grow diaries community for the 👇likes👇, follows, comments, and subscriptions on my YouTube channel👇.
Thank you Happy Growing 🌱🌱🌱
https://youtube.com/channel/UCAhN7yRzWLpcaRHhMIQ7X4g

Likes
38
Share


@Danger90946
Follow
Day 106 12/25/2021 being of a new week and this will be more than likely the last week this lady gets any nutrients thinking Wednesday. After that will start flush with collected rain water. After checking trichomes they were about 85% cloudy about 10% clear and 5% amber which is right where she should be since the end is coming fast.
Day 110 12/29/2021- Started flush today and will continue to just feed rain water until next Wednesday. Will cut her down next Friday 01/07/2022.


Likes
6
Share


@SonGoku848
Follow
Fine 4 settimana di flow procede tutto bene 2 LH2P mangiano di più rispetto le altre, alla fine le due ermafrodite dopo aver eliminato i rami con i fiori maschi non se ne sono più formati quindi ottimo ormai dovrei essere fuori pericolo ma continuo a controllare

Likes
27
Share


@LockDownGrow
Follow
Ok so this week I did a defoliation and a tigh down too the netting , I really was not planning on doing such a big defoliation but the leafs became thick and dense and there was almost no light penitration down too the lower branches of the plant , so she is opened right up now and the humidity and temperature has dropped loads and the air is moving alot better around the leaves and branches , I will not take anything more off her now , I have also added Cal mag too the nutrients for this week only , she is well into pre flower now but the stretch has not yet started so I figured it's no or never too defoliate and tigh them down ,
I am very happy with them so far and being new too all this it's all very exciting ,
Thanks for looking :)
Likes
38
Share


@Snakeking
Follow
Everything is fine i still water-and feed them 5 times a week
2 times light compost tea with bath guano and molasses. I startd to add iguana juice bloom in my compost tea! Lets see the reaction of my girls.
I also add a little bit of rhino skin by advanced nutrients against heat wave

Likes
11
Share


@CanabisLoverHobbyGrower
Follow
Put on alot of size, I think they are coming to the end of the stretch now, loads and loads of bud sites and both look so healthy, roll on next week 😀 👌

Processing
Likes
35
Share


@DjDaveAtHome
Follow
The stretch is amazing! This plant is a real sky king! Buds are really stacking well on most of the branches. A major recovery from the massive defoliation from last week! Internodes are Sativa like. Branchy. BHB 1 is a monster! Around 19 viable bud sites. She's taaall. Lollipopped the lower quadrant for airflow and to redirect the growth where it is needed.
BHB 2 is the shorter, slightly younger plant. Shorter and has about 1-12 bud sites. Five branches are taller than the rest (This is a similar trend in #1).
The buds are looking healthy. I do get the occasional burnt leaf from my heater at night. Another week of stretching and another big defoliation and that problem should have sorted itself out. Just found out my res temp is at 62°F. I've started the circulation fan in my insulated box in sync with my exit fan. When it gets too warm, it'll start not only my exit fan, but also the box fan. Should raise the temp gradually back up to 65°. Where I like it. Still, no one has complained. Growth was/is still vigorous and healthy! Keeping the PPMs at around 800-900. Going to do a straight water flush for 24 hours, then start again at 500 PPMs or so. In soil I've always done periodic flushes throughout the cycle of the plant. Usually twice in veg. Once at around 6 weeks and another at transition. The third is at week four of flower and the last is the obligatory final flush. 24-48 hours after the flushes, there is a strong and vigorous spurt from the plant. three days later 'in soil' I go back to nutrients. DWC requires much less time to do the same thing, so 24 hours, it is! I've done two flushes so far and the experience in DWC is the same. Just faster. I highly recommend trying it if you haven't already.
Although the root rot is essentially gone, I continue to brew my microbe tea using Advanced Nutrients Tarantula. I add a litre every forty eight hours to each plants res. This is just prevention at this point. There is so much peat moss and soil left in the root ball when transplanted from their soil, it just seems prudent. Future grows will be done 'sterile. With no organic material or biosphere (microbes)... unless we run into problems again. With the res temps so low, I don't think it'll be an issue.
Blueberry Headband (2) from Humboldt Seeds.
https://www.humboldtseeds.net/en/blueberry-headband/
Lighting
https://www.horticulturelightinggroup.ca/products/260w-qb-v2-led-kit
DWC Nutients
https://generalhydroponics.com/floraseries
FloraGro 5ml/gal
FloraBloom 10ml/gal
FloraMicro 7.5ml/gal
Cal Mag 5ml/gal
https://generalhydroponics.com/calimagic
Epsom salts
Brown Slime Root Rot Organic Microbe Tea
5 ml (1 tsp) organic sulphur free molasses
5 ml Alaskan Organic grow fertilizer (or something comparable)
5 ml Alaskan bloom fertilizer (or something comparable)
5 ml Seaweed or kelp fertilizer
2-4 ml Advanced Nutrients Tarantula

Likes
293
Share


@Ju_Bps
Follow
Hello growmies 👩🌾👨🌾🌲🌲,
👋 The babies growing good, finaly to transplant them 😁.
Soil
2l pot
Coco Ball
Plagron Lightmix
Previous leaves have been burned by the lamp, in the middle week a friend have been harvested,
So I've setup the babies on the left side with light off,
Since look really better and new leaves look healthy 💚
Starting Grow nutes
💧 Give water each 2/3 day
And vaporise plant with water + Plagron Roots (1ml/l)
0.25 l Water + Roots + Grow (1 + 2 ml/l)
0.25 l Water + Roots + Grow (1 + 2.5 ml/l)
0.3 l Water + Roots + Grow (1 + 3 ml/l)
PH@6
💡Mars Hydro - FC 3000
50% 80 cm
Mars Hydro Fan kit
Setting 8
Have a good week and see you next week 👋
Thanks community for follow, likes, comments, always a pleasure 👩🌾👨🌾❤️🌲
Mars Hydro - Smart FC3000 300W Samsung LM301B LED Grow Light💡💡
https://www.mars-hydro.com/fc-3000-samsung-lm301b-led-grow-light
Mars Hydro - 6 Inch Inline Fan And Carbon Filter Combo With Thermostat Controller 💨💨
https://www.mars-hydro.com/6-inch-inline-duct-fan-and-carbon-filter-combo-with-thermostat-controller
Fast Buds - Gorilla Cookies FF🌲🌲
https://2fast4buds.com/us/seeds/gorilla-cookies-fast-flowering


