Likes
Comments
Share

@frigo_camelo
Follow
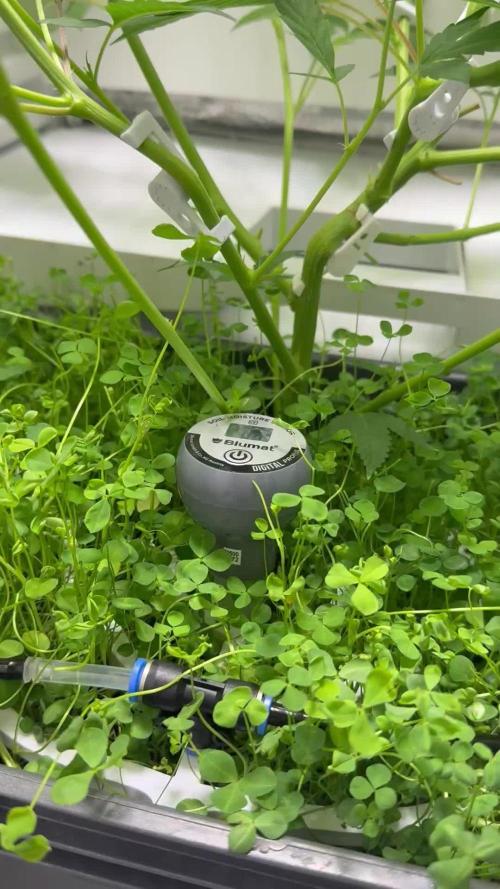
end of week 1 flower | plant looking really green | changed from using blumats to the good old drip ring in the closed loop config | hope i now got better controll over the humidity in soil | plant grew very nicely to be spread under the net | installed the scrog end of week 1 | now 2 weeks of holiday | hope for the best

Likes
14
Share


@SweetKush
Follow
Day 74. The harvest is near. I will start with a 14 day flush this coming week. The Trikoms sparkle like diamonds on the buds and it smells absolutely magical. The harvest won't be that great but the quality of this weed will be absolutely outstanding, I'm sure 😁✌️.
Day 77. The gorilla is approaching the end, The Tricoma are cloudy and are becoming more and more milky to show a shade of amber and orange-colored spouts spread across the buds. I aim to start flushing her at the end of this week, and then give her a 10-14 day flush.

Likes
5
Share


@GarciasGarden
Follow
Day 9 plants looking great all green already seeing bud sites forming! Can’t wait to see the buds on these girls!
Again check out General hydroponics their nutrients are the best out there!


Likes
7
Share


@R_Dub
Follow
11/13 Started Super Cropping on Amy, Gina, and Rosa, Judy is just at her 4th node, so i reached the second node and twisted the stalk until I could feel the fiber break and then I bent the stalk in the direction that I will ultimately tie down in, not long enough yet to get to the edge of the pot. In an hour I checked on the girls and they were all back to normal.
11/14 Watered 500 mil 6.5 PH tied down Amy, Gina and Rosa, broke a leaf off of Amy while bending
11/15 Spritz with Yucca foliar spray reapplied LST girls are looking great really healthy and green
11/16 Reapplied LST and accidentally broke the main stem on Gina, decided to go ahead and top her since the break was at a node and impossible to tape, so I guess we are also testing topping as well as going Organic. Adjusted lights to 25 inches above Judy the shortest girl. Brewed up an Organic Tea using 1 Cup Nature's Living Soil Concentrate, 1 Cup EB Stone Earth Worm Casings, 1 Tablespoon Unsulphered Molasses, 1 Tablespoon Fish Meal with Kelp, let the tea brew for 18 hours.
11/17 Fed each girl 1 Liter of Compost Tea reapplied LST the thought is the plants are three weeks in the soil and are growing at a healthy pace (with the exception of Judy), I want to make sure they have enough food in the soil available to them now to take them to flower. Next week I will apply dry amendments and 2-8-8 fertilizer to be available that first week of flower.
11/18 Out of town so gave them a light spritz of Yucca before lights on and that's it.
11/19 Man one day without reapplying LST and it freaking shows!! I had to go to town and really work the stems back into shape, really started to figure out what I am actually trying to achieve with spreading the stems out to expose as many sites as possible and trying to get as even a canopy as possible. So at the end of it I had to Super Crop a few stems on Rosa that had grown a little too long, tied down the rest of her stems and tucked the large leaves as best as I could to get as many sites as possible exposed. Applied the same approach to Gina but since she was inadvertently topped little easier to do, also I can see since I fed them the Compost Tea Gina has bounced back from her chop and her leaves are upright and pointing to the light, the two new "main stems" are growing outward and are close to the Mesa that i am creating. Judy is the weird little runt with tight, tight nodes like she's hiding something.....Trudy Judy.....So I just bent her main down and moved the stems as best as I can, I would love to let her just do her thing but I also wanted to try ScrOG on this run but we'll see after next week. Amy, Amy, Amy my pouty princess I don't think she likes being shorter than Rosa because she's become almost shy, not as aggressive growth that she was showing before. Reapplied LST on her main and tucked leaves, also started defoliating some of the lower leaves off of her. I'm going to start plucking lower leaves off of all of the plants going forward to prepare them for the switch to flower. The girls are all showing their sex and I can safely say that they are all Ladies, I'm seeing pistils forming and sites starting to show. I soaked the ladies down with 1/4 tsp Nectar of the Gods Bloom Khaos and 16 oz PH 6.2 bottle. Checked back on them 3 hours later and all of their faces are pointing to the lights, the leaves look amazingly green with no noticeable deficiencies. The Ladybugs are going to town and I don't know what I'm more excited about the amazing growth of the girls or seeing a ladybug crawling on a leaf!

Likes
20
Share


@Bread_n_Buds
Follow
Here we are again ready to start again, always under the sign of Zamnesia, we make our fantastic plants and we show you what we are capable of. We have 5 autoflowering strains and 5 photoperiodic ones and now we present them to you.
The fourth autoflowering that we present to you is our version or rather of Zamnesia forgive me if I start to feel at home, it is the Northern Lights. Here we are talking about a classic of classics naturally in the Zamnesia version as I said above with the right ruderalis it really promises big harvests in a short time. There is great competition on this plant and I have grown some very good ones let's see what the home one is like.
To explain my germination method which is a combination of experiences acquired in the field and readings of the right advisors, I have chosen to divide it into phases so whoever wants can follow them and understand better step by step.
- Preparatory Phase ---- Check the average temperature in the room, humidity status to understand if it is the case to start or wait, I decided for the end of August because the temperatures start to drop towards the 22-25 degrees recommended for germination.
Then another thing more or less credible depending on the sensitivity is the control of the lunar phases. I believe in it a lot, it is a method that ancient farmers used to understand when it was best to plant depending on the attraction of the moon. To make my life easier I use a simple app that advises you on the right time to plant, harvest and put in the jar (depending on the lunar phases).
- Phase 1 --- Soaking in water. There are many authoritative friends who advise against this method due to the risk of drowning, but I have always been fine and I follow the rule if it opens in water the seed is almost certainly healthy and will come out of the ground 90% normally.
- Phase 2 --- Opening the seed in water. As soon as the seed opens and the root comes out a little, you have to be very very careful not to leave the seed in the water open for too long. This is why there is a risk of drowning. So as soon as the root comes out, it must be planted. Do not wait for it to stretch out a lot, you can wait a little longer in the absorbent paper, but not in water.
- Phase 3 --- In the meantime, while I soaked the seeds, I prepared my pots: I use small biodegradable pots (choose the ones with holes underneath for drainage). A few hours before working with the opened seeds, I moistened the soil with water adjusted to the right pH (5.8 - 6.2) and Plagron Power Roots. The small root is now open and we can make a little hole with a toothpick, widen it and insert the seed. Not too deep with the root facing downwards. From Serious Seeds we learned the dome technique: if you put a small dome of soil on the seed the water will settle on the sides avoiding overwatering problems.
- Phase 4 --- The plant emerges from the soil. So far I have not put the light, now I turn it on at minimum after half a day of soil to give direction to the seedlings. The first week the light will be gradually brought from 40% to 60% to go to 70% - 75% in the remaining weeks of veg. During the first week maximum, I keep the cycle of 24 hours to avoid stretching. Be careful not to exceed the first week at least with photoperiodic plants.
- Germination % --- In water 20/20 seeds have opened for good luck I'm waiting to talk when they come out of the ground but it seems that we are going towards an excellent percentage of germination..."Not too bad"...
- Soil and Food --- The soil used is entirely organic in its entirety and is the Plagron Promix that will be used with the 100% organic pack provided by Zamnesia complete with all the main fertilizers for your plant buy it at the link --
https://www.zamnesia.io/it/11457-plagron-easy-pack-natural.html
// Strain Description // Born from the rib of a classic, Northern Lights Automatic is a weed from the past, but with a futuristic update. This feminized version sees Northern Lights hybridized with a ruderalis to create an extra sweet variety, that all fans are sure to love. Growers can expect abundant results in just 9 weeks, from seed to harvest! -
- Get a seed of this fantastic strain --- https://www.zamnesia.io/it/3324-zamnesia-seeds-northern-lights-automatica-femminizzata.html
- Soil and Fertilizers entirely organic --- https://plagron.com/en
- Growbox --- https://www.secretjardin.com/
- Music and sound --- I made my girls listen to 432hz frequencies and music from www.radionula.com
- Z --- You can find these seeds, much more from the world of cannabis, mushrooms and an incredible series of accessories and gadgets on the reference site not only mine but of many growers ----
https://www.zamnesia.io


Likes
9
Share


@Budking420
Follow
This lady is amazing shes facebook famous now too over 34k likes. Really enjoying this grow it was a pleasure. I believe she is ready but gonna push her through for another day. I've got a ton of stuff hanging now so I'm not in any rush & I enjoyed this run. This is by far my most popular diary & plant for that matter. Check back next week to see just how fast she dries & cures. Always remember its 4:20 somewhere!!!!

Likes
17
Share


@sunshinegroww
Follow
Had to pull some of the bottom leaves 🍃 to improve the airflow and be easier to water ,very good looking so far ,starting to give her some nutes for flowering every other water
Likes
32
Share


@BB_US
Follow
This week I transplanted my ladies to their 3 gallon oxypot. They both look very healthy with a big root mass and strong stalk. Topping in 4 days or until they are settled in proper.

Likes
11
Share


@TheThiccBud
Follow
sooooo... I have now harvested the plants and they looks so pretty 😍😌 I'm really proud of myself to have produced such THICC BUDS!!! 😅😍 and the smell is so awsome 😵 this strain is a 11 from 10 👌 a realy big Thanks to Royal Queen Seeds for this 2 awsome strains 💪 A detailed rating comes after drying with a detailed score board 😄
Likes
14
Share


@RakonGrow
Follow
Tag 82:
Hab mich nun doch entschieden , da die Trichome wirklich zu 90% Milchig sind , die Dame am Stamm abzuhacken . (Extra ein kleines Beil gekauft (scherz)) . Dann im Stück einfach Kopfüber . Abluft ist an , Ventilator unter der Spitze . Jetzt noch 4-5 Tage warten (je nach Temp und Feuchte) . Und dann schauen wir mal was es wird .Für mich wichtig , viel Feuchtigkeit im Raum , ich will das sie auch nach dem Trocknen noch kleben . Ergo hab ich den Stoftopf drinne stehen gelassen .
Tag 82-88:
Kopfübertrocknung
+ Temperatur : 21°C - 23°C)
+ Lüftfeuchtigkeit : 52%rH-60%rH
+ VPD kleiner gleich 1.2
+ 4 bis 5 Tage
Ich versuche maximal einen VPD von 1.2 zu halten für ca 4-5 Tage.
Tag 85:
Ein Video hinzugefühgt wo ihr das Trockenzelt sehen könnt. Die LED hab ich genau unter der Abluft angebracht damit kein einseitiger Luftzug entsteht, dafür mit mehr Power .
Tag 86:
Video von der Kopfüberhängenden hinzugefühgt.
Tag 88:
5 Tage lang getrocknet , Blüten vom Stiel getrennt und in Schalen in den Weinkühlschrank mit Silikatgel für die Feuchteregelung.
Tag 90:
Trichome aufgenommen.
CureBoxen geschlossen nach 2 Tagen im Weinkühler
Next Step:
Bouveda 58% , Sauerstoffabsorbierer


Likes
9
Share


@VIPgrower
Follow
Day 37 of flowering week six lsd look good tips a little burnt but I’m not to worried keeping nutrients low about 3/4 strength 1.4 ex 770 to 800 ppm drinking lots watering about every four days feed water feed water

Likes
169
Share


@SlowpokeFuegobud
Follow
🍊 🐶 💜 🐘 🍊 🐶 💜 🐘 🍊 🐶 💜 🐘 🍊 🐶 💜 🐘 🍊 🐶 💜 🐘 🍊 🐶 💜 🐘 🍊 🐶 💜 🐘 🍊 🐶 💜 🐘 🍊 🐶 💜 🐘
Welcome to week 12, my fellow growmies!! 💚 💚 💚
I'm back from Catalonia and the girls are still there, waiting for me! 🎉 I missed them like crazy, you might understand. I never missed a person like that. 😬
The water bottles released their water too early, the floor got flooded, and the girls were super dry when I got home. I watered the same night with lights off. I mean the floor was dirty anyway.. 😅
DAY 83
Watered with 2ml bloom + 1ml pk + 4ml growzyme + humics + bigfruits + 2ml calmag 💧
Thanks for stopping by, it's a true pleasure to have you as visitors!! 💚 💚 💚 😘
💜 🐘
______________________________________________________________
About Sour Tangie Dawg cannabis seeds
Sour Tangie Dawg is a sativa dominant cross between the famous Tangie and Chemdawg. Expect a combination of sweet & fruity mixed with a gassy, jet-fuel flavour. The amazing mix of citrus, tangerine, pine and gasoline produces uniquely rich, dank buds. The powerful sativa high is strong, uplifting and long lasting, great for creativity and socialising.
Chemdawg is the parent of OG Kush, all Diesel strain originate from Chemdawg. The Tangie is originally a Skunk hybrid strain but extremely fruity with the trademark Tangerine flavour. This strain is potent with THC-levels over 20% alongside very generous yields of top quality weed, very suited for hash and rosin producers. If you’re looking for a strain to produce the best tasting concentrates this Sour Tangie Dawg is a proven winner! She easy to grow and the perfect choice for SCROG growing due to her growth speed and stretch. We advise switching to 12/12 light when 75% of the net is filled. For outdoor growers the harvest period is early October. Indoors she’s finished after 9 weeks of flower - fast for a sativa dominant strain. We recommend growing in soil with organic nutrients for the best tasting weed.
Get some fantastic genetics here: https://supersativaseedclub.com/ 💜 🐘
___________________________________________________________________________
SETUP:
80x80x180 cm Zelsius
240W Full Spectrum LED IR UV dimmable
DW240H-A6-HS
Heatsink color red
LED Chips:
512pcs SAMSUNG LM301H + 24pcs Osram 660nm + 8pcs Osram IR 730nm + 8pcs UV 385nm
Color mix: 2700K + 4000K
2,8umol/J
Driver HLG-240H-C2100B
Coverage: veg 5x3ft / flower 4x2ft
Product size: 628x205x68mm
Green Buzz Nutrients
Shouts go out to my sponsors @GreenBuzzNutrients, thanks so much for your support! ❤️
If anyone would like to try their amazing organic products, use code GD42025 for generous 25% discount (for orders of minimum 75€) ✨
https://greenbuzznutrients.com/
Biobizz Lightmix
custom exhaust fan 320/270cm³/h
Carbon Active Granulate 240cm³/h
tab water pH 8 - EC 0,25 with Calmag to 0,5
Advanced Hydroponics pH minus Grow + Bloom to pH 6.2
🍊 🐶 💜 🐘 🍊 🐶 💜 🐘 🍊 🐶 💜 🐘 🍊 🐶 💜 🐘 🍊 🐶 💜 🐘 🍊 🐶 💜 🐘 🍊 🐶 💜 🐘 🍊 🐶 💜 🐘 🍊 🐶 💜 🐘

Likes
6
Share


@StonerMike
Follow
Purple lemonade has been looking crazy for weeks smh. I haven’t had time to continuously update. Pics and video are from 7.22
Likes
116
Share


@bioaccessory
Follow
Закончилось долгое увлекательное путешествие, мне даже немного грустно. В этот цикл я впервые попробовал технику мэйн-лайниг, надеюсь моя работа вам понравилась, я старался чтоб куст получился красивым.
Хочу сказать спасибо сервису GrowDiaries - это уникальная база данных по выращиванию от тысяч гроверов со всего земного шара. Я, в свою очередь, в этом дневнике стрался очень подробно описывать и фотографировать все свои действия, возможно мой опыт также кому-то будет полезен.
Отдельное спасибо всем, кто посетил и комметнировал мой дневник - вместе мы совершенствуем наше мастерство.
👉Забавный интересный факт👈
На приготовление компота для полива за весь цикл выращивания было использовано 241 литров воды 😉
Спасибо, что были на связи, и будьте здоровы! 🙏
Likes
13
Share


@TiiipsyTerpz
Follow
Easy week the fem spray started showing signs it worked. So she will be pregnant soon! Added a little girl power from natureslivingsoil.com and make sure to check out our sponsor Mars-hydro.com and use code CGD2021 for a discount.