


Likes
Comments
Share


@Maddog_thegrower
Follow
Roughly at about 4.5 week I have turned the lights to 12/12 most of the flowers have shown sex with roughly about 60% being females, not a bad % of females, could have been a lot worse. The ICC’s are a bit stretchy & the cookies are quite squat and the bubblegum & black nitro’s are average size for the age.



Likes
46
Share


@Juschiln420
Follow
6/18 added water, ph
6/19
Added 3ml cal mag banana, cookies
Added water
6/20 added water, ph
6/21added water, ph
6/22 added 2ml bloom to banana
6/23 added water, ph
6/24
Added water and nutrients
Runtz and cookies
Bloom(Full strength)(new)
Micro 0.75/L x 11.3=8.5ml
Gro 0.50/L x 11.3=5.65ml
Bloom 1/L x 11.3=11.3ml
Cal mag 1/L x11.3= 11.3ml
Bud candy 2/L × 11.3= 22.6ml
Big bud 2/L x 11.3= 22.6ml
Hydroguard 2/Gal x 3.5=7ml
3 gal = 11.3L
6/25 added water, ph
Records kept here
https://1drv.ms/x/s!AmTQ-7u9iyH6kDFcBT1QhRk7ttv4


Likes
7
Share


@RivenWaters
Follow
Seeing the frosty goodness for the first time this week. I’m still giving the girls two caps of h2o2 to every gallon of water and so far it’s working as expected! They seem very healthy with no signs of pests or PM (knock on wood). I also forgot to mention that I flushed them once this week and couldn’t believe the amount of water a 5 gallon pot can handle! must be the coco.

Likes
14
Share


@Fullmeltalchemist
Follow
D80/F29 - 12.4 - All is well except for 1 Black Sugar plant that is showing what I believe is calcium deficiency. Hmm, it’s really only on the older leaves, none of the new growth is affected and the buds are still developing on pace. So I will give some compost tea, along with all the others. Let me know if you have any other ideas please!
D83/F32 - 12.7 - Cruizin. treated with some top dress super soil concentrate. Beside the one deficient plant, the others are all great ❄️ ❄️ ❄️ ❄️ ❄️ ❄️

Likes
45
Share


@BodyByVio
Follow
Beautiful flower full of trichomes. Smell and test fantastic. Very fast flowering. She was done on day 49 but I cut her down few days later.
I love the strain, the only thing that I will like this strain to have is a better yield. Beast quality buds I ever grew.

Processing
Likes
67
Share


@Ageddd
Follow
Whats up GD !!!
------------- GROWTH-------------
Topped both plants, the bigger one, it is 3 days younger than the other, and seems to have faster development, more vigorous.. I think the reasons could be the pheno or the level of root development, i ll explain it :
C#1 was in a yogurth as seen on photos and having all the sun.
C#2 was in a wider recipient, lower in height, and in a room with poor light.
I watered both plants at the same time, C#2 got curvy leaves when watered, i think maybe she likes near dry soil, or cant handle that level of humidity in the roots ... in my opinion she has less developed roots and the pot hadnt enought holes to let the air come in, the oposite of C#1, that seems to handle better humidity and is eating all she can, getting fluorescent green below sunlight.
Both plants have same feeding and soil composition.
------------- IRRIGATION-------------
Watered both ladies, around 0.2-0.3l each one with Deeper Underground.
------------- NUTRIENTS-------------
Tall cheese C#1 : Deeper underground 1ml/l
Short cheese C#2 : Deeper underground 1ml/l + Micro Vita (it only had Canna Pro soil )
---------------------------------------
Good vibes !!
_12/04/2018_

Likes
189
Share


@Legendaryseedthumb
Follow
:)
Day 88: took some buds from her today actually! I have no smoke 😆 but she tasted decent even from a microwave fast dry, not even a little bit of hay just like weed with some undertones. Very wei😂😂😂😂

Likes
2
Share


@GuerrillaGrowAbuser
Follow
Plants are experiencing some benefits from the medium, and some deficiencies. Seeing root stress and light burning and clawing on the two lunchbox ogs. Luckily the growth has still been solid so I'm not gonna sit here and complain. Pots were backfilled up which is why they look lower despite growing more.
Likes
15
Share


@Solarcradle
Follow
Dec 26/Day 16.25 @5pm: LST begins and at 8pm 1 top leaf defoliated for light penetration.
Dec 26 @10pm: Turned bloom lights off (cobs) and left veg lights on. Lowered lighting to 12". Broke her main stalk and taped it. EEEE Giving her a short break from the heat and time to stretch while I LST her. Her humidity levels are up around 54-60% with cobs off and humidifier running.
Dec 27/Day 17 @4:20pm: Both cob and veg lights are on again and the light hangs 12" above.
Dec 27 @9:30pm: Watered her with 2.5L at a PH of 6.56, soaking the whole pot through for the first time. PH runoff was 6.71
This week, I started watering daily with 0.4L and by week end about 0.75L at PH 6.6-6.7

Likes
4
Share


@Budking420
Follow
These girls are coming along despite the same hiccups as the strawberry gorilla. What it is I think is cal mag issues from re using old soil and over watering. I added ac infinity self watering bases to help me keep up with the 24 hour lighting. Check back next week to see just how fast they bud & remember its 4:20 somewhere!!!!!
Likes
18
Share


@DogDoctorOfficial
Follow
Seedsman Seeds Germination Report - Run 01: The White OG Journey
Kickoff to Germination: The Start of Something Great!
Welcome to the beginning of this adventure with The White OG feminized seeds from Seedsman Seeds. Excitement is in the air as we’re searching for strong, resilient plants, and this journey has all the best tools and tips. Starting with five seeds, we’re aiming for a solid beginning and maximum potential. Let’s explore every step in detail to make this grow as robust as it can be!
Germination Process: Tools of the Trade
TheCannaKan: The Ultimate Germination Gadget
I’m thrilled to share my love for TheCannaKan, a little germination wonder! This tool is essential for any grower who wants to start their seeds with precision and care. I noticed rapid results in just 24 hours, with the seeds showing signs of life. At about 32 hours, I transferred them to the Root Riots, which brings us to the next exciting stage.
Why I Love TheCannaKan:
• Quick Results: Seeds sprouted rapidly, minimizing wait time.
• Consistency: Keeps moisture levels optimal for uniform germination.
• User-Friendly: Simple yet effective for both new and experienced growers.
Root Riots and Their Role in Root Development
After sprouting, I placed the seedlings into Root Riot cubes under a dome. Root Riots are fantastic for stabilizing young plants, providing an airy and nutrient-friendly environment that promotes robust root growth from the start.
Benefits of Root Riots:
• Root Aeration: Soft yet structured, these cubes support root expansion.
• Moisture Retention: Holds just the right amount of water for growing seedlings.
• Enhanced Root Health: The cubes are ideal for preventing damping-off and ensuring healthy, white roots.
Nutrients to Kickstart Growth: Aptus Holland Regulator and Startbooster
To give the seedlings a perfect start, I added Aptus Holland’s Regulator and Startbooster (1ml/L each). This mix promotes early root and stem strength, giving seedlings the ability to absorb light and nutrients more efficiently.
• Aptus Regulator: Enhances plant resilience, aids in nutrient absorption, and promotes early vitality.
• Aptus Startbooster: Adds a balanced mix of growth hormones and nutrients that are ideal for the early stages, encouraging healthy roots and faster seedling growth.
Light and Environment: Future of Grow FOG LED with TrolMaster Tent X Controller
I’m using a Future of Grow (FOG) LED at 600W, but keeping it dimmed down to around 200 PPFD. This setting is controlled by the TrolMaster Tent X Controller to give the plants the perfect start without overwhelming them with intense light. Controlled lighting helps seedlings to develop without stress, encouraging healthy growth and internode spacing.
Shoutouts:
• Future of Grow LED: High-quality, efficient LED light that adapts well to seedling and veg stages.
• TrolMaster Tent X Controller: Reliable and intuitive control over light, humidity, and more. Perfect for a hands-off, efficient environment setup.
Observations: One Seedling Takes the Lead
At the end of this germination stage, it looks like one seedling has emerged as the strongest, while the others may need a few more days. Patience and observation are key; some seeds naturally take a bit more time to sprout. I’ll keep monitoring these with hope, allowing each seedling its own rhythm.
Grower’s Notes and Tips
• Consistency Matters: Germination is all about steady conditions—consistent moisture, gentle nutrients, and stable lighting make all the difference.
• Document Everything: Keeping a log of each step (like this one!) helps track growth patterns and provides valuable insights for future grows.
• Stay Positive and Patient: Not every seed will sprout at the same rate. Trust the process and remember each plant is unique.
Community Shoutouts
Thank you to everyone who makes this process smoother and inspiring—TrolMaster, Aptus Holland, Future of Grow, and Seedsman Seeds for amazing genetics and tools, as well as the growers’ community who share insights, tips, and encouragement along the way.
Next Steps
Now that we’re through germination, we’ll move into the early growth phase. I’ll keep documenting the lighting adjustments, nutrient changes, and growth patterns of each plant, especially that eager seedling leading the way!
Growers Love, and here’s to a strong start for the future of this grow! 🌱
DISCOUNT CODE - SeedsmanSeeds - DOGDOCTOR 10% off
As always thank you all for stopping by, for the love and for it all , this journey of mine wold just not be the same without you guys, the love and support is very much appreciated and i fell honored and so joyful with you all in my life 🙏
With true love comes happiness 💚🙏 Always believe in your self and always do things expecting nothing and with an open heart , be a giver and the universe will give back to you in ways you could not even imagine so 💚
Friendly reminder all you see here is pure research and for educational purposes only
💚Growers Love To you All and remember to keep that smile big and alive 💚
Likes
12
Share


@KannaGrowing
Follow
Semana de transición entre el abono para el periodo vegetativo (Bio Vega) y el abono que utilizaremos durante el periodo de floración (Bio Flores). El primero más rico en nitrógeno y el segundo, en fósforo, magnesio y potasio.
Mezclo Bio Rhizotonic + Bio Vega + Bio Flores y riego con 50 litros de agua, todo el cultivo... Alterno riegos cada tres días, unos con abono y otros con agua.
La próxima semana, elimináremos Bio Vega.

Likes
37
Share


@GreenHouseLab
Follow
Week 8 in the books, cruising to the finish line two more hard watering each and 48 hrs of darkness starting Friday.
Genetics: Natty Roots Seed Co
Instagram: @green_house_lab
Likes
44
Share


@MadeInGermany
Follow
Info :
Unfortunately, I had to find out that my account is used for fake pages in social media.
I am only active here on growdiaries.
I am not on facebook instagram twitter etc All accounts except this one are fake.
Harvest day 67.
Hey guys :-) .
Finally the time has come the lady has been harvested :-).
In the last week the water was freshly mixed with Canna Flush and an Ec of 0.4 in order to completely use up the nutrients in the last few days 👍.
You can see it on the beautiful autumn yellow leaves :-).
Before harvesting, the lights were turned off completely for 48 hours.
After everything was neatly trimmed by hand, the buds were put into the drying tent, where they are allowed to dry for the first 8-12 days at a humidity of 62% before they ferment with 62% boveda packs in jars.
After another 3-4 weeks in the glasses, the 58% boveda packs come in for the final touch :-).
Of course, the final update comes from the fermented end product 👍.
Until then, I wish you all a lot of fun and stay healthy 🙏🏻
You can buy this Strain at
www.Zamnesia.com
Type:
Runtz
☝️🏼
Genetics:
Zkittlez
X
Gelato
👍
Vega lamp: 2 x Todogrow LED CXB3590 COB 55 W
1 x Sanlight S2W 62 W
💡
Flower lamp : 2 x Todogrow LED CXB3590 COB 55 W
1 x Sanlight S2W 62 W
💡 ☝️
Grow Aero System : Growtool 0.8
☝️
Fertilizer:
Canna Aqua Vega A + B , Canna Aqua Flores A + B , Rizotonic, Cannazym, CANNA Boost, Pk 13/14, Canna Cal / Mag, Canna Ph - Grow, Canna Ph-Bloom
☝️🌱
Water:
Osmosis water mixed with normal water (24 hours stale that the chlorine evaporates) to 0.2 EG. Add Cal / Mag to 0.4 Ec Ph with ph- to 5.6 - 6.4
💦 💧

Likes
10
Share


@mutantfarmer
Follow
😎Shalom brothers! Another week has passed and I am glad to share the results with you again. This week I continued to do all sorts of experiments testing my girl for strength. We survived lst, defoliation and cloning. And I also added 30 watts of red light with a wavelength of 630nm, using Samsung 351LH diodes.This spectrum enhances flowering, and helps the plant to form internodes with shorter distances, which will give more growth points for future buds.
👌Let's start with nutrition. I changed the frequency of watering, now my plant is watered 6 times for 20 minutes during daylight hours, every 3 hours.
This week I made a nutrient solution with the following recipe:
Water 183 ppm, 8l
Silicon 4ml
Сalmag 1.5ml
GHE Flora: Gro 7.5 Micro 5 Bloom 2.5
pH down 5.5 ml
Total 669 ppm, 5.6 pH
💪About training. Let's start with LST:
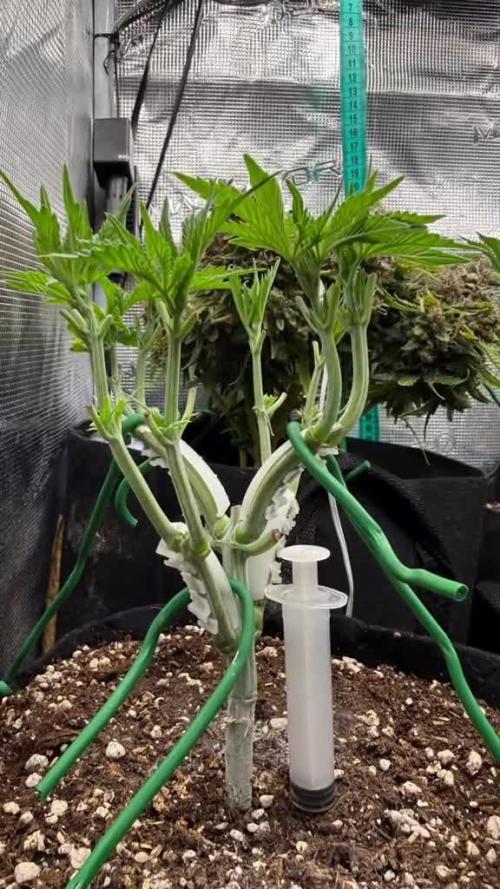
Low stress training, abbreviated as LST (LowStressTrainig), is similar to the art of bonsai except for cannabis plants. This is a special technique of bending and tying plants to give them the desired shape.
LST will also help you get a lot of massive buds by leveling the crown of your plant so that the lighting is more effective on it. Using LST will help you increase your yield and is surprisingly fun.
😈The following I did defoliation:
Pruning leaves or defoliation is an old Japanese technique that has been kept secret for a long time. The main goal is the intensive development of the tree, that is, in one year the tree goes through a two-year growth cycle.
This method consists in partial removal of leaves. Classically, only deciduous trees are subjected to such an operation. But, it is quite possible to do this with some tropical plants and not only, in order to bring them out of a prolonged period of dormancy.
Defoliation leads to a decrease in the size of leaves and an increase in their number. As a side or positive effect, the rejuvenation of the crown can be considered, that is, new and fresh foliage appears, which will be better preserved and will have a more attractive appearance and bright color.
👊And as promised, I'll tell you about stimulants:
GHE Root Booster - a natural supplement for the growth of the root system; promotes the growth and development of a rich, healthy root system. The preparation contains vitamins, enzymes, organic and humic acids that stimulate root growth without synthetic additives.
GHE Fulvic - Soluble humates (humic and fulvic acids) contain a huge amount of natural components that stimulate plant growth, as well as enhance nutritional ingredients. Fulvic acid is the substance that does all the hard work: converting nutrients into a form readily available to plants, which increases the efficiency of the nutrients.
RasTea Bio-Energy SPELL is a universal 100% organic stimulant for improving metabolism based on highly concentrated and highly purified humic and fulvic acids in combination with vitamins, amino acids, polysaccharides, extracts and extracts from plants, ensures better absorption of nutrients by plants. The unique formula activates the natural potential of plants, which has a beneficial effect on all stages of development, increasing stress resistance, growth intensity and yield.
I give all three stimulants one sheet at a time, and since they are somewhat similar, I give them in turn.
👽Well, see you next week. This will be the last week of the growing season, we will go through another workout, take a break from stress and go to the bloom.
Likes
48
Share


@TheIceCreamParlour
Follow
Pineapple in the Parlour!
End of week 5 for these two beauties. I've fed them twice with the same feed as week 4 but both times supplemented 1ml per litre with Canna Nitrogen and 0.5 of BioGreen Calgel. They've responded perfectly changing to a luscious deep green colour and nearly doubled in size! I'm putting this down to many factors but have to give some credit to my new Ecotechnics Unis Co2 doser. It took a few days for the plants to respond but they have had a great burst of growth in the last 72 hours.
At the beginning of the week I struggled with some environmental issues and these plants looked lacking in calcium but you wouldn't know if you looked at them today. Both beautiful and green!
I'm hoping that by next week they will start showing signs of flower as I'm training them to go under a scrog and dont actually want them to get too big. The reason for this is because i have 2 Six Shooter in the tent also and want to give them enough space to show me just how good a strain they are.
Ahhh But...... afterall this is my competition grow and I want these Pinapple to flourish and yeild the best they can. Hence why I'm investing heavily in my environment. As well as the Co2 I've also added an additional 300w LED into the tent. Its actually the light I used to veg these plants but I have ordered a new light for my veg box and I'm not about having lights sat around 😁
Fingers crossed these girls make the flip at some point this week. P
Update: Day 39 added a few more photos of these beautiful Pinapple! I think FastBuds should have named them Amazon Express because this canopy is thick!!!! I think they are just showing their first signs of flower which is great so I may do a little bit of defoliation tomorrow or Saturday. Some of the biggest fan leaves are the size of my hand and taking up a lot of that valuable canopy light. As these are going under the net I'm just constantly tucking them under as they grow a couple of inches per day. Everything going really well with this grow I'm really optimistic.
Likes
17
Share


@Kirsten
Follow
19.1.25:
I have watered all plants with 300ml of dechlorinated water PH'd to 6.3, with 1/3 jar of black strap molasses with Ecothrive Biosys-1g.
I am looking to increase the sugars for microbial life and plant processes.
It'll also add some extra Calcium, Magnesium and trace elements.
I also, watered all plants with Bloom nutrients.
Using dechlorinated water PH'd to 6.3 with the following nutrients: (ml/l) ;-
♡ 2ml Cal-Mag
♡ 2ml Ecothrive Flourish
♡ 2ml Xpert Nutrients Bloom Booster
♡ 2ml Biobizz Bloom
♡ 2ml Biobizz Top Max
♡ 1g of Ecothrive Biosys
I watered around 1-3 litres per plant. Depending on size and requirements.
I'm still spilling water containing the nutrient solution. 🙄
I am using this to rub into the leaves. I think a nice foliar massage won't do any harm, make the most of the situation.
The plants have become very hungry and thirsty. Increased the water by double.
I ran out of my TNC cal-mag. I decided to order the Xpert Nutrients brand, as I like their products. It isn't organic as far as I can tell, but I don't think it matters too much to me, to be honest.
I also want to top dress this week, so I bought some Green Leaf PK bud Booster dry amendment from Amazon, too.
I'll mix it with canna coco, perlite, worm castings, and Ecothrive Life Cycle.
24.1.25:
I went ahead and top dressed all the plants with 4.5 gallons of my supersoil custom mix.
This consists of the following substrate and dry amendments:
♡ 60% Canna coco
♡ 20% Worm castings
♡ 15 % Perlite
The remaining 5% consists of the following dry amendments;-
♡ 10g Ecothrive Biosys
♡ 1 Tsp RHS Mycorrhizal Fungi granules
♡ 3 Tsp Vitalink Bat guano
♡ 4 Tsp Diatomaceous earth
♡ 8 Tsp Ground Cinnamon
♡ 10g Green Leaf Bud Booster PK booster.
♡ 3 Tsp Ecothrive Life Cycle.
•Worm castings for some all round nutrition.
•Cinnamon for mildew and bug repellent.
•Canna coco base substrate.
•Perlite for adding oxygen to the root and soil system.
•Green Leaf Bud Booster PK Booster for blooming. Building strong big buds.
•Vitalink bat guano again for Bloom.
•RHS Mycorrhizal Fungi granules, to boost beneficial microbes.
•Ecothrive Life Cycle for lots of great benefits.
•Diatomaceous earth for Silica.
•Ecothrive Biosys, for an extra microbial boost.
Thanks for checking out my diary 🍃 ✌️
Likes
5
Share

@hassehujasse
Follow
Time to bring hi-definition production staff on board.
Time-lapse flowering stages is incredible. Enjoy it
Good morning Babys. Fast check out and let fly
Working hard with co2 in my homemade lab.
First time Mars Hydro at 100% of his power.Two small boxes always better then just one big)))

Likes
2
Share


@gr3g4l
Follow
A los 15 dias terminé deshaciéndome de la nº6 y resitué las plantas dejando en medio la segunda más peque , la nº2.
A los 17 dias una poda de apicales nº1 nº3 nº4 y nº5 . La nº 2 la dejé para que crezca un poco más y así también poder hacer la poda sin dificultad.
A los 19 dias podé el apical de la nº2. La del medio.
After 15 days, I finished removing plant #6 and rearranged the plants, leaving the second smallest one, #2, in the middle.
After 17 days, I performed apical pruning on plants #1, #3, #4, and #5. I left #2 to grow a little more so I could also prune it more easily.
At 19 days I pruned the apical bud of number 2. The middle one.


