
Likes
Comments
Share


@Pinkpanther
Follow
Ha empezado a florecer poco a poco, día 2 semana 2 de floración.

Likes
37
Share


@DogDoctorOfficial
Follow
🌱 Week 2: Mutant Magic in Full Swing! 🌱
Hey Grow Fam! Another week, another step forward in the adventure with these Mentha de Croco beauties. Week 2 has been nothing short of fascinating—the variety in leaf shapes is absolutely mesmerizing. These tiny mutants are already showing their unique personality, and I’m loving every second of watching them grow! 🌿✨
Tent Conditions: Consistency is Key
The setup remains the same as last week, keeping these little ones in the perfect environment to thrive:
• Temperature: Stable, warm conditions for steady growth.
• Humidity: Maintaining high RH ensures they’re still enjoying tropical vibes as their root systems develop.
• Lighting: The Future of Grow (FOG) LED at 200 PPFD continues to deliver just the right amount of light to keep the plants growing compact and strong.
Nutrition: Introducing the Organic-Mineral Boost 🌿
This week, I started feeding the plants with the incredible Aptus Holland organic-mineral line. It’s been a game-changer, and here’s why I love it:
What’s Organic-Mineral Nutrition?
• Combines the benefits of organic matter (microbial health and soil vitality) with the efficiency of mineral nutrients (direct uptake by plants).
• Supports balanced, steady growth while boosting plant resilience.
This Week’s Feeding Schedule:
• Regulator (0.15 ml/L): A silica-based product that strengthens plant structure and helps regulate stress, ensuring the plants stay strong and sturdy.
• CalMag Boost (0.25 ml/L): Calcium and magnesium are essential for cell wall development and chlorophyll production, supporting lush, vibrant growth.
• All-in-One Liquid (1 ml/L): A comprehensive blend that delivers all the essential nutrients in one easy feed, perfect for these little mutants finding their stride.
• Start Booster (0.25 ml/L): Packed with root-stimulating microbes and nutrients, this product ensures strong root development and prepares the plants for explosive growth in the coming weeks.
Why Aptus?
I’ve been a huge fan of Aptus Holland because their line truly focuses on building strong, healthy plants from the ground up. The results speak for themselves—happy plants, explosive growth, and vibrant health at every stage. true believer here and way before being sponsored by them .
Mutant Leaf Love: Celebrating the Unique 🌿
The highlight of this week has to be the unique leaf patterns these plants are developing. Each one seems to have its own story to tell—serrated edges, funky symmetry, and a whole spectrum of textures. They’re tiny but mighty, and it’s so exciting to see the potential of these genetics from Terpyz Mutant Genetics come to life.
Mutants always bring surprises, and it’s a beautiful reminder that diversity is what makes this journey so rewarding.
Reflections & Tips for Fellow Growers 💡
💚 Feed Lightly, Grow Strong: For young plants, keep your feed gentle to avoid overloading them. Start slow and adjust as they grow.
🌱 Celebrate Differences: Each plant will grow at its own pace, and unique traits are part of the magic. Patience is key!
💧 Stay Consistent: The foundation you build in these early weeks sets the tone for the entire grow. Stable conditions = happy plants.
Shoutouts & Grower’s Love 💚
Big thank you to @Terpyz Genetics for these funky mutant seeds, @Aptus Holland for their stellar nutrition lineup, @Future of Grow for the lighting that keeps these beauties thriving, @Pro Mix Soil for the best one i have encountered so far and @Grow Diaries for being an amazing platform to share this journey.
And a HUGE shoutout to all of you—followers, growers, or just curious passersby! Your love, support, and shared passion for growing make this experience truly special.
Stay tuned for more mutant magic in Week 3. Let’s grow, let’s grow, let’s grow! 🌟
Genetics - Mentha De Croco
https://terpyz.eu/products/menta-de-croco-fern-type?_pos=1&_sid=e9237cbcb&_ss=r
DogDoctorOfficial Discount Codes @ terpyz.eu - DOCTOR 15% off
Nutrition - @aptusholland
https://aptus-holland.com/
Led Power @ F.O.G. Future Of Grow
https://www.thefuturofgrow.com/en/online-store/BLACK-SERIES-600-p489093171
Controls @ TrolMaster
https://www.trolmaster.eu/tent-x
As always thank you all for stopping by, for the love and for it all , this journey of mine wold just not be the same without you guys, the love and support is very much appreciloved and i fell honored with you all in my life
With true love comes happiness Always believe in your self and always do things expecting nothing and with an open heart , be a giver and the universe will give back to you in ways you could not even imagine so
Growers Love To you All 💚

Likes
9
Share


@Dormando
Follow
BEGIN WEEK 8 -
Day 50 - 12/11 -
Light Water.
Day 3 into flowering.
Observe red stems.
Day 51 - 12/12 -
Day 4 into flowering.
Red streaks on stem disappearing slowly.
Plain Water about a cup.
Day 52 - 12/13 -
Day 5 into flowering.
No Water.
Day 53 - 12/14 -
Day 6 into flowering.
1.8ml Grow + 1.2 Calmag fed.
Red Streaks appear to be stopped growing, looking good progress.
Trimmed Fan leaves to expose canopy.
Minor adjustment to ties.
Day 54 - 12/15 -
Day 7 - 1 Week in flowering.
Light plain water. About 2 cups.
Growth like wild, nice dense green canopy formed.
Trimmed lower growth, fan leavs, chopped off weak tops from bottom.
Adjusted ties, spaced out the main tops.
Day 55 - 12/16 -
Day 8 into flowering.
Light plain water.
Day 56 - 12/17 -
Day 9 into flowering.
2ml + 1.2ml Ferts.
Plant ajustment and red streaks recovered really good. Overall looking healthy to my rookie vision.
END WEEK 8.

Likes
15
Share


@38PLAN
Follow
Abbiamo tagliato a metà 3 piante,farò il raccolto scaglionato,le lascerò ancora per un pò cercando di evitare le cime popcorn,l'odore é fortissimo e la quantità incredibile,fino ad ora la miglior pianta mai fatta,e da tagliare rimane ancora molto....BUON ANNO!!

Likes
74
Share


@Ferenc
Follow
Day 59, 17th of November 2021:
Well, not much to mention but the most important: Pistils are coming so the flowers are on the way!!!!!
Set up is the same nothing has changed:
ViparSpectra XS2000 is on full power which is 240W so 100% capacity.
Ventilation: 12 hours period when the lamp is on it switches 1 hour on and after one hour off mostly to keep the temperature and of course because of fresh air flow. When the lamp is off it switches on in every 2 hours for 15 min at the same time with the extraction fan.
The extraction fan is on 12 hours when the lamp is, and then it switches on in every 2 hours for 30 min.
That's all a bit more water for them from today also. Humidity quite the same approx 50%, temperature as well approx 26-27 Celsius.
Fertilization remains the same since last week, the BioBizz family raised up to be 2ml/L each so it is like 2ml/L of BioGrow, 2ml/L of BioBloom, 2ml/L of TopMax... see the ratio above.
The schedule of the fertilization has not changed happnes 2x a week except epsom salt just 1x a week.


Likes
7
Share


@Annakonda
Follow
Je commence la deuxième semaine de strech
J'ai modifié la puissance de la led et la hauteur pour pouvoir changer le "dli" (dli week 2= 35)
JAI ENFIN RECU LE CALMAG après 10 jours🙄 wtf.
Cette semaine , j'ai fait une erreur , j'ai laissé mes plants 5 jours sans boire 😔😔 (je n'avais pas le choix).
J'ai changé ma manière d'arroser.
Les 6 premières semaines a chaque arrosage (additifs et/ou engrais)
A partir de cette semaine , j'arrose 1 fois avec les additifs et les engrais , 1 x juste avec le calmag et 1 x juste à leau.
Je suis à flo+13 , donc normalement la fin du stretch, mais je m'étonne de voir que les plantes sont petites. La plus grande fait maximum 70 cm.🤔🤔🤔.
Demain normalement le stretch devrait être fini.
Et puis on verra .
Le reste la semaine prochaine...

Processing
Likes
23
Share


@PrairieFrostGrow
Follow
*
******* Week 10 - June 13 to 19, 2020 - Days 64 to 70 from germination **********
*
She is getting really close to harvest......around day 77??? into darkness next week I suspect.
She has been awesome but the damn pH has total screwed with the yield though as she couldn’t get the potassium she wanted to fatten up some more in weeks 9 and 10. They are going to be very sticky buds but the size will not be as big as if the pH had stayed in 6.1 to 6.4 range through flower......running mid 7’s is too damn high. Looking more into unfiltered tap water as another issue this run..........dechlorinated but not filtered........
More info to come.......getting pictures added in for now.
Little more detail:
June 13 - Day 64
-
👍

Processing
Likes
3
Share


@Nick2323ramirez
Follow
Everything is going AMAZING! I have started giving her some fox farm big bloom every other feeding. As you can see she's flowering now. The smell is very strong and sweet. Additionally, one set of nodes just split into 2 growth tips as if I had topped it. I've never seen anything like that before. So far I have nothing but good to say about SpliffSeeds!
Likes
27
Share


@adam_pawloski87
Follow
Let’s go Day 36 !!! This week went real great, girls built up a lot of structure, and stayed super healthy ! Today they got fed just water phd at 6.5 ! They been really loving that balance! I also removed a lot of under trim since we are going into preflower , so had to shave up those legs lol ! It’s really great for them , the love that airflow , but don’t take off too much or you could shock your plants so be careful ! Can’t wait to see what these girls do this week ! Hope you all enjoy an are ready for another amazing productive week ! Peace , Love , an positive vibes to y’all Cheers LetsGrowwww!!! 😶🌫️💨💨💨💨


Likes
14
Share


@BLAZED
Follow
Week 1 (31-1 to 6-2)
As for my waterings, i give RO water, with 0.50 grams of Calcium, and 0.2 ml of Atami Rootbastic a liter.
Growdiaries wont let me put my nutrients in grams so i'm forced to choose mililiters.
31-1
Watering: 20 ml.
They are stretching quite a bit.
I turned on the fan on the lowest setting for some air movement.
1-2
Watering: 20 ml.
2-2
Watering: 20 ml.
3-2
Watering: 20 ml.
Heights:
Kush#1: 9cm
Kush#2: 7.5cm
4-2
Watering: 40 ml.
I attached a wire to the Kush#1 for extra stability as it was a bit fragile in combination with the fan.
5-2
Watering: 20 ml.
6-2
Watering: 60 ml.
Heights:
Kush#1: 10cm
Kush#2: 8.5cm

Likes
Comments
Share

@eg0ouh
Follow
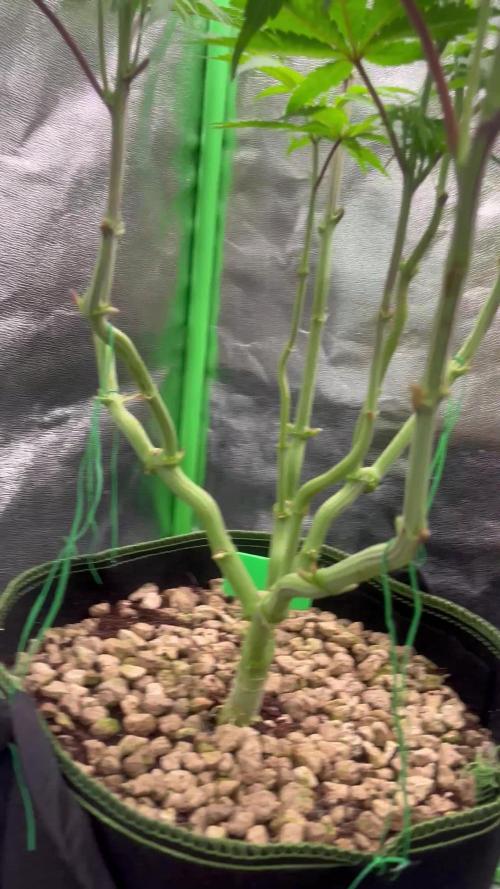
4 days ago last cut and huge stressing, now i sent them on 12/12 Bloom time, i Like how they grow and think everything Looks good so far.
Any thoughts?

Likes
50
Share

@GERGrowDesigns
Follow
Dear Growers, Welcome to my Dutch Passion Diaries Competition 2025 entry!
For this competition, I’ve chosen the Indoor Feminized strain: Orange Bud 2.0
Media from Week 15 or Flower week 6-7 After Moving into the New Tent for the flower weeks. Stage.
Here’s what I’m working with for the Final Tent after Moving for the Flower time in the Future :
• 🌱 Tent: 220x150x150
• 🧑🌾 Breeder Company: Dutch Passion
• 💧 Humidity Range: 50
• ⏳ Flowering Time: 8W-10W
• Strain Info: 20-25%THC, Sativa
• 🌡️ Temperature: 26
• 🍵 Pot Size: 0.5l
• Nutrient Brand: Narcos
• ⚡ Lights : 720W x 2
Dimmed to 400w Each at the Moment. Because of Heatwave ⭐
A huge thank you to Dutch Passion for allowing me to be a part of this amazing competition and for supporting the grower community worldwide! Your genetics and passion speak for themselves!
Curious to try these strains for yourself?
You can check them out and support me at the same time through my personal link:
https://dutch-passion.com/?a_aid=GGD
I would truly appreciate every bit of feedback, help, questions, or discussions – and of course, your likes and interactions mean the world to me as I try to stand out in this exciting competition!
Let’s grow together – and don’t forget to stop by again to see the latest updates!
Happy growing!
Stay lifted and stay curious!
Peace & Buds!

Likes
82
Share


@DreamIT
Follow
💜🤜 Purple Punch OG by Sweet Seed 🤛💜
🤜22.8 new fertilizer tomorrow, I hope it will recover quickly
🤜23.8 Very clear, the flush has done its job, today we start with the new line of fertilizers 🤘🤘
🤜24.8 🤘🤘
🤜25.8 all great, it's getting longer, yeah!
🤜26.8 now ready to bloom 🤘🦄
🤜27.8 It shouldn't be long before it blooms. She seems to have recovered well from the flush and fertilizer change, I hope she starts soon
🤜28.8
__________________________________________
❓ Are you new to the world of the cultivation and don't know where to safely buy your seeds?
😮From SweetSeeds you can find award-winning, sweet, fast, fragrant, beautiful, and delicious genetics !!!
✅http: //bit.ly/SweetSeeds_
__________________________________________
👀 Are you looking for a good lamp to start with? 👀
🌞Viparspectra has something more than the others, take a look at their site.
⏩ Use "GDVIP" for an extra discount or "ViparDreamIT" for an extra 5 %% discount
👀 Search for it on Amazon
✅Amazon US: https://amzn.to/30xSTVq
✅Amazon Canada: https://amzn.to/38udUVe
✅Viparspectra UE: bit.ly/ViparspectraUE
👀 Watch my ViparSpectra XS1000 unboxing on YouTube, leave a like and write to the channel 🦄
✅http://bit.ly/UnboxingViparSpectraDreamIT
__________________________________________
📷🥇 Follow the best photos on Instagram 🥇📷
https://www.instagram.com/dreamit420/
🔻🔻Leave a comment with your opinion if you pass by here🔻🔻
🤟🦄💚 Thank you and enjoy the growth 💚🦄🤟

Likes
Comments
Share


@CeeJayy420
Follow
She’s been chopped and trimmed—final weight came in at 105g. The buds are dense, pleasantly heavy, and absolutely beautiful. They shimmer like green velvet under the light, a texture and glow that feels almost surreal after weeks of care and anticipation. It’s a satisfying end to the cycle, and seeing the results laid out makes all the effort worthwhile. Now onto drying and curing, with hopes of preserving every bit of that richness.

Likes
49
Share


@masterofsmeagol
Follow
5/24 Woke up on payday to find that my father is in the hospital. My house was robbed a few days before so I guess the hits keep coming. The plants are doing good though. I'm glad I kept them in as we had a frost last night. I moved my cage yesterday onto the asphalt and put the big pallet in. I just need to sanitize the others before they go in the cage. I'm being super cautious. I think tomorrow will be the day I make the switch to the garage while they fill out these 3's.OK.
5/25 Plants were all moved to the garage with the door open for indirect light. It's 54 degrees. At night I'll pull them back in and give them a few more hours under the hps which will also help with heat. Knocked a stem sideways but it'll pop back. Feels good to get things moving. HST seems to being going good.
UPDATE: Went back over at one and noticed that the plant I hit with a wire (or something I didn't see what happened) was almost sideways and really loose. I had tied it to a clip with flagging. That didn't work. I asked a friend and I ended up pinching off the first true leaves then mounded happy drug up around it to keep it upright. It LOOKS much happier. Of course that shit happens to your biggest healthiest plants. Oh well all the 10th planet are doing phenomenal. Can't wait to move these girls to there final homes. Plants went under lights at seven. I'm acclimenting them to the right light schedule. I don't want to jump from 18/6 to 15 hours. They did really good in the cold Temps and wind. The big one I had to fix looks like it's doing great. Once they are hardened and fill these pots they go in their final home.
5/26 Plants did great being in direct sunlight for a few hours and staying in the garage at night. They look super healthy. I'm planning on watering tomorrow. Wondering if I should start to add some silica to strengthen the stalks. Also wondering if I should add more soil to some of the pots like I did to the other one as the stretched a little. This is something I may do tomorrow before I water.
Went back over to switch the lights on and pull the plants back and lock up at 7:30. Forgot my phone of course and these girls were looking amazing. I have to water tomorrow. I coukd add more soul to some of the pots but I'm reluctant due to stem rot. They'll get buried much deeper in there final homes. Don't want to mount up soil and then water and promote rot. Anyway plants are adapting amazing. Dialing the light closer to normal here. This is a great transition place for them to he. I've noticed a few wrinkled leaves but thats to be expected. Oh, I got my free pure Michigan seeds from premium cultivars!!!
5/27 WATERED EVERYTHING TODAY WITH HALF A Powerade BOTTLE APPROX. 16OZ. Plants are in direct light in the mornings and I haven't seem any burning yet. I noticed a small spot on one of the first true leaves but I think it's just a bite from an insect. Everything is green as hell. I'm wondering if I should add fresh soil to the pots but I didn't want to do it on a watering day. Plus the plants will be going in there final homes shortly. Very happy with progress this far.
UPDATE Went over at 1230 and everything looked great. I sanitized the cage AND the pallets. Also bought 3 more 30 gallon grow bags. Once they go in there they will explode! I can't wait. I'm considering ordering netting for moths. Depending on price i might get some. If not I'll keep using the BT.
UPDATE: Went and checked around 430. Temps were in the 70's and they had a few hours of direct sun. No burns evident as of yet. Pallets fit in the cage like puzzle pieces. Now I need to sanitize my grade stakes bamboo and trellis and setthat stuff up. I'm going to screw the grade stakes to the pallets and attach garden rods and bamboo with zip ties and I'll have a horizontal trellis. Once branches are a little bigger I'll begin LST. The plants that I topped AND the ones I FIMed are doing great. The FIMed ones with at least three colas some have four. Hoping the plants took that time growing roots.
5/28 Plants are all standing up tall. They loved that water. Haven't noticed any burns and they get direct sunlight in the mornings. Soon I can put them in the cage and start setting up my trellis and supports. Fan leaves on soms are bigger than my hands. These girls are probably the healthiest plants I've grown. I usually do clones and end up starting with problems. This is great starting with seeds and have no problems.
UPDATE: Went back around two because Temps had reached 92f and rh was only 20%. Nights cool off greatly so it's a dramatic temperature shift. Plants looked great. All standing up looking great. Put plants in at 7:30 ,and continue the light until 9 and have it turn on at 4am. Then they are out by sunrise. Did notice some burning on one of my plants a large fan leaf. What can I say? It was extremely hot. I'm surprised they did as well as they did.
5/29 Everything standing up perfectly looking great. Plantscget an extra hour of sun at night and morning and are on 19/7 with the extra added light. Trying to acclimate and finish hardening off this week. I'd love to be able to at least put them in full sunlight for the day. I think they'd be fine. I'm really impressed with how they are growing. Second guessing not HST all of them. However I think I might light dep a couple. We'll see. I've still got work to do.
UPDATE: put the plants in around 7. One of my lights shit the bed. They are just 150 watt hps but I was using them to finish hardening off my plants and slowly adjust them to the natural light. The on/off switch fell off. I'm sure my cousin can fix it bit the one is pe9bably fine as I'm only going fir a few more days. The thing about having this many plants to choose from is that I can pheno hunt and put the VERY best into the final containers and if I decide too I could light dep.
5/30 WATERED EVERYTHING TODAY WITH HALF A POWERADE BOTTLE. My cousin can probably fix the other light but I don't think it will matter. Within a week I'm going to have these girls in their final homes. I just need to sanitize the trellis and posts and then screw them to the pallets. I'll have this all taken care of before the plants go in the hole. I did notice another burn on a leaf. Def glad I'm taking the time to do this right.
UPDATE: I put the girls in the barn around 7:30 and flicked the one 150 watt HPS light I have working on. I added a half hour more of darkness to try to acclimate them quicker. Light stays on until 9 qnd came back on at four but i changed it to 4:30. I'm usually there by 5. I'm looking through my surveillance cameras and it doesn't even look like the light is on. Of course its super bright out but I should be able to see from that image. Luckily the building the go in has massive windows up top to let light in and windows on every side so the light is probably unnecessary. However due to my bullshit luck last year I'm being as cautious as I can. Tomorrow is supposed to be extremely hot again as is the next day. I think I'll leave the door down a little, open the other and move the plants back so they have no direct sunlight and adding a fan. That way they can continue to recover. They seem bigger everything I see them.
5/31 Another hot day. I figure a few more days (under a week) and I can transplant these girls! Supposed to be 85 today and 90 tomm. It was 45 when I got here. These girls are doing well handling this bipolar weather.
UPDATE: IM AN IDIOT AND THIS IS AN 8 DAY WEEK lol. Maybe I'll do a six day week next time to get back on track. Went back over at two and noticed some burns. Sent a video to a friend andcwith the sun we've had and the weather in the 90's he agreed the damage was minimal. However there was someone there working who opened more doors which let a lot more light in. It's supposed to be in the 90s tomorrow too. I may leave the doors shut. There are windows on everyside and an enormous cone at the top so the get plenty of sun. He also grows and I've been careful to not let anyone that grows go around my plants. I'm going to have to talk with family about this. To be honest I'm kinda pissed. Next watering I may add some kelp me kelp you and start a small nute regimen.
UPDATE Went back over at seven after having a panic attack. Half stoned half asleep. Stupidly I was looking at a plant and thought "shit" the FIM must not have took but in reality I was just stoned and tired so I topped a plant that had already been fimmed so we'll see how that goes. Purple punch is so far behind everything else it's not even funny. There might be one that's doing pretty well and that of course is the one with no HST. Branches on the other strains are thick and ready for LST though. What I think I'll do is transplant the 10th planets and the blueberry cheese ones that are ready and hold off on the rest for a while. Hopfully I'll be able to show plants in final homes next week.


Likes
19
Share


@SkibidiGrimes
Follow
it took two days for the root to generate and a little less for it to come out of the ground once planted
Likes
4
Share


@Organic473
Follow
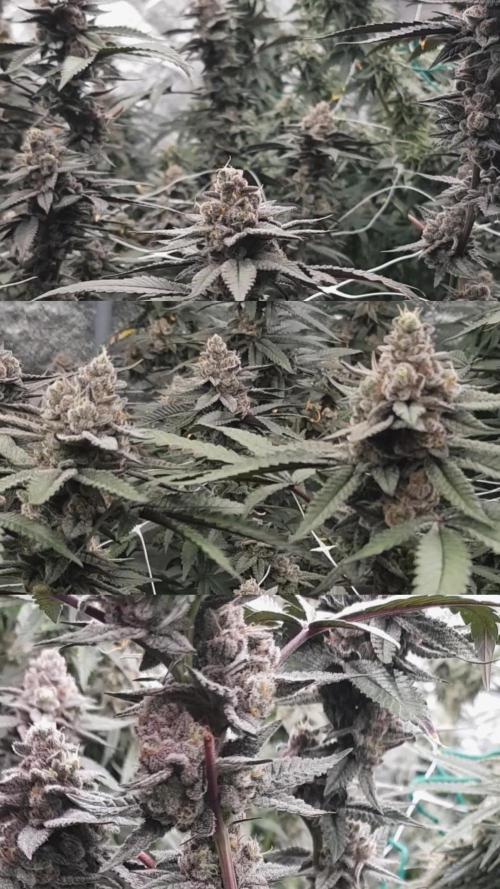
No added nutrients in flower let’s see how she does…so far the bus structure is looking good the colors are excellent.

Likes
25
Share


@EBxAH
Follow
Still just a waiting on the light shift, lol. This is what's left, Black Widow! My neighbor took the Banner and botched it. The Skywalker in the ground died. This is all that's left, lol. I hope it turns out decent! I been cultivating, with my wife, some Early Miss, Wedding Cake, Gelato, Fucking Incredible. We've harvested 1 early miss, 1 wedding cake,and 1 gelato so far. We have 1 fucking incredible coming down in a few weeks and waiting on 4 more early miss, 1 gelato, 2 fucking incredible, and 1 wedding cake. Obviously plus the widow.

Likes
10
Share


@Northern_Ent
Follow
June 8: planted out first one. Other two are in a single peat pot as I messed up during planting. Oh well.
Using peat pots as intermediate containers because it is too cold here to start seeds outdoors in final containers.
Solo cups last year didn’t work well cuz I left them in the cups too long. Hence my later start using peat pots this year.
Processing
Likes
26
Share


@Growin
Follow
Holaaa
Hoy día 43 desde la germinación retomamos el seguimiento a estás señoritas.
Altura Sweet gelato auto 81 CM
Altura Cmxl1 62 CM
Altura Cmxl2 60 CM
Hoy se realiza riesgo de 1 Lt , la Sweet gelato ha demostrado más signos de mayor requerimiento de agua, por lo que aumentarle la frecuencia de riego para esta planta.
Me sorprende que la Sweet gelato auto ha crecido lentamente, alcanzando una altura considerable de XL, y ahora que ha entrado en floracion, se siente ese gran aroma dulce.
Comienza la cuenta regresiva para las Cream Mandarine, cada día se aprecian mayor tamaño de las flores .
Día 45.
Riego con 1 Lt por planta
Día 47
Altura Sweet gelato auto 89 CM
Altura Cmxl1 67
Altura Cmxl2 60
Dia 48
Riego 1Lt por planta
Aportes, sugerencias, favor comentar.